Layout - start of beginnings
In this article I will talk about the layout of interface elements in PyGTK. We will use the interface designer Glade and make the first cross-platform application on PyGTK.
First, a few words about the preparation of the Windows machine: install everything you need for development.
If you do not have Python installed, and there is no desire to download everything separately, download the full archive of everything you need for Windows (20 MB) , which I uploaded to Yandex. All files checked by ClamWin . Put in the order described below:
')
In Ubuntu, you need to install the glade-3 package:
I use Ubuntu, so all subsequent screenshots of the development process are made in Ubuntu. However, in Windows, Glade works in the same way, there is no difference.
There are two main types of layout (division into 3 areas is done here for an example, an arbitrary number of areas can be specified):
To immediately understand how it works, look at the picture with a horizontal layout, and imagine that this is a layout of a “rubber” site. If you increase the size of the window, the area will expand, and vice versa.
Gaps are set in pixels, so they always remain the same.
The numbers inside the areas are their ordinal numbers. As you already understood, the numbering starts from zero and goes from left to right and from top to bottom.
Glade is a visual interface editor, it saves a tree of elements in an XML file. This XML file is read by the program, and PyGTK creates real windows and widgets on the screen. Thus, the application interface can be operated separately from the logic. This is the right approach.
Launch GLade (in Windows, the glade-3.exe program, which I already wrote about above) and try to do something based on HBox. First, add a window:
choose a horizontal layout:
Leaving the number of areas by default, a horizontal layout will appear with 3 areas:
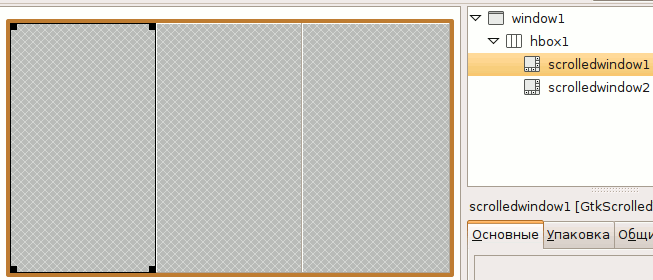
on the right side of the screen there is a tree of elements of our interface and a property editor for the selected element Choose hbox1 (horizontal layout just created)

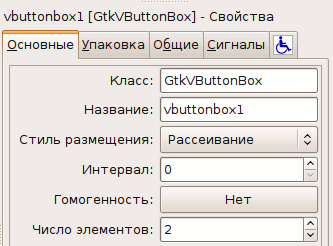
In the property editor, Interval specifies the spacing in pixels between areas for placing elements, Homogeneity determines whether all areas are of the same size, and Number of Elements defines the number of areas. Leave everything as it is.
GTK has such an interesting feature: if we add lines to the text field and reach the end of the visible area, the text field will increase in height and eventually go beyond the screen. To prevent this from happening, you need to place a text field in the scroll pane. The scroll pane will automatically show scrolls if there is more text than will fit on the screen, and will remove if less.
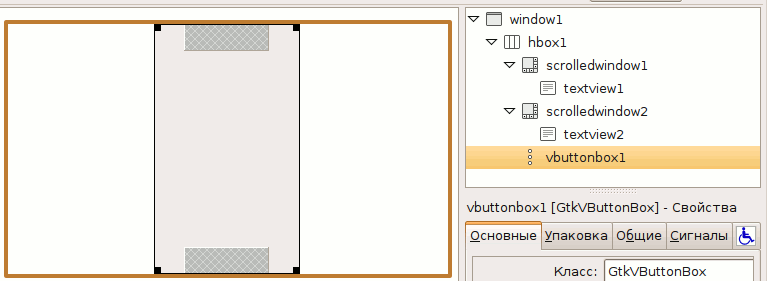
Add in the areas 0 and 2 (i.e., in the extreme areas) the scroll area:
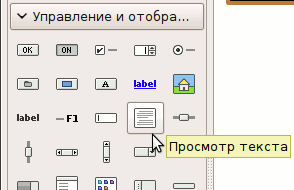
In each scroll area we place the text editor:

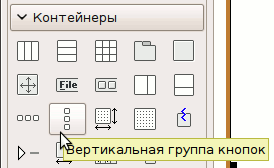
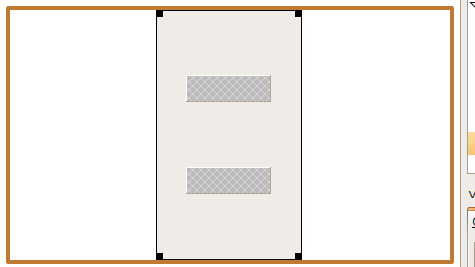
Now, in the remaining empty middle area, add another layout element, a vertical group of buttons with 2 elements:
Change the style of placement of buttons on the "scattering":
so the interface looks more organic.
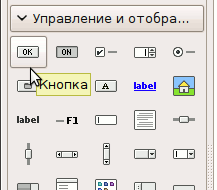
Add a button to each cell:
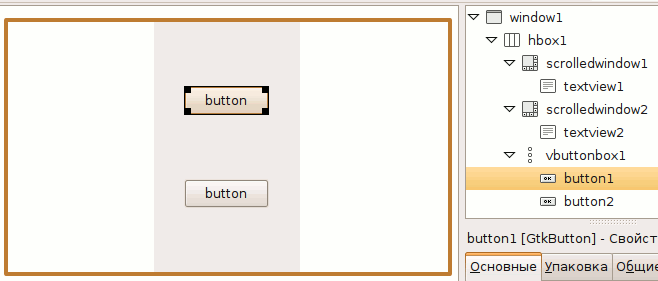
In the property editor of the button1 button, we change the label to “There ->”, and for the button2 button to “<- Here”:

When you press the GTK button will send a signal. To receive and process it, you must give the signal a name. Select button1 and go to the “Signals” tab. Let's call the signal of pressing the button button1 “button1_clicked_cb”, and the buttons button2 “button2_clicked_cb”:
In general, almost everything is ready, except for one little thing: the main window does not have a normal name, and it is invisible :-)
Fix it, and at the same time set the initial size of the window:
Here, in general, and everything, the first interface in style of a habr is ready. Save it to the file pygtk001.glade. The glade extension means that it is a glade file. You can download the finished file that I made.
The interface that we created can be used for some operations with text. For example, translation from one language to another, encryption and decryption, and so on. The interface is in the file pygtk001.glade, now you need to revive it with code. Our program will be very smart, it will be able to move the text here and there :-)
The code is very simple (there are no checks, because it is not a “combat” program), only 50 lines, with 60 comments:
Download the source file.
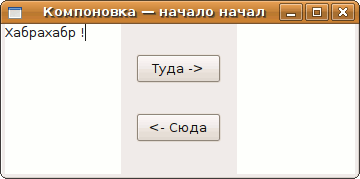
Run under Ubuntu:
Run under Windows:
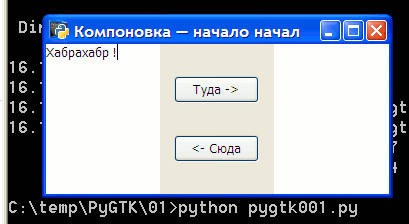
(I have a little adjusted font sizes in Windows, so a little bit non-standard)
We learned a little bit about the types of builds in PyGTK, made a simple GUI using Glade, and started it under Ubuntu and Windows XP. Everything works as expected :-)
In the following articles we will continue to get acquainted with PyGTK, waiting for your feedback.
Training
First, a few words about the preparation of the Windows machine: install everything you need for development.
If you do not have Python installed, and there is no desire to download everything separately, download the full archive of everything you need for Windows (20 MB) , which I uploaded to Yandex. All files checked by ClamWin . Put in the order described below:
- Python: Python 2.5.2 Windows installer . I specify the version of Python for which, at the time of this writing, there are PyGTK installers for Windows. Ie, for trouble-free installation. If you see that there is PyGTK under 2.6 or later, download it.
- GTK +: download the complete GTK + build for Windows (gtk + -win32-runtime) , install.
- Now download and install PyCairo, PyGObject and PyGTK for Windows. Direct links for Python 2.5.x version: PyCairo , PyGObject , PyGTK
- Well, finally, Glade. Take the glade-win32 , unpack (for example, C: \ GTK \ glade). The bin directory contains the program, glade-3.exe (it will hardly work for you before restarting the machine)
')
In Ubuntu, you need to install the glade-3 package:
sudo apt-get install glade-3
I use Ubuntu, so all subsequent screenshots of the development process are made in Ubuntu. However, in Windows, Glade works in the same way, there is no difference.
Horizontal and vertical
There are two main types of layout (division into 3 areas is done here for an example, an arbitrary number of areas can be specified):
| Horizontal | Vertical |
|---|---|
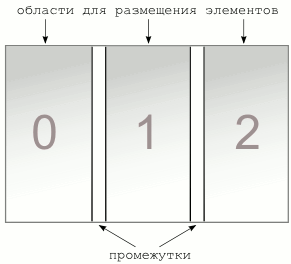 | 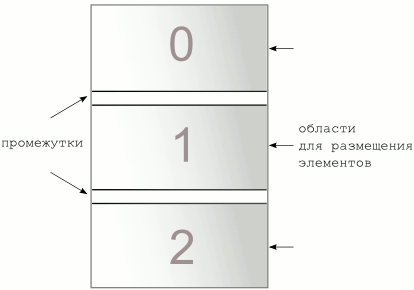 |
To immediately understand how it works, look at the picture with a horizontal layout, and imagine that this is a layout of a “rubber” site. If you increase the size of the window, the area will expand, and vice versa.
Gaps are set in pixels, so they always remain the same.
The numbers inside the areas are their ordinal numbers. As you already understood, the numbering starts from zero and goes from left to right and from top to bottom.
Glade
Glade is a visual interface editor, it saves a tree of elements in an XML file. This XML file is read by the program, and PyGTK creates real windows and widgets on the screen. Thus, the application interface can be operated separately from the logic. This is the right approach.
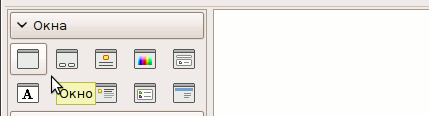
Launch GLade (in Windows, the glade-3.exe program, which I already wrote about above) and try to do something based on HBox. First, add a window:
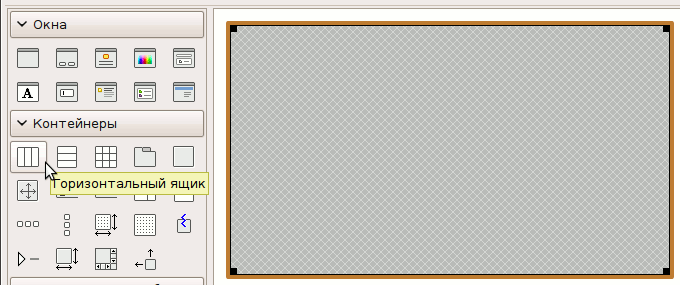
choose a horizontal layout:
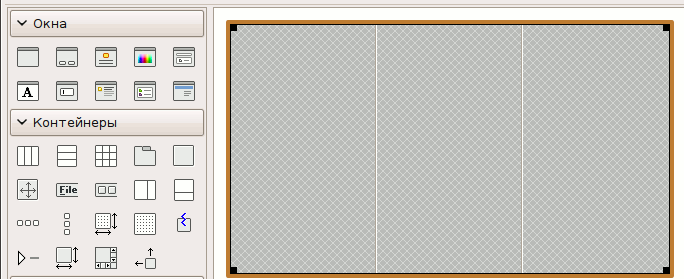
Leaving the number of areas by default, a horizontal layout will appear with 3 areas:
on the right side of the screen there is a tree of elements of our interface and a property editor for the selected element Choose hbox1 (horizontal layout just created)
In the property editor, Interval specifies the spacing in pixels between areas for placing elements, Homogeneity determines whether all areas are of the same size, and Number of Elements defines the number of areas. Leave everything as it is.
Scroll Pane, Text Editor
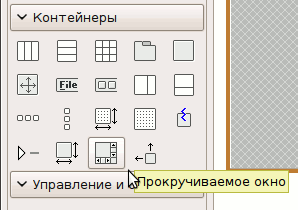
GTK has such an interesting feature: if we add lines to the text field and reach the end of the visible area, the text field will increase in height and eventually go beyond the screen. To prevent this from happening, you need to place a text field in the scroll pane. The scroll pane will automatically show scrolls if there is more text than will fit on the screen, and will remove if less.
Add in the areas 0 and 2 (i.e., in the extreme areas) the scroll area:
In each scroll area we place the text editor:
Vertical button group
Now, in the remaining empty middle area, add another layout element, a vertical group of buttons with 2 elements:
Change the style of placement of buttons on the "scattering":
so the interface looks more organic.
Buttons, signals
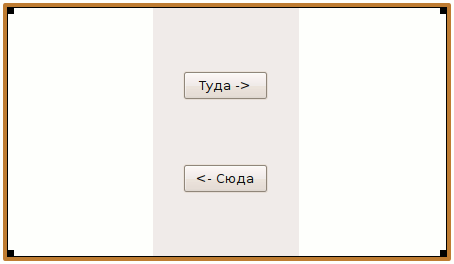
Add a button to each cell:
In the property editor of the button1 button, we change the label to “There ->”, and for the button2 button to “<- Here”:
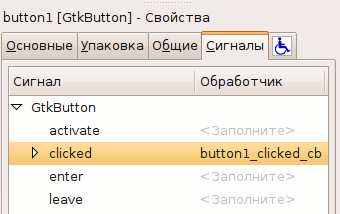
When you press the GTK button will send a signal. To receive and process it, you must give the signal a name. Select button1 and go to the “Signals” tab. Let's call the signal of pressing the button button1 “button1_clicked_cb”, and the buttons button2 “button2_clicked_cb”:
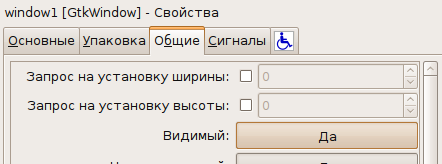
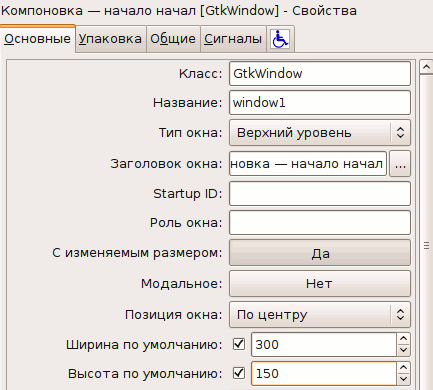
In general, almost everything is ready, except for one little thing: the main window does not have a normal name, and it is invisible :-)
Fix it, and at the same time set the initial size of the window:
Here, in general, and everything, the first interface in style of a habr is ready. Save it to the file pygtk001.glade. The glade extension means that it is a glade file. You can download the finished file that I made.
The first working program
The interface that we created can be used for some operations with text. For example, translation from one language to another, encryption and decryption, and so on. The interface is in the file pygtk001.glade, now you need to revive it with code. Our program will be very smart, it will be able to move the text here and there :-)
The code is very simple (there are no checks, because it is not a “combat” program), only 50 lines, with 60 comments:
#! / usr / bin / env python # coding: utf-8 import sys import os try: import pygtk pygtk.require ('2.0') except: sys.exit (1) try: import gtk import gtk.glade except: sys .exit (1) class App: def __init __ (self): # Load the interface file self.gladefile = "pygtk001.glade" # interface element tree self.widgetsTree = gtk.glade.XML (self.gladefile) # Dictionary defining links events with handler functions dic = {"button1_clicked_cb": self.text_operation, "button2_clicked_cb": self.text_operation,} # The magic command that connects the signals to the handlers self.widgetsTree.signal_autoconnect (dic) # We connect the window closing event with the application termination function self.window = self.widgetsTree.get_widget ("window1") if (self.window): self.window.connect ("destroy", self.close_app) #At It has application logic. Backward word processing routes for each button. # The first element is the name of the text source widget, the second is the name of the recipient widget self.routes = {'button1': ('textview1', 'textview2'), 'button2': ('textview2', 'textview1')} def text_operation (self, widget): "A function that flushes text back and forth" # source widget source = self.widgetsTree.get_widget (self.routes [widget.name] [0]) # receiver widget destination = self.widgetsTree .get_widget (self.routes [widget.name] [1]) # text source buffer source_text_buffer = source.get_buffer () # array of text border iterators in the source text buffer (start and end) source_text_buffer_bounds = source_text_buffer.get_bounds () # proper text text buffer source_text = source_text_buffer.get_text (source_text_buffer_bounds [0], source_text_buffer_bounds [1]) set the text in the text buffer of the destination widget destination.get_buffer (). set_text (source_text) # clear the source text buffer source_text_buffer.set_text ('') def close_app (self, widget): gtk.main_quit () if __name__ == "________" : app = App () gtk.main () Download the source file.
Run under Ubuntu:
Run under Windows:
(I have a little adjusted font sizes in Windows, so a little bit non-standard)
Results
We learned a little bit about the types of builds in PyGTK, made a simple GUI using Glade, and started it under Ubuntu and Windows XP. Everything works as expected :-)
In the following articles we will continue to get acquainted with PyGTK, waiting for your feedback.
Source: https://habr.com/ru/post/44755/
All Articles