Control Raspberry via websockets
Raspberry Pi has gained immense popularity around the world. However, many of the amateur developers are faced with the problem of access to the device from the Internet. As a rule, you have to conjure with DDNS or buy a static IP address. Both options involve configuring the router, which is not for everyone and is not always available. In addition, the opening of direct access to the device from the intrint carries certain security risks.
A common way to solve this problem is to use an intermediate server through which the server and the client connect to each other.
The scheme is extremely widely used in various remote access packages: VNCViewer, AmmyyAdmin, etc.
Option 1-DDNS
')

Option 2 - static IP address
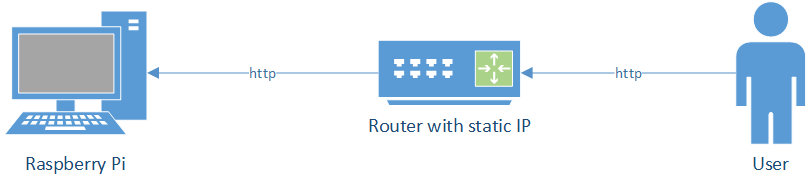
Option 3 - use an intermediate server

This connection scheme can be implemented through the MQTT over Websockets protocol, but it was interesting for me to implement something much simpler, JSON-oriented, extensible, without protocol restrictions on message size and with a more obvious security model.
The choice of protocol was obvious. WebSocket has long been supported by browsers and most platforms and programming languages.
The data bus model is trivial:
WebSocket server supports unlimited channels. Each channel can be both open and password protected. The channel exists only while at least one client is connected to it. No data is stored on the server in principle. The password is set by the first client connecting to the channel. Clients without a password / with the wrong password will not be allowed into the channel.
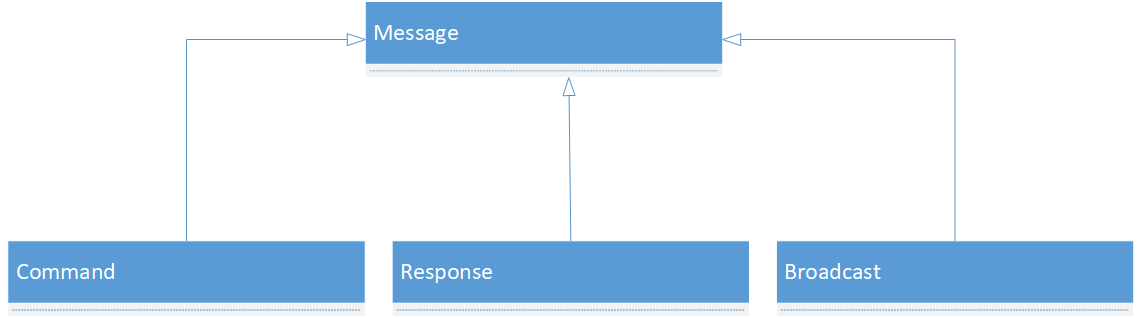
The channel is a container for messages. Messages can be of three types: address messages (commands) that are intended for one or several recipients, response messages and broadcast messages that will be received by all clients connected to the channel.
Such a scheme makes it relatively safe to use common hubs for many consumers. There is no need for settings, generation of users on the server (as in MQTT), generation of access keys, etc.
Messages are not saved anywhere, they are not logged and are transmitted via wss protected protocol.
Messages are typed JSON objects. Binary information is transmitted as Base64 encoded string.
The project code is available on GitHub , and you can find the current hub here .
The project consists of a WebSocket server on .net, a web application client that connects to the server and a python application for raspberry pi.
A web application is far from the only possible way to interact with a websocket server. For example, you can easily write a cloud client that will “listen” to webcam events and save pictures to some cloud storage.
The architecture allows you to connect an unlimited number of raspberry pi and clients to one channel.
For example, if you want to build some kind of security / climate / smart home control system - you can put all the raspberry on one channel and send commands to all at once or to actor to instances.
Broadcast events "broadcast" will receive all members of the network.

To be continued ...
A common way to solve this problem is to use an intermediate server through which the server and the client connect to each other.
The scheme is extremely widely used in various remote access packages: VNCViewer, AmmyyAdmin, etc.
Option 1-DDNS
')
Option 2 - static IP address
Option 3 - use an intermediate server
This connection scheme can be implemented through the MQTT over Websockets protocol, but it was interesting for me to implement something much simpler, JSON-oriented, extensible, without protocol restrictions on message size and with a more obvious security model.
The choice of protocol was obvious. WebSocket has long been supported by browsers and most platforms and programming languages.
The data bus model is trivial:
WebSocket server supports unlimited channels. Each channel can be both open and password protected. The channel exists only while at least one client is connected to it. No data is stored on the server in principle. The password is set by the first client connecting to the channel. Clients without a password / with the wrong password will not be allowed into the channel.
The channel is a container for messages. Messages can be of three types: address messages (commands) that are intended for one or several recipients, response messages and broadcast messages that will be received by all clients connected to the channel.
Such a scheme makes it relatively safe to use common hubs for many consumers. There is no need for settings, generation of users on the server (as in MQTT), generation of access keys, etc.
Messages are not saved anywhere, they are not logged and are transmitted via wss protected protocol.
Messages are typed JSON objects. Binary information is transmitted as Base64 encoded string.
The project code is available on GitHub , and you can find the current hub here .
The project consists of a WebSocket server on .net, a web application client that connects to the server and a python application for raspberry pi.
A web application is far from the only possible way to interact with a websocket server. For example, you can easily write a cloud client that will “listen” to webcam events and save pictures to some cloud storage.
The architecture allows you to connect an unlimited number of raspberry pi and clients to one channel.
For example, if you want to build some kind of security / climate / smart home control system - you can put all the raspberry on one channel and send commands to all at once or to actor to instances.
Broadcast events "broadcast" will receive all members of the network.
A few words about the features of the application
- Remote access to the file system. You can watch, download and upload images, sound files and other files. It is quite convenient not to carry all your multi-cage archive of photos on the phone. Well, or if you need something to look in the archives.
- PiCamera allows you to receive an image both on demand and in webcam mode. Along with receiving sound from a microphone can be used as a cheap solution for security. Requires a connected pi camera.
- Sending sound recordings to raspberry or getting recordings from a microphone. It can be used both for some safety tasks, and for voice interaction with cats or children. Requires connection to a TV / speaker and microphone respectively.
- Turn on / off / get the focus of the TV. CEC protocol allows you to control your TV via HDMI cable. You must install cec-client on raspberry.
- Display audio and text information on the TV. This feature includes turning on and receiving focus on the TV and displaying a text message, accompanied by an audible signal. Conveniently, if you need to remotely get children to do their homework.
- Remote display of pictures. If you want to surprise your family and suddenly take a photo of your adventures on family TV, then this function is just for that. Choose any picture of your PC or phone and send it to raspberry.
- Obtain data on humidity, temperature. Raspberry sends a Broadcast message with a predetermined periodicity. In addition to humidity and temperature, the message contains information about the temperature and processor load, disk loading and memory. Jointly managing remote I / O ports can be used as a remote control for indoor climate. A DHT11 sensor ($ 1) is required to measure the temperature.
- Manage I / O ports. Allows you to both read information from selected GPIO ports, and display a signal to them. You can get the status of switches, light up the lights, ring the bells, and control some more serious devices through the relay.
- Remote start of commands allows to execute any shell commands on raspberry. For example, start viewing a photo album or movie. If this possibility seems unsafe to you - this feature can be disabled.
To be continued ...
Source: https://habr.com/ru/post/447496/
All Articles