Breaking a simple quack with Ghidra - Part 1
The fact that this is such a beast - Ghidra (“Hydra”) - and what it eats with it is eaten by programs, many already, probably, know firsthand, although this tool came to public access quite recently - in March of this year. I will not bother readers with the description of Hydra, its functionality, etc. Those who are in the subject, I am sure, have studied all this themselves, and those who are not yet in the subject can do it at any time, since it’s good now to find detailed information on the web is not difficult. By the way, one of the aspects of Hydra (the development of plug-ins for it) has already been covered in Habré (excellent article!) I’ll only give the main links:
So, Hydra is a free cross-platform interactive disassembler and decompiler with a modular structure, with support for almost all major CPU architectures and a flexible graphical interface for working with disassembled code, memory, restored (decompiled) code, debugging symbols, and much more .
Let's try something already to break this Hydra!
As a “victim” we will find a simple “crackme” (crackme) program. I just went to the website crackmes.one , indicated the search level = 2-3 (“simple” and “medium”), the source language of the program = “C / C ++” and the platform = “Multiplatform”, as in the screenshot below:
')
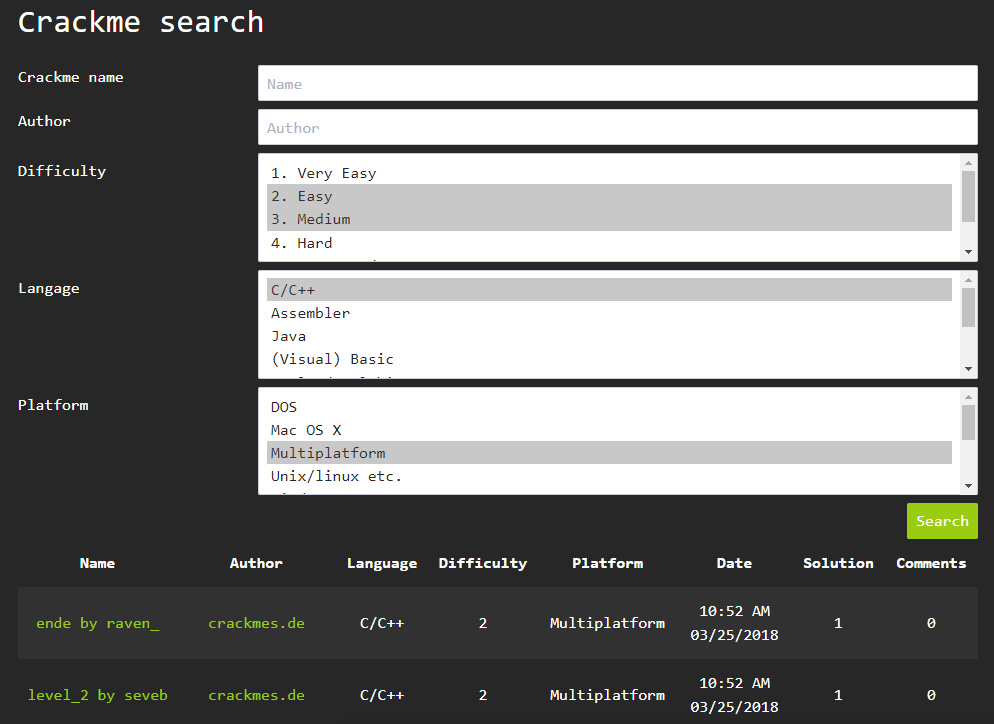
The search gave 2 results (in green below). The first crack was 16-bit and did not start on my Win10 64-bit, but the second one ( level_2 by seveb ) came up. You can download it from this link .
Download and unpack cracks; The password for the archive, as indicated on the website, is crackmes.de . In the archive we find two directories corresponding to Linux and Windows. On my machine, I go to the Windows directory and meet in it the only executable - level_2.exe . Let's run and see what it wants:

Looks like a bummer! When you run the program displays nothing. We try to run again, passing it an arbitrary string as a parameter (what if it is waiting for the key?) - and nothing again ... But do not despair. Let's assume that we also have to figure out the launch parameters as a task! It's time to uncover our "Swiss knife" - Hydra.
Suppose you already have a Hydra installed. If not, then everything is simple.
We are launching Hydra and in the opened Project Manager we immediately create a new project; I gave him the name crackme3 (i.e., crackme and crackme2 have already been created). The project is, in fact, a file directory, you can add any files to study it (exe, dll, etc.). We will immediately add our level_2.exe ( File | Import or just the I key):
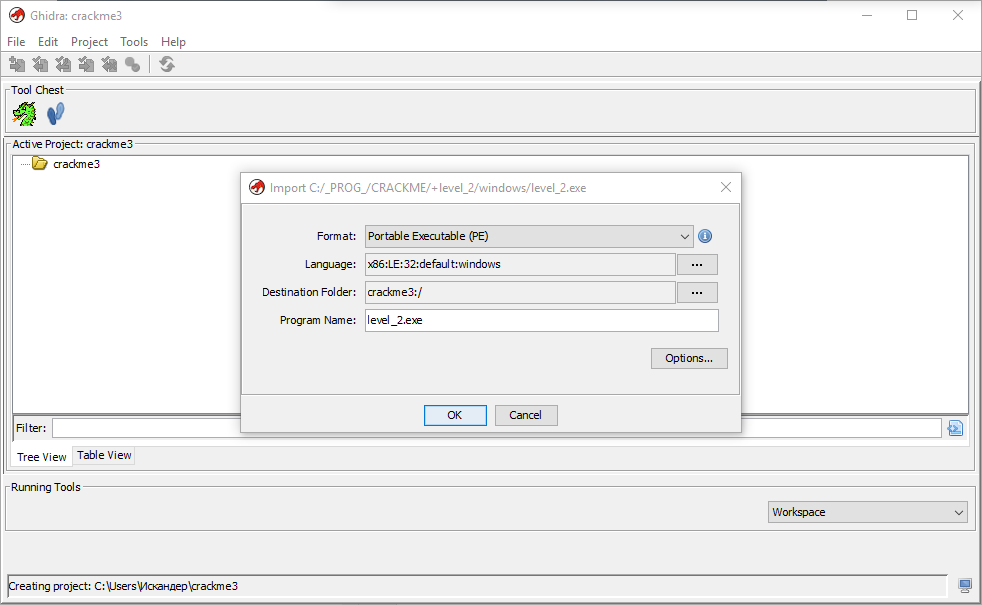
We see that already before the import, Hydra defined our experimental quackery as a 32-bit PE (portable executable) for the Win32 OS and the x86 platform. After importing our waiting for more information:
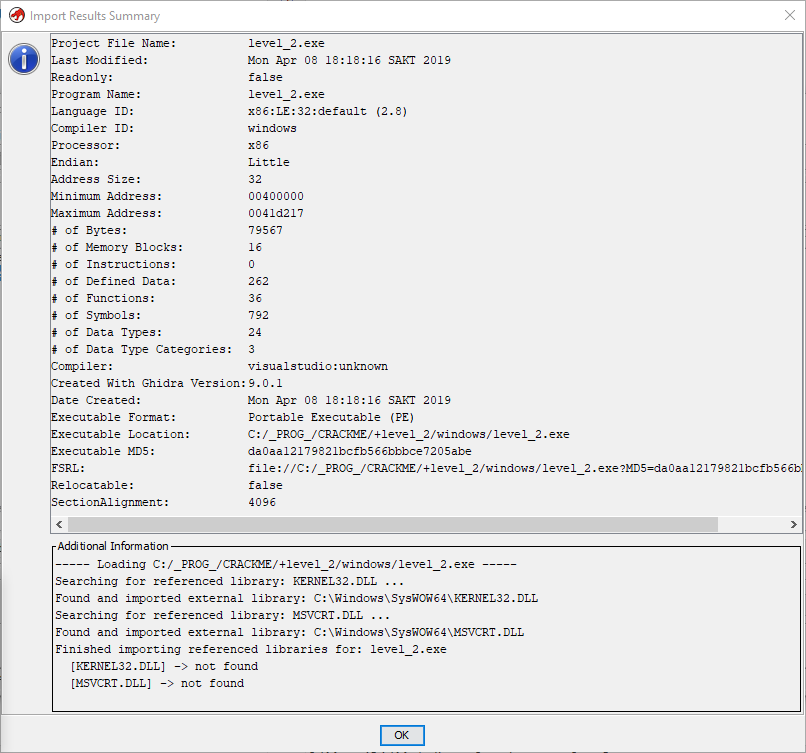
Here, besides the aforementioned digit capacity, we may still be interested in the order of bytes (endianness), which in our case is Little (from the youngest to the highest byte), which was to be expected for the “Intel” 86th platform.
With the preliminary analysis we finished.
Time to run a full automatic program analysis in Hydra. This is done by double clicking on the corresponding file (level_2.exe). Having a modular structure, Hydra provides all of its core functionality with a system of plug-ins that can be added / disabled or developed independently. The same with analysis - each plugin is responsible for its own type of analysis. Therefore, first a window opens in front of us, in which you can select the types of analysis of interest:
For our purposes, it makes sense to leave the default settings and run the analysis. The analysis itself is performed fairly quickly (it took me about 7 seconds), although users on the forums complain that for large projects Hydra loses its speed in IDA Pro . Perhaps this is true, but for small files, this difference is not significant.
So, the analysis is complete. Its results are displayed in the Code Browser window:
This window is essential for working in Hydra, so you should study it more closely.
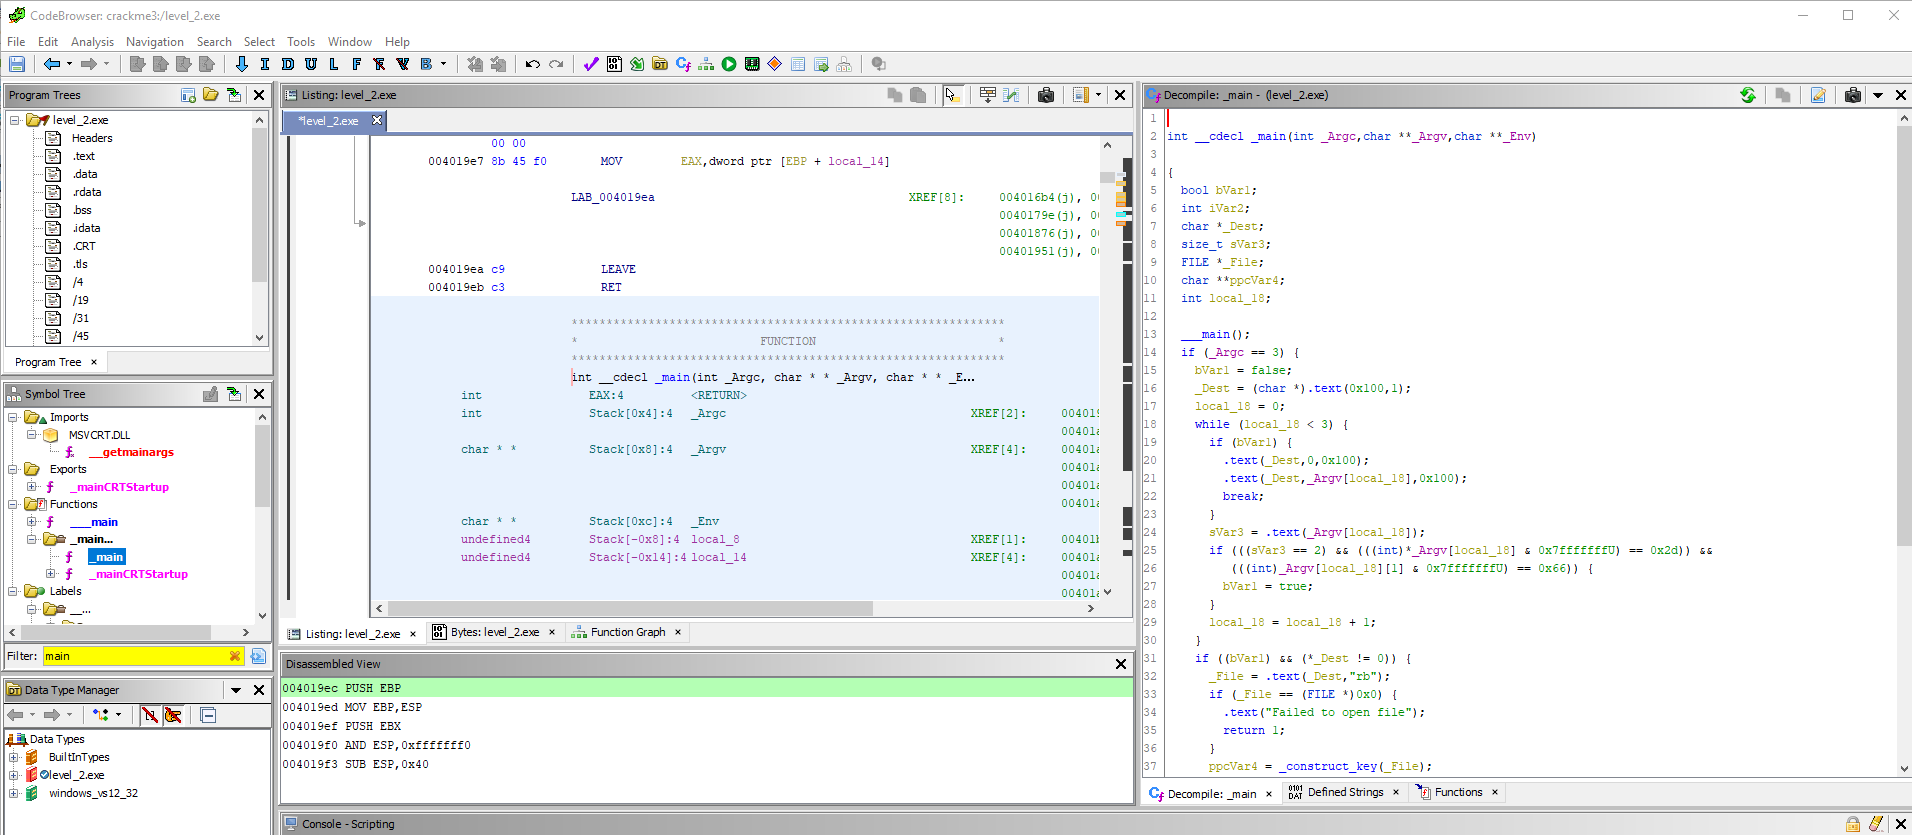
Well, let's proceed to the direct analysis of our quack programs. You should start in most cases with searching for the program entry point, i.e. the main function that is called when it is started. Knowing that our quacks are written in C / C ++, we guess that the name of the main function will be main () or something like that :) Spoken-done. Enter “main” into the Character Tree filter (in the left panel) and see the _main () function in the Functions section. Go to it by clicking the mouse.
In the disassembler listing, the corresponding code section is immediately displayed, and on the right we see the decompiled C code of this function. Here it is worth noting another convenient Hydra chip - the synchronization of the selection: when the mouse selects the range of ASM commands, the corresponding code section in the decompiler is highlighted and vice versa. In addition, if the memory browser is open, the allocation is synchronized with the memory. As they say, all ingenious is simple!
I will immediately note an important feature of work in Hydra (as opposed to, say, work in IDA). Work in Hydra is focused, first of all, on the analysis of decompiled code . For this reason, the creators of Hydra (we remember - talking about spies from the NSA :)) paid great attention to the quality of decompilation and the convenience of working with the code. In particular, one can proceed to the definition of functions, variables and sections of memory simply by double-clicking in the code. Also, any variable and function can be immediately renamed, which is very convenient, since default names do not carry a meaning and can be confusing. As you will see later, we will use this mechanism often.
So, we have the main () function, which Hydra “prepared” as follows:
It seems to be okay - the definition of variables, standard C-types, conditions, cycles, function calls. But looking more closely at the code, we notice that for some reason the names of some functions were not defined and replaced by the _text () pseudo- function (in the decompiler window - .text () ). Let's start by defining what these functions are.
Double-click on the body of the first call.
we see that this is just a wrapper function around the standard calloc () function, which serves to allocate memory for data. So let's just rename this function to calloc2 () . Having placed the cursor on the function header, we call the context menu and select the Rename function (hot key - L ) and enter a new name in the opened field:

We see that the function was immediately renamed. Go back to the body of main () (the Back button in the toolbar or Alt + <- ) and see that instead of the mysterious _text () there is already calloc2 () . Fine!
We do the same with all the other wrapper functions: alternately, we go over their definition, see what they do, rename (I added index 2 to the standard C-function names) and go back to the main function.
All right, with not clear functions have understood. We start to study the code of the main function. Skipping variable declarations, we see that the function returns the value of the variable iVar2, which is zero (a sign of the success of the function) only if the condition specified by the string is met
_Argc is the number of command line parameters (arguments) passed to main () . That is, our program "eats" 2 arguments (the first argument, we remember, is always the path to the executable file).
OK, go ahead. Here we create a C-string ( char array) of 256 characters:
Next we have a cycle of 3 iterations. In it, we first check whether the bVar1 flag is set, and if so, copy the following command line argument (string) to _Dest :
This flag is set when analyzing the following argument:
The first line calculates the length of this argument. The condition further checks that the length of the argument must be 2, the penultimate character == "-", and the last character == "f". Notice how the decompiler “translated” the extraction of characters from a string using a byte mask.
Here I immediately added comments. We check the correctness of the arguments ("-f path_to_file") and open the corresponding file (the 2nd passed argument, which we copied to _Dest). The file will be read in binary format, as indicated by the “rb” parameter of the fopen () function. If a read error occurs (for example, the file is unavailable) an error message is output to the stderror stream and the program is terminated with code 1.
Further - the most interesting:
The open file descriptor ( _File ) is passed to the _construct_key () function, which, obviously, performs the check of the key to be found. This function returns a two-dimensional byte array ( char ** ), which is stored in the variable ppcVar3 . If the array is empty, a concise “Nope” is output to the console (that is, in our opinion, “Nah!”) And the memory is freed. Otherwise (if the array is not empty), a seemingly valid key is displayed and the memory is also freed. At the end of the function, the file descriptor is closed, the memory is freed and the iVar2 value is returned .
So now we understand what we need:
1) create a binary file with the correct key;
2) pass his path to the quacks after the argument "-f"
In the second part of the article, we will analyze the function _construct_key () , which, as we found out, is responsible for checking the desired key in the file.
- Official page on the NSA USA website
- Github Project
- The first review in the magazine "Hacker"
- Great YouTube channel with Ghidra Parsing
So, Hydra is a free cross-platform interactive disassembler and decompiler with a modular structure, with support for almost all major CPU architectures and a flexible graphical interface for working with disassembled code, memory, restored (decompiled) code, debugging symbols, and much more .
Let's try something already to break this Hydra!
Step 1. Find and study quacks
As a “victim” we will find a simple “crackme” (crackme) program. I just went to the website crackmes.one , indicated the search level = 2-3 (“simple” and “medium”), the source language of the program = “C / C ++” and the platform = “Multiplatform”, as in the screenshot below:
')
The search gave 2 results (in green below). The first crack was 16-bit and did not start on my Win10 64-bit, but the second one ( level_2 by seveb ) came up. You can download it from this link .
Download and unpack cracks; The password for the archive, as indicated on the website, is crackmes.de . In the archive we find two directories corresponding to Linux and Windows. On my machine, I go to the Windows directory and meet in it the only executable - level_2.exe . Let's run and see what it wants:
Looks like a bummer! When you run the program displays nothing. We try to run again, passing it an arbitrary string as a parameter (what if it is waiting for the key?) - and nothing again ... But do not despair. Let's assume that we also have to figure out the launch parameters as a task! It's time to uncover our "Swiss knife" - Hydra.
Step 2. Creating a project in Hydra and preliminary analysis
Suppose you already have a Hydra installed. If not, then everything is simple.
Install ghidra
We are launching Hydra and in the opened Project Manager we immediately create a new project; I gave him the name crackme3 (i.e., crackme and crackme2 have already been created). The project is, in fact, a file directory, you can add any files to study it (exe, dll, etc.). We will immediately add our level_2.exe ( File | Import or just the I key):
We see that already before the import, Hydra defined our experimental quackery as a 32-bit PE (portable executable) for the Win32 OS and the x86 platform. After importing our waiting for more information:
Here, besides the aforementioned digit capacity, we may still be interested in the order of bytes (endianness), which in our case is Little (from the youngest to the highest byte), which was to be expected for the “Intel” 86th platform.
With the preliminary analysis we finished.
Step 3. Perform an automatic analysis.
Time to run a full automatic program analysis in Hydra. This is done by double clicking on the corresponding file (level_2.exe). Having a modular structure, Hydra provides all of its core functionality with a system of plug-ins that can be added / disabled or developed independently. The same with analysis - each plugin is responsible for its own type of analysis. Therefore, first a window opens in front of us, in which you can select the types of analysis of interest:
Analysis Settings Window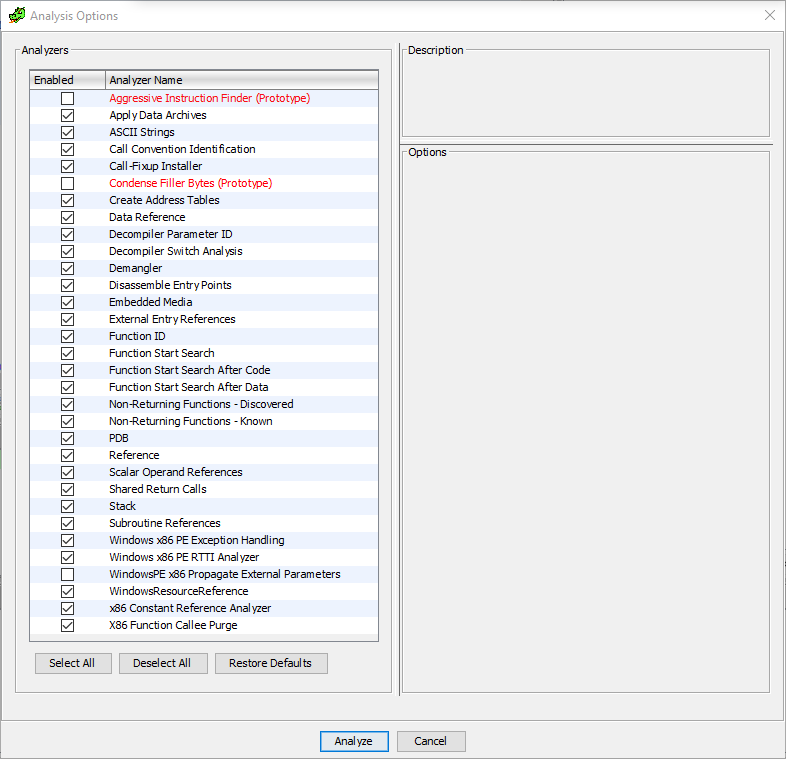
For our purposes, it makes sense to leave the default settings and run the analysis. The analysis itself is performed fairly quickly (it took me about 7 seconds), although users on the forums complain that for large projects Hydra loses its speed in IDA Pro . Perhaps this is true, but for small files, this difference is not significant.
So, the analysis is complete. Its results are displayed in the Code Browser window:
This window is essential for working in Hydra, so you should study it more closely.
Code Browser Interface Overview
The default interface settings break the window into three parts.
In the central part there is the main window - the disassembler listing, which is more or less similar to its “brothers” in IDA, OllyDbg, etc. The default columns in this listing are (from left to right): memory address, command opcode, ASM command, ASM command parameters, cross reference (if applicable). Naturally, the display can be changed by clicking on the button in the form of a brick wall in the toolbar of this window. To be honest, I have never seen such a flexible configuration of the disassembler output, it is extremely convenient.
In the left part 3 of the panel:
For us, the most useful window here is a tree of characters that allows you to quickly find, for example, a function by its name and go to the appropriate address.
In the right part is the listing of the decompiled code (in our case in the C language).
In addition to the default windows, you can select and place about a dozen other windows and views anywhere in the browser's Window menu. For convenience, I added a window for viewing memory (Bytes) and a window with a graph of functions (Function Graph) in the central part, and in the right part - string variables (Strings) and a table of functions (Functions). These windows are now available in separate tabs. Also, any windows can be detached and made “floating”, placing and changing their size at their discretion - this is also a very thoughtful, in my opinion, solution.
In the central part there is the main window - the disassembler listing, which is more or less similar to its “brothers” in IDA, OllyDbg, etc. The default columns in this listing are (from left to right): memory address, command opcode, ASM command, ASM command parameters, cross reference (if applicable). Naturally, the display can be changed by clicking on the button in the form of a brick wall in the toolbar of this window. To be honest, I have never seen such a flexible configuration of the disassembler output, it is extremely convenient.
In the left part 3 of the panel:
- Program sections (click on the section to go through the sections)
- Tree of symbols (imports, exports, functions, titles, etc.)
- Type tree of used variables
For us, the most useful window here is a tree of characters that allows you to quickly find, for example, a function by its name and go to the appropriate address.
In the right part is the listing of the decompiled code (in our case in the C language).
In addition to the default windows, you can select and place about a dozen other windows and views anywhere in the browser's Window menu. For convenience, I added a window for viewing memory (Bytes) and a window with a graph of functions (Function Graph) in the central part, and in the right part - string variables (Strings) and a table of functions (Functions). These windows are now available in separate tabs. Also, any windows can be detached and made “floating”, placing and changing their size at their discretion - this is also a very thoughtful, in my opinion, solution.
Step 4. Studying the program's algorithm - the main () function
Well, let's proceed to the direct analysis of our quack programs. You should start in most cases with searching for the program entry point, i.e. the main function that is called when it is started. Knowing that our quacks are written in C / C ++, we guess that the name of the main function will be main () or something like that :) Spoken-done. Enter “main” into the Character Tree filter (in the left panel) and see the _main () function in the Functions section. Go to it by clicking the mouse.
Overview of the main () function and renaming of obscure functions
In the disassembler listing, the corresponding code section is immediately displayed, and on the right we see the decompiled C code of this function. Here it is worth noting another convenient Hydra chip - the synchronization of the selection: when the mouse selects the range of ASM commands, the corresponding code section in the decompiler is highlighted and vice versa. In addition, if the memory browser is open, the allocation is synchronized with the memory. As they say, all ingenious is simple!
I will immediately note an important feature of work in Hydra (as opposed to, say, work in IDA). Work in Hydra is focused, first of all, on the analysis of decompiled code . For this reason, the creators of Hydra (we remember - talking about spies from the NSA :)) paid great attention to the quality of decompilation and the convenience of working with the code. In particular, one can proceed to the definition of functions, variables and sections of memory simply by double-clicking in the code. Also, any variable and function can be immediately renamed, which is very convenient, since default names do not carry a meaning and can be confusing. As you will see later, we will use this mechanism often.
So, we have the main () function, which Hydra “prepared” as follows:
Main () listing
int __cdecl _main(int _Argc,char **_Argv,char **_Env) { bool bVar1; int iVar2; char *_Dest; size_t sVar3; FILE *_File; char **ppcVar4; int local_18; ___main(); if (_Argc == 3) { bVar1 = false; _Dest = (char *)_text(0x100,1); local_18 = 0; while (local_18 < 3) { if (bVar1) { _text(_Dest,0,0x100); _text(_Dest,_Argv[local_18],0x100); break; } sVar3 = _text(_Argv[local_18]); if (((sVar3 == 2) && (((int)*_Argv[local_18] & 0x7fffffffU) == 0x2d)) && (((int)_Argv[local_18][1] & 0x7fffffffU) == 0x66)) { bVar1 = true; } local_18 = local_18 + 1; } if ((bVar1) && (*_Dest != 0)) { _File = _text(_Dest,"rb"); if (_File == (FILE *)0x0) { _text("Failed to open file"); return 1; } ppcVar4 = _construct_key(_File); if (ppcVar4 == (char **)0x0) { _text("Nope."); _free_key((void **)0x0); } else { _text("%s%s%s%s\n",*ppcVar4 + 0x10d,*ppcVar4 + 0x219,*ppcVar4 + 0x325,*ppcVar4 + 0x431); _free_key(ppcVar4); } _text(_File); } _text(_Dest); iVar2 = 0; } else { iVar2 = 1; } return iVar2; } It seems to be okay - the definition of variables, standard C-types, conditions, cycles, function calls. But looking more closely at the code, we notice that for some reason the names of some functions were not defined and replaced by the _text () pseudo- function (in the decompiler window - .text () ). Let's start by defining what these functions are.
Double-click on the body of the first call.
_Dest = (char *)_text(0x100,1); we see that this is just a wrapper function around the standard calloc () function, which serves to allocate memory for data. So let's just rename this function to calloc2 () . Having placed the cursor on the function header, we call the context menu and select the Rename function (hot key - L ) and enter a new name in the opened field:
We see that the function was immediately renamed. Go back to the body of main () (the Back button in the toolbar or Alt + <- ) and see that instead of the mysterious _text () there is already calloc2 () . Fine!
We do the same with all the other wrapper functions: alternately, we go over their definition, see what they do, rename (I added index 2 to the standard C-function names) and go back to the main function.
We comprehend the function code main ()
All right, with not clear functions have understood. We start to study the code of the main function. Skipping variable declarations, we see that the function returns the value of the variable iVar2, which is zero (a sign of the success of the function) only if the condition specified by the string is met
if (_Argc == 3) { ... } _Argc is the number of command line parameters (arguments) passed to main () . That is, our program "eats" 2 arguments (the first argument, we remember, is always the path to the executable file).
OK, go ahead. Here we create a C-string ( char array) of 256 characters:
char *_Dest; _Dest = (char *)calloc2(0x100,1); // new char[256] C++ Next we have a cycle of 3 iterations. In it, we first check whether the bVar1 flag is set, and if so, copy the following command line argument (string) to _Dest :
while (i < 3) { /* . */ if (bVar1) { /* */ memset2(_Dest,0,0x100); /* _Dest */ strncpy2(_Dest,_Argv[i],0x100); break; } ... } This flag is set when analyzing the following argument:
n_strlen = strlen2(_Argv[i]); if (((n_strlen == 2) && (((int)*_Argv[i] & 0x7fffffffU) == 0x2d)) && (((int)_Argv[i][1] & 0x7fffffffU) == 0x66)) { bVar1 = true; } The first line calculates the length of this argument. The condition further checks that the length of the argument must be 2, the penultimate character == "-", and the last character == "f". Notice how the decompiler “translated” the extraction of characters from a string using a byte mask.
The decimal values of the numbers, and at the same time the corresponding ASCII characters can be spied on by holding the cursor over the corresponding hexadecimal literal. ASCII mapping does not always work (?), So I recommend looking at the ASCII table on the Internet. It is also possible directly in Hydra to convert scalars from any number system to any other (via the context menu -> Convert ), in this case, this number will be displayed everywhere in the selected number system (in the disassembler and in the decompiler); but personally, I prefer to leave hexes in the code for slimming work, because memory addresses, offsets, etc. everywhere are given hexes.After the loop goes this code:
if ((bVar1) && (*_Dest != 0)) { /* 1) "-f" 2) - */ _File = fopen2(_Dest,"rb"); if (_File == (FILE *)0x0) { /* 1 */ perror2("Failed to open file"); return 1; } ... } Here I immediately added comments. We check the correctness of the arguments ("-f path_to_file") and open the corresponding file (the 2nd passed argument, which we copied to _Dest). The file will be read in binary format, as indicated by the “rb” parameter of the fopen () function. If a read error occurs (for example, the file is unavailable) an error message is output to the stderror stream and the program is terminated with code 1.
Further - the most interesting:
/* !!! !!! */ ppcVar3 = _construct_key(_File); if (ppcVar3 == (char **)0x0) { /* , "Nope" */ puts2("Nope."); _free_key((void **)0x0); } else { /* - */ printf2("%s%s%s%s\n",*ppcVar3 + 0x10d,*ppcVar3 + 0x219,*ppcVar3 + 0x325,*ppcVar3 + 0x431); _free_key(ppcVar3); } fclose2(_File); The open file descriptor ( _File ) is passed to the _construct_key () function, which, obviously, performs the check of the key to be found. This function returns a two-dimensional byte array ( char ** ), which is stored in the variable ppcVar3 . If the array is empty, a concise “Nope” is output to the console (that is, in our opinion, “Nah!”) And the memory is freed. Otherwise (if the array is not empty), a seemingly valid key is displayed and the memory is also freed. At the end of the function, the file descriptor is closed, the memory is freed and the iVar2 value is returned .
So now we understand what we need:
1) create a binary file with the correct key;
2) pass his path to the quacks after the argument "-f"
In the second part of the article, we will analyze the function _construct_key () , which, as we found out, is responsible for checking the desired key in the file.
Source: https://habr.com/ru/post/447450/
All Articles