Creating interface elements programmatically using PureLayout (Part 2)
Hi, Habr! I present to your attention the translation of the article Creating UI Elements Programmatically Using PureLayout by Aly Yaka.
Welcome to the second part of the article on creating interface software using PureLayout. In the first part, we created the user interface of a simple mobile application completely with code, without using Storyboards or NIBs. In this guide, we will look at some of the most commonly used user interface elements in all applications:
')
In our application, you probably need a navigation bar so that the user can navigate from the contact list to detailed information about a particular contact, and then go back to the list.
All this is handled out of the box by the navigation controller. And adding one more will take just one extra line of code (unless you want to customize the navigation bar).
Go to AppDelegate.swift and add the following line of code below, let
Now change the
Now run your application. The result should look like this:
Unfortunately, something went wrong. It looks like the navigation bar overlaps our upperView, and we have several ways to fix this:
I personally choose the second option, but you will study the first one. I also recommend checking and carefully reading the Apple documents on
Now go to the viewDidLoad method and add this
You can also add this

Before proceeding, we need to reduce our
Now right-click on the
Click on Cocoa Touch Class and then Next. Now write “ProfileView” as the class name, and next to “Subclass of:”, be sure to enter “UIView”. This simply tells XCode to automatically make our class inheritable from
And now we are ready to refactor.
Cut and paste all the lazy variables from the view controller into our new look.
Below the last deferred variable, override
An error will appear stating that the “required” initializer “init (coder :)” must be provided by the subclass “UIView”:

You can fix this by clicking on the red circle and then Fix.

In any overridden initializer, you almost always have to call the initializer of the superclass, so add this line of code at the top of the method:
Cut and paste the
Then call this method from the initializer:
For restrictions, override
When overriding any method, it is always useful to check its documentation by visiting Apple documents or, more simply, hold down the Option (or Alt) key and click on the function name:

Cut and paste the constraint code from the view controller into our new method:
Now go back to the view controller and initialize the
Now our view controller is reduced to a few lines of code!
To make sure everything works as intended, run your application and see what it looks like.
Having a thin, tidy review controller should always be your goal. It may take a long time, but it will save you from unnecessary trouble during maintenance.
Next we will add a UITableView to present the contact information, such as phone number, address, etc.
If you have not done so already, go to the Apple documentation to familiarize yourself with the UITableView, UITableViewDataSource and UITableViewDelegate.
Go to
If you try to start the application, Xcode complains that this class is neither a delegate nor a data source for the
Once again, Xcode will complain about a class that does not comply with the
Here we have two methods that we need to implement:
Now go back to
Delete the word code and return it now 1.
Under this feature, start typing
And, again, for now, return
Now, to connect our table view inside
Go to
Now replace the old
Xcode will now complain about the missing
Now our
Returning to
The first line adds three constraints between the table view and its superview: the right, left, and bottom sides of the table view are attached to the right, left, and bottom sides of the profile view.
The second row attaches the top of the table view to the bottom of the segmented control with an interval of eight points between them. Run the application, and the result should look like this:

Great, now everything is in place, and we can begin to deploy our cells.
To implement
Enter “UITableViewCell” in the “Subclass of:” field, and Xcode will automatically fill in the class name “TableViewCell”. Enter “ProfileView” before autocomplete so that the final name is “ProfileInfoTableViewCell”, then click “Next” and “Create”. Go ahead and delete the created methods, since we will not need them. If you want, you can first read their descriptions to see why we don’t need them right now.
As we said earlier, our cell will contain basic information, which is the name of the field and its description, and therefore we will need labels for them.
And now we will override the initializer so that the cell can be configured:
As for the restrictions, we are going to do a little bit different, but, nevertheless, very useful:
Here we start using
Great, now we can start drawing the cells in our table view. Let's go to
We also add a constant for the cell's reuse identifier. This identifier is used to remove cells from the table view when they are displayed. This is an optimization that you can (and should) use to help
Now let me show you how to reuse cells in one line of code in the
Here we inform the tabular view of the withdrawal of a reusable cell from the queue using the identifier under which we registered the path to the cell that is about to appear to the user. Then we force the cell to be brought to
Now set the

Amazing right
It is possible, and most likely there will be a case when you want different cells to have a height in accordance with the information inside them, which is not known in advance. To do this, you will need a table view with automatically calculated dimensions, and in fact there is a very simple way to do this.
First of all, in
Go back to
Here we inform the table view that the row height should have an automatically calculated value based on its content.
Regarding the estimated row height:
In
Now go and add another cell, increasing the number of rows to four and adding another
Now run the application, and it should look something like this:

Amazing isn't it? And as a reminder of why we actually write our user interface with code, here’s the whole blog post written by our mobile team, why we don’t use Instabug storyboards .
What you have done in two parts of this lesson:
Welcome to the second part of the article on creating interface software using PureLayout. In the first part, we created the user interface of a simple mobile application completely with code, without using Storyboards or NIBs. In this guide, we will look at some of the most commonly used user interface elements in all applications:
')
- UINavigationController / Bar
- UITableView
- Self-sizing UITableViewCell
UINavigationController
In our application, you probably need a navigation bar so that the user can navigate from the contact list to detailed information about a particular contact, and then go back to the list.
UINavigationController will easily solve this problem using the navigation bar.UINavigationController is just a stack to which you move a multitude of views. The most top view (the one that was moved last) is visible to the user right now (except when you have another view, presented on top of this, let's say favorites). And when you press the top view controllers of the navigation controller, the navigation controller automatically creates a “back” button (upper left or right side depending on the current language preferences of the device), and pressing this button returns you to the previous view.All this is handled out of the box by the navigation controller. And adding one more will take just one extra line of code (unless you want to customize the navigation bar).
Go to AppDelegate.swift and add the following line of code below, let
viewController = ViewController (): let navigationController = UINavigationController(rootViewController: viewController) Now change the
self.window? .RootViewController = viewController self.window? .RootViewController = navigationController self.window? .RootViewController = viewController self.window? .RootViewController = navigationController self.window? .RootViewController = viewController self.window? .RootViewController = navigationController . In the first line, we created an instance of UINavigationController and passed it our viewController as rootViewController , which is the view controller at the very bottom of the stack, which means that there will never be a back button on the navigation bar of this view. Then we give our window a navigation controller as rootViewController , since now it will contain all the views in the application.Now run your application. The result should look like this:
Unfortunately, something went wrong. It looks like the navigation bar overlaps our upperView, and we have several ways to fix this:
- Increase the size of our
upperViewto match the height of the navigation bar. - Set the navigation bar's
isTranslucentproperty tofalse. This will make the navigation bar opaque (if you didn’t notice, it is slightly transparent), and now the top edge of the superview will become the bottom of the navigation bar.
I personally choose the second option, but you will study the first one. I also recommend checking and carefully reading the Apple documents on
UINavigationController and UINavigationBar :- UINavigationController - UIKit | Apple Developer Documentation
- UINavigationBar - UIKit | Apple Developer Documentation
Now go to the viewDidLoad method and add this
self.navigationController? .NavigationBar.isTranslucent = false super.viewDidLoad () self.navigationController? .NavigationBar.isTranslucent = false super.viewDidLoad () , so that it would look like this: override func viewDidLoad() { super.viewDidLoad() self.navigationController?.navigationBar.isTranslucent = false self.view.backgroundColor = .white self.addSubviews() self.setupConstraints() self.view.bringSubview(toFront: avatar) self.view.setNeedsUpdateConstraints() } You can also add this
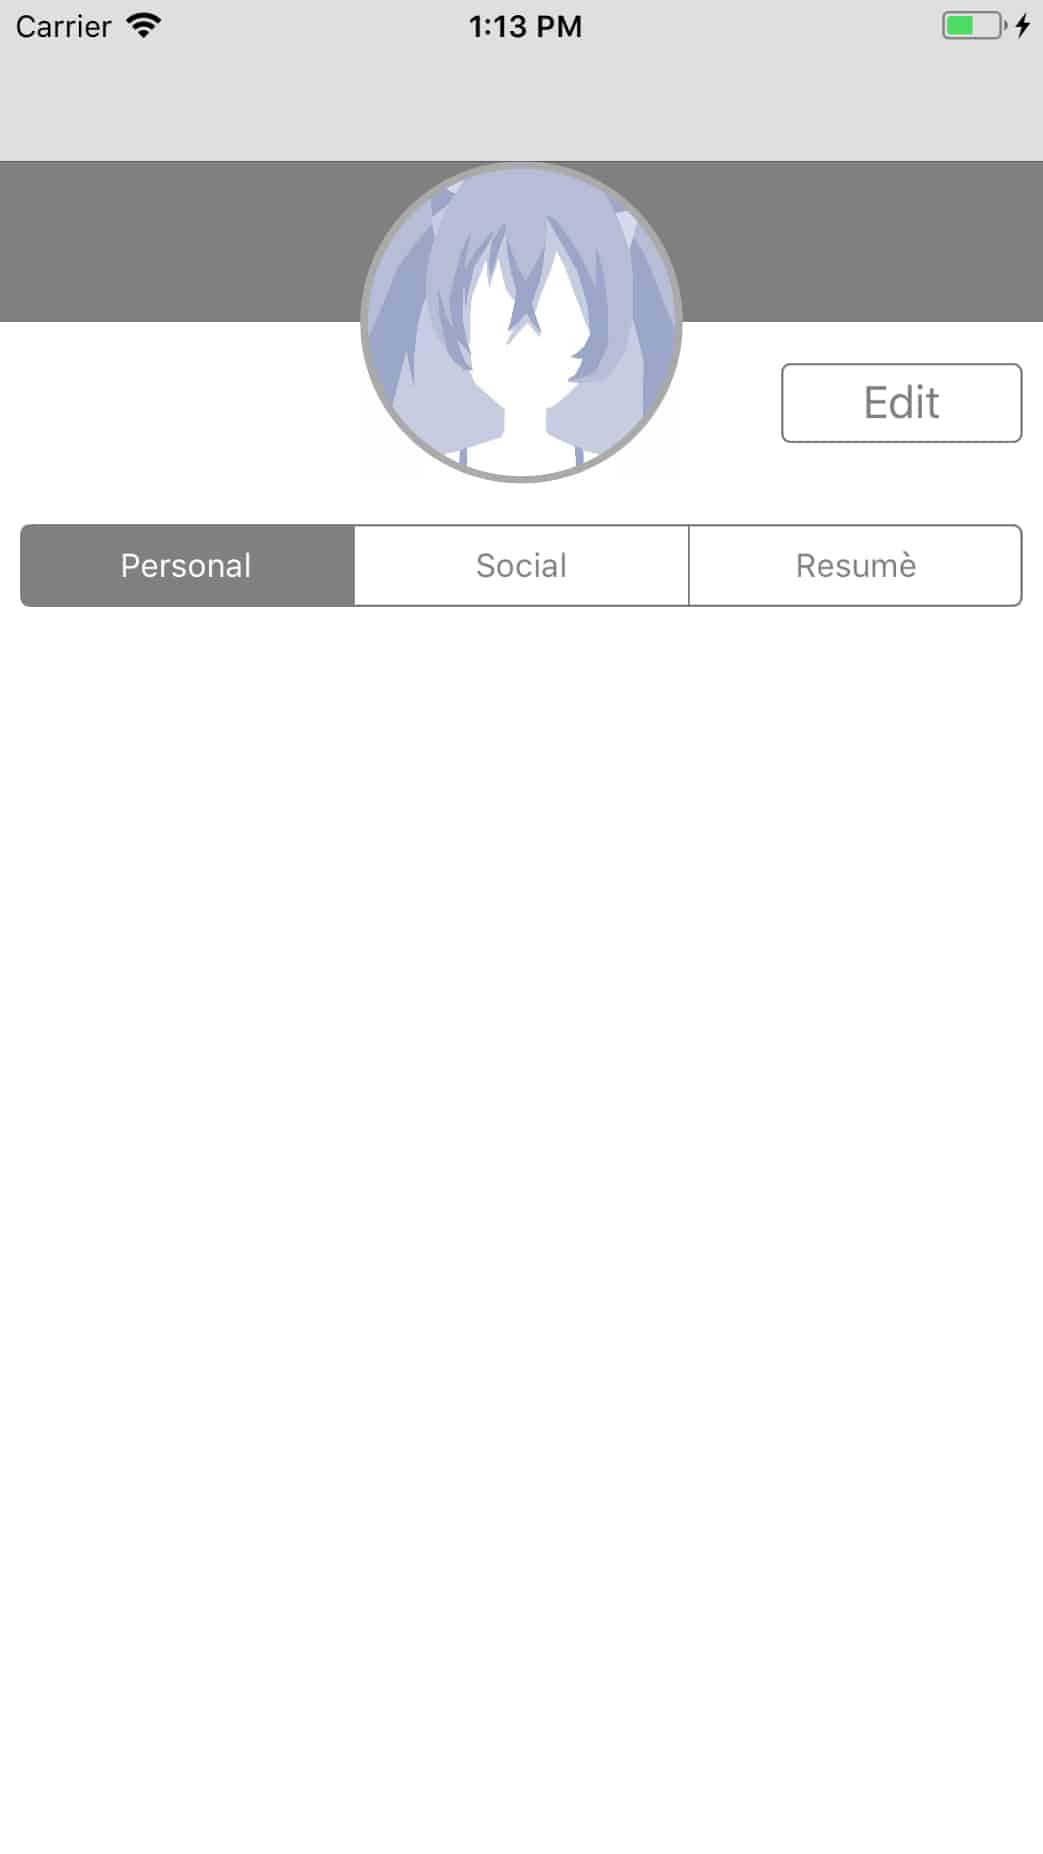
self.title = "John Doe" viewDidLoad , which will add a "Profile" to the navigation bar so that the user knows where he is at the moment. Start the application and the result should look like this:Refactoring our View Controller
Before proceeding, we need to reduce our
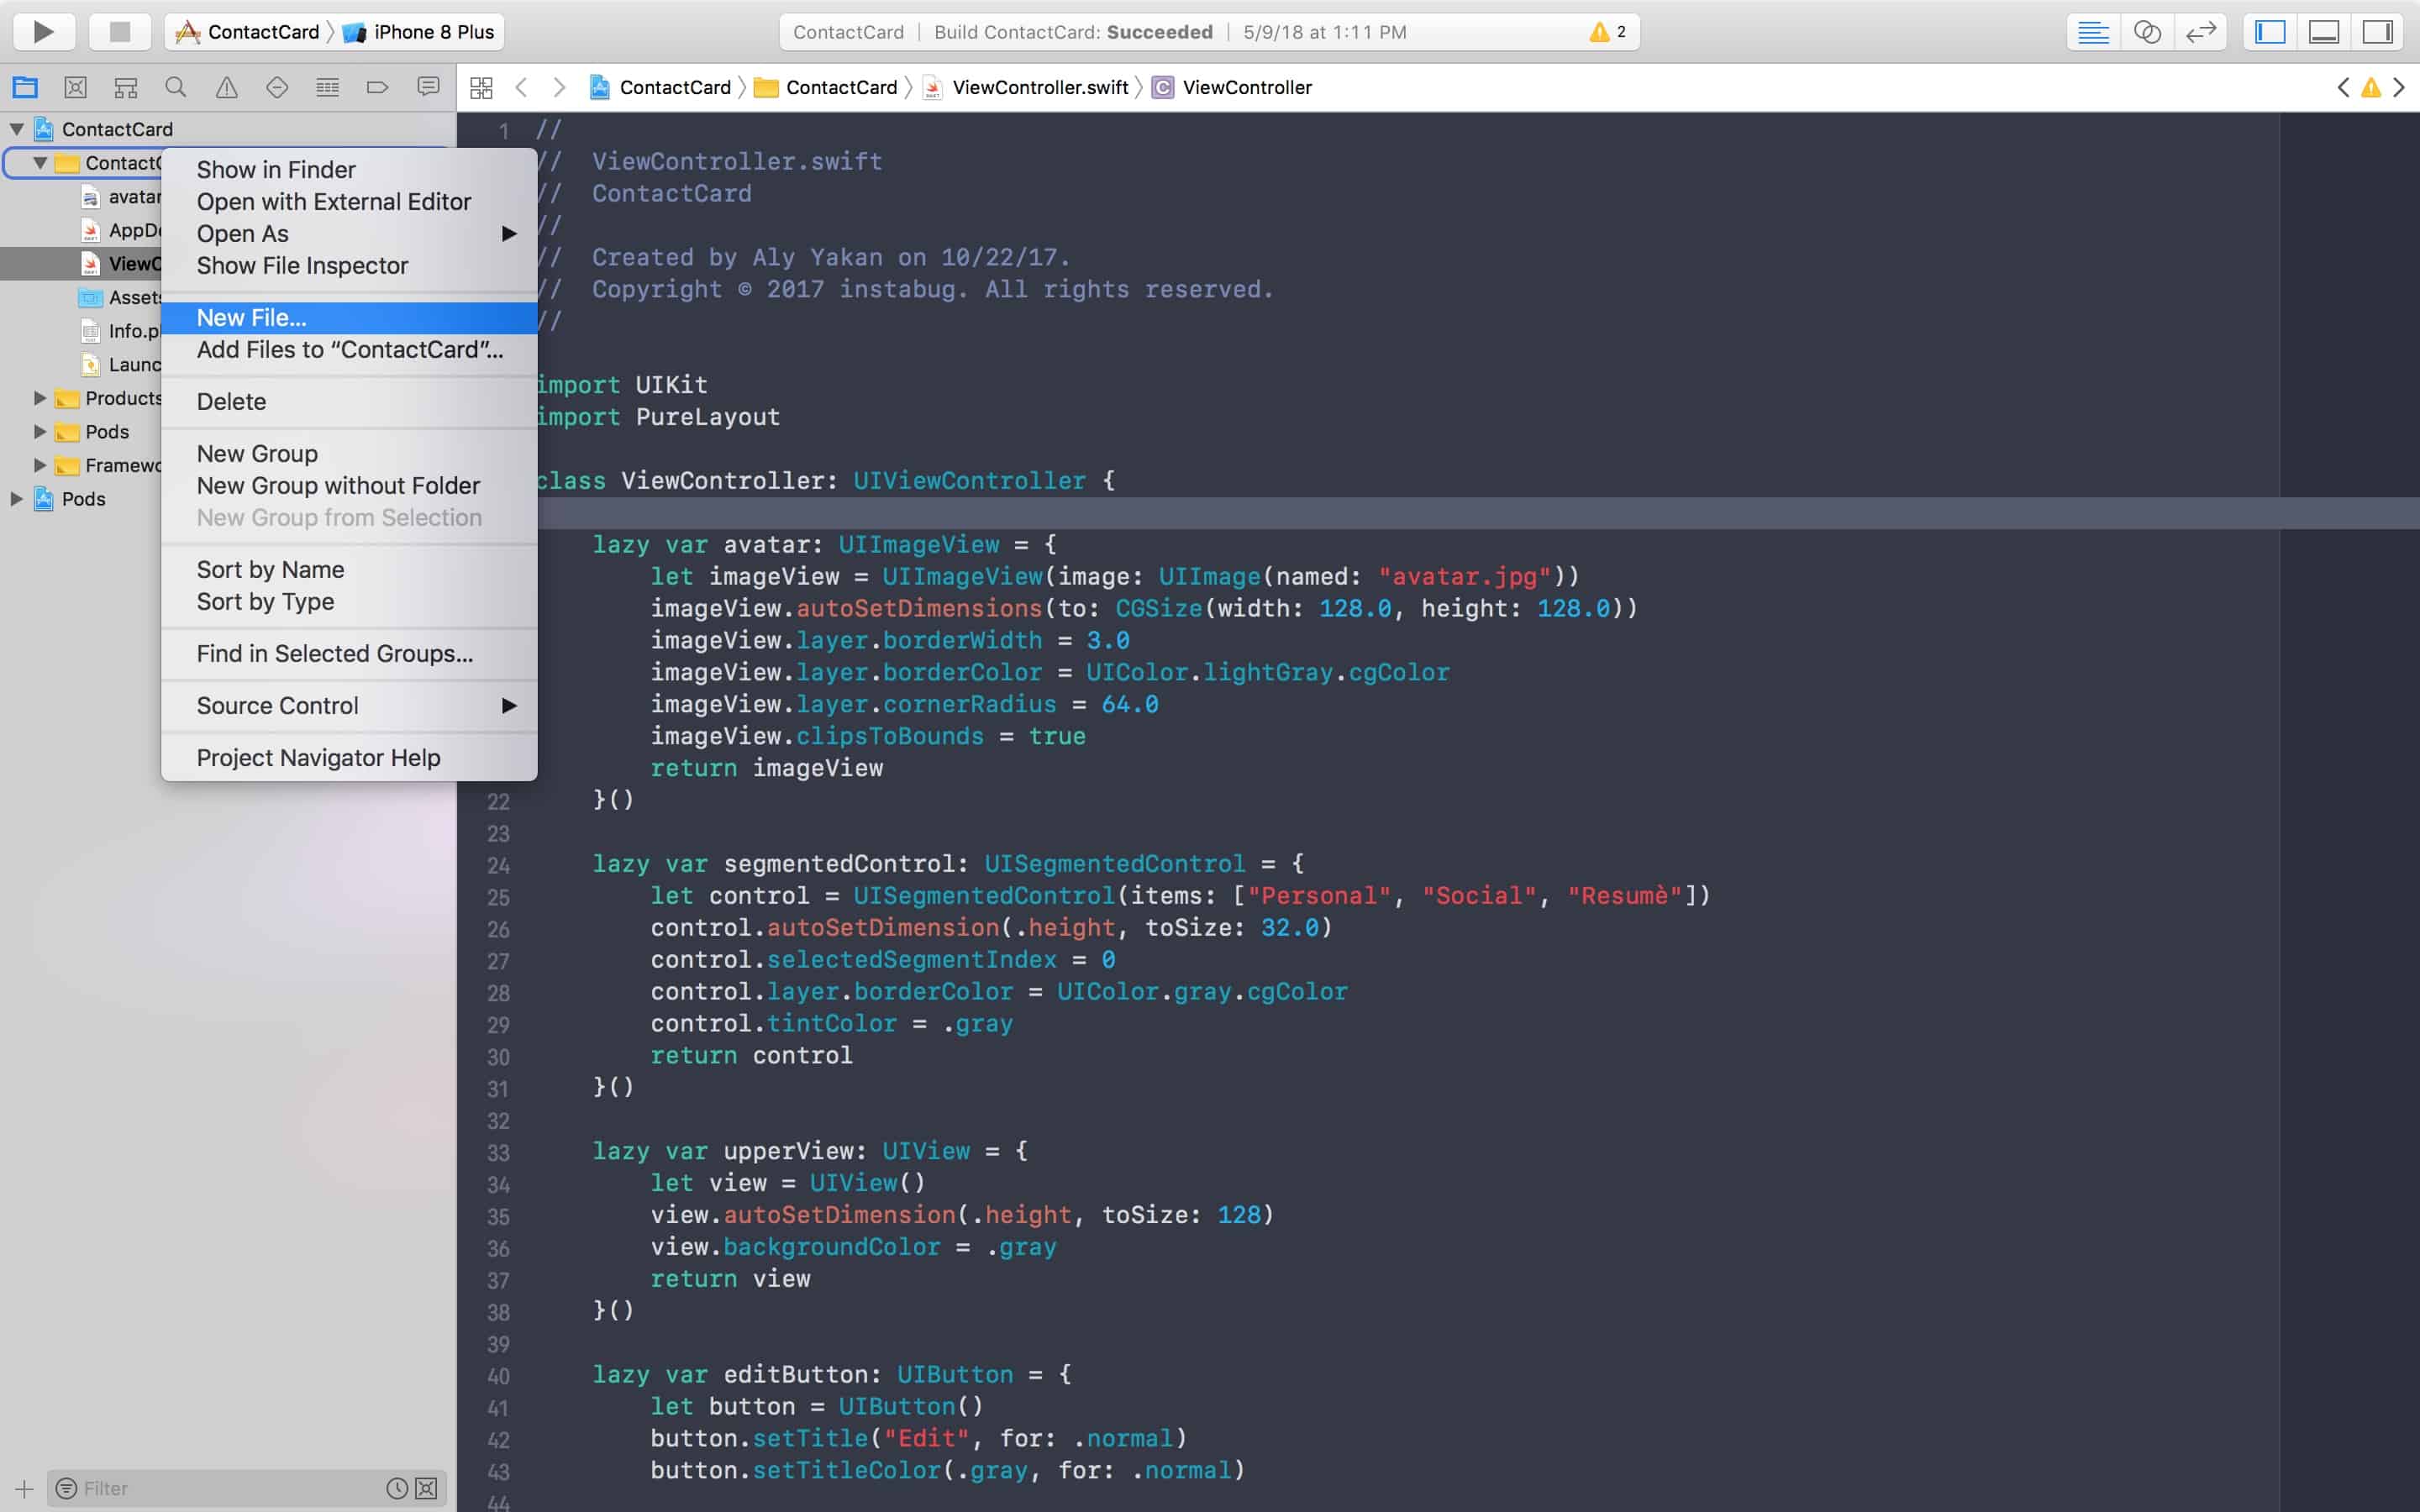
ViewController.swift file in order to be able to use only real logic, and not just code for user interface elements. We can do this by creating a subclass of UIView and moving all our user interface elements there. The reason we do this is to follow the Model-View-Controller or MVC architectural pattern for short. Learn more about MVC Model-View-Controller (MVC) in iOS: a modern approach .Now right-click on the
ContactCard folder in the Project Navigator and select "New File":Click on Cocoa Touch Class and then Next. Now write “ProfileView” as the class name, and next to “Subclass of:”, be sure to enter “UIView”. This simply tells XCode to automatically make our class inheritable from
UIView , and it will add some template code. Now click Next, then Create and remove the commented code: /* // Only override draw() if you perform custom drawing. // An empty implementation adversely affects performance during animation. override func draw(_ rect: CGRect) { // Drawing code } */ And now we are ready to refactor.
Cut and paste all the lazy variables from the view controller into our new look.
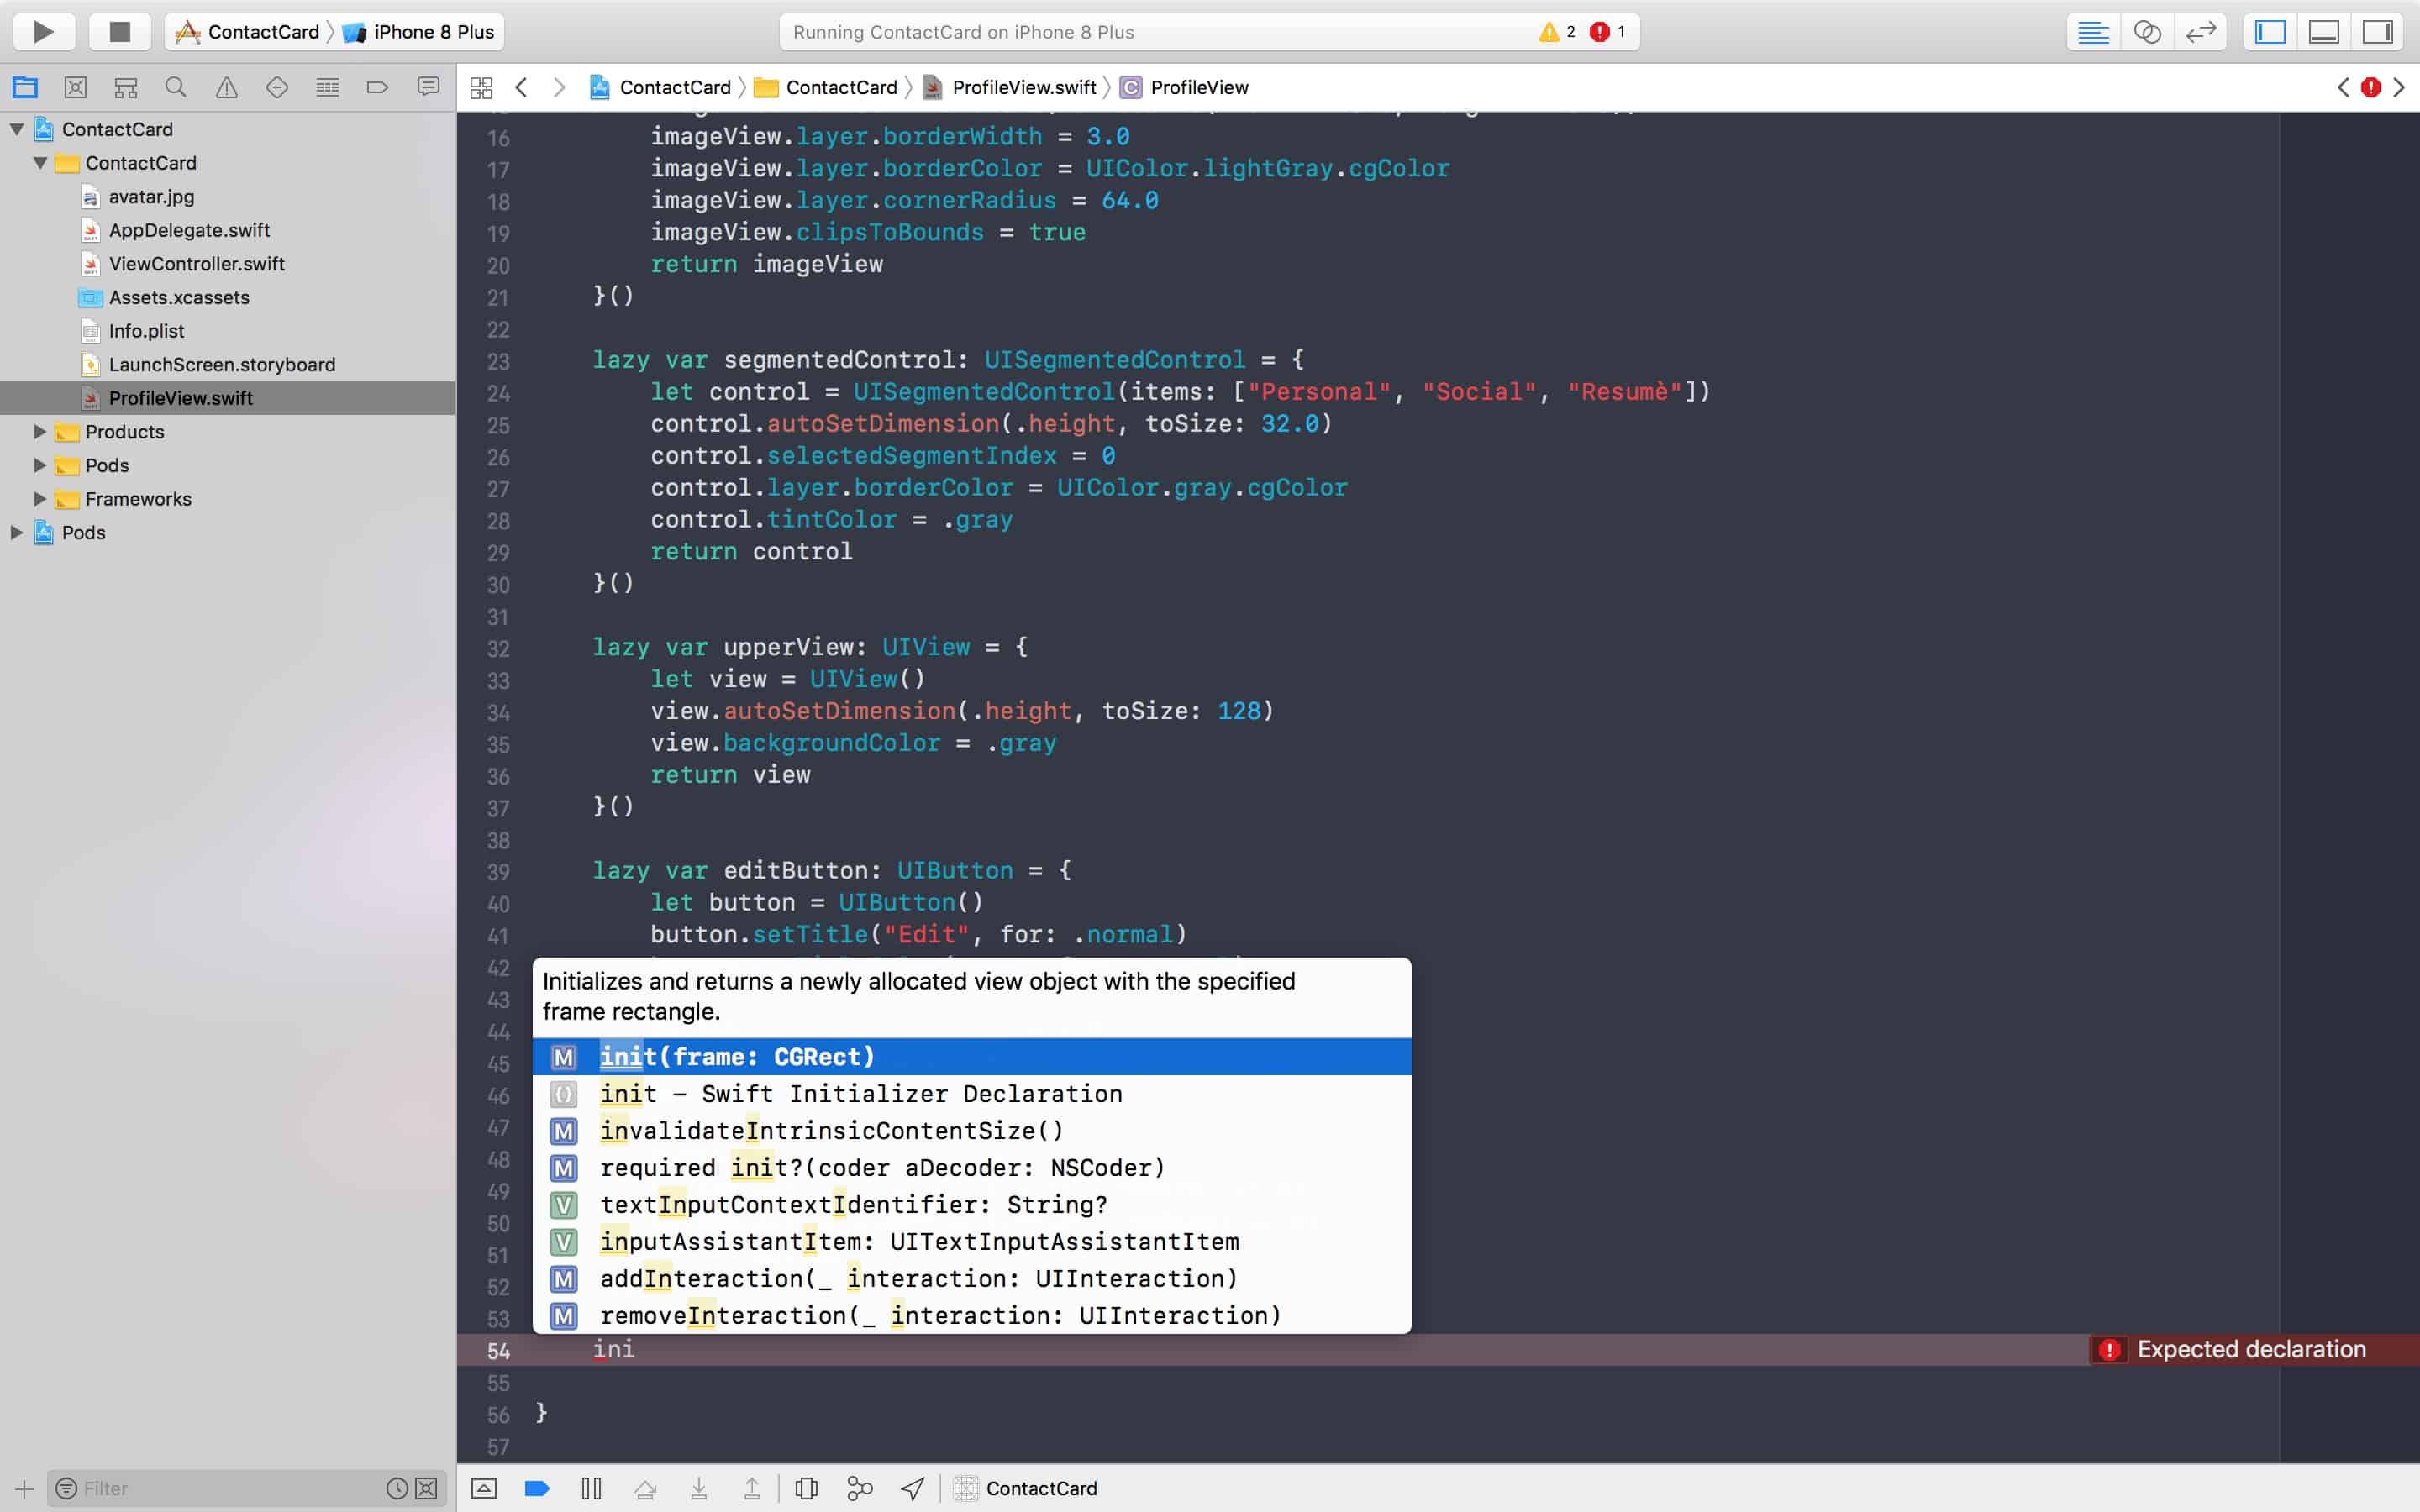
Below the last deferred variable, override
init(frame :) by typing init , and then selecting the first autocomplete result from Xcode.An error will appear stating that the “required” initializer “init (coder :)” must be provided by the subclass “UIView”:
You can fix this by clicking on the red circle and then Fix.
In any overridden initializer, you almost always have to call the initializer of the superclass, so add this line of code at the top of the method:
super.init (frame: frame) .Cut and paste the
addSubviews() method under the initializers and remove self.view before each addSubview call. func addSubviews() { addSubview(avatar) addSubview(upperView) addSubview(segmentedControl) addSubview(editButton) } Then call this method from the initializer:
override init(frame: CGRect) { super.init(frame: frame) addSubviews() bringSubview(toFront: avatar) } For restrictions, override
updateConstraints() and add a call at the end of this function (where it will always remain): override func updateConstraints() { // Insert code here super.updateConstraints() // Always at the bottom of the function } When overriding any method, it is always useful to check its documentation by visiting Apple documents or, more simply, hold down the Option (or Alt) key and click on the function name:
Cut and paste the constraint code from the view controller into our new method:
override func updateConstraints() { avatar.autoAlignAxis(toSuperviewAxis: .vertical) avatar.autoPinEdge(toSuperviewEdge: .top, withInset: 64.0) upperView.autoPinEdgesToSuperviewEdges(with: .zero, excludingEdge: .bottom) segmentedControl.autoPinEdge(toSuperviewEdge: .left, withInset: 8.0) segmentedControl.autoPinEdge(toSuperviewEdge: .right, withInset: 8.0) segmentedControl.autoPinEdge(.top, to: .bottom, of: avatar, withOffset: 16.0) editButton.autoPinEdge(.top, to: .bottom, of: upperView, withOffset: 16.0) editButton.autoPinEdge(toSuperviewEdge: .right, withInset: 8.0) super.updateConstraints() } Now go back to the view controller and initialize the
ProfileView instance above the viewDidLoad method let profileView = ProfileView(frame: .zero) , add it as a subview to the ViewController .Now our view controller is reduced to a few lines of code!
import UIKit import PureLayout class ViewController: UIViewController { let profileView = ProfileView(frame: .zero) override func viewDidLoad() { super.viewDidLoad() self.navigationController?.navigationBar.isTranslucent = false self.title = "Profile" self.view.backgroundColor = .white self.view.addSubview(self.profileView) self.profileView.autoPinEdgesToSuperviewEdges() self.view.layoutIfNeeded() } } To make sure everything works as intended, run your application and see what it looks like.
Having a thin, tidy review controller should always be your goal. It may take a long time, but it will save you from unnecessary trouble during maintenance.
UITableView
Next we will add a UITableView to present the contact information, such as phone number, address, etc.
If you have not done so already, go to the Apple documentation to familiarize yourself with the UITableView, UITableViewDataSource and UITableViewDelegate.
- UITableView - UIKit | Apple Developer Documentation
- UITableViewDataSource - UIKit | Apple Developer Documentation
- UITableViewDelegate - UIKit | Apple Developer Documentation
Go to
ViewController.swift and add lazy var for tableView above viewDidLoad() : lazy var tableView: UITableView = { let tableView = UITableView() tableView.translatesAutoresizingMaskIntoConstraints = false tableView.delegate = self tableView.dataSource = self return tableView }() If you try to start the application, Xcode complains that this class is neither a delegate nor a data source for the
UITableViewController , and therefore we will add these two protocols to the class: class ViewController: UIViewController, UITableViewDataSource, UITableViewDelegate { . . . Once again, Xcode will complain about a class that does not comply with the
UITableViewDataSource protocol, which means that there are mandatory methods in this protocol that are not defined in the class. To find out which of these methods you must implement, while holding Cmd + Control, click the UITableViewDataSource protocol in the class definition and you will proceed to the protocol definition. For any method that is not preceded by the word optional , a class corresponding to this protocol must be implemented.Here we have two methods that we need to implement:
public func tableView(_ tableView: UITableView, numberOfRowsInSection section: Int) -> Int- this method tells the table view how many rows we want to show.public func tableView(_ tableView: UITableView, cellForRowAt indexPath: IndexPath) -> UITableViewCell- this method requests a cell in each row. Here we initialize (or reuse) the cell and insert the information we want to show to the user. For example, the first cell will display the phone number, the second cell will display the address, and so on.
Now go back to
ViewController.swift , start typing numberOfRowsInSection , and when auto-complete appears, select the first option. func tableView(_ tableView: UITableView, numberOfRowsInSection section: Int) -> Int { <#code#> } Delete the word code and return it now 1.
func tableView(_ tableView: UITableView, numberOfRowsInSection section: Int) -> Int { return 1 } Under this feature, start typing
cellForRowAt and select the first method from autocomplete again. func tableView(_ tableView: UITableView, cellForRowAt indexPath: IndexPath) -> UITableViewCell { <#code#> } And, again, for now, return
UITableViewCell . func tableView(_ tableView: UITableView, cellForRowAt indexPath: IndexPath) -> UITableViewCell { return UITableViewCell() } Now, to connect our table view inside
ProfileView , we define a new initializer that takes a table view as a parameter so that it can add it as a subview and set the appropriate restrictions for it.Go to
ProfileView.swift and add an attribute for the table view directly above the initializer:var tableView: UITableView! determined, so we are not sure that he will be constantly.Now replace the old
init (frame :) implementation with: init(tableView: UITableView) { super.init(frame: .zero) self.tableView = tableView addSubviews() bringSubview(toFront: avatar) } Xcode will now complain about the missing
init (frame :) for ProfileView , so go back to ViewController.swift and replace let profileView = ProfileView (frame: .zero) with lazy var profileView: UIView = { return ProfileView(tableView: self.tableView) }() Now our
ProfileView has a link to the table view, and we can add it as a subview, and set the correct limits for it.Returning to
ProfileView.swift , add addSubview(tableView) to the end of addSubviews() and set these restrictions to updateConstraints() above super.updateConstraints : tableView.autoPinEdgesToSuperviewEdges(with: .zero, excludingEdge: .top) tableView.autoPinEdge(.top, to: .bottom, of: segmentedControl, withOffset: 8) The first line adds three constraints between the table view and its superview: the right, left, and bottom sides of the table view are attached to the right, left, and bottom sides of the profile view.
The second row attaches the top of the table view to the bottom of the segmented control with an interval of eight points between them. Run the application, and the result should look like this:
Great, now everything is in place, and we can begin to deploy our cells.
UITableViewCell
To implement
UITableViewCell , we almost always need to create subclasses of this class, so right-click the ContactCard folder in the Project Navigator, then “New file ...”, then “Cocoa Touch Class” and “Next”.Enter “UITableViewCell” in the “Subclass of:” field, and Xcode will automatically fill in the class name “TableViewCell”. Enter “ProfileView” before autocomplete so that the final name is “ProfileInfoTableViewCell”, then click “Next” and “Create”. Go ahead and delete the created methods, since we will not need them. If you want, you can first read their descriptions to see why we don’t need them right now.
As we said earlier, our cell will contain basic information, which is the name of the field and its description, and therefore we will need labels for them.
lazy var titleLabel: UILabel = { let label = UILabel() label.translatesAutoresizingMaskIntoConstraints = false label.text = "Title" return label }() lazy var descriptionLabel: UILabel = { let label = UILabel() label.translatesAutoresizingMaskIntoConstraints = false label.text = "Description" label.textColor = .gray return label }() And now we will override the initializer so that the cell can be configured:
override init(style: UITableViewCellStyle, reuseIdentifier: String?) { super.init(style: style, reuseIdentifier: reuseIdentifier) contentView.addSubview(titleLabel) contentView.addSubview(descriptionLabel) } required init?(coder aDecoder: NSCoder) { fatalError("init(coder:) has not been implemented") } As for the restrictions, we are going to do a little bit different, but, nevertheless, very useful:
override func updateConstraints() { let titleInsets = UIEdgeInsetsMake(16, 16, 0, 8) titleLabel.autoPinEdgesToSuperviewEdges(with: titleInsets, excludingEdge: .bottom) let descInsets = UIEdgeInsetsMake(0, 16, 4, 8) descriptionLabel.autoPinEdgesToSuperviewEdges(with: descInsets, excludingEdge: .top) descriptionLabel.autoPinEdge(.top, to: .bottom, of: titleLabel, withOffset: 16) super.updateConstraints() } Here we start using
UIEdgeInsets to set intervals around each label. A UIEdgeInsets object can be created using the UIEdgeInsetsMake(top:, left:, bottom:, right:) method UIEdgeInsetsMake(top:, left:, bottom:, right:) . For example, for titleLabel we say that we want the upper limit to be four points, and the right and left eight. We do not care about the bottom because we exclude it, as we will attach it to the top of the description label. Take a minute to read and visualize all the constraints in your head.Great, now we can start drawing the cells in our table view. Let's go to
ViewController.swift and change the lazy initialization of our table view to register this class of cells in the table view and set the height for each cell. let profileInfoCellReuseIdentifier = "profileInfoCellReuseIdentifier" lazy var tableView: UITableView = { ... tableView.register(ProfileInfoTableViewCell.self, forCellReuseIdentifier: profileInfoCellReuseIdentifier) tableView.rowHeight = 68 return tableView }() We also add a constant for the cell's reuse identifier. This identifier is used to remove cells from the table view when they are displayed. This is an optimization that you can (and should) use to help
UITableView reuse cells that were previously presented to display new content instead of redrawing a new cell from scratch.Now let me show you how to reuse cells in one line of code in the
cellForRowAt method: func tableView(_ tableView: UITableView, cellForRowAt indexPath: IndexPath) -> UITableViewCell { let cell = tableView.dequeueReusableCell(withIdentifier: profileInfoCellReuseIdentifier, for: indexPath) as! ProfileInfoTableViewCell return cell } Here we inform the tabular view of the withdrawal of a reusable cell from the queue using the identifier under which we registered the path to the cell that is about to appear to the user. Then we force the cell to be brought to
ProfileInfoTableViewCell so that we can access its properties so that we can, for example, set the title and description. This can be done using the following: func tableView(_ tableView: UITableView, cellForRowAt indexPath: IndexPath) -> UITableViewCell { ... switch indexPath.row { case 0: cell.titleLabel.text = "Phone Number" cell.descriptionLabel.text = "+234567890" case 1: cell.titleLabel.text = "Email" cell.descriptionLabel.text = "john@doe.co" case 2: cell.titleLabel.text = "LinkedIn" cell.descriptionLabel.text = "www.linkedin.com/john-doe" default: break } return cell } Now set the
numberOfRowsInSection to return "3" and start your application.Amazing right
Self-Sizing Cells
It is possible, and most likely there will be a case when you want different cells to have a height in accordance with the information inside them, which is not known in advance. To do this, you will need a table view with automatically calculated dimensions, and in fact there is a very simple way to do this.
First of all, in
ProfileInfoTableViewCell add this line to the descriptionLabel lazy initializer: label.numberOfLines = 0 Go back to
ViewController and add these two lines to the initializer of the table view: lazy var tableView: UITableView = { ... tableView.estimatedRowHeight = 64 tableView.rowHeight = UITableViewAutomaticDimension return tableView }() Here we inform the table view that the row height should have an automatically calculated value based on its content.
Regarding the estimated row height:
“The table view can be improved.” - Apple Docs
In
ViewDidLoad we need to reload the table view for these changes to take effect: override func viewDidLoad() { super.viewDidLoad() ... DispatchQueue.main.async { self.tableView.reloadData() } } Now go and add another cell, increasing the number of rows to four and adding another
switch to the cellForRow : case 3: cell.titleLabel.text = "Address" cell.descriptionLabel.text = "45, Walt Disney St.\n37485, Mickey Mouse State" Now run the application, and it should look something like this:
Conclusion
Amazing isn't it? And as a reminder of why we actually write our user interface with code, here’s the whole blog post written by our mobile team, why we don’t use Instabug storyboards .
What you have done in two parts of this lesson:
- Removed
main.storyboardfile from your project. - We created a
UIWindowprogrammatically and assigned it arootViewController. - We created various user interface elements in the code, such as tags, image views, segmented controls, and table views with their cells.
- Embedded
UINavigationBarinto your application. - Created a dynamic size
UITableViewCell.
Source: https://habr.com/ru/post/447374/
All Articles