React Training Course, Part 27: Course Project
In this part of the translation of the React course, you are invited to create a meme generator.

→ Part 1: Course Overview, React, ReactDOM, and JSX Reasons
→ Part 2: Functional Components
→ Part 3: Component Files, Project Structure
→ Part 4: Parent and Child Components
→ Part 5: Getting Started on a TODO Application, Basics of Styling
→ Part 6: Some of the features of the course, JSX and JavaScript
→ Part 7: Inline Styles
→ Part 8: continued work on the TODO application, familiarity with the properties of the components
→ Part 9: Component Properties
→ Part 10: Workshop on working with the properties of components and styling
→ Part 11: dynamic markup generation and the map array method
→ Part 12: workshop, the third stage of work on the TODO application
→ Part 13: Class Based Components
→ Part 14: Workshop on Class Based Components, Component State
→ Part 15: workshops on working with the state of components
→ Part 16: the fourth stage of work on a TODO application, event handling
→ Part 17: the fifth stage of working on a TODO application, modifying the state of components
→ Part 18: Sixth Stage of Work on a TODO Application
→ Part 19: Component Life Cycle Techniques
→ Part 20: The first lesson in conditional rendering.
→ Part 21: the second lesson and workshop on conditional rendering
→ Part 22: the seventh stage of work on a TODO application, loading data from external sources
→ Part 23: First Form Lesson
→ Part 24: Second Form Lesson
→ Part 25: Workshop on working with forms
→ Part 26: Application Architecture, Container / Component Pattern
→ Part 27: course project
→ Original
')
So we got to the course project. Let's create an application that will generate memes. Let's start working with the standard create-react-app project created using this command:
Here you can find information about the features of its use.
In the course of working on this project, you will be asked to implement some of its parts yourself, and then read the explanations about them. In the standard project there is already a template code, which is, in particular, in the
In this project you are invited to use the following styles:
These styles can be included in the
So, based on the assumption that the
This is what should appear in
Here we import
Here’s what the
Here is the simplest functional component.
At this stage of the project, the project looks as shown below.

Application in browser
Now create two new components, in two files whose names correspond to the names of the components:
Given what functions are assigned to these components, think about what they should be.
Here is the contents of the
Since this component will be used only for displaying the application header, we have designed it as a functional component.
Here is the code for the
Here we, taking into account the tasks to be solved by means of the
After creating these files, we import them into
Check the appearance of the application.

Application in browser
Now let's work on the
Here's how the look of the application changes.

Application in browser
The title of the application is designed in accordance with the styles previously connected to
We continue to engage component
This is how the
Now the appearance of the application is not affected.
We will use calls to the API, which returns an array of objects containing references to images, based on which memes can be created. At this stage of the project, you are invited to implement the following functionality in the
Here, to make it clearer, a fragment of the JSON data returned when accessing this API:
Solving the problem posed above, you need to take into account that we are talking about the data that the component needs at the very beginning of the application.
Therefore, to load them, we will resort to the component's lifecycle method
Here is the code of the
This is what gets into the console after successfully loading the data.
Application in the browser, output to the console of the first element of the loaded array
Note that the image is described using a variety of properties. We will only use the
At the beginning of the course we talked about how this application will look like.
Meme generator
In particular, in its interface there is a pair of text entry fields that will be displayed in the upper and lower parts of the image. Now you are offered, based on the updated
By the way, pay attention to the fact that in order to include a comment in the code returned by the
Here is what you should have at this stage of work on the application:
Now the application page will look like below.

Application in browser
As long as only the fields with the text of prompts are displayed, entering data into them does not lead to changes in the interface. In order to check the correctness of the mechanisms implemented here, you can use the
Now let's work on the part of the application that is responsible for displaying the image meme. Recall that we now have an array containing information about the images that are planned to be used as the basis of memes. The application must, by clicking on the
Here is the updated code for the
Here is how the app looks now.
Application in browser
Notice that the image that initialized the state is displayed here. We do not currently use images that are stored in the state property

Application in browser
As you can see, the application subsystems responsible for working with the text function as expected. Now it remains only to make it so that by clicking on the
In order to equip an application with this feature, perform the following task. Create a method that works when you click on the
Here is the code in which the solution to this problem is given:
The
Application page in the browser
Course project completed.
In this lesson, you created an application that uses what you learned while mastering React. Next time we will talk about the development of modern React-applications and discuss the ideas of projects, realizing that you can practice working with React.
Dear readers! Have you encountered any difficulties in carrying out this course project?

→ Part 1: Course Overview, React, ReactDOM, and JSX Reasons
→ Part 2: Functional Components
→ Part 3: Component Files, Project Structure
→ Part 4: Parent and Child Components
→ Part 5: Getting Started on a TODO Application, Basics of Styling
→ Part 6: Some of the features of the course, JSX and JavaScript
→ Part 7: Inline Styles
→ Part 8: continued work on the TODO application, familiarity with the properties of the components
→ Part 9: Component Properties
→ Part 10: Workshop on working with the properties of components and styling
→ Part 11: dynamic markup generation and the map array method
→ Part 12: workshop, the third stage of work on the TODO application
→ Part 13: Class Based Components
→ Part 14: Workshop on Class Based Components, Component State
→ Part 15: workshops on working with the state of components
→ Part 16: the fourth stage of work on a TODO application, event handling
→ Part 17: the fifth stage of working on a TODO application, modifying the state of components
→ Part 18: Sixth Stage of Work on a TODO Application
→ Part 19: Component Life Cycle Techniques
→ Part 20: The first lesson in conditional rendering.
→ Part 21: the second lesson and workshop on conditional rendering
→ Part 22: the seventh stage of work on a TODO application, loading data from external sources
→ Part 23: First Form Lesson
→ Part 24: Second Form Lesson
→ Part 25: Workshop on working with forms
→ Part 26: Application Architecture, Container / Component Pattern
→ Part 27: course project
Lesson 45. Course project. Meme generator
→ Original
')
So we got to the course project. Let's create an application that will generate memes. Let's start working with the standard create-react-app project created using this command:
npx create-react-app meme-generator Here you can find information about the features of its use.
In the course of working on this project, you will be asked to implement some of its parts yourself, and then read the explanations about them. In the standard project there is already a template code, which is, in particular, in the
index.js and App.js . You can easily delete this code and try to write it yourself in order to test yourself in the implementation of standard mechanisms of React-applications.In this project you are invited to use the following styles:
* { box-sizing: border-box; } body { margin: 0; background-color: whitesmoke; } header { height: 100px; display: flex; align-items: center; background: #6441A5; /* fallback for old browsers */ background: -webkit-linear-gradient(to right, #2a0845, #6441A5); /* Chrome 10-25, Safari 5.1-6 */ background: linear-gradient(to right, #2a0845, #6441A5); /* W3C, IE 10+/ Edge, Firefox 16+, Chrome 26+, Opera 12+, Safari 7+ */ } header > img { height: 80%; margin-left: 10%; } header > p { font-family: VT323, monospace; color: whitesmoke; font-size: 50px; margin-left: 60px; } .meme { position: relative; width: 90%; margin: auto; } .meme > img { width: 100%; } .meme > h2 { position: absolute; width: 80%; text-align: center; left: 50%; transform: translateX(-50%); margin: 15px 0; padding: 0 5px; font-family: impact, sans-serif; font-size: 2em; text-transform: uppercase; color: white; letter-spacing: 1px; text-shadow: 2px 2px 0 #000, -2px -2px 0 #000, 2px -2px 0 #000, -2px 2px 0 #000, 0 2px 0 #000, 2px 0 0 #000, 0 -2px 0 #000, -2px 0 0 #000, 2px 2px 5px #000; } .meme > .bottom { bottom: 0; } .meme > .top { top: 0; } .meme-form { width: 90%; margin: 20px auto; display: flex; justify-content: space-between; } .meme-form > input { width: 45%; height: 40px; } .meme-form > button { border: none; font-family: VT323, monospace; font-size: 25px; letter-spacing: 1.5px; color: white; background: #6441A5; } .meme-form > input::-webkit-input-placeholder { /* Chrome/Opera/Safari */ font-family: VT323, monospace; font-size: 25px; text-align: cen } .meme-form > input::-moz-placeholder { /* Firefox 19+ */ font-family: VT323, monospace; font-size: 25px; text-align: cen } .meme-form > input:-ms-input-placeholder { /* IE 10+ */ font-family: VT323, monospace; font-size: 25px; text-align: cen } .meme-form > input:-moz-placeholder { /* Firefox 18- */ font-family: VT323, monospace; font-size: 25px; text-align: cen } These styles can be included in the
index.css file already present in the project and index.css in the index.js file.So, based on the assumption that the
index.js and App.js files are now empty, you, as the first task, are invited to write the index.js code index.js , create the simplest component in App.js and display it in index.js .This is what should appear in
index.js : import React from "react" import ReactDOM from "react-dom" import './index.css' import App from "./App" ReactDOM.render(<App />, document.getElementById("root")) Here we import
React and ReactDOM , import styles from index.css and the App component. After that, using the ReactDOM.render() method, we ReactDOM.render() what the App component forms into the element of the index.html page with the root identifier ( <div id="root"></div> ).Here’s what the
App.js file looks like: import React from "react" function App() { return ( <h1>Hello world!</h1> ) } export default App Here is the simplest functional component.
At this stage of the project, the project looks as shown below.
Application in browser
Now create two new components, in two files whose names correspond to the names of the components:
- The
Headercomponent that will be used to display the application header. - Component
MemeGenerator, which will solve the main tasks assigned to the application. Namely, API calls will be made here. The application data will also be stored here.
Given what functions are assigned to these components, think about what they should be.
Here is the contents of the
Header.js file: import React from "react" function Header() { return ( <h1>HEADER</h1> ) } export default Header Since this component will be used only for displaying the application header, we have designed it as a functional component.
Here is the code for the
MemeGenerator.js file: import React, {Component} from "react" class MemeGenerator extends Component { constructor() { super() this.state ={} } render() { return ( <h1>MEME GENERATOR SECTION</h1> ) } } export default MemeGenerator Here we, taking into account the tasks to be solved by means of the
MemeGenerator component, will use the component based on the class. There is a constructor in which we initialize the state with an empty object.After creating these files, we import them into
App.js and return the markup from the functional component App , which uses instances of these components, not forgetting that if the functional component returns several elements, they need to be wrapped into something. In our case, this is the <div> . Here is the updated App.js code: import React from "react" import Header from "./Header" import MemeGenerator from "./MemeGenerator" function App() { return ( <div> <Header /> <MemeGenerator /> </div> ) } export default App Check the appearance of the application.
Application in browser
Now let's work on the
Header component. Here we use the HTML5 <header> semantic element. This tag will contain the image and text. Now the code of the Header.js file will look like this: import React from "react" function Header() { return ( <header> <img src="http://www.pngall.com/wp-content/uploads/2016/05/Trollface.png" alt="Problem?" /> <p>Meme Generator</p> </header> ) } export default Header Here's how the look of the application changes.
Application in browser
The title of the application is designed in accordance with the styles previously connected to
index.js . The work on the Header component is now complete.We continue to engage component
MemeGenerator . Now you are invited to independently initialize the state of this component by writing the following data into it:- Text displayed at the top of the meme (
topTextproperty). - Text displayed at the bottom of the meme (
bottomTextproperty). - Random image (the
randomImageproperty, which needs to be initialized by the link http://i.imgflip.com/1bij.jpg ).
This is how the
MemeGenerator.js code will be after the state is initialized: import React, {Component} from "react" class MemeGenerator extends Component { constructor() { super() this.state = { topText: "", bottomText: "", randomImg: "http://i.imgflip.com/1bij.jpg" } } render() { return ( <h1>MEME GENERATOR SECTION</h1> ) } } export default MemeGenerator Now the appearance of the application is not affected.
We will use calls to the API, which returns an array of objects containing references to images, based on which memes can be created. At this stage of the project, you are invited to implement the following functionality in the
MemeGenerator component:- Access the API https://api.imgflip.com/get_memes/ .
- Save the data available in the response as an array of
response.data.memesin a new state property (allMemeImgs).
Here, to make it clearer, a fragment of the JSON data returned when accessing this API:
{ "success":true, "data":{ "memes":[ { "id":"112126428", "name":"Distracted Boyfriend", "url":"https:\/\/i.imgflip.com\/1ur9b0.jpg", "width":1200, "height":800, "box_count":3 }, { "id":"87743020", "name":"Two Buttons", "url":"https:\/\/i.imgflip.com\/1g8my4.jpg", "width":600, "height":908, "box_count":2 }, { "id":"129242436", "name":"Change My Mind", "url":"https:\/\/i.imgflip.com\/24y43o.jpg", "width":482, "height":361, "box_count":2 }, …. ] } } Solving the problem posed above, you need to take into account that we are talking about the data that the component needs at the very beginning of the application.
Therefore, to load them, we will resort to the component's lifecycle method
componentDidMount() . Here we will use the standard fetch() method to access the API. It returns a promise. After the data is loaded, the response object will be available to us, we extract the memes array from it and put it in the new state property allMemeImgs , initialized with an empty array. Since this data is not yet used to form something that is displayed on the screen, we will display the first element of the array in the console to check the correctness of the data loading mechanism.Here is the code of the
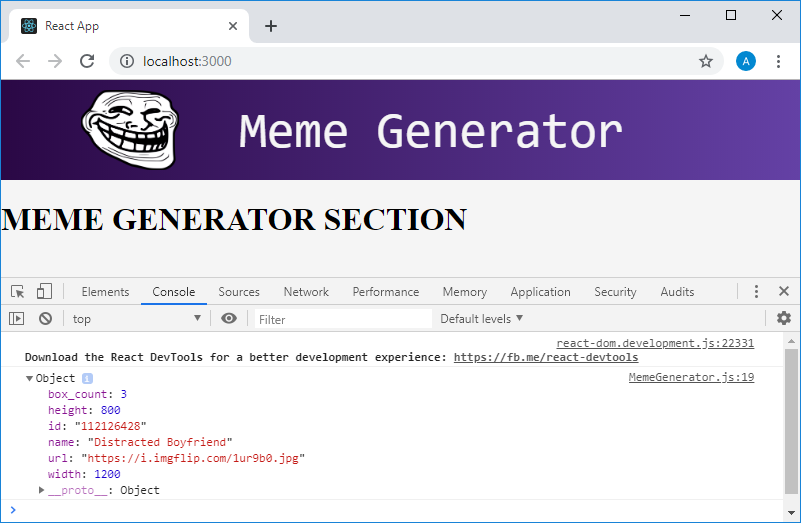
MemeGenerator component at this stage of the work: import React, {Component} from "react" class MemeGenerator extends Component { constructor() { super() this.state = { topText: "", bottomText: "", randomImg: "http://i.imgflip.com/1bij.jpg", allMemeImgs: [] } } componentDidMount() { fetch("https://api.imgflip.com/get_memes") .then(response => response.json()) .then(response => { const {memes} = response.data console.log(memes[0]) this.setState({ allMemeImgs: memes }) }) } render() { return ( <h1>MEME GENERATOR SECTION</h1> ) } } export default MemeGenerator This is what gets into the console after successfully loading the data.
Application in the browser, output to the console of the first element of the loaded array
Note that the image is described using a variety of properties. We will only use the
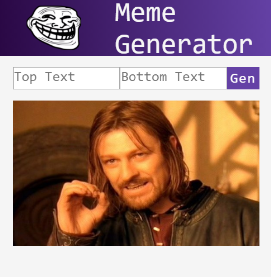
url property, which gives access to the link to download the image.At the beginning of the course we talked about how this application will look like.
Meme generator
In particular, in its interface there is a pair of text entry fields that will be displayed in the upper and lower parts of the image. Now you are offered, based on the updated
MemeGenerator component code shown below, which differs from the above code of this component in that the form blank has been added here, create a couple of text fields, topText and bottomText . Note that these must be managed components. Add the necessary attributes to them. Create an onChange event onChange these fields, where you need to update the corresponding state properties as you enter text in them. import React, {Component} from "react" class MemeGenerator extends Component { constructor() { super() this.state = { topText: "", bottomText: "", randomImg: "http://i.imgflip.com/1bij.jpg", allMemeImgs: [] } } componentDidMount() { fetch("https://api.imgflip.com/get_memes") .then(response => response.json()) .then(response => { const {memes} = response.data this.setState({ allMemeImgs: memes }) }) } render() { return ( <div> <form className="meme-form"> { // } <button>Gen</button> </form> </div> ) } } export default MemeGenerator By the way, pay attention to the fact that in order to include a comment in the code returned by the
render() method, we enclosed it in braces in order to indicate to the system that it should take the given fragment as JavaScript code.Here is what you should have at this stage of work on the application:
import React, {Component} from "react" class MemeGenerator extends Component { constructor() { super() this.state = { topText: "", bottomText: "", randomImg: "http://i.imgflip.com/1bij.jpg", allMemeImgs: [] } this.handleChange = this.handleChange.bind(this) } componentDidMount() { fetch("https://api.imgflip.com/get_memes") .then(response => response.json()) .then(response => { const {memes} = response.data this.setState({ allMemeImgs: memes }) }) } handleChange(event) { const {name, value} = event.target this.setState({ [name]: value }) } render() { return ( <div> <form className="meme-form"> <input type="text" name="topText" placeholder="Top Text" value={this.state.topText} onChange={this.handleChange} /> <input type="text" name="bottomText" placeholder="Bottom Text" value={this.state.bottomText} onChange={this.handleChange} /> <button>Gen</button> </form> </div> ) } } export default MemeGenerator Now the application page will look like below.
Application in browser
As long as only the fields with the text of prompts are displayed, entering data into them does not lead to changes in the interface. In order to check the correctness of the mechanisms implemented here, you can use the
console.log() command.Now let's work on the part of the application that is responsible for displaying the image meme. Recall that we now have an array containing information about the images that are planned to be used as the basis of memes. The application must, by clicking on the
Gen button, randomly select an image from this array and form a meme.Here is the updated code for the
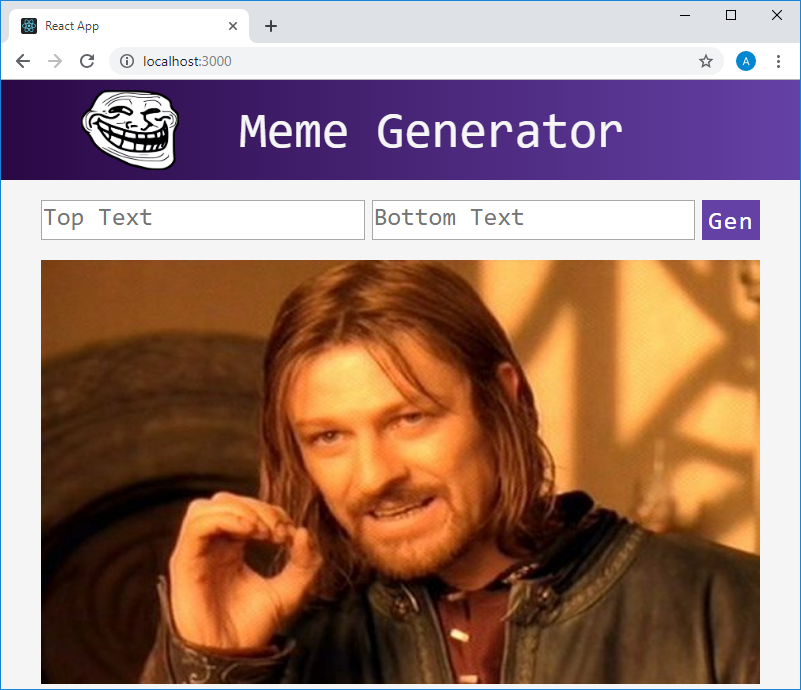
MemeGenerator component. Here, in the render() method, below the form description code, there is a <div> element that includes an <img> element that displays an image, and a pair of <h2> elements that display labels. The <div> and <h2> elements are designed using the styles that we added to the project at the very beginning of working on it. import React, {Component} from "react" class MemeGenerator extends Component { constructor() { super() this.state = { topText: "", bottomText: "", randomImg: "http://i.imgflip.com/1bij.jpg", allMemeImgs: [] } this.handleChange = this.handleChange.bind(this) } componentDidMount() { fetch("https://api.imgflip.com/get_memes") .then(response => response.json()) .then(response => { const {memes} = response.data this.setState({ allMemeImgs: memes }) }) } handleChange(event) { const {name, value} = event.target this.setState({ [name]: value }) } render() { return ( <div> <form className="meme-form"> <input type="text" name="topText" placeholder="Top Text" value={this.state.topText} onChange={this.handleChange} /> <input type="text" name="bottomText" placeholder="Bottom Text" value={this.state.bottomText} onChange={this.handleChange} /> <button>Gen</button> </form> <div className="meme"> <img align="center" src={this.state.randomImg} alt="" /> <h2 className="top">{this.state.topText}</h2> <h2 className="bottom">{this.state.bottomText}</h2> </div> </div> ) } } export default MemeGenerator Here is how the app looks now.
Application in browser
Notice that the image that initialized the state is displayed here. We do not currently use images that are stored in the state property
allMemeImgs . Let's try to enter something in the text fields.Application in browser
As you can see, the application subsystems responsible for working with the text function as expected. Now it remains only to make it so that by clicking on the
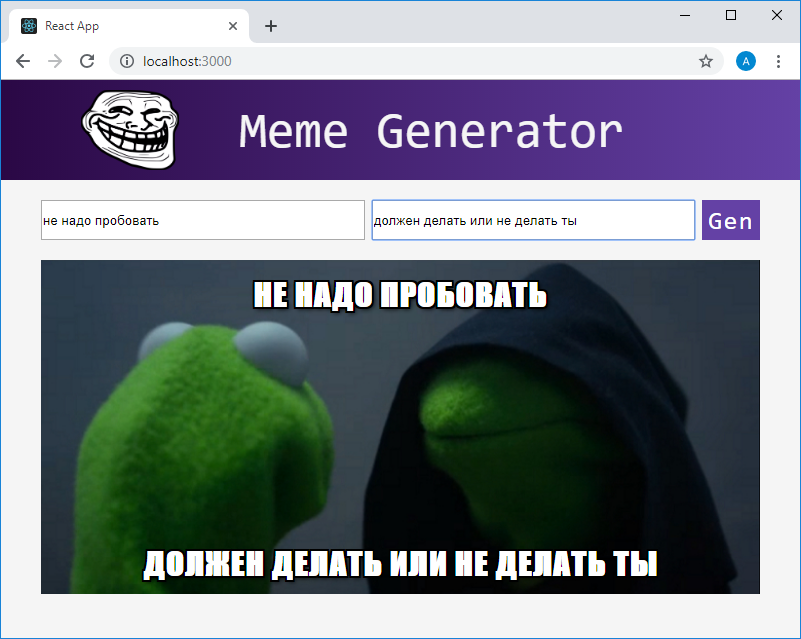
Gen button from the array with the image data, a random image would be selected and loaded into the <img> element present on the page below the text input fields.In order to equip an application with this feature, perform the following task. Create a method that works when you click on the
Gen button. This method should choose one of the images, information about which is stored in the state property allMemeImgs , and then perform actions that allow you to display this image in the <img> element located below the text input fields. allMemeImgs in allMemeImgs that allMemeImgs stores an array of objects that describe images, and that each object from this array has a url property.Here is the code in which the solution to this problem is given:
import React, {Component} from "react" class MemeGenerator extends Component { constructor() { super() this.state = { topText: "", bottomText: "", randomImg: "http://i.imgflip.com/1bij.jpg", allMemeImgs: [] } this.handleChange = this.handleChange.bind(this) this.handleSubmit = this.handleSubmit.bind(this) } componentDidMount() { fetch("https://api.imgflip.com/get_memes") .then(response => response.json()) .then(response => { const {memes} = response.data this.setState({ allMemeImgs: memes }) }) } handleChange(event) { const {name, value} = event.target this.setState({ [name]: value }) } handleSubmit(event) { event.preventDefault() const randNum = Math.floor(Math.random() * this.state.allMemeImgs.length) const randMemeImg = this.state.allMemeImgs[randNum].url this.setState({ randomImg: randMemeImg }) } render() { return ( <div> <form className="meme-form" onSubmit={this.handleSubmit}> <input type="text" name="topText" placeholder="Top Text" value={this.state.topText} onChange={this.handleChange} /> <input type="text" name="bottomText" placeholder="Bottom Text" value={this.state.bottomText} onChange={this.handleChange} /> <button>Gen</button> </form> <div className="meme"> <img align="center" src={this.state.randomImg} alt="" /> <h2 className="top">{this.state.topText}</h2> <h2 className="bottom">{this.state.bottomText}</h2> </div> </div> ) } } export default MemeGenerator The
Gen button can be assigned an event handler that occurs when you click on it, as is done when working with any other buttons. However, given that this button is used to submit the form, it would be better to use the form's onSubmit event handler. In this handler, handleSubmit() , we call the event event event.preventDefault() to cancel the standard form event.preventDefault() procedure during which the page is reloaded. Next, we get a random number in the range from 0 to the value corresponding to the index of the last element of the array allMemeImgs and use this number to refer to the element with the corresponding index. Referring to the element that is an object, we get the property of this object url and write it in the state property randomImg . After that, the component is re-rendered and the page appearance changes.Application page in the browser
Course project completed.
Results
In this lesson, you created an application that uses what you learned while mastering React. Next time we will talk about the development of modern React-applications and discuss the ideas of projects, realizing that you can practice working with React.
Dear readers! Have you encountered any difficulties in carrying out this course project?
Source: https://habr.com/ru/post/447136/
All Articles