Visualization of the revival time of Roshan
This article discusses the interception of graphical API functions using the example of DirectX 9 under x64 as applied to the game Dota 2 .
A detailed description of how to infiltrate the game process, how to change the flow of execution will be described in detail, a brief description of the implemented logic will be given. In the end, let's talk about other possibilities for drawing that the engine provides.

')
This article is planned as the first of a cycle and gives an idea of how you can use the graphics API for your purposes, describes the functionality required to understand the next part. I plan to devote the second article to searching for a pointer to the list of entities in Source 2 (also using Dota 2 as an example) and using it in conjunction with Source2Gen to write “additional” logic (something like this , I will most likely show “map hack” ( attention to the quotes, what is at stake can be viewed on the video), or the automation of the first article). The third article is planned in the form of writing a driver, communicating with it (IOCTL), using it to bypass VAC protection (something similar to this ).
I needed to use the graphics API for visual debugging of my bot, which I wrote for Dota 2 (the visualized information in real time is very convenient). I am a graduate student and I am engaged in the reconstruction of 3D heads and morphing with the help of pictures and depth camera - the topic is quite interesting, but for me it’s not my favorite. Since I have been doing this for the fifth year (starting with the magistracy), I realized one thing - yes, I studied this area quite well, I easily study articles with methods and approaches, I implement them. But this is all, I myself can only optimize the algorithm that has been studied, compare it with those already studied and implemented, and decide whether to use it in a specific task. On optimization, the business ends, it’s impossible to invent something new, which is very important for graduate school (the novelty of the research). Began to think - while there is time, you can find a new topic. The topic already needs to be well understood (at the current level) or it can be quickly pulled up.
At the same time, I worked in game development and this is probably the most interesting thing that a programmer can do (personal opinion) and was very interested in the topic of AI, bots. At that time there were two topics that I knew pretty well - then I was engaged in building a dynamic navigation mesh (client-server) and studying the network part of a dynamic shooter. The topic of dynamic mesh didn’t fit right away - I did it during working hours, I had to ask permission for use in the diploma from the management, besides, the novelty topic was open - I also studied and implemented the existing approaches on articles, but this was no novelty. The topic with the network part of the dynamic shooter (I was planning to use it for interacting in virtual reality) again broke both about the fact that I did this during working hours and about the novelty; you can read a series of articles from Pixonic, where the author himself says that the topic this is interesting, only approaches were invented 30 years ago and have not changed much.
Around this time, OpenAI released their bot. This is certainly not 5 to 5 , but it was awesome! I could not get rid of the thought of trying to make a bot and first of all I began to think about how to use it as a dissertation, about novelty, how to present it to a supervisor. With the novelty in this regard, everything was much better - surely you could come up with something for the two previous topics, but apparently the bot made me think, cling, develop and look for ideas much stronger. So, I decided to make a bot 1 on 1 (the battle for the miduch, like OpenAI), present it to the head, tell how cool it is, how many different approaches there are, mathematics, and most importantly, the new one.
The most necessary thing that a bot needs at the first stage is knowledge of the environment in which it is located - I intended to take the state of the world from the memory of the game and spent the first stage searching for a pointer to the Entity List and integrating with the brainchild Source2Gen - This piece generates the Source2 engine structure, which it takes from the schemas. The main idea and prerequisite for the emergence of schemes is the replication of the state between the client and the server, but apparently the developers really liked the idea and they spread it much more widely, I advise you to read here .
I had the reverse engineering experience: I did cheats for Silent Storm, I did key generators (the most interesting was for Black & White) - what is keygen you can read in DrMefistO here , a combo in Cabal Online (everything was complicated by the fact that this game was guarded by Game Guard , guarded it from ring0 (under the driver in kernel mode), hiding the process (which at least does not easily penetrate it) - you can read more here ).
Accordingly, I had some groundwork in this area, the bot got access to the environment for the planned time. It's amazing how much information the dota server replicates through the delta to the client, for example, the client has information about any teleports, health and its changes from the engineers (except Roshan, he does not replicate) - all this is in the fog of war. Although I encountered some difficulties, this is what I am going to discuss in the next article.
If you have a question why I did not use Dota Bot Scripting , I will answer with an excerpt from the documentation:
As a result, I ran into a lot of problems in the implementation of the bot by ml, over which I spent enough time to realize that two years before the end of the training I could not surpass my knowledge and experience in the current topic. I don’t play Dota Auto Chess from Dota 2, I’m spending my free time on a diploma and Apex Legend reverser (the structure of which is rather similar to Dota 2, I think). Accordingly, the only benefit from the work done is the publication of a technical article on this topic.
I plan to show these principles on a real game - Dota 2. The game uses Valve Anti Cheat anti- cheat. I really like Valve as a company: very cool products, director, attitude towards players, Steam, Source Engine 2, ... VAC. VAC works from user-mode (ring3), it does not scan everything and, compared to other anti-cheats, is harmless (from what esea does (specifically their anti-cheats) all desire to use this platform disappears). I am sure that VAC does its work in such a gentle way - it does not monitor from kernel mode, it does not ban on hardware (only the account), it does not insert watermarks into the screens - thanks to Valve's attitude to the players, they do not install a full-fledged antivirus for you, as they do Game Guard, BattlEye, Warden and others, because all this is so hacked and in addition spends processor resources that the game could take (even if it is done periodically), there are false positives (especially players on laptops). Is there no wall hack, aimbot, speed hack, ESP in PUBG, Apex, Fortnite?
Actually about Dota 2. The game works at a frequency of 40 Hz (25 ms), the client interpolates the game state, input prediction is not used - if you have a lag, a game - it’s important not even a game, controlled units - it is completely freezed. The game mechanics server communicates with the client via RUDP (reliable UDP) encrypted messages, the client basically sends input (if you host the lobby, commands can be sent), the server sends a replica of the game world and teams. Navigation is carried out on a 3D grid, each cell has its own type of terrain. The movement is carried out with the help of navigation and physics (the impossibility of passing a shaker through a fissure, clogs and so on).
The state of the world with all the entities is in the memory in its pure form without encryption - you can study the memory of the game with the help of the Cheat Engine. Obfuscation to lines and code does not apply.
The game Dota 2 has a neutral "ancient", the murder of which gives a good reward: experience, gold, the ability to roll back cooldowns of skills and items, Aegis (second life), his name is Roshan. Getting Aegis can fundamentally turn the game around or give an even greater advantage to the stronger side, respectively, players try to remember / record the time of his death, to plan when to get together and attack him, or to be nearby to protect him. All ten players are notified of the death of Roshan, regardless of whether he is hidden in the fog of war. The revival time has a mandatory eight minutes, after which Roshan may appear randomly in the interval of three minutes.
The task is as follows : provide the player with information on the current state of Roshan (alive, ressurect_base-base time is reborn, ressurect_extra-extra time is being reborn).
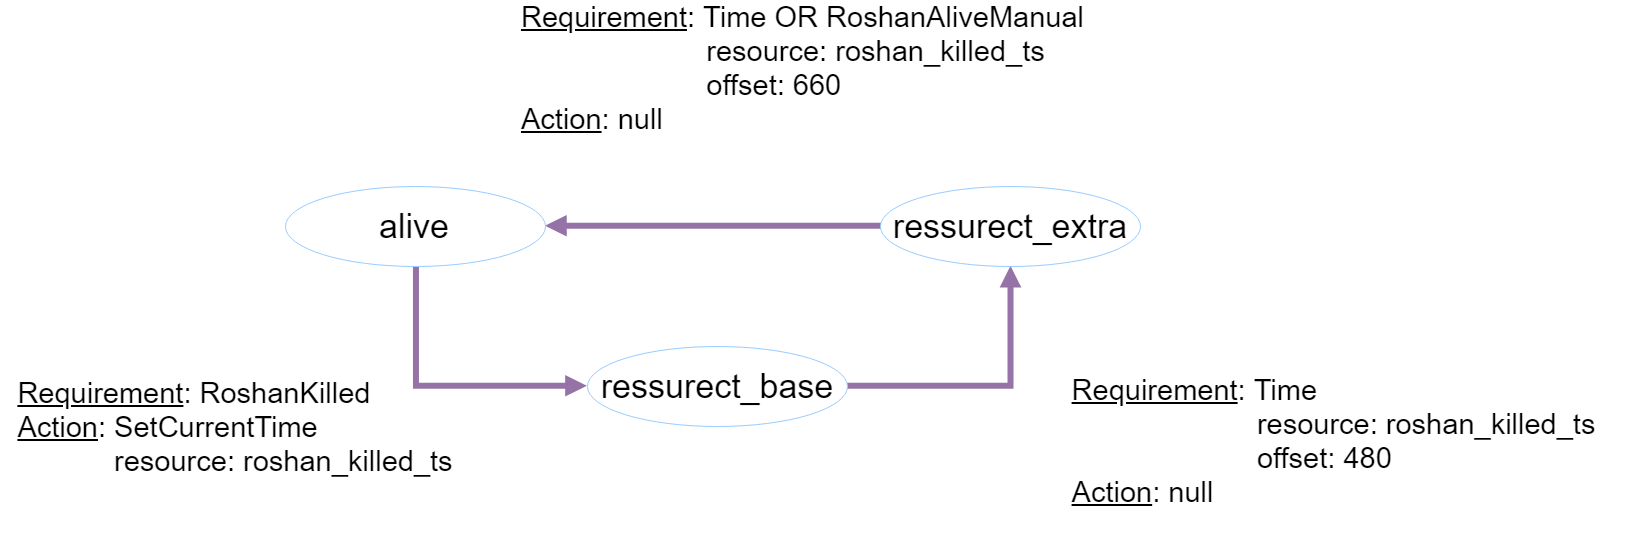
Figure 1 - Conditions of transitions between states and actions during the transition
For states in which Roshan is dead, display the end time of the stay in this state. The transition from the state of alive to ressurect_base must be made by the player in the manual mode by the button. In the case of the detection / death of Roshan in the ressurect_extra state (for example, the enemy team secretly sneaked into the lair and killed him), the transition to the alive / ressurect_base state is also carried out manually by a button. The Roshan status (and the end time of being in a state of rebirth) should be shown in text form, the required input (killing and interruption of the ressurect_extra state) with a button.

Figure 2 - Interface elements - label, button and canvas
This is the only task that I could think of, so that work with the memory of the game was not required and there was at least some value for the player — even to display any elementary characteristics, such as health, mana, positions of entities, you need to either find them when using the Cheat Engine in the memory of the game, which needs to be further explained for a long time, or using Source2Gen, which will be the next article. Setting the task forces the player to follow Roshan, putting a lot of action on him, which is quite inconvenient - but he will have something to rely on in the second part.
We will write our injected.dll, which will contain MVC-based business logic and embed it in the Dota 2 process. Dll will use our silk_way.lib library, which will contain trap logic to change the execution flow, logger, memory scanner and data structures .
Create an empty project in C ++, call it NativeInjector. The main code is in the Inject function.
The function obtains the path and the name of the process, searches by the name of the process for its Id using the GetProcessIdentificator.
In short, GetProcessIdentificator runs through all running processes and looks for a process with the appropriate name.

Figure 3 - The initial state of the process
Further direct library implementation by creating a remote stream.

Figure 4 - Creating a remote stream
Be sure to close the process handler at the end with the CloseHandle function; you can also free the allocated memory. Our injector is ready and waiting for us to write business logic in injected.dll with the library silk_way.lib.
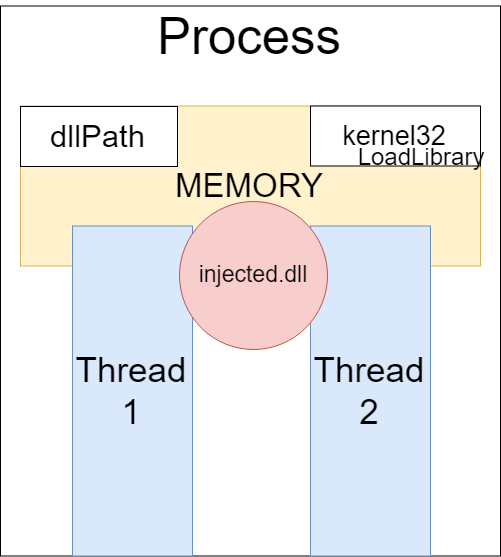
Figure 5 - Completion of the library implementation
For a better understanding of the principle, you can watch the video . In conclusion, I would say that the safer approach is to directly inject code into the main process flow .
Let's start the implementation of silk_way.lib - a static library that contains data structures, a logger, a memory scanner and traps. In fact, I took a small part of my work, something that can be explained most easily, which is not too tied to the rest, but at the same time solves the problem posed.
In brief about data structures: Vector - classic list, insert and delete O (N), search O (N), memory O (N); Queue - cyclic queue, O (1) insertion and deletion time, no search, O (N) memory; RBTree - red-black tree, time of insertion and removal of O (logN), search O (logN), memory O (N). I prefer the hash, which is used to implement dictionaries in C # and Python, the red-black trees that the standard C ++ library uses. The reason is that the hash is harder to implement more correctly than a tree (I find and try variations of hashes about every half year), and usually the hash takes up more memory (although it works faster). These structures are used to create collections both in business logic and in traps.
I try not to use the structures from the standard library and implement them myself, specifically in our case it does not matter, but this is important if your dll is debugged or the assembly is in the open (it is rather a matter of commercial cheats, which we condemn ). I advise you to write all the structures yourself, it gives you great opportunities.
As an example, if you make a game and do not want the “schoolchildren” to scan it using the Cheat Engine, you can make wrappers for primitive types and store the encrypted value in memory. In fact, this is not a salvation, but it can weed out some of those who are trying to read and change the memory of the game.
Implemented output to the console and write to the file. Interface:
Implementation for output to file:
The implementation for console output is of the same type. If we want to use logging, it is necessary to define the ILogger * interface, declare the required logger, call the Log function with the required format, for example:
The scanner is engaged in the fact that displays the value of the memory pointed to by the transmitted pointer and makes a comparison with the sample in memory. Functional comparison with the pattern will be discussed later.
Interface:
The implementation of the header file:
Source file implementation:
To use, you need to define the IScanner * interface, declare the desired scanner and call the PrintMemory function, where you can set the title, pointer and length, for example:
The most interesting part of the library is silk_way.lib. Hooks are used to change the flow of the program. Create an executable project called Sandbox.
The Device class is inherited from the IUnknown interface, our task is to intercept the call to the Present and EndScene functions of any Device instance, and call the original functions in the receiver. We do not know the place in the code, where and why these functions are called, in which thread.
Looking at the Present and EndScene functions, you can see that they are virtual. Virtual functions are needed to override the behavior of the parent class. Virtual functions, as well as non-virtual functions, are pointers to memory, in which operational codes (opcode) and argument values are recorded. Since virtual functions differ from heirs and parents, they have different pointers (these are completely different functions) and are stored in the Virtual Method Table (VMT). This table is stored in memory and is a pointer to a class pointer, we will find it for the Device:
VMT stores pointers to virtual functions; if we want to inherit from Device, the successor will contain its own VMT. VMT stores function pointers sequentially in increments equal to the pointer size (for x86 it is 4 bytes, for x64 it is 8), according to the order in which the function is defined in the class. Find the pointers to the Present and EndScene functions, which are located in the third and fourth place:
It is also important that the pointer to the class method should first contain a reference to the class instance. In C ++, C # hides it from us, and the compiler knows this - in Python, self is explicitly specified by the first parameter in the class method. More details about the agreement on calling (calling convention) here , you need to look for thiscall.
Consider the instruction e9 ff 3a fd ff - here e9 is the opcode (with the JMP mnemonic), which tells the processor to change the instruction pointer (EIP for x86, RIP for x64), jump from the current address to FFFD3AFF (4294785791). It is also worth noting that the numbers are stored in the memory “vice versa”. Functions have a prologue and epilogue and are stored in the .code section. Let's see what is stored in our pointers to the Present function using a scanner:
In the console we see:
To understand the set of these codes, you can view the table , or use the existing disassemblers. We will take the ready disassembler - hde (hacker disassembler engine). Also for comparison, you can look at the distorm and capstone . Pass the pointer to the function to any disassembler and it will say that for it it uses opcodes, argument values, and so on.
Now we are ready to go directly to the traps. We'll look at Opcode Hook and Hardware Breakpoint. The most common traps that I advise to implement and learn.
Probably the most frequently used and simplest trap is the Opcode Hook (in the article listing the traps it is called Byte patching) - note that it is easily recognized by anti-cheat when misused (without understanding how anti-cheat works, without knowing which area and memory section it scans in the current moment and other things the ban will not be slow in coming). With skillful use, it is a wonderful trap, quick and easy to understand.
If you read the code in parallel while reading the article and are in Debug mode, switch to Release - this is important.
So, I remind you, we need to intercept the performance of the Present and EndScene functions.
We implement interceptors — functions where we want to transfer control:
Let's think about the abstractions that we need. We need an interface that will enable us to set a trap, remove it and provide information about it. The trap information must contain a pointer to the intercepted function, the receiver function and the springboard (the fact that we intercepted the function does not mean that it is no longer needed, we also want to be able to use it - the springboard will help to call the original intercepted function).
The IHook interface provides us with such features. We want that when any instance of the Device class calls the Present and EndScene functions (that is, the RIP pointer passes to these addresses), our PresentHook and EndSceneHook functions execute, respectively.
Imagine visually how the intercepted function, receiver and springboard are located in memory (section .code) at the moment when control enters the intercepted function:
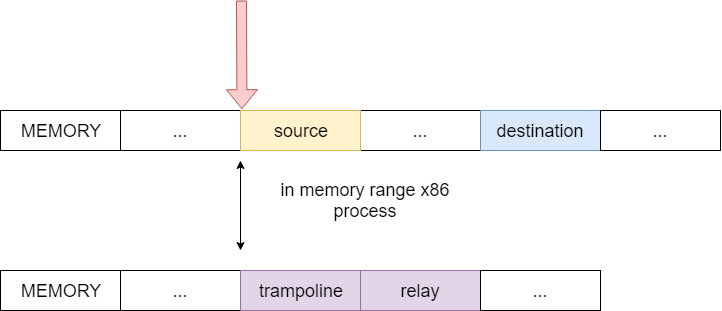
Figure 6 - The initial state of the memory, the execution enters the intercepted function
Now we want the RIP (red arrow) to go from source to the beginning of destination. How to do it? As already written above, the source memory location contains an opcode that the processor will execute when source arrives. In fact, we need to jump from one part to another, redirect the RIP pointer. As you might have guessed, there is an opcode that allows you to transfer control from the current address to the desired one, called this JMP mnemonic.
You can jump directly to the desired address, or relative to the current address, these jumps can be found in the table - ff and e9, respectively. Create the structures for these instructions:
The relative jump instruction is shorter, but there is a limitation - unsigned int says that you can jump within 4,294,967,295, which is not enough for the x64 process.
Accordingly, the destination function destination address can easily pass this value and be outside the unsigned int, which is quite possible for the x64 process (for x86 everything is much simpler and you can limit yourself to this very relative jump for the implementation of the Opcode Hook). A direct jump takes 14 bytes, for comparison, relative - only 5 (we packed structures, pay attention to #pragma pack (push, 1)).
We need to rewrite the value at source to one of these hopping instructions.
Before you catch a function, you should study it - the easiest way to do this is using a debager (I’ll show you how to do it with x64dbg), or a disassembler. For Present, we have already deduced 30 bytes from its beginning, instruction 48 89 4c 24 8 takes 5 bytes.
Let's implement a relative leap. I prefer this option largely because of the length of the instructions. The idea is as follows: we replace the first 5 bytes of the original function, preserving the modified bytes, replace them with a relative jump to the address of the instruction, which lies within the unsigned int.

Figure 7 - The original 5 bytes of the source function are replaced by a relative jump
What gives us a leap on the allocated memory (the purple region), how did we get closer to transferring control to the destination by this action? In the memory we have allocated there is a direct jump, which will move the RIP to the destination.

Figure 8 - Switching the RIP to the receiver function
It remains to figure out how to call a caught function. We need to execute the overwritten instructions and start from the untouched part of the source. We proceed in the following way: we will save the damaged instructions to the beginning of the trampoline, remember how many bytes were damaged and jump directly to source + corruptLen, to the “healthy” instructions.
Execution of saved instructions, overwritten by relative jump:

Figure 9 - Using the springboard to call the intercepted function
Further execution of instructions that are not affected by rubbing:

Figure 10 - Continuation of the execution of instructions of the intercepted function
We have set the trap, but it also needs to be able to remove. Breaking - do not build, the idea is simple - we will return the worn bytes of the source, remove the trap entry from the collection, and free the allocated memory:
Testing work. Immediately change our receivers so that they can call captured functions using the springboard:
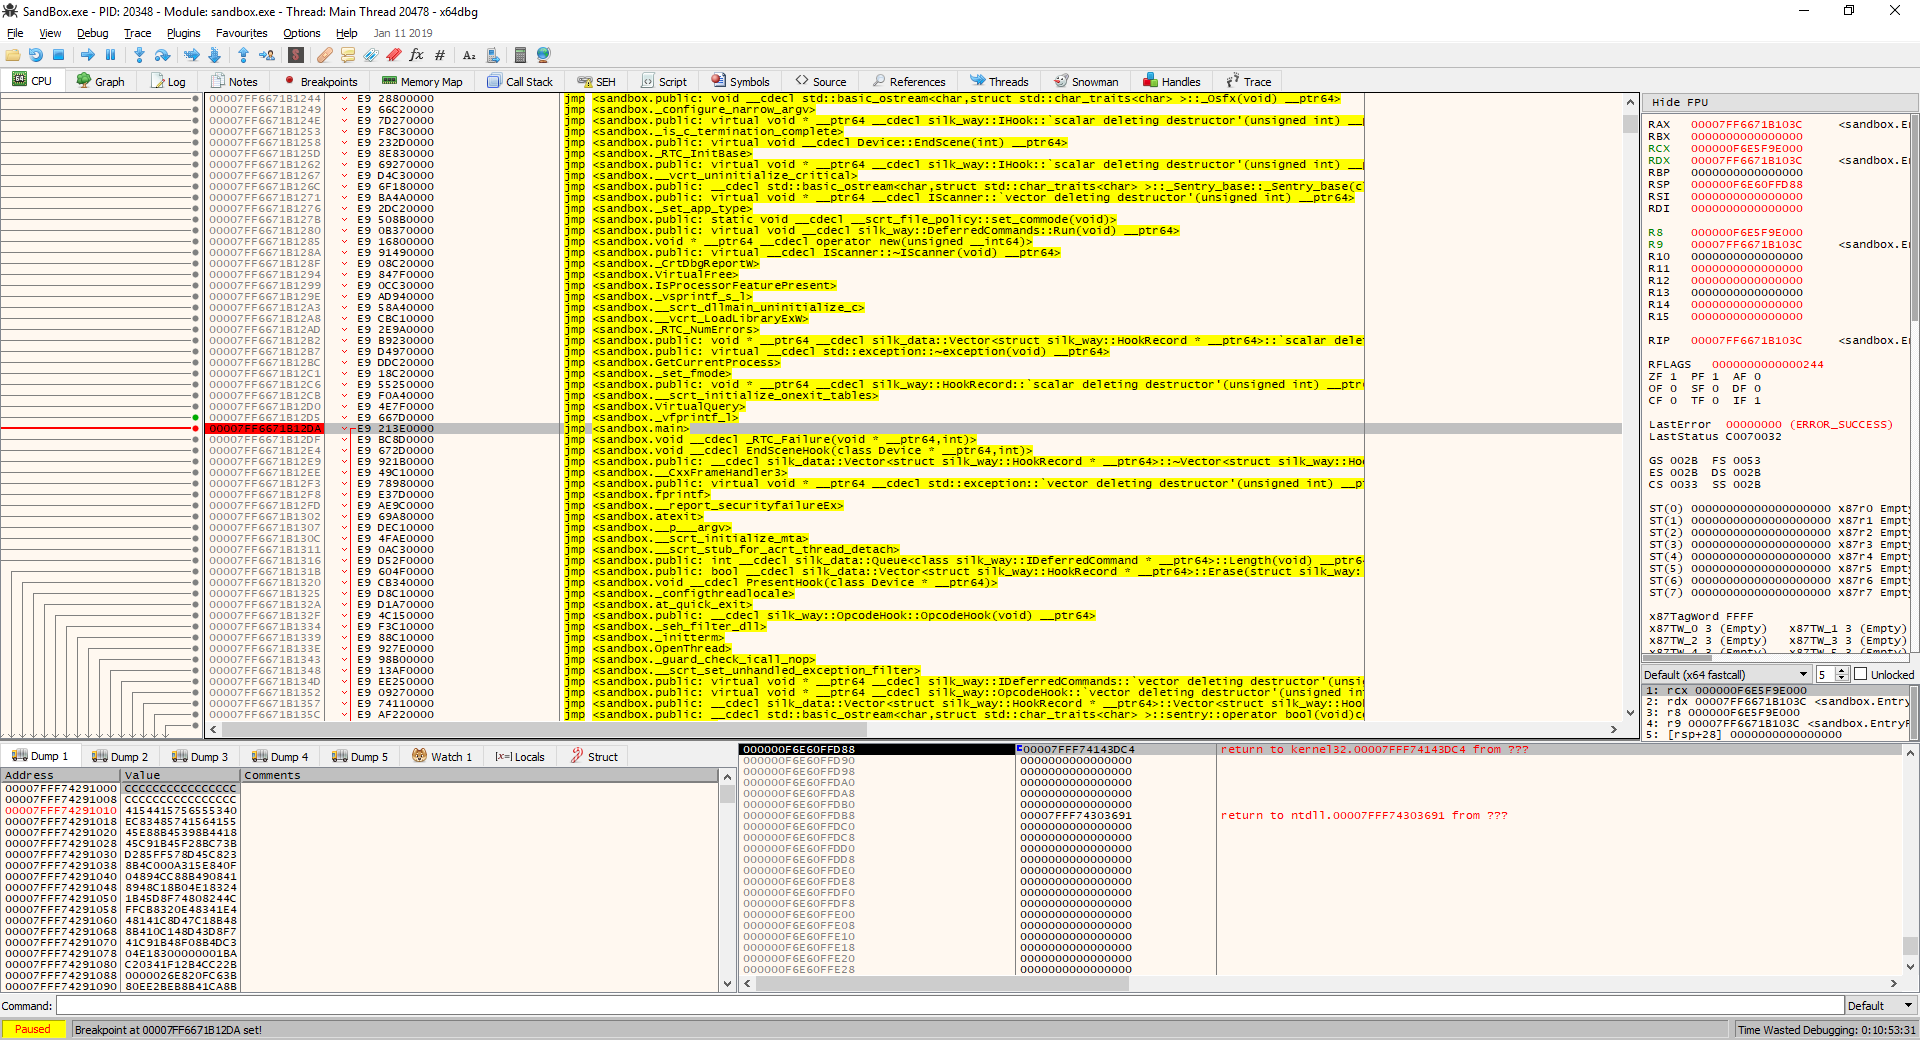
Works.Additionally, you can check in x64dgb.
Remember, at first I asked you to work in the Release build? Now let's go to Debug and run the program. The program crashes ... The trap is triggered, but an attempt to cause a springboard causes an exception that says that the address where we call the springboard is not at all. What have we missed? What is the problem with the debug build? Run and look at the opcode of the Present function:
When running in x64dbg, you can see the following. Figure 11 - Debug build instructions In the Debug opcode has changed, now the compiler adds a relative jump to e9 f4 36 0. All functions turn into a jump, including the main and entry point to the mainCRTStartup program. Another opcode, well, okay, it had to be copied to the springboard, when calling the springboard this relative jump was called, then a direct jump to the intact part of the source. Here it becomes clear that everything is done as we realized, only a relative leap for that and a relative one, that its execution from different addresses, source and trampoline, expose the RIP to completely different values.
In my humble experience, the realization of a case with a relative leap covers 99% of uses. There are some more opcodes that should be processed separately. Remember that before setting a trap on a function, you should not be lazy and study it. I will not bother you and add functionality to the 100 percent option (again, in my humble experience), if you need it or are interested, you can see how such libraries are organized and specifically what other cases they check - it will be easy to do , if you figured out what is going on here.
Relative jump is really quite common, so I propose to implement it. The relative jump consists of the opcode e9 and the value to which you must jump to the current address. Accordingly, you can simply find out where you need to jump, and jump right there from the springboard straight jump. Even if we meet there a new relative leap - it will already be from the correct address.
If the disassembler returns information that the opcode of this command is e9, we calculate the address to jump to (ULONG_PTR ripPtr = (ULONG_PTR) pSource + context.len + (INT32) context.imm.imm32), and write the address to the springboard as the value of the direct jump argument.
Also note that in a multithreaded environment, a situation may arise when, at the moment of installing / removing a hook, one of the threads can start performing the function we are catching - as a result, the process will fall. Partly how to deal with this will be explained in Hardware Breakpoint.
If you need a proven tool, you want to be sure that your trap will work, you do not have your own work and you do not want to learn the prologue of the function - use ready-made solutions, for example, Microsoft offers its own Detour library. I do not use such libraries and use a self-written solution for a number of reasons, so I cannot advise something, I can only name those libraries that I studied in order to open something new and adopt: PolyHook , MinHook , EasyHook (especially if you need C # hooks).
Opcode Hook is a simple and fast trap, but not the most effective. Anti-cheat can easily track a change in a piece of memory, but Opcode Hook can be used for anti-cheating itself or intercepting system calls (for example, NtSetInformationThread) that it uses. Hardware Breakpoint is a trap that does not change the process memory. I saw threads on the forums where it was asked if VAC tracks this trap - the answers are usually ambiguous. Personally, VAC did not ban me for using them and did not reset the registers (it was a little less than six months ago, maybe something has changed).
So, the task is the same - we are in the sandbox (Sandbox project), it is necessary to intercept the methods of the Device Present and EndScene class, in which we call the original methods. We already have a ready-made interface for traps - IHook, let's deal with the work of the "iron" breakpoints.
The principle is this: there are four “working” registers DR0-DR3 in which the address can be written, depending on the setting of the DR7 control register, when an attempt is made to write, read, or execute at a given address, an exception will be generated with the type EXCEPTION_SINGLE_STEP, which must be processed in a previously registered handler . You can use both the SEH handler and VEH - we will use the latter, since it has a higher priority.
We implement this idea:
For more information on what DR6 and DR7 are, as well as on the approach of PageGuard, I can recommend the Gray Hat Python book: Python Programming for Hackers and Reverse Engineers. In short, DR7 enables / disables the use of a “working” register — even if any of the DR0-DR3 registers contain an address, but in the DR7 the corresponding register flag is disabled, the breakpoint will not work. Also DR7 sets the type of work with the address at which you need to throw an exception - whether the address was read, the record was recorded or the address is used to execute the instruction (we are interested in the last option).
Removing the trap is also quite simple and is done through the DR7 control register.
It remains to deal with the threads - the trap must be set for those threads that cause the intercepted function. We will not bother about this.
The code above bypasses all visible processes and looks for the current process. In the process found for the next thread, we get the thread handler, find one of the four free registers and set a trap. It is worth paying attention to the Freeze and Unfreeze functions - this is what Opcode Hook said about multithreading - they completely stop the execution of threads of this process (except the current one), to prevent a situation when one of the threads enters the intercepted function.
A similar need to implement in the function of removing the trap.
It remains to add an exception handler VEH. Add and remove are performed by AddVectoredExceptionHandler and RemoveVectoredExceptionHandler functions from any stream.
The handler must check the type of the exception (EXCEPTION_SINGLE_STEP is needed), check the address at which the exception occurred with what is in the registers and if such an address is found, rearranges the RIP pointer to the address of the receiver. The state of the stack is preserved, so that as the receiver continues, all parameters on the stack will be intact.
We implement the described handler in the sandbox:
In theory, everything is ready, we launch the program, expecting exactly the same work as that of the OpcodeHook.
This does not happen, our program freezes - or rather, it constantly enters the PresentHook and at the moment when the springboard is to be called, the function is called again. The fact is that the “iron” breakpoint has not disappeared, since when we call the springboard (which in the case of “iron” breakpoints indicates the original function), we again alarm the same address and raise an exception. The solution is the following: we remove the breakpoint when it is detected in the handler for a particular thread, and set it again at the right moment. The location of the update will choose the time of completion of the receiver function.
This is implemented as follows: a delayed command is added to the handler along with the removal of the breakpoint, the purpose of which is to update the breakpoint in the specified stream. The command runs at the end of the receiver function.
Imagine visually the work of "iron" breakpoints.

Figure 12 - The initial state
Put trap add VEH handler forward when control reaches the functions of the source:
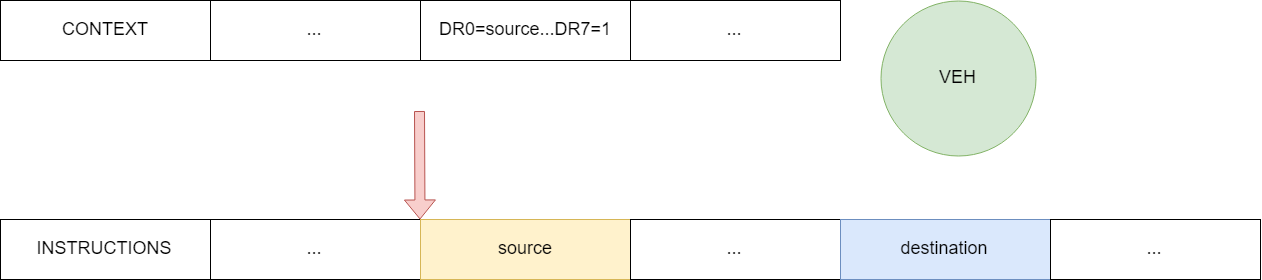
Figure 13 - Step preparation interception
Raised exception handler is called, which redirects the RIP to the receiver and resets breakpoint:

Figure 14 - redirection thread of execution to the receiver function
. This is the end of the trap theme, the silk_way.lib static library is ready. From my experience I can say that I often use OpcodeHook, VMT Hook, Forced Exception Hook (probably the “hemorrhoid” trap), HardwareBreakpoint and PageGuard (when runtime is not critical, one-time hooks).
The basis of logic is presented in the form of MVC (model-view-controller). All basic entities are inherited from the ISilkObject interface.
In the library, when developing a bot, I first implemented ECS (you can read about this approach here and here ). When I realized that running a bot with real players is quite a long time, I wrote a simulation where ml libraries were tested (with a three-dimensional grid for navigation (Dota 2 just uses a 3D grid for navigation) and simplified 2D physics for a bodybuilder). When the need for simulation disappeared and I figured out how and what to log, what information to collect during the battle, ECS eliminated all need and the models simply began to contain a component dictionary (for presentation just like the guys from SkyForge, the section “Avatars and mobs), which contained, in essence, wrappers over the structures from Source2Gen. For this article, I did not begin to transfer this implementation in order to simplify the material. The model contains a Schema in which its description is stored (this moment is simplified and in this implementation the model is not created according to the scheme, the scheme only describes it (stores the preset values that can be hard coded) - this can be compared with the storage of the game content in xml / json ).
Schematically, the model of the model can be represented as follows: Figure 15 - Schematic representation of the Model Implementation in code:

The schema includes a description of a specific model and contains a context that the model can use.
There is nothing special to say about Presentation, Presentation Status and Controller, the implementation is similar to Models. They also consist of a schema and context. To solve the problem for the View, Canvas, ViewCollection, Label and Button are implemented; for the last two, the states corresponding to the states in which Roshan is located are also implemented.
Objects are created using a factory. Factories use the interface type as a key, translating it into a string using typeid (T) .raw_name (). In general, it is bad to do so, why and how it can be properly read by Andrei Alexandrescu, Modern C ++ Design: Generic Programming. Factory implementation:
Before using the factory to build objects, you need to register.
Filling the scheme can be done in any way - you can use json, you can directly in the code.
The view learns about changing the Model through events. You can get feedback in class methods and ordinary functions.
If an object wants to report events inside it, you need to add an IEvent * for each event. Another object that is interested in events occurring inside this object should create an ICallback * and pass it inside IEvent * (subscribe to the event).
The basic primitive types (SILK_INT, SILT_FLOAT, SILK_STRING, ...) are implemented in Core.h.
DirectX 9 is one of the graphics APIs supported by Dota 2. The device is a class inherited from IUnknown and contains virtual functions. Accordingly, having received a pointer to a virtual table of methods, we can get pointers to the functions we need. Non-virtual class functions are not included in the table and are in the .code segment, since they are the only ones, they cannot be redefined. By the way, in OpenGL and Vulkan, the interception of functions of the device is much simpler, since they are not virtual and you can get a pointer using GetProcAddress (). The architecture of DirectX 11 is more complicated than 9, but not much.
To intercept a virtual class method (as well as non-virtual) we need an instance of this class, any instance. With the help of the instance, we will get the table of virtual methods and get the necessary pointers to functions. The easiest way to find an instance of a class is to create it yourself.
To do this, we need to create an object with the IDirect3D9 interface using the Direct3DCreate9 function, and create the device itself using this object by calling the CreateDevice method. We can call these functions directly from the DirectX library, but for the sake of securing the material we will call them through pointers. As you can see from d3d9.h, Direct3DCreate9 is a normal function and a pointer to it can be obtained via GetProcAddress (just like we did in NativeInjector to get a pointer to LoadLibrary).
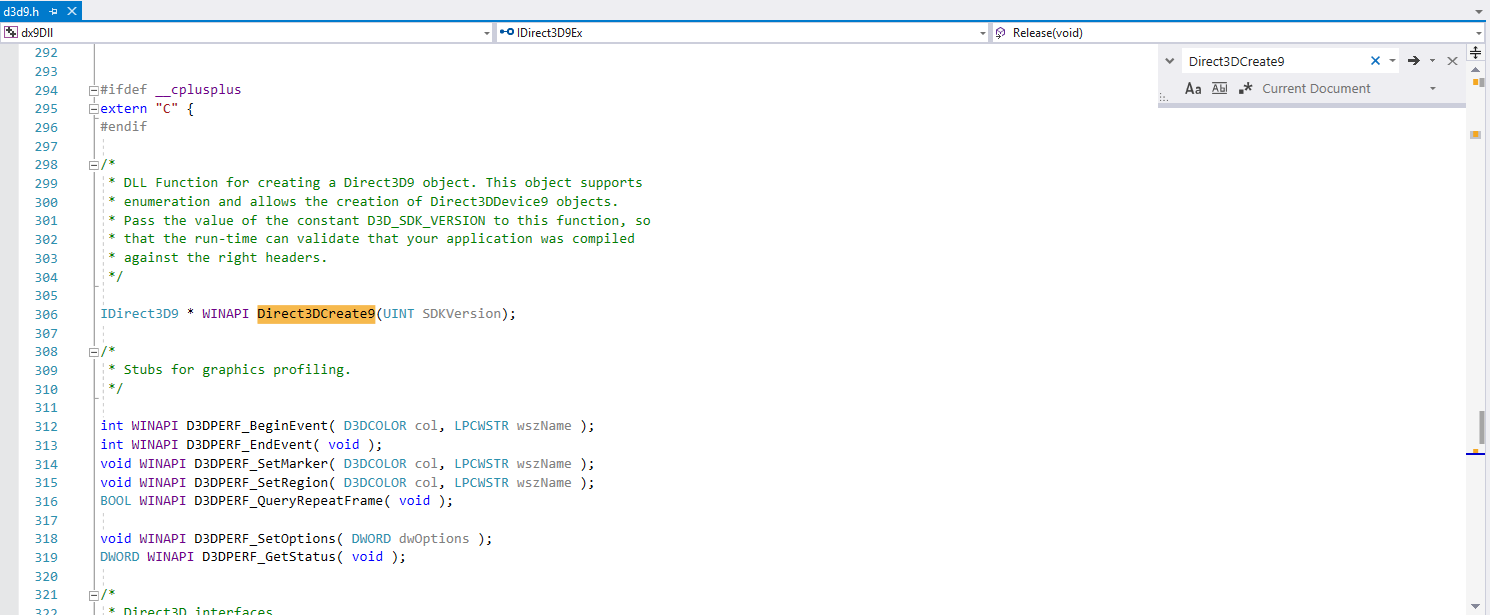
Figure 18 - CreateDevice description in d3d9.h
Create an instance of IDirect3D9:
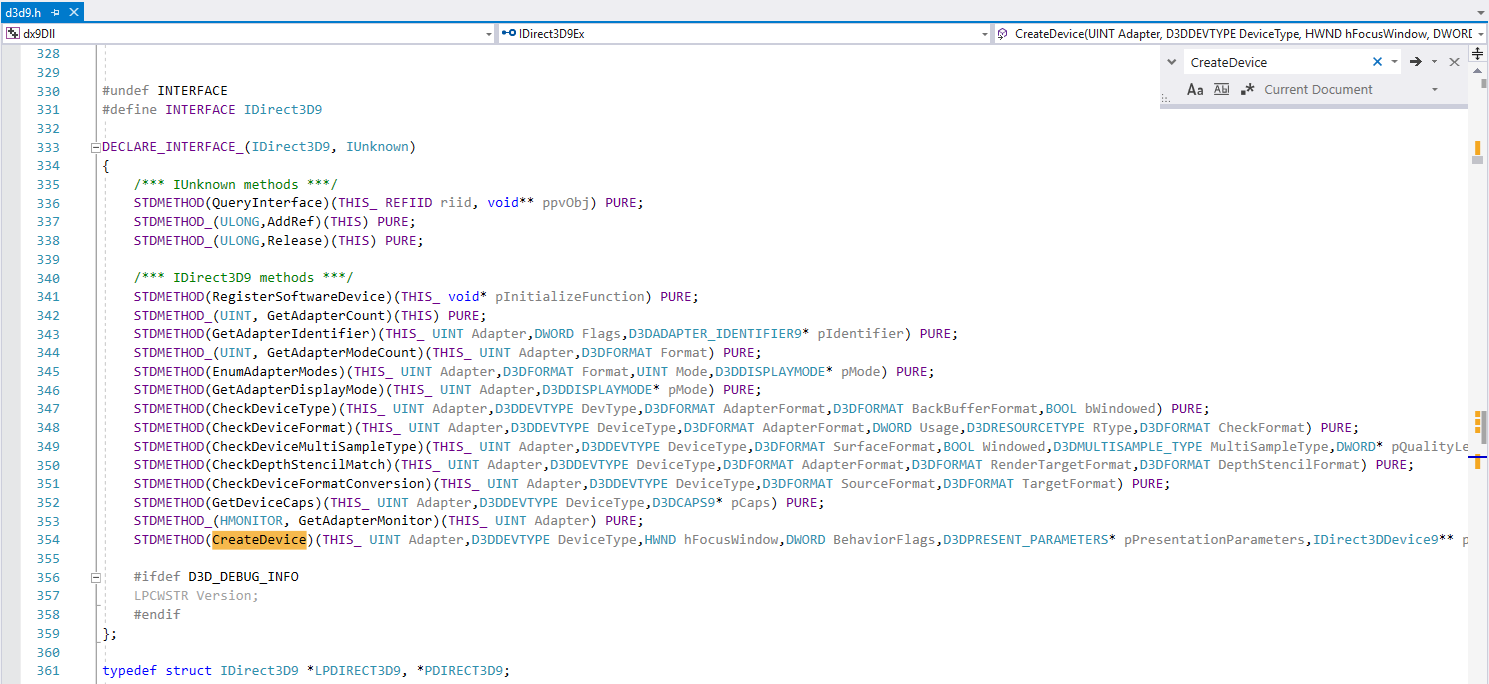
With IDirect3D9, we can create a device by calling pD3D-> CreateDevice (...). To get a pointer to the necessary functions from VMT, we need to know the order in which these methods are defined. Figure 19 - Searching the index of the CreateDevice method of the IDirect3D9 interface. We get the 16th index. In addition to CreateDevice, we also need the Release and GetAdapterDisplayMode methods.
Great, we created the DirectX 9 device, now we need to understand what functions are used to render the scene, what we need to intercept. We need to answer the question: "How does DirectX 9 show us the scene?". To show the scene, use the Present function . It is also necessary to introduce such concepts as front buffer (a buffer that stores what is displayed (long action) on the screen), back buffer - contains what is ready for display and is preparing to become the front buffer, swap chain is the actual set of buffers that alternately (flipping) from front to back (DirectX 9 has only 1 swap chain). Before calling Present, a couple of functions BeginScene and EndScene are called , where you can change the back buffer.
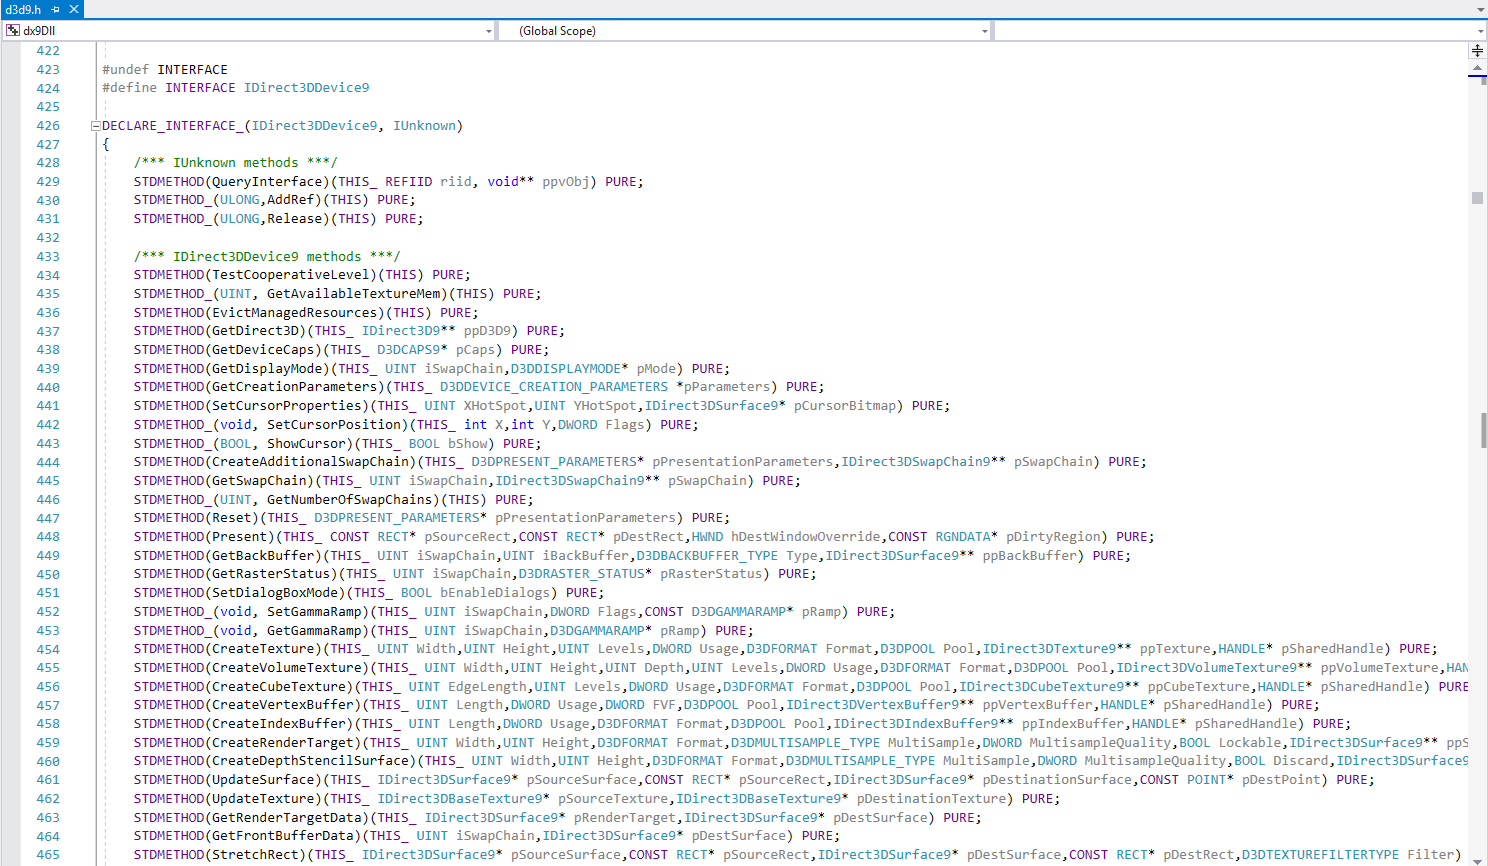
Let's intercept two functions (in fact, one business will be enough for us to perform business logic): EndScene and Present. To do this, we will look at the location of these functions in the IDirect3DDevice9 class. Figure 20 - Declaring the IDirect3DDevice9 interface Let's declare pointers with the following function signatures:
Let's declare a trap right away with an error handler, since HardwareBreakpoint is actually our only implemented secure interception option that VAC does not track (you can also test with Opcode Hook, but your account will most likely fly off to the ban):
Zahukayem designated functions of any of our two traps:
Functions receivers:
The EndScene creates a business logic controller. After creation, the controller update is called, where all the logic is updated.
I note that now we have implemented work with DirectX 9. If we want to do some kind of mod, cheat, etc., it is necessary to support all four APIs. This is justified if there are already favorite libraries in the arsenal, presets for UI, otherwise you can use another method - a functional that uses the engine for drawing the game.
It is also worth saying that the call to update the logic from EndScene () is not the best option - you can find periodic calls to the functions of the engine or call logic in your thread. If you are satisfied with the call from EndScene, it is better to do this with lockstep.
Now we have implemented everything that we planned.
Now you can create a fake account in the incentive and inject injected.dll into the Dota 2 process. I have to say right away that I don’t know how the situation with the “iron” breakpoints is at the moment - for using the Opcode Hook (as we do in the current form) you just get a ban. I did it about six months ago - there was no ban for Hardware Breakpoint, I cannot say what the situation is at the moment. Before preparing the article, I took two accounts and tried Opcode Hook and HWBP on them, the first one flew into the ban (about 2 weeks passed), the second did not (3 weeks passed). But still there are no guarantees that the ban will not be in the future. Then do not be offended if you accidentally make an introduction from your main account or forget to log in to fake - here already watch yourself and be careful.

23 —
Implementation in 1x1 mode. Figure 24 - Introduction to the match It is also worth saying that there is another way of drawing - surface drawing by creating a second window with the appropriate size. Unfortunately, I did not manage to implement the possibility of using the surface approach for the case of full-screen mode, the approach described in the article allows you to embed the drawing both in full-screen mode and in windowed mode without any problems. Our embedded UI contains only a text label and a button, implemented on pure DirectX 9 - this is all that is required to solve the problem. You can implement both on a clean API, and using ready-made libraries, complex tables, beautiful menus and diagrams - in general, a UI of any complexity. Of course, not only 2D.

Implementing the same functionality for each API is quite a chore, the developers make convenient wrappers, providing functions for drawing, UI, etc., which the game itself uses. Valve also provides Javascript and Lua APIs for Dota 2 . This is done in order to make life easier for modders and game designers, for whom C ++ is complex (not even C ++ itself, but proper use in the context of the engine). Here there are functions for drawing, and the logic of the game - you can prescribe the behavior of the unit, for example, the selection of objects, the use of skills and stuff. Actually, with the help of this and spells are written.
We will be interested in the DoIncludeScript function, which allows you to run your Lua scripts and use the Scripting API there. I did not use it in my project, because I did not see the value in it, using functions directly from C ++, I saw the idea of using it in or_75 and decided to include it in the article. This will introduce you to what will be in the second part and save space in it, you will not have to explain certain points in the debugger’s work.
Let's get startedThe task is as follows: it is necessary to find a pointer to the DoIncludeScript function, which takes the name of the script and the handler, to examine it. We will search for the function with the help of a scanner from our library silk_way.lib. Functions, as we have already found out, are encoded in memory using a table of opcodes — let's examine this function and try to identify its storage pattern in memory. Now the scanner does not have the necessary functionality, we need the ability to search for a template in the process memory.
To speed up the search, we will search for a pattern not in the entire memory of the process, but in a specific module (our function lies in client.dll, this will be seen in the debugger and discussed below). We will look for the module using tlHelp32 by name by iterating through all the modules of the process, for which we will create a function for finding the module in the current process GetModuleInfo.
The pattern is a string with the value of bytes, the byte skip is denoted by the symbol “??” - for example, “j9 ?? ?? ?? ??48 03 08 ?? f1 ff ”.
Parsing a string, for convenience, we will translate the pattern from the string representation to the list of unsigned char values, set the flags of the bytes to be skipped.
The search engine is implemented in the FindPattern function, where the initial and final address of the search is set according to the received information about the module. Information about the memory that will be searched, is requested by the VirtualQuery function, there are a number of requirements for memory - it must be busy (it will be an error to search in free memory), the memory must be readable, executable and not contain the PageGuard flag:
Now we are able to search for the desired pattern in the memory of the process, but do not yet know what to look for. Launch Steam under the Fake account and open your favorite debugger (let's say that at the time of reading the article x64dbg is one for you - I do not have a paid license for IDA Pro), run dota2.exe from the directory ... \ Steam \ steamapps \ common \ dota 2 beta \ game \ bin \ win64. In principle, I did not notice that VAC was not indifferent to the Cheat Engine and x64dbg, I do not remember that when using these tools, the account was banned. By the way, the debugger has a ScyllaHide plugin that intercepts system functions like NtCreateThreadEx, NtSetInformationThread, etc., hiding the fact of your work, you can install this plugin.
At each stop (there will be 10-15) we continue execution with the help of Run (F9). When the game starts, we will see the menu and can proceed to the study. After starting the game, perform a search by string (Search for-> All Modules-> String References), set the filter “DoIncludeScript”. Figure 25 - Search by rows in the game process memory. We will go to the disassembler (CPU tab) by double clicking on the first result. This will be our starting address, since it is located in client.dll, the other results lead to server.dll and animationsystem.dll. Let's construct the call graph from the received address. Figure 26 - Call graph After decompiling, we find the entry point where DoIncludeScript is used - the fourth node of the graph. Actually, the function itself.
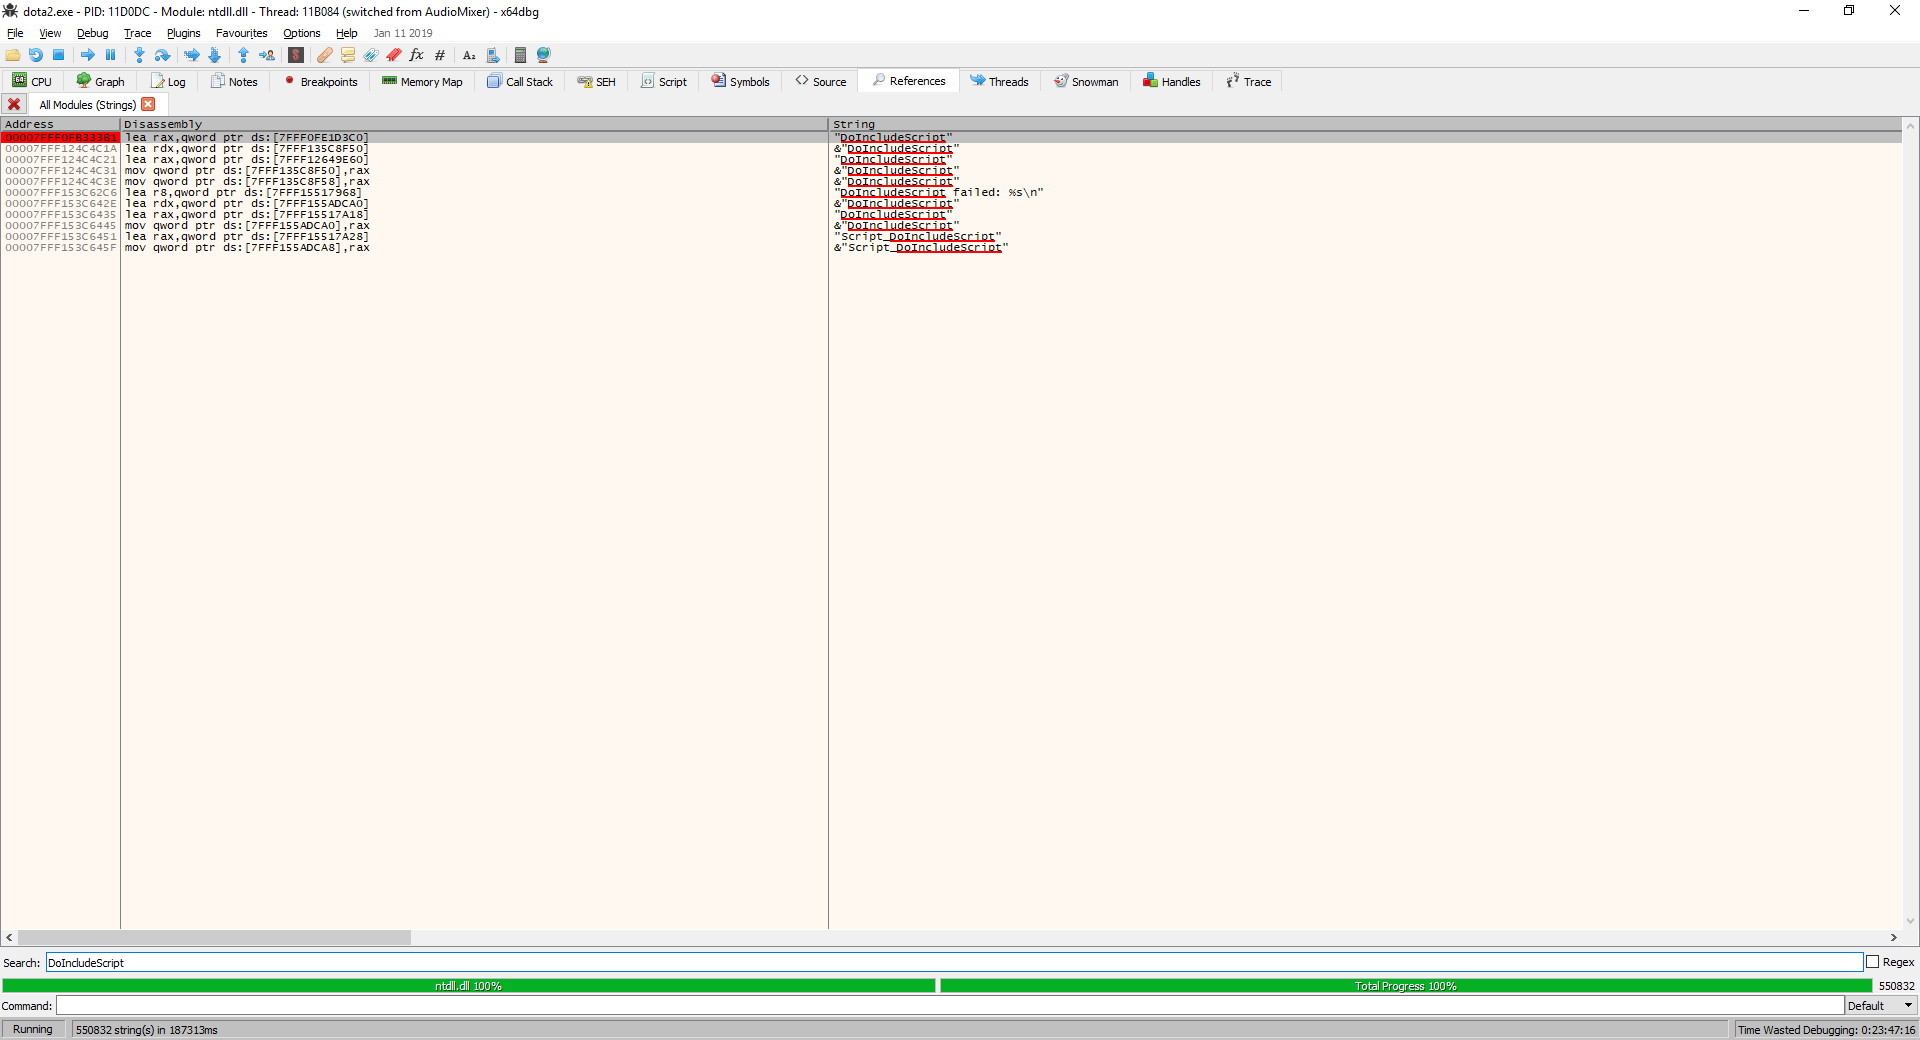
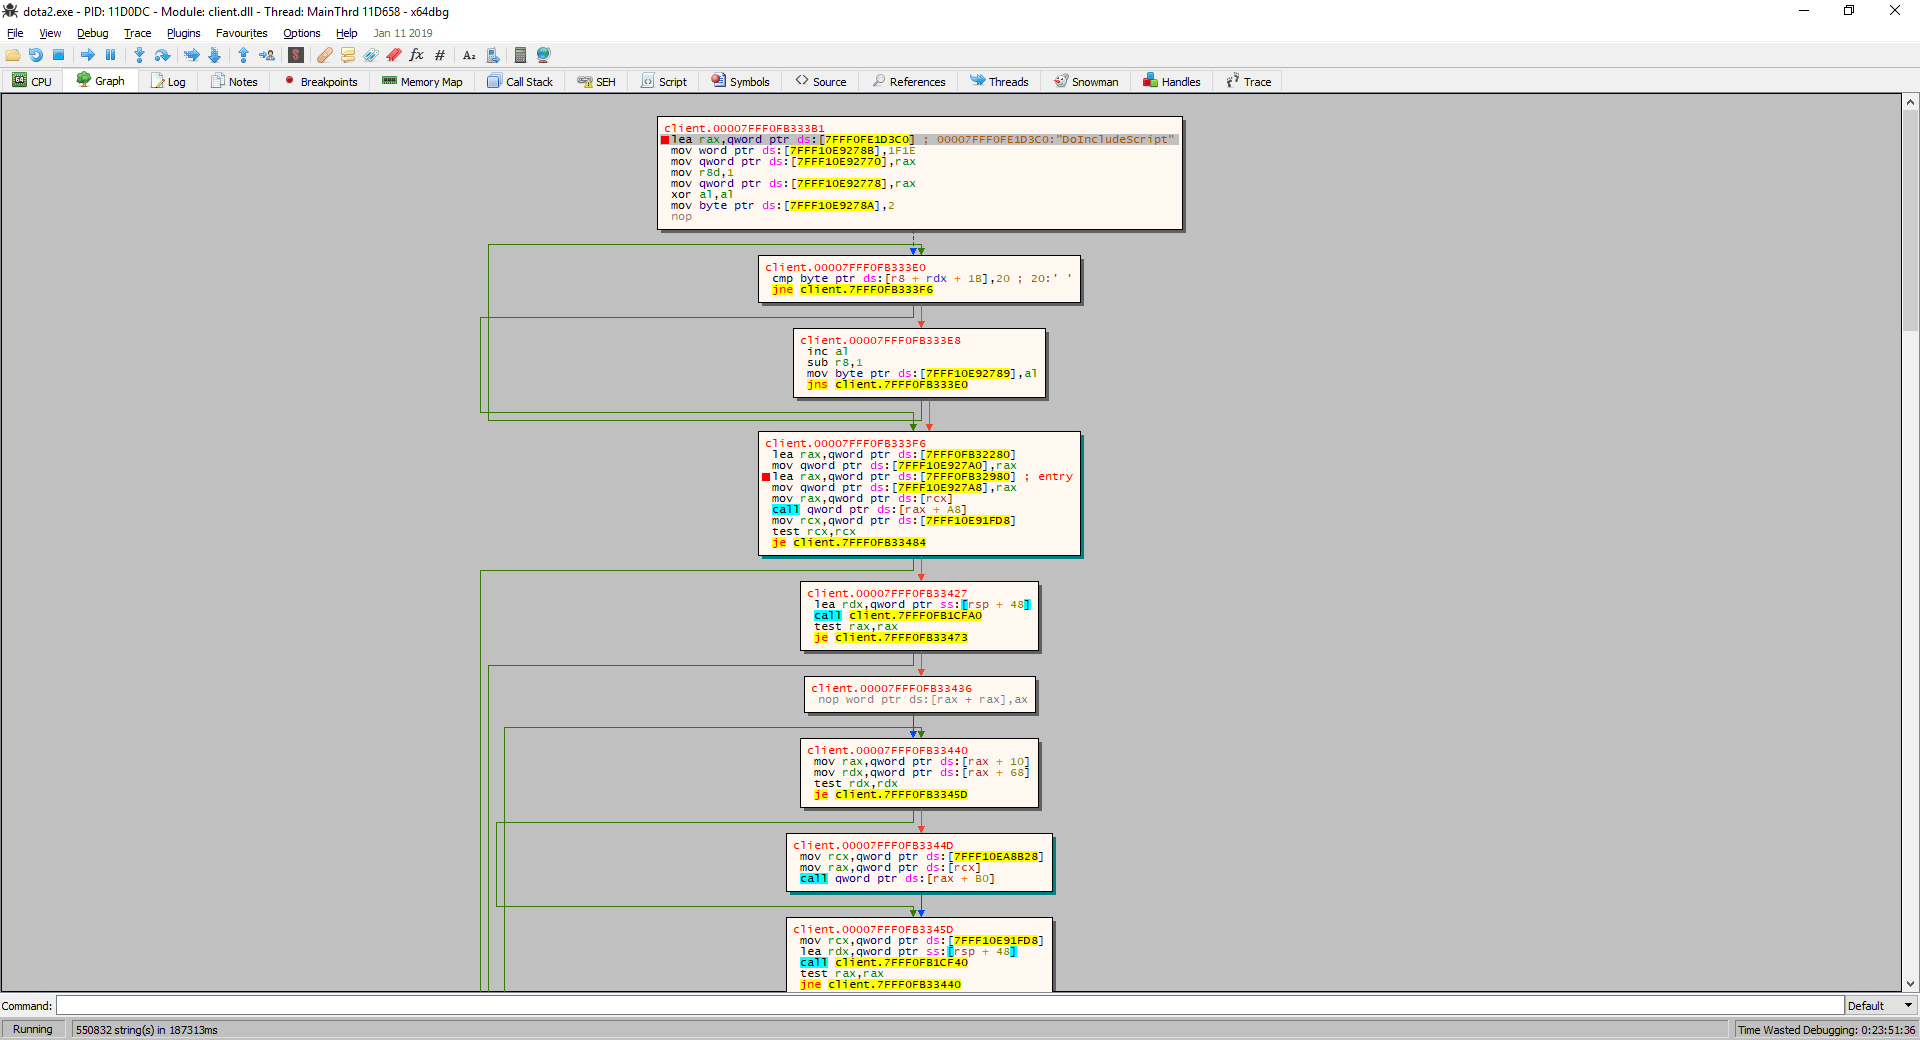
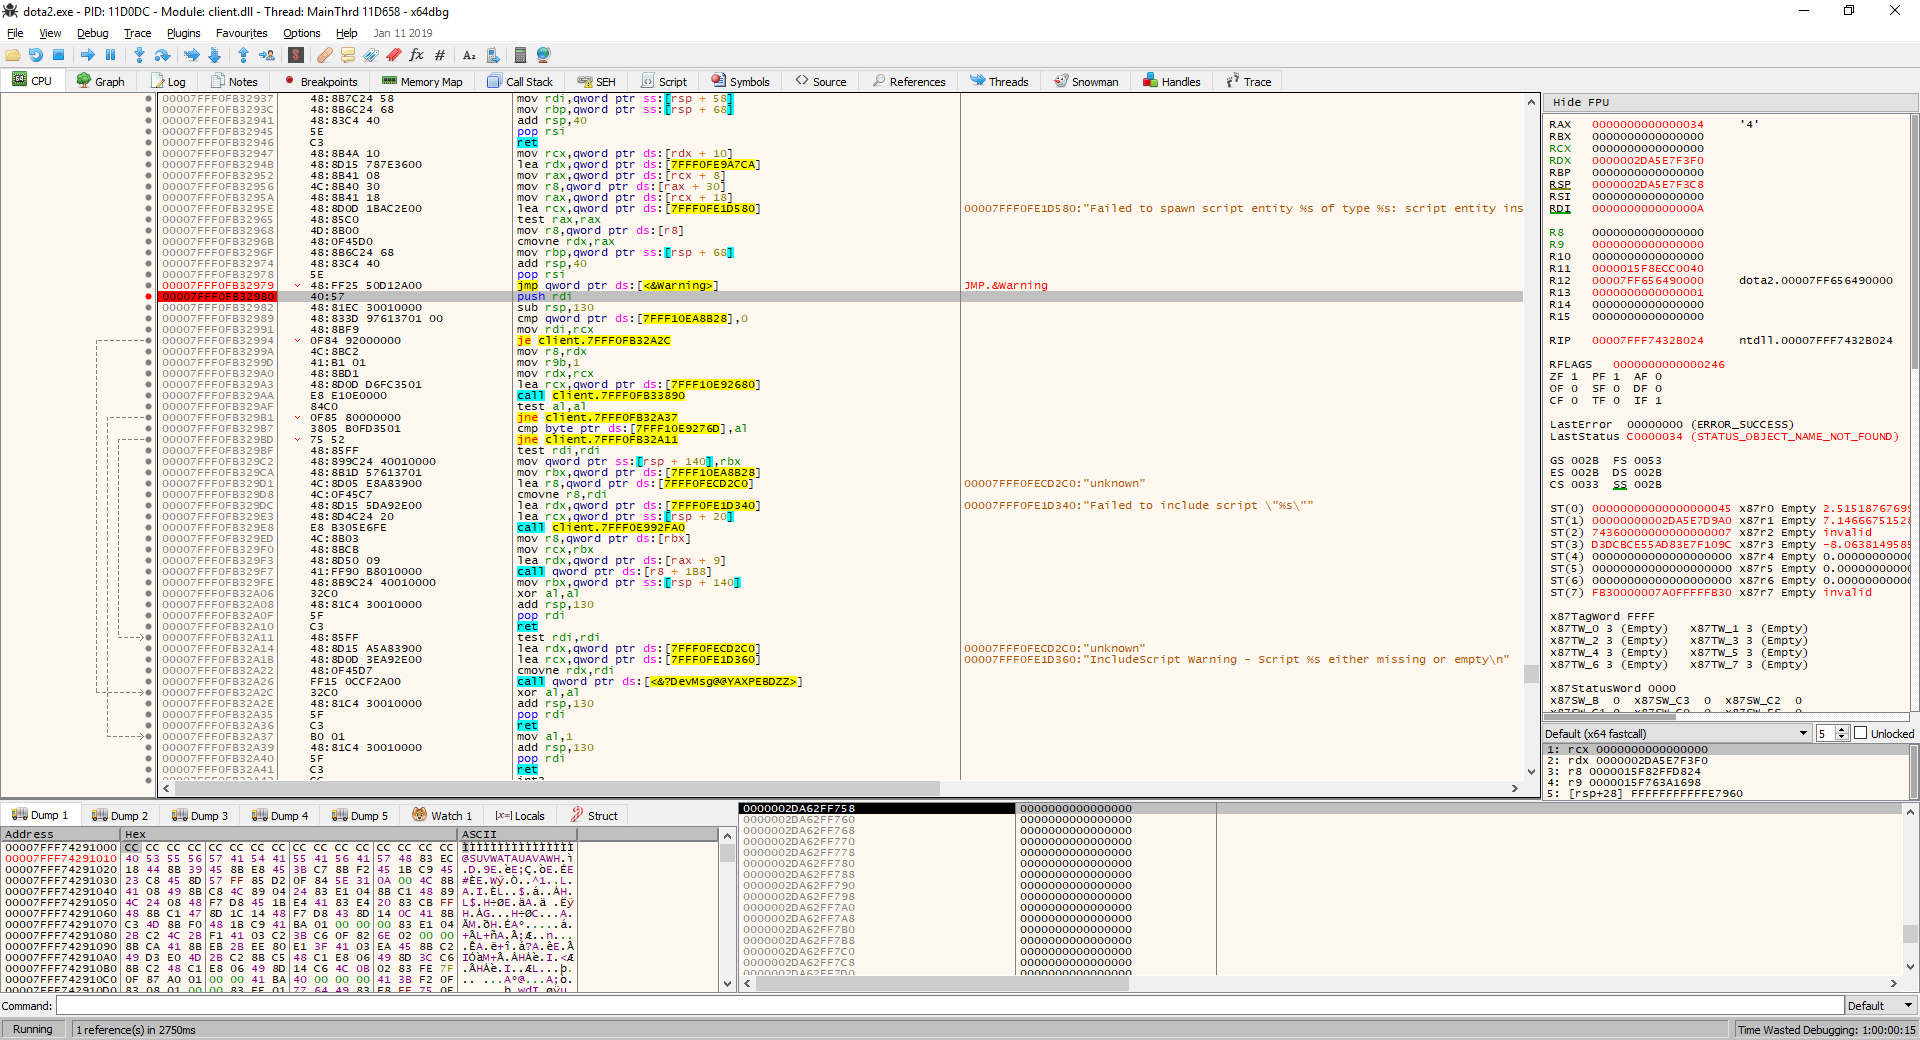
Figure 27 — DoIncludeScript function
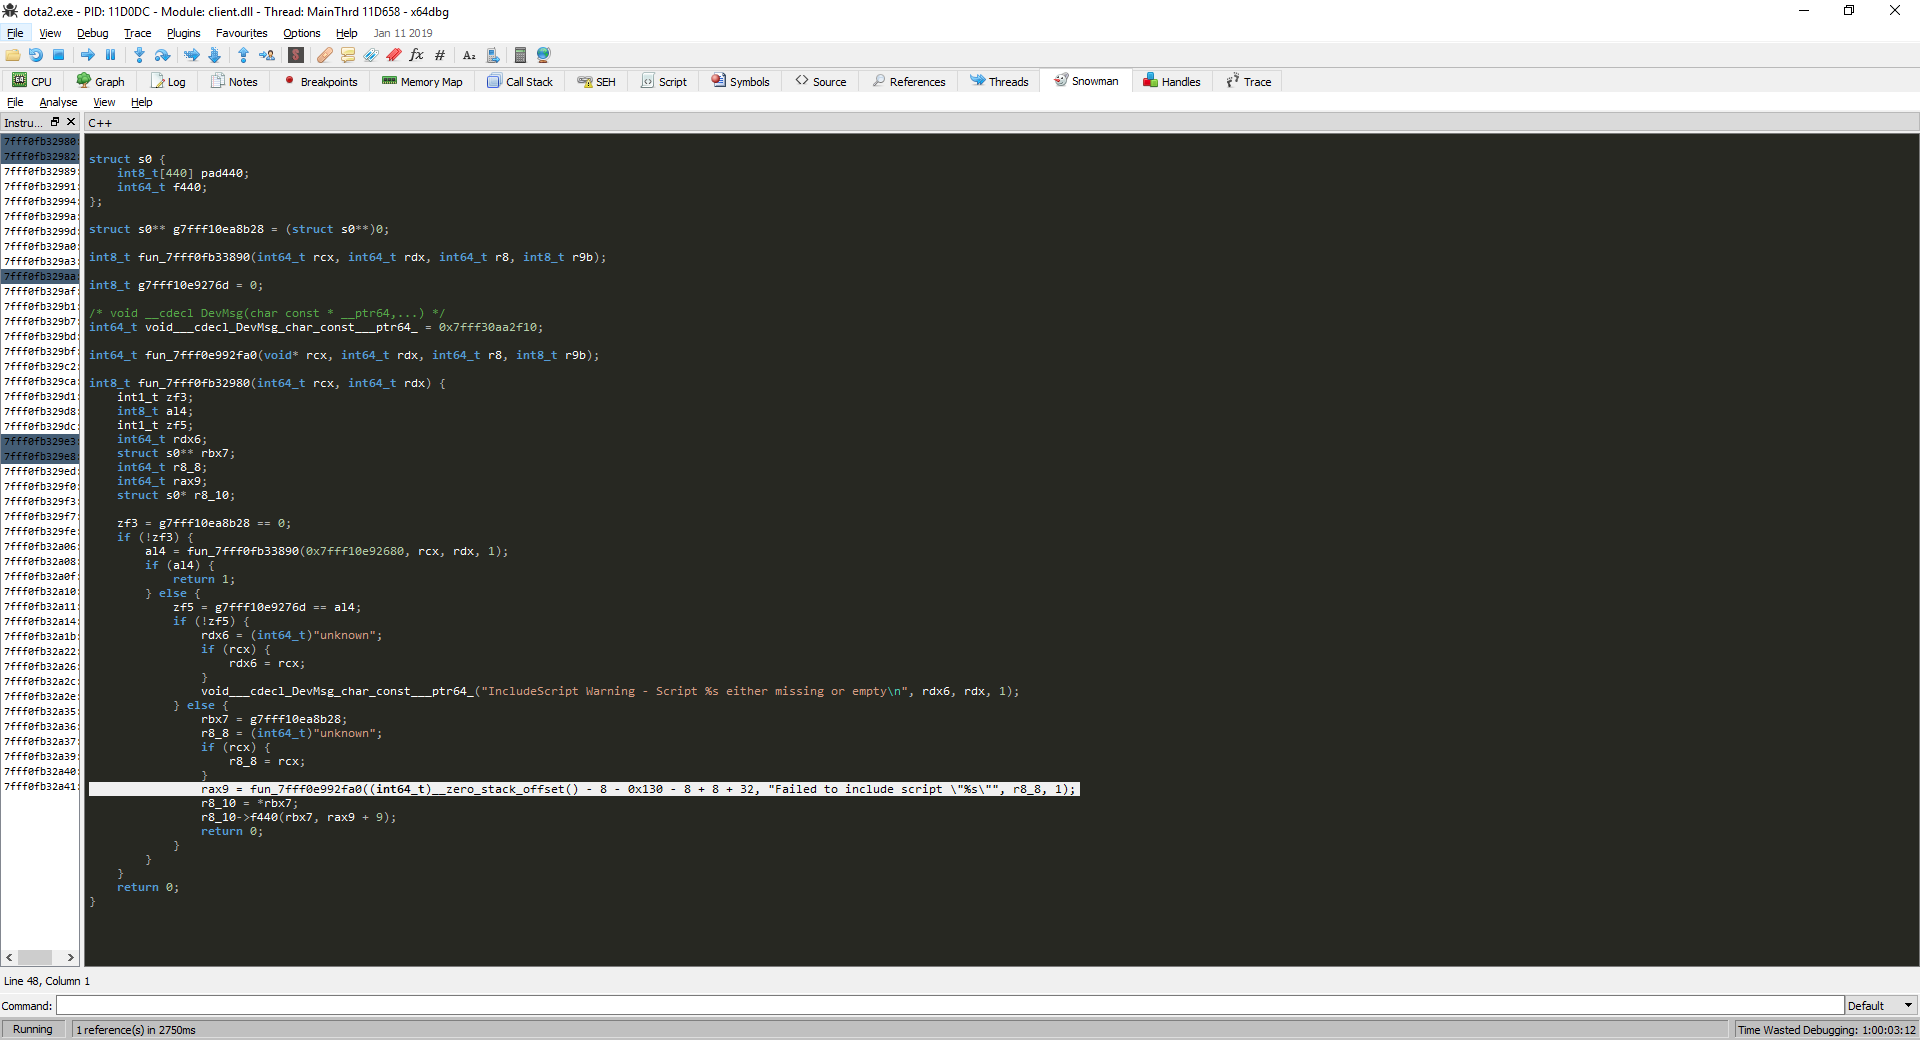
Graph. Figure 28 - Call graph from DoIncludeScript Decompiling the use of a function shows the following code and the place where it was called (we are decompiling from a graph, not from a disassembler). Figure 29 - Decompilation of the DoIncludeScript function call Let's make a template from the instructions in Figure 27 of the DoIncludeScript function call. Arguments can change, respectively, the arguments in the template we want to skip when searching, we denote them by "??". I got the following: 40 57 48 81 EC ??

?? ?? ?? 48 83 3D ?? ?? ?? ?? ??48 8B F9 0F 84. To compose the template, we used the first node of the graph from Figure 28, whose instructions can be viewed in Figure 27.
Create a script on Lua silk_way.lua, put it in “... \ Steam \ steamapps \ common \ dota 2 beta \ game \ dota \ scripts \ vscripts ".
This script bypasses all entities and displays the coordinates in accordance with its position.
We declare the function using the above documentation and the decompiled code from Figure 29.
Function call
After the introduction, we will see information about the position of the game entities. Figure 30 - The result of the implementation Now we can run our scripts. But they are executed in Lua, but let's say the event that Roshan died, we need in C ++ code (since we have the main logic written on it), what should we do? We'll have to find pointers to the necessary functions in the same way (as we did for DoIncludeScript), engine functions and other functionality that we are interested in using the Source SDK and Source2Gen. But about this in the next part, where we will find a pointer to the list of entities and write more logic close to the game mechanics. If you want everything at once, you can try, I enclose this , this , this and this

links.
In conclusion, I would like to say thank you to everyone who shares their work and knowledge in the field of reverse, transferring their experience to others. Speaking only about Dota 2 without praydog, I would kill a lot of time, so that with the help of Cheat Engine I could get the structure of the game data, and the developments made could break during any flooded Valve update. Updates break both found static pointers and rarely change the structure of entities. With or75, I saw the use of the DoIncludeScript function and with its help I showed an example of text output using the game engine.
In pursuit of simplicity of presentation, I could have missed something, omitted various cases that I thought were unworthy of attention, or, on the contrary, fanned an explanation — if a careful reader finds such errors, I will be glad to correct them and listen to the comments. Source code can be found by reference .
Thanks to everyone who took the time to read the article.
A detailed description of how to infiltrate the game process, how to change the flow of execution will be described in detail, a brief description of the implemented logic will be given. In the end, let's talk about other possibilities for drawing that the engine provides.
')
Disclaimer: The author is not responsible for your use of the knowledge gained in this article or damage as a result of their use. All information here is for educational purposes only. Especially for companies developing MOBA to help them fight cheaters. And, of course, the author of the article is a botmaster, cheater, and he always has been.The last sentence is worth explaining - I am for fair competition. I use cheats only as a sporting interest, improving the skills of reverse, studying the work of anti-cheats and only outside rating competitions.
1. Introduction
This article is planned as the first of a cycle and gives an idea of how you can use the graphics API for your purposes, describes the functionality required to understand the next part. I plan to devote the second article to searching for a pointer to the list of entities in Source 2 (also using Dota 2 as an example) and using it in conjunction with Source2Gen to write “additional” logic (something like this , I will most likely show “map hack” ( attention to the quotes, what is at stake can be viewed on the video), or the automation of the first article). The third article is planned in the form of writing a driver, communicating with it (IOCTL), using it to bypass VAC protection (something similar to this ).
2. Why do I need it
I needed to use the graphics API for visual debugging of my bot, which I wrote for Dota 2 (the visualized information in real time is very convenient). I am a graduate student and I am engaged in the reconstruction of 3D heads and morphing with the help of pictures and depth camera - the topic is quite interesting, but for me it’s not my favorite. Since I have been doing this for the fifth year (starting with the magistracy), I realized one thing - yes, I studied this area quite well, I easily study articles with methods and approaches, I implement them. But this is all, I myself can only optimize the algorithm that has been studied, compare it with those already studied and implemented, and decide whether to use it in a specific task. On optimization, the business ends, it’s impossible to invent something new, which is very important for graduate school (the novelty of the research). Began to think - while there is time, you can find a new topic. The topic already needs to be well understood (at the current level) or it can be quickly pulled up.
At the same time, I worked in game development and this is probably the most interesting thing that a programmer can do (personal opinion) and was very interested in the topic of AI, bots. At that time there were two topics that I knew pretty well - then I was engaged in building a dynamic navigation mesh (client-server) and studying the network part of a dynamic shooter. The topic of dynamic mesh didn’t fit right away - I did it during working hours, I had to ask permission for use in the diploma from the management, besides, the novelty topic was open - I also studied and implemented the existing approaches on articles, but this was no novelty. The topic with the network part of the dynamic shooter (I was planning to use it for interacting in virtual reality) again broke both about the fact that I did this during working hours and about the novelty; you can read a series of articles from Pixonic, where the author himself says that the topic this is interesting, only approaches were invented 30 years ago and have not changed much.
Around this time, OpenAI released their bot. This is certainly not 5 to 5 , but it was awesome! I could not get rid of the thought of trying to make a bot and first of all I began to think about how to use it as a dissertation, about novelty, how to present it to a supervisor. With the novelty in this regard, everything was much better - surely you could come up with something for the two previous topics, but apparently the bot made me think, cling, develop and look for ideas much stronger. So, I decided to make a bot 1 on 1 (the battle for the miduch, like OpenAI), present it to the head, tell how cool it is, how many different approaches there are, mathematics, and most importantly, the new one.
The most necessary thing that a bot needs at the first stage is knowledge of the environment in which it is located - I intended to take the state of the world from the memory of the game and spent the first stage searching for a pointer to the Entity List and integrating with the brainchild Source2Gen - This piece generates the Source2 engine structure, which it takes from the schemas. The main idea and prerequisite for the emergence of schemes is the replication of the state between the client and the server, but apparently the developers really liked the idea and they spread it much more widely, I advise you to read here .
I had the reverse engineering experience: I did cheats for Silent Storm, I did key generators (the most interesting was for Black & White) - what is keygen you can read in DrMefistO here , a combo in Cabal Online (everything was complicated by the fact that this game was guarded by Game Guard , guarded it from ring0 (under the driver in kernel mode), hiding the process (which at least does not easily penetrate it) - you can read more here ).
Accordingly, I had some groundwork in this area, the bot got access to the environment for the planned time. It's amazing how much information the dota server replicates through the delta to the client, for example, the client has information about any teleports, health and its changes from the engineers (except Roshan, he does not replicate) - all this is in the fog of war. Although I encountered some difficulties, this is what I am going to discuss in the next article.
If you have a question why I did not use Dota Bot Scripting , I will answer with an excerpt from the documentation:
The API is restricted.This series of articles is aimed at beginners who are interested in the topic of reverse engineering.
3. Why am I writing about this?
As a result, I ran into a lot of problems in the implementation of the bot by ml, over which I spent enough time to realize that two years before the end of the training I could not surpass my knowledge and experience in the current topic. I don’t play Dota Auto Chess from Dota 2, I’m spending my free time on a diploma and Apex Legend reverser (the structure of which is rather similar to Dota 2, I think). Accordingly, the only benefit from the work done is the publication of a technical article on this topic.
4. Dota 2
I plan to show these principles on a real game - Dota 2. The game uses Valve Anti Cheat anti- cheat. I really like Valve as a company: very cool products, director, attitude towards players, Steam, Source Engine 2, ... VAC. VAC works from user-mode (ring3), it does not scan everything and, compared to other anti-cheats, is harmless (from what esea does (specifically their anti-cheats) all desire to use this platform disappears). I am sure that VAC does its work in such a gentle way - it does not monitor from kernel mode, it does not ban on hardware (only the account), it does not insert watermarks into the screens - thanks to Valve's attitude to the players, they do not install a full-fledged antivirus for you, as they do Game Guard, BattlEye, Warden and others, because all this is so hacked and in addition spends processor resources that the game could take (even if it is done periodically), there are false positives (especially players on laptops). Is there no wall hack, aimbot, speed hack, ESP in PUBG, Apex, Fortnite?
Actually about Dota 2. The game works at a frequency of 40 Hz (25 ms), the client interpolates the game state, input prediction is not used - if you have a lag, a game - it’s important not even a game, controlled units - it is completely freezed. The game mechanics server communicates with the client via RUDP (reliable UDP) encrypted messages, the client basically sends input (if you host the lobby, commands can be sent), the server sends a replica of the game world and teams. Navigation is carried out on a 3D grid, each cell has its own type of terrain. The movement is carried out with the help of navigation and physics (the impossibility of passing a shaker through a fissure, clogs and so on).
The state of the world with all the entities is in the memory in its pure form without encryption - you can study the memory of the game with the help of the Cheat Engine. Obfuscation to lines and code does not apply.
From the graphics API available DirectX9, DirectX11, Vulkan, OpenGL.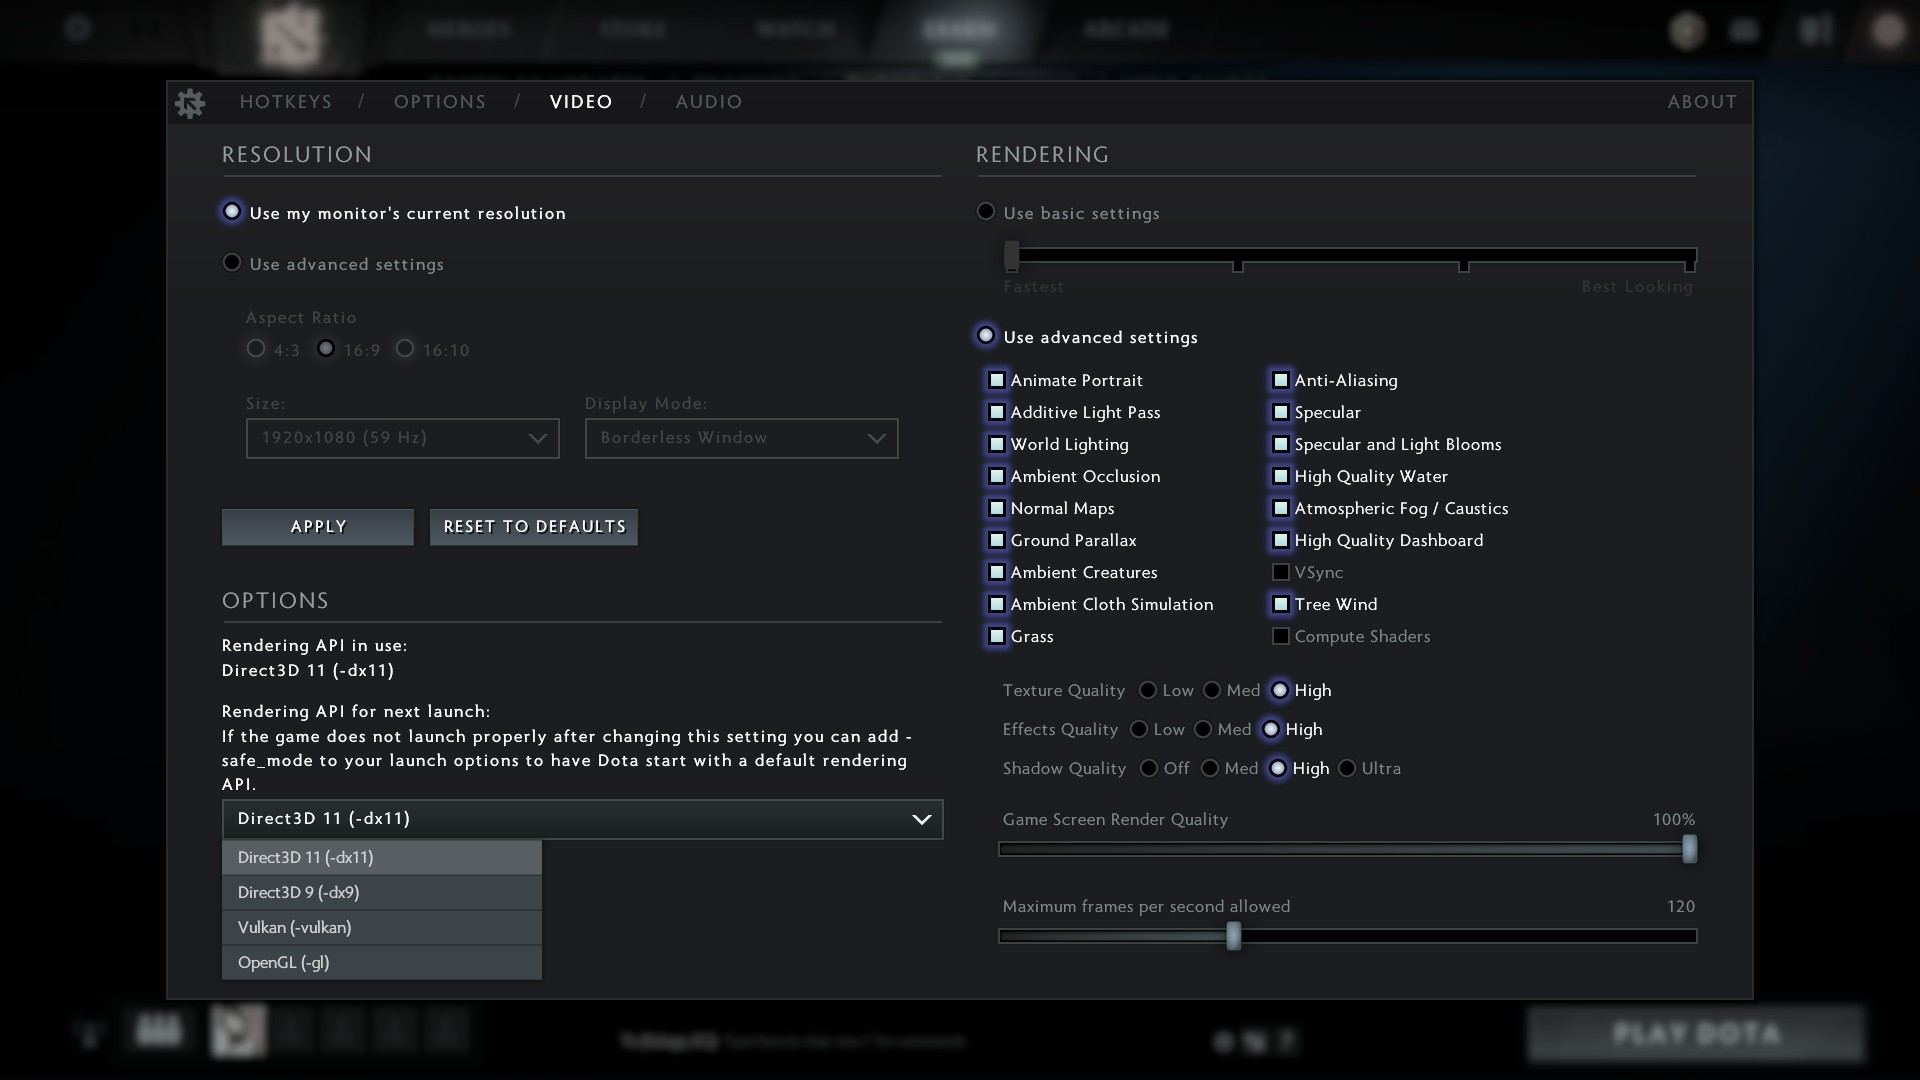
5. Task setting
The game Dota 2 has a neutral "ancient", the murder of which gives a good reward: experience, gold, the ability to roll back cooldowns of skills and items, Aegis (second life), his name is Roshan. Getting Aegis can fundamentally turn the game around or give an even greater advantage to the stronger side, respectively, players try to remember / record the time of his death, to plan when to get together and attack him, or to be nearby to protect him. All ten players are notified of the death of Roshan, regardless of whether he is hidden in the fog of war. The revival time has a mandatory eight minutes, after which Roshan may appear randomly in the interval of three minutes.
The task is as follows : provide the player with information on the current state of Roshan (alive, ressurect_base-base time is reborn, ressurect_extra-extra time is being reborn).
Figure 1 - Conditions of transitions between states and actions during the transition
For states in which Roshan is dead, display the end time of the stay in this state. The transition from the state of alive to ressurect_base must be made by the player in the manual mode by the button. In the case of the detection / death of Roshan in the ressurect_extra state (for example, the enemy team secretly sneaked into the lair and killed him), the transition to the alive / ressurect_base state is also carried out manually by a button. The Roshan status (and the end time of being in a state of rebirth) should be shown in text form, the required input (killing and interruption of the ressurect_extra state) with a button.
Figure 2 - Interface elements - label, button and canvas
This is the only task that I could think of, so that work with the memory of the game was not required and there was at least some value for the player — even to display any elementary characteristics, such as health, mana, positions of entities, you need to either find them when using the Cheat Engine in the memory of the game, which needs to be further explained for a long time, or using Source2Gen, which will be the next article. Setting the task forces the player to follow Roshan, putting a lot of action on him, which is quite inconvenient - but he will have something to rely on in the second part.
We will write our injected.dll, which will contain MVC-based business logic and embed it in the Dota 2 process. Dll will use our silk_way.lib library, which will contain trap logic to change the execution flow, logger, memory scanner and data structures .
6. Injector
Create an empty project in C ++, call it NativeInjector. The main code is in the Inject function.
void Inject(string & dllPath, string & processName) { DWORD processId = GetProcessIdentificator(processName); if (processId == NULL) throw invalid_argument("Process dont existed"); HANDLE hProcess = OpenProcess(PROCESS_CREATE_THREAD | PROCESS_QUERY_INFORMATION | PROCESS_VM_OPERATION | PROCESS_VM_READ | PROCESS_VM_WRITE, FALSE, processId); HMODULE hModule = GetModuleHandle("kernel32.dll"); FARPROC address = GetProcAddress(hModule, "LoadLibraryA"); int payloadSize = sizeof(char) * dllPath.length() + 1; LPVOID allocAddress = VirtualAllocEx( hProcess, NULL, payloadSize, MEM_COMMIT | MEM_RESERVE, PAGE_READWRITE); SIZE_T written; bool writeResult = WriteProcessMemory(hProcess, allocAddress, dllPath.c_str(), payloadSize, & written); DWORD treadId; CreateRemoteThread(hProcess, NULL, 0, (LPTHREAD_START_ROUTINE) address, allocAddress, 0, & treadId); CloseHandle(hProcess); } The function obtains the path and the name of the process, searches by the name of the process for its Id using the GetProcessIdentificator.
GetProcessIdentificator function
DWORD GetProcessIdentificator(string & processName) { PROCESSENTRY32 processEntry; processEntry.dwSize = sizeof(PROCESSENTRY32); HANDLE snapshot = CreateToolhelp32Snapshot(TH32CS_SNAPPROCESS, NULL); DWORD processId = NULL; if (Process32First(snapshot, & processEntry)) { while (Process32Next(snapshot, & processEntry)) { if (!_stricmp(processEntry.szExeFile, processName.c_str())) { processId = processEntry.th32ProcessID; break; } } } CloseHandle(snapshot); return processId; } In short, GetProcessIdentificator runs through all running processes and looks for a process with the appropriate name.
Figure 3 - The initial state of the process
Further direct library implementation by creating a remote stream.
A detailed explanation of the function Inject
Upon the found Id, the process is opened using the OpenProcess function with the rights to create a stream, obtain information about the process, write and read. The GetModuleHandle function retrieves the kernel32 library module; this is done to get the address of the LoadLibraryA function contained in it by the GetProcAddress function. The purpose of LoadLibrary is to load our injected.dll into the specified process. That is, we need to call LoadLibrary from the process we are interested in (“Dota2.exe”), for this we create a new thread remotely using CreateRemoteThread. As a pointer to the function with which the new thread will be launched, we pass the address of the LoadLibraryA function. If you look at the signature of the LoadLibraryA function, then at the input it requires as a parameter the path to the loadable library - HMODULE LoadLibraryA (LPCSTR lpLibFileName). We deliver this argument as follows: CreateRemoteThread in the parameters after the address of the start function accepts a pointer to its parameters, we create a pointer to lpLibFileName by writing the value to the process memory with the WriteProcessMemory function (having previously allocated memory using VirtualAllocEx).
Figure 4 - Creating a remote stream
Be sure to close the process handler at the end with the CloseHandle function; you can also free the allocated memory. Our injector is ready and waiting for us to write business logic in injected.dll with the library silk_way.lib.
Figure 5 - Completion of the library implementation
For a better understanding of the principle, you can watch the video . In conclusion, I would say that the safer approach is to directly inject code into the main process flow .
7. Silk Way
Let's start the implementation of silk_way.lib - a static library that contains data structures, a logger, a memory scanner and traps. In fact, I took a small part of my work, something that can be explained most easily, which is not too tied to the rest, but at the same time solves the problem posed.
7.1. Data structures
In brief about data structures: Vector - classic list, insert and delete O (N), search O (N), memory O (N); Queue - cyclic queue, O (1) insertion and deletion time, no search, O (N) memory; RBTree - red-black tree, time of insertion and removal of O (logN), search O (logN), memory O (N). I prefer the hash, which is used to implement dictionaries in C # and Python, the red-black trees that the standard C ++ library uses. The reason is that the hash is harder to implement more correctly than a tree (I find and try variations of hashes about every half year), and usually the hash takes up more memory (although it works faster). These structures are used to create collections both in business logic and in traps.
I try not to use the structures from the standard library and implement them myself, specifically in our case it does not matter, but this is important if your dll is debugged or the assembly is in the open (it is rather a matter of commercial cheats, which we condemn ). I advise you to write all the structures yourself, it gives you great opportunities.
As an example, if you make a game and do not want the “schoolchildren” to scan it using the Cheat Engine, you can make wrappers for primitive types and store the encrypted value in memory. In fact, this is not a salvation, but it can weed out some of those who are trying to read and change the memory of the game.
7.2. Logger
Implemented output to the console and write to the file. Interface:
class ILogger { protected: ILogger(const char * _path) { path = path; } public: virtual ~ILogger() {} virtual void Log(const char * format, ...) = 0; protected: const char * path; }; Implementation for output to file:
class MemoryLogger: public ILogger { public: MemoryLogger(const char * _path): ILogger(_path) { fopen_s( & fptr, _path, "w+"); } ~MemoryLogger() { fclose(fptr); } void Log(const char * format, ...) { char log[MAX_LOG_SIZE]; log[MAX_LOG_SIZE - 1] = 0; va_list args; va_start(args, format); vsprintf_s(log, MAX_LOG_SIZE, format, args); va_end(args); fprintf(fptr, log); } protected: FILE * fptr; }; The implementation for console output is of the same type. If we want to use logging, it is necessary to define the ILogger * interface, declare the required logger, call the Log function with the required format, for example:
ILogger* logger = new MemoryLogger(filename); logger->Log("(%llu)%s: %d\n", GetCurrentThreadId(), "EnumerateThread result", result); 7.3. Scanner
The scanner is engaged in the fact that displays the value of the memory pointed to by the transmitted pointer and makes a comparison with the sample in memory. Functional comparison with the pattern will be discussed later.
Interface:
class IScanner { protected: IScanner() {} public: virtual ~IScanner() {} virtual void PrintMemory(const char * title, unsigned char * memPointer, int size) = 0; }; The implementation of the header file:
class FileScanner : public IScanner { public: FileScanner(const char* _path) : IScanner() { fopen_s(&fptr, _path, "w+"); } ~FileScanner() { fclose(fptr); } void PrintMemory(const char* title, unsigned char* memPointer, int size); protected: FILE* fptr; }; Source file implementation:
void FileScanner::PrintMemory(const char* title, unsigned char* memPointer, int size) { fprintf(fptr, "%s:\n", title); for (int i = 0; i < size; i++) fprintf(fptr, "%x ", (int)(*(memPointer + i))); fprintf(fptr, "\n", title); } To use, you need to define the IScanner * interface, declare the desired scanner and call the PrintMemory function, where you can set the title, pointer and length, for example:
IScanner* scan = new ConsoleScanner(); scan->PrintMemory("source orig", (unsigned char*)source, 30); 7.4. Traps
The most interesting part of the library is silk_way.lib. Hooks are used to change the flow of the program. Create an executable project called Sandbox.
The Device class will be our mannequin for trap research.
class Unknown { protected: Unknown() {} public: ~Unknown() {} virtual HRESULT QueryInterface() = 0; virtual ULONG AddRef(void) = 0; virtual ULONG Release(void) = 0; }; class Device : public Unknown { public: Device() : Unknown() {} ~Device() {} virtual HRESULT QueryInterface() { return 0; } virtual ULONG AddRef(void) { return 0; } virtual ULONG Release(void) { return 0; } virtual int Present() { cout << "Present()" << " " << i << endl; return i; } virtual void EndScene(int j) { cout << "EndScene()" << " " << i << " " << j << endl; } void Dispose() { cout << "Dispose()" << " " << i << endl; } public: int i; }; The Device class is inherited from the IUnknown interface, our task is to intercept the call to the Present and EndScene functions of any Device instance, and call the original functions in the receiver. We do not know the place in the code, where and why these functions are called, in which thread.
Looking at the Present and EndScene functions, you can see that they are virtual. Virtual functions are needed to override the behavior of the parent class. Virtual functions, as well as non-virtual functions, are pointers to memory, in which operational codes (opcode) and argument values are recorded. Since virtual functions differ from heirs and parents, they have different pointers (these are completely different functions) and are stored in the Virtual Method Table (VMT). This table is stored in memory and is a pointer to a class pointer, we will find it for the Device:
Device* device = new Device(); unsigned long long vmt = **(unsigned long long**)&device; VMT stores pointers to virtual functions; if we want to inherit from Device, the successor will contain its own VMT. VMT stores function pointers sequentially in increments equal to the pointer size (for x86 it is 4 bytes, for x64 it is 8), according to the order in which the function is defined in the class. Find the pointers to the Present and EndScene functions, which are located in the third and fourth place:
typedef int (*pPresent)(Device*); typedef void (*pEndScene)(Device*, int j); pPresent ptrPresent = nullptr; pEndScene ptrEndScene = nullptr; int main() { //declare Device and find pointer vmt ptrPresent = (pPresent)(*(unsigned long long*)(vmt + 8 * 3)); ptrEndScene = (pEndScene)(*(unsigned long long*)(vmt + 8 * 4)); } It is also important that the pointer to the class method should first contain a reference to the class instance. In C ++, C # hides it from us, and the compiler knows this - in Python, self is explicitly specified by the first parameter in the class method. More details about the agreement on calling (calling convention) here , you need to look for thiscall.
Consider the instruction e9 ff 3a fd ff - here e9 is the opcode (with the JMP mnemonic), which tells the processor to change the instruction pointer (EIP for x86, RIP for x64), jump from the current address to FFFD3AFF (4294785791). It is also worth noting that the numbers are stored in the memory “vice versa”. Functions have a prologue and epilogue and are stored in the .code section. Let's see what is stored in our pointers to the Present function using a scanner:
IScanner* scan = new ConsoleScanner(); scan->PrintMemory("Present", (unsigned char*)ptrPresent, 30); In the console we see:
Present: 48 89 4c 24 8 48 83 ec 28 48 8d 15 40 4a 0 0 48 8b d 71 47 0 0 e8 64 10 0 0 48 8d To understand the set of these codes, you can view the table , or use the existing disassemblers. We will take the ready disassembler - hde (hacker disassembler engine). Also for comparison, you can look at the distorm and capstone . Pass the pointer to the function to any disassembler and it will say that for it it uses opcodes, argument values, and so on.
7.4.1 Opcode Hook
Now we are ready to go directly to the traps. We'll look at Opcode Hook and Hardware Breakpoint. The most common traps that I advise to implement and learn.
Probably the most frequently used and simplest trap is the Opcode Hook (in the article listing the traps it is called Byte patching) - note that it is easily recognized by anti-cheat when misused (without understanding how anti-cheat works, without knowing which area and memory section it scans in the current moment and other things the ban will not be slow in coming). With skillful use, it is a wonderful trap, quick and easy to understand.
If you read the code in parallel while reading the article and are in Debug mode, switch to Release - this is important.
So, I remind you, we need to intercept the performance of the Present and EndScene functions.
We implement interceptors — functions where we want to transfer control:
int PresentHook(Device* device) { cout << "PresentHook" << endl; return 1; } void EndSceneHook(Device* device, int j) { cout << "EndSceneHook" << " " << j << endl; } Let's think about the abstractions that we need. We need an interface that will enable us to set a trap, remove it and provide information about it. The trap information must contain a pointer to the intercepted function, the receiver function and the springboard (the fact that we intercepted the function does not mean that it is no longer needed, we also want to be able to use it - the springboard will help to call the original intercepted function).
#pragma pack(push, 1) struct HookRecord { HookRecord() { reservationLen = 0; sourceReservation = new void*[RESERV_SIZE](); } ~HookRecord() { reservationLen = 0; delete[] sourceReservation; } void* source; void* destination; void* pTrampoline; int reservationLen; void* sourceReservation; }; #pragma pack(pop) class IHook { protected: IHook() {} public: virtual ~IHook() {} virtual void SetExceptionHandler( PVECTORED_EXCEPTION_HANDLER pVecExcHandler) = 0; virtual int SetHook(void* source, void* destination) = 0; virtual int UnsetHook(void* source) = 0; virtual silk_data::Vector<HookRecord*>* GetInfo() = 0; virtual HookRecord* GetRecordBySource(void* source) = 0; }; The IHook interface provides us with such features. We want that when any instance of the Device class calls the Present and EndScene functions (that is, the RIP pointer passes to these addresses), our PresentHook and EndSceneHook functions execute, respectively.
Imagine visually how the intercepted function, receiver and springboard are located in memory (section .code) at the moment when control enters the intercepted function:
Figure 6 - The initial state of the memory, the execution enters the intercepted function
Now we want the RIP (red arrow) to go from source to the beginning of destination. How to do it? As already written above, the source memory location contains an opcode that the processor will execute when source arrives. In fact, we need to jump from one part to another, redirect the RIP pointer. As you might have guessed, there is an opcode that allows you to transfer control from the current address to the desired one, called this JMP mnemonic.
You can jump directly to the desired address, or relative to the current address, these jumps can be found in the table - ff and e9, respectively. Create the structures for these instructions:
#pragma pack(push, 1) // 32-bit relative jump. typedef struct { unsigned char opcode; unsigned int delta; } JMP_REL; // 64-bit absolute jump. typedef struct { unsigned char opcode1; unsigned char opcode2; unsigned int dummy; unsigned long long address; } JMP_ABS; #pragma pack(pop) The relative jump instruction is shorter, but there is a limitation - unsigned int says that you can jump within 4,294,967,295, which is not enough for the x64 process.
Accordingly, the destination function destination address can easily pass this value and be outside the unsigned int, which is quite possible for the x64 process (for x86 everything is much simpler and you can limit yourself to this very relative jump for the implementation of the Opcode Hook). A direct jump takes 14 bytes, for comparison, relative - only 5 (we packed structures, pay attention to #pragma pack (push, 1)).
We need to rewrite the value at source to one of these hopping instructions.
Before you catch a function, you should study it - the easiest way to do this is using a debager (I’ll show you how to do it with x64dbg), or a disassembler. For Present, we have already deduced 30 bytes from its beginning, instruction 48 89 4c 24 8 takes 5 bytes.
Let's implement a relative leap. I prefer this option largely because of the length of the instructions. The idea is as follows: we replace the first 5 bytes of the original function, preserving the modified bytes, replace them with a relative jump to the address of the instruction, which lies within the unsigned int.
Figure 7 - The original 5 bytes of the source function are replaced by a relative jump
What gives us a leap on the allocated memory (the purple region), how did we get closer to transferring control to the destination by this action? In the memory we have allocated there is a direct jump, which will move the RIP to the destination.
Figure 8 - Switching the RIP to the receiver function
It remains to figure out how to call a caught function. We need to execute the overwritten instructions and start from the untouched part of the source. We proceed in the following way: we will save the damaged instructions to the beginning of the trampoline, remember how many bytes were damaged and jump directly to source + corruptLen, to the “healthy” instructions.
Execution of saved instructions, overwritten by relative jump:
Figure 9 - Using the springboard to call the intercepted function
Further execution of instructions that are not affected by rubbing:
Figure 10 - Continuation of the execution of instructions of the intercepted function
Code implementing the above idea
int OpcodeHook::SetHook(void* source, void* destination) { auto record = new HookRecord(); record->source = source; record->destination = destination; info->PushBack(record); JMP_ABS pattern = {0xFF, 0x25, 0x00000000, // JMP[RIP + 6] empty 0x0000000000000000 }; // absolute address pattern.address = (ULONG_PTR)source; int currentLen = 0; int redLine = sizeof(JMP_REL); while (currentLen < redLine) { hde64s context; const void* pSource = (void*)((unsigned char*)source + currentLen); hde64_disasm(pSource, &context); memcpy((unsigned char*)record->sourceReservation + currentLen, pSource, context.len); record->reservationLen += context.len; currentLen += context.len; } int trampolineMemorySize = 2 * sizeof(JMP_ABS) + record->reservationLen; record->pTrampoline = AllocateMemory(source, trampolineMemorySize); pattern.address = (unsigned long long)(unsigned char*)source + record->reservationLen; memcpy((unsigned char*)record->pTrampoline, record->sourceReservation, record->reservationLen); int offset = record->reservationLen; memcpy((unsigned char*)record->pTrampoline + offset, &pattern, sizeof(JMP_ABS)); pattern.address = (ULONG_PTR)destination; ULONG_PTR relay = (ULONG_PTR)record->pTrampoline + sizeof(pattern) + record->reservationLen; memcpy((void*)relay, &pattern, sizeof(pattern)); DWORD oldProtect = 0; VirtualProtect(source, sizeof(JMP_REL), PAGE_EXECUTE_READWRITE, &oldProtect); JMP_REL* pJmpRelPattern = (JMP_REL*)source; pJmpRelPattern->opcode = 0xE9; pJmpRelPattern->delta = (unsigned int)((LPBYTE)relay - ((LPBYTE)source + sizeof(JMP_REL))); VirtualProtect(source, sizeof(JMP_REL), oldProtect, &oldProtect); return SUCCESS_CODE; } Explanation of the SetHook function
A record is created that stores information about the trap, after the record is added to the collection. The instructions are traversed from the beginning of the source address until the relative jump instruction can be completely entered (5 bytes), the overwritten instructions are copied to the reservation, their length is remembered.
This functionality is implemented by the AllocateMemory function.
The idea is simple - we will go through memory, starting from a specific address (in our case, a pointer to source) up and down until we find a free piece that fits the size.
Let's return to the SetHook function. Copy the worn bytes from the source into the allocated memory and immediately afterwards insert a direct jump to source + corrupt in order to continue execution from intact instructions.
Next comes the setting of the relay pointer, which is responsible for redirecting the flow of execution to the destination by direct jumping to the receiver's address. In the end, we change the source - set the rights to write to the place of memory where the function is located and replace the first 5 bytes with a relative jump leading to the relay address.
A very important point is that we need to allocate memory for the springboard and relay, in which we will store instructions for redirecting the stream from source to destination and the address to this memory must be within the limits for which a relative jump can afford to jump (unsigned int).
This functionality is implemented by the AllocateMemory function.
void* OpcodeHook::AllocateMemory(void* origin, int size) { const unsigned int MEMORY_RANGE = 0x40000000; SYSTEM_INFO sysInfo; GetSystemInfo(&sysInfo); ULONG_PTR minAddr = (ULONG_PTR)sysInfo.lpMinimumApplicationAddress; ULONG_PTR maxAddr = (ULONG_PTR)sysInfo.lpMaximumApplicationAddress; ULONG_PTR castedOrigin = (ULONG_PTR)origin; ULONG_PTR minDesired = castedOrigin - MEMORY_RANGE; if (minDesired > minAddr && minDesired < castedOrigin) minAddr = minDesired; int test = sizeof(ULONG_PTR); ULONG_PTR maxDesired = castedOrigin + MEMORY_RANGE - size; if (maxDesired < maxAddr && maxDesired > castedOrigin) maxAddr = maxDesired; DWORD granularity = sysInfo.dwAllocationGranularity; ULONG_PTR freeMemory = 0; ULONG_PTR ptr = castedOrigin; while (ptr >= minAddr) { ptr = FindPrev(ptr, minAddr, granularity, size); if (ptr == 0) break; LPVOID pAlloc = VirtualAlloc((LPVOID)ptr, size, MEM_COMMIT | MEM_RESERVE, PAGE_EXECUTE_READWRITE); if (pAlloc != 0) return pAlloc; } while (ptr < maxAddr) { ptr = FindNext(ptr, maxAddr, granularity, size); if (ptr == 0) break; LPVOID pAlloc = VirtualAlloc((LPVOID)ptr, size, MEM_COMMIT | MEM_RESERVE, PAGE_EXECUTE_READWRITE); if (pAlloc != 0) return pAlloc; } return NULL; } The idea is simple - we will go through memory, starting from a specific address (in our case, a pointer to source) up and down until we find a free piece that fits the size.
Let's return to the SetHook function. Copy the worn bytes from the source into the allocated memory and immediately afterwards insert a direct jump to source + corrupt in order to continue execution from intact instructions.
Next comes the setting of the relay pointer, which is responsible for redirecting the flow of execution to the destination by direct jumping to the receiver's address. In the end, we change the source - set the rights to write to the place of memory where the function is located and replace the first 5 bytes with a relative jump leading to the relay address.
We have set the trap, but it also needs to be able to remove. Breaking - do not build, the idea is simple - we will return the worn bytes of the source, remove the trap entry from the collection, and free the allocated memory:
int OpcodeHook::UnsetHook(void* source) { auto record = GetRecordBySource(source); DWORD oldProtect = 0; VirtualProtect(source, sizeof(JMP_REL), PAGE_EXECUTE_READWRITE, &oldProtect); memcpy(source, record->sourceReservation, record->reservationLen); VirtualProtect(source, sizeof(JMP_REL), oldProtect, &oldProtect); info->Erase(record); FreeMemory(record); return SUCCESS_CODE; } Testing work. Immediately change our receivers so that they can call captured functions using the springboard:
int PresentHook(Device* device) { auto record = hook->GetRecordBySource(ptrPresent); pPresent pTrampoline = (pPresent)record->pTrampoline; auto result = pTrampoline(device); cout << "PresentHook" << endl; return result; } void EndSceneHook(Device* device, int j) { auto record = hook->GetRecordBySource(ptrEndScene); pEndScene pTrampoline = (pEndScene)record->pTrampoline; pTrampoline(device, 2); cout << "EndSceneHook" << " " << j << endl; } We test, whether we did everything correctly, whether memory is flowing, whether everything is correctly executed.
int main() { while (true) { Device* device = new Device(); device->i = 3; unsigned long long vmt = **(unsigned long long**)&device; ptrPresent = (pPresent)(*(unsigned long long*)(vmt + 8 * 3)); ptrEndScene = (pEndScene)(*(unsigned long long*)(vmt + 8 * 4)); IScanner* scan = new ConsoleScanner(); scan->PrintMemory("Present", (unsigned char*)ptrPresent, 30); hook = new OpcodeHook(); hook->SetHook(ptrPresent, &PresentHook); hook->SetHook(ptrEndScene, &EndSceneHook); device->Present(); device->EndScene(7); device->Present(); device->EndScene(7); device->i = 5; ptrPresent(device); ptrEndScene(device, 9); hook->UnsetHook(ptrPresent); hook->UnsetHook(ptrEndScene); ptrPresent(device); ptrEndScene(device, 7); delete hook; delete device; } } Works.Additionally, you can check in x64dgb.
Remember, at first I asked you to work in the Release build? Now let's go to Debug and run the program. The program crashes ... The trap is triggered, but an attempt to cause a springboard causes an exception that says that the address where we call the springboard is not at all. What have we missed? What is the problem with the debug build? Run and look at the opcode of the Present function:
Present: e9 f4 36 0 0 e9 df 8d 0 0 e9 aa b0 0 0 e9 75 3e 0 0 e9 80 38 0 0 e9 da 81 0 0 When running in x64dbg, you can see the following. Figure 11 - Debug build instructions In the Debug opcode has changed, now the compiler adds a relative jump to e9 f4 36 0. All functions turn into a jump, including the main and entry point to the mainCRTStartup program. Another opcode, well, okay, it had to be copied to the springboard, when calling the springboard this relative jump was called, then a direct jump to the intact part of the source. Here it becomes clear that everything is done as we realized, only a relative leap for that and a relative one, that its execution from different addresses, source and trampoline, expose the RIP to completely different values.
In my humble experience, the realization of a case with a relative leap covers 99% of uses. There are some more opcodes that should be processed separately. Remember that before setting a trap on a function, you should not be lazy and study it. I will not bother you and add functionality to the 100 percent option (again, in my humble experience), if you need it or are interested, you can see how such libraries are organized and specifically what other cases they check - it will be easy to do , if you figured out what is going on here.
Relative jump is really quite common, so I propose to implement it. The relative jump consists of the opcode e9 and the value to which you must jump to the current address. Accordingly, you can simply find out where you need to jump, and jump right there from the springboard straight jump. Even if we meet there a new relative leap - it will already be from the correct address.
The implementation of the installation of the trap, taking into account the relative jump
int OpcodeHook::SetHook(void* source, void* destination) { auto record = new HookRecord(); record->source = source; record->destination = destination; info->PushBack(record); JMP_ABS pattern = {0xFF, 0x25, 0x00000000, // JMP[RIP + 6] empty 0x0000000000000000 }; // address pattern.address = (ULONG_PTR)source; int currentLen = 0; bool isJmpOpcode = false; int redLine = sizeof(JMP_REL); while (currentLen < redLine && !isJmpOpcode) { hde64s context; const void* pSource = (void*)((unsigned char*)source + currentLen); hde64_disasm(pSource, &context); if (context.opcode == 0xE9) { ULONG_PTR ripPtr = (ULONG_PTR)pSource + context.len + (INT32)context.imm.imm32; pattern.address = ripPtr; isJmpOpcode = true; } memcpy((unsigned char*)record->sourceReservation + currentLen, pSource, context.len); record->reservationLen += context.len; currentLen += context.len; } int trampolineMemorySize = isJmpOpcode ? 2 * sizeof(JMP_ABS) : 2 * sizeof(JMP_ABS) + record->reservationLen; record->pTrampoline = AllocateMemory(source, trampolineMemorySize); if (!isJmpOpcode) { pattern.address = (unsigned long long)(unsigned char*)source + record->reservationLen; memcpy((unsigned char*)record->pTrampoline, record->sourceReservation, record->reservationLen); } int offset = isJmpOpcode ? 0 : record->reservationLen; memcpy((unsigned char*)record->pTrampoline + offset, &pattern, sizeof(JMP_ABS)); pattern.address = (ULONG_PTR)destination; ULONG_PTR relay = (ULONG_PTR)record->pTrampoline + sizeof(pattern) + record->reservationLen; memcpy((void*)relay, &pattern, sizeof(pattern)); DWORD oldProtect = 0; VirtualProtect(source, sizeof(JMP_REL), PAGE_EXECUTE_READWRITE, &oldProtect); JMP_REL* pJmpRelPattern = (JMP_REL*)source; pJmpRelPattern->opcode = 0xE9; pJmpRelPattern->delta = (unsigned int)((LPBYTE)relay - ((LPBYTE)source + sizeof(JMP_REL))); VirtualProtect(source, sizeof(JMP_REL), oldProtect, &oldProtect); return SUCCESS_CODE; } If the disassembler returns information that the opcode of this command is e9, we calculate the address to jump to (ULONG_PTR ripPtr = (ULONG_PTR) pSource + context.len + (INT32) context.imm.imm32), and write the address to the springboard as the value of the direct jump argument.
Also note that in a multithreaded environment, a situation may arise when, at the moment of installing / removing a hook, one of the threads can start performing the function we are catching - as a result, the process will fall. Partly how to deal with this will be explained in Hardware Breakpoint.
If you need a proven tool, you want to be sure that your trap will work, you do not have your own work and you do not want to learn the prologue of the function - use ready-made solutions, for example, Microsoft offers its own Detour library. I do not use such libraries and use a self-written solution for a number of reasons, so I cannot advise something, I can only name those libraries that I studied in order to open something new and adopt: PolyHook , MinHook , EasyHook (especially if you need C # hooks).
7.4.2. Hardware breakpoint
Opcode Hook is a simple and fast trap, but not the most effective. Anti-cheat can easily track a change in a piece of memory, but Opcode Hook can be used for anti-cheating itself or intercepting system calls (for example, NtSetInformationThread) that it uses. Hardware Breakpoint is a trap that does not change the process memory. I saw threads on the forums where it was asked if VAC tracks this trap - the answers are usually ambiguous. Personally, VAC did not ban me for using them and did not reset the registers (it was a little less than six months ago, maybe something has changed).
, , VAC DR /, - , . HWBP , - , , , DR0-DR7 .HWBP uses special processor registers to interrupt thread execution. If the flow context contains the DR0-DR7 registers installed in a certain way and the RIP goes to one of the four addresses stored in DR0-DR3, an exception can be caught that can be caught by exception type and context state to determine at which address the control threw the exception and make a conclusion - trap or not. The essential limitation of this approach is that only four functions can be used at a time and they need to be set for each thread separately, which leads to inconvenience if a trap is installed and a new one is created / re-created that causes the trap. This is not a special obstacle and is corrected by the interception of the BaseThreadInitThunk function, the restriction in the use of 4 traps did not bother me personally.If the number of hooks is critical for you, pay attention to the PageGuard approach.
So, the task is the same - we are in the sandbox (Sandbox project), it is necessary to intercept the methods of the Device Present and EndScene class, in which we call the original methods. We already have a ready-made interface for traps - IHook, let's deal with the work of the "iron" breakpoints.
The principle is this: there are four “working” registers DR0-DR3 in which the address can be written, depending on the setting of the DR7 control register, when an attempt is made to write, read, or execute at a given address, an exception will be generated with the type EXCEPTION_SINGLE_STEP, which must be processed in a previously registered handler . You can use both the SEH handler and VEH - we will use the latter, since it has a higher priority.
We implement this idea:
int HardwareBPHook::SetHook(void* source, void* destination, HANDLE* hThread, int* reg) { CONTEXT context; ZeroMemory(&context, sizeof(context)); context.ContextFlags = CONTEXT_DEBUG_REGISTERS; if (!GetThreadContext(*hThread, &context)) return ERROR_GET_CONTEXT; *(&context.Dr0 + *reg) = (unsigned long long)source; context.Dr7 |= 1ULL << (2 * (*reg)); context.Dr7 |= HW_EXECUTE << ((*reg) * 4 + 16); context.Dr7 |= HW_LENGTH << ((*reg) * 4 + 18); if (!SetThreadContext(*hThread, &context)) return ERROR_SET_CONTEXT; return SUCCESS_CODE; } What happens in the code
, , DR7. .
For more information on what DR6 and DR7 are, as well as on the approach of PageGuard, I can recommend the Gray Hat Python book: Python Programming for Hackers and Reverse Engineers. In short, DR7 enables / disables the use of a “working” register — even if any of the DR0-DR3 registers contain an address, but in the DR7 the corresponding register flag is disabled, the breakpoint will not work. Also DR7 sets the type of work with the address at which you need to throw an exception - whether the address was read, the record was recorded or the address is used to execute the instruction (we are interested in the last option).
Removing the trap is also quite simple and is done through the DR7 control register.
int HardwareBPHook::UnsetHook(void* source, HANDLE* hThread) { CONTEXT context; ZeroMemory(&context, sizeof(context)); context.ContextFlags = CONTEXT_DEBUG_REGISTERS; if (!GetThreadContext(*hThread, &context)) return ERROR_GET_CONTEXT; for (int i = 0; i < DEBUG_REG_COUNT; i++) { if ((unsigned long long)source == *(&context.Dr0 + i)) { info->GetItem(i)->source = 0; *(&context.Dr0 + i) = 0; context.Dr7 &= ~(1ULL << (2 * i)); context.Dr7 &= ~(3 << (i * 4 + 16)); context.Dr7 &= ~(3 << (i * 4 + 18)); break; } } if (!SetThreadContext(*hThread, &context)) return ERROR_SET_CONTEXT; return SUCCESS_CODE; } It remains to deal with the threads - the trap must be set for those threads that cause the intercepted function. We will not bother about this.
Place a trap for all threads of the process.
int HardwareBPHook::SetHook(void* source, void* destination) { THREADENTRY32 te32; HANDLE hThread = CreateToolhelp32Snapshot(TH32CS_SNAPTHREAD, 0); if (hThread == INVALID_HANDLE_VALUE) return ERROR_ENUM_THREAD_START; te32.dwSize = sizeof(THREADENTRY32); if (!Thread32First(hThread, &te32)) { CloseHandle(hThread); return ERROR_ENUM_THREAD_START; } DWORD dwOwnerPID = GetCurrentProcessId(); bool isRegDefined = false; int freeReg = -1; Freeze(); do { if (te32.th32OwnerProcessID == dwOwnerPID) { HANDLE openThread = OpenThread(THREAD_ALL_ACCESS, FALSE, te32.th32ThreadID); if (!isRegDefined) { CONTEXT context; ZeroMemory(&context, sizeof(context)); context.ContextFlags = CONTEXT_DEBUG_REGISTERS; if (!GetThreadContext(openThread, &context)) return ERROR_GET_CONTEXT; freeReg = GetFreeReg(&context.Dr7); if (freeReg == -1) return ERROR_GET_FREE_REG; isRegDefined = true; } SetHook(source, destination, &openThread, &freeReg); CloseHandle(openThread); } } while (Thread32Next(hThread, &te32)); CloseHandle(hThread); Unfreeze(); auto record = info->GetItem(freeReg); record->source = source; record->destination = destination; record->pTrampoline = source; return SUCCESS_CODE; } The code above bypasses all visible processes and looks for the current process. In the process found for the next thread, we get the thread handler, find one of the four free registers and set a trap. It is worth paying attention to the Freeze and Unfreeze functions - this is what Opcode Hook said about multithreading - they completely stop the execution of threads of this process (except the current one), to prevent a situation when one of the threads enters the intercepted function.
Protecting streams from calling the function being intercepted
int IHook::Freeze() { THREADENTRY32 te32; HANDLE hThread = CreateToolhelp32Snapshot(TH32CS_SNAPTHREAD, 0); if (hThread == INVALID_HANDLE_VALUE) return ERROR_ENUM_THREAD_START; te32.dwSize = sizeof(THREADENTRY32); if (!Thread32First(hThread, &te32)) { CloseHandle(hThread); return ERROR_ENUM_THREAD_START; } DWORD dwOwnerPID = GetCurrentProcessId(); do { if (te32.th32OwnerProcessID == dwOwnerPID && te32.th32ThreadID != GetCurrentThreadId()) { HANDLE openThread = OpenThread(THREAD_ALL_ACCESS, FALSE, te32.th32ThreadID); if (openThread != NULL) { SuspendThread(openThread); CloseHandle(openThread); } } } while (Thread32Next(hThread, &te32)); CloseHandle(hThread); return SUCCESS_CODE; } int IHook::Unfreeze() { // equal { HANDLE openThread = OpenThread(THREAD_ALL_ACCESS, FALSE, te32.th32ThreadID); if (openThread != NULL) { ResumeThread(openThread); CloseHandle(openThread); } } // equal return 0; } A similar need to implement in the function of removing the trap.
It remains to add an exception handler VEH. Add and remove are performed by AddVectoredExceptionHandler and RemoveVectoredExceptionHandler functions from any stream.
void HardwareBPHook::SetExceptionHandler(PVECTORED_EXCEPTION_HANDLER pVecExcHandler) { pException = AddVectoredExceptionHandler(1, pVecExcHandler); } ~HardwareBPHook() { info->Clear(); delete info; RemoveVectoredExceptionHandler(pException); } The handler must check the type of the exception (EXCEPTION_SINGLE_STEP is needed), check the address at which the exception occurred with what is in the registers and if such an address is found, rearranges the RIP pointer to the address of the receiver. The state of the stack is preserved, so that as the receiver continues, all parameters on the stack will be intact.
We implement the described handler in the sandbox:
LONG OnExceptionHandler( EXCEPTION_POINTERS* exceptionPointers) { if (exceptionPointers->ExceptionRecord->ExceptionCode != EXCEPTION_SINGLE_STEP) return EXCEPTION_CONTINUE_EXECUTION; for (int i = 0; i < DEBUG_REG_COUNT; i++) { if (exceptionPointers->ContextRecord->Rip == (unsigned long long)hook->GetInfo()->GetItem(i)->source) { exceptionPointers->ContextRecord->Rip = (unsigned long long)hook->GetInfo()->GetItem(i)->destination; break; } } return EXCEPTION_CONTINUE_EXECUTION; } In theory, everything is ready, we launch the program, expecting exactly the same work as that of the OpcodeHook.
This does not happen, our program freezes - or rather, it constantly enters the PresentHook and at the moment when the springboard is to be called, the function is called again. The fact is that the “iron” breakpoint has not disappeared, since when we call the springboard (which in the case of “iron” breakpoints indicates the original function), we again alarm the same address and raise an exception. The solution is the following: we remove the breakpoint when it is detected in the handler for a particular thread, and set it again at the right moment. The location of the update will choose the time of completion of the receiver function.
This is implemented as follows: a delayed command is added to the handler along with the removal of the breakpoint, the purpose of which is to update the breakpoint in the specified stream. The command runs at the end of the receiver function.
IDeferredCommands* hookCommands; int PresentHook(Device* device) { auto record = hook->GetRecordBySource(ptrPresent); pPresent pTrampoline = (pPresent)record->pTrampoline; auto result = pTrampoline(device); cout << "PresentHook" << endl; hookCommands->Run(); return result; } void EndSceneHook(Device* device, int j) { auto record = hook->GetRecordBySource(ptrEndScene); pEndScene pTrampoline = (pEndScene)record->pTrampoline; pTrampoline(device, 2); cout << "EndSceneHook" << " " << j << endl; hookCommands->Run(); } LONG OnExceptionHandler(EXCEPTION_POINTERS* exceptionPointers) { if (exceptionPointers->ExceptionRecord->ExceptionCode != EXCEPTION_SINGLE_STEP) return EXCEPTION_CONTINUE_EXECUTION; for (int i = 0; i < DEBUG_REG_COUNT; i++) { if (exceptionPointers->ContextRecord->Rip == (unsigned long long)hook->GetInfo()->GetItem(i)->source) { exceptionPointers->ContextRecord->Dr7 &= ~(1ULL << (2 * i)); exceptionPointers->ContextRecord->Rip = (unsigned long long)hook->GetInfo()->GetItem(i)->destination; IDeferredCommand* cmd = new SetD7Command(hook, GetCurrentThreadId(), i); hookCommands->Enqueue(cmd); break; } } return EXCEPTION_CONTINUE_EXECUTION; } Implementing Pending Commands
namespace silk_way { class IDeferredCommand { protected: IDeferredCommand(silk_way::IHook* _hook) { hook = _hook; } public: virtual ~IDeferredCommand() { hook = nullptr; } virtual void Run() = 0; protected: silk_way::IHook* hook; }; class SetD7Command : public IDeferredCommand { public: SetD7Command(silk_way::IHook* _hook, unsigned long long _threadId, int _reg) : IDeferredCommand(_hook) { threadId = _threadId; reg = _reg; } void Run() { HANDLE hThread = OpenThread(THREAD_ALL_ACCESS, FALSE, threadId); if (hThread != NULL) { bool res = SetD7(&hThread); CloseHandle(hThread); } } private: bool SetD7(HANDLE* hThread) { CONTEXT context; ZeroMemory(&context, sizeof(context)); context.ContextFlags = CONTEXT_DEBUG_REGISTERS; if (!GetThreadContext(*hThread, &context)) return false; *(&context.Dr0 + reg) = (unsigned long long)hook->GetInfo()->GetItem(reg)->source; context.Dr7 |= 1ULL << (2 * reg); if (!SetThreadContext(*hThread, &context)) return false; return true; } private: unsigned long long threadId; int reg; }; class IDeferredCommands : public silk_data::Queue<IDeferredCommand*>, public IDeferredCommand { protected: IDeferredCommands() : Queue(), IDeferredCommand(nullptr) {} public: virtual ~IDeferredCommands() {} }; } Imagine visually the work of "iron" breakpoints.
Figure 12 - The initial state
Put trap add VEH handler forward when control reaches the functions of the source:
Figure 13 - Step preparation interception
Raised exception handler is called, which redirects the RIP to the receiver and resets breakpoint:
Figure 14 - redirection thread of execution to the receiver function
. This is the end of the trap theme, the silk_way.lib static library is ready. From my experience I can say that I often use OpcodeHook, VMT Hook, Forced Exception Hook (probably the “hemorrhoid” trap), HardwareBreakpoint and PageGuard (when runtime is not critical, one-time hooks).
8. Logic architecture
The basis of logic is presented in the form of MVC (model-view-controller). All basic entities are inherited from the ISilkObject interface.
8.1. Model
In the library, when developing a bot, I first implemented ECS (you can read about this approach here and here ). When I realized that running a bot with real players is quite a long time, I wrote a simulation where ml libraries were tested (with a three-dimensional grid for navigation (Dota 2 just uses a 3D grid for navigation) and simplified 2D physics for a bodybuilder). When the need for simulation disappeared and I figured out how and what to log, what information to collect during the battle, ECS eliminated all need and the models simply began to contain a component dictionary (for presentation just like the guys from SkyForge, the section “Avatars and mobs), which contained, in essence, wrappers over the structures from Source2Gen. For this article, I did not begin to transfer this implementation in order to simplify the material. The model contains a Schema in which its description is stored (this moment is simplified and in this implementation the model is not created according to the scheme, the scheme only describes it (stores the preset values that can be hard coded) - this can be compared with the storage of the game content in xml / json ).
Schematically, the model of the model can be represented as follows: Figure 15 - Schematic representation of the Model Implementation in code:
template <class S> SILK_OBJ(IModel) { ACCESSOR(IIdentity, Id) ACCESSOR(S, Schema) public: IModel(IIdentity * id, ISchema * schema) { Id = id; Schema = dynamic_cast<S*>(schema); components = new silk_data::RBTree<SILK_STRING*, IComponent>( new StringCompareStrategy()); } ~IModel() { delete Id; Schema = nullptr; components->Clear(); delete components; } template <class T> T* Get(SILK_STRING * key) { return (T*)components->Find(key); } private: silk_data::RBTree<SILK_STRING*, IComponent>* components; }; The schema includes a description of a specific model and contains a context that the model can use.
class IModelSchema : public BaseSchema { ACCESSOR(ModelContext, Context) public: IModelSchema(const char* type, const char* name, IContext* context) : BaseSchema(type, name) { Context = dynamic_cast<ModelContext*>(context); } ~IModelSchema() { Context = nullptr; } }; class ModelContext : public SilkContext { ACCESSOR(ILogger, Logger) ACCESSOR(IChrono, Clock) ACCESSOR(GigaFactory, Factory) ACCESSOR(IGameModel*, Model) public: ModelContext(SILK_GUID* guid, ILogger* logger, IChrono* clock, GigaFactory* factory, IGameModel** model) : SilkContext(guid) { Logger = logger; Clock = clock; Factory = factory; Model = model; } ~ModelContext() { Logger = nullptr; Clock = nullptr; Factory = nullptr; Model = nullptr; } }; Model collection and circuit collection
template <class T, class S> class IModelCollection : public silk_data::Vector<T*>, public IModel<S> { protected: IModelCollection(IIdentity* id, ISchema* schema) : Vector(), IModel(id, schema) { auto factory = Schema->GetContext()->GetFactory(); auto guid = Schema->GetContext()->GetGuid(); foreach (Schema->Length()) { auto itemSchema = Schema->GetItem(i); auto item = factory->Build<T>(itemSchema->GetType()->GetValue(), guid->Get(), itemSchema); PushBack(item); } } public: ~IModelCollection() { Clear(); } T* GetByName(const char* name) { foreach (Length()) if (GetItem(i)->GetSchema()->CheckName(name)) return GetItem(i); return nullptr; } }; So for example, the interface and the implementation of a model that stores the status of Roshan
DEFINE_IMODEL(IRoshanStatusModel, IRoshanStatusSchema) { VIRTUAL_COMPONENT(IStatesModel, States) public: virtual void Resolve() = 0; protected: IRoshanStatusModel(IIdentity * id, ISchema * schema) : IModel(id, schema) {} }; DEFINE_MODEL(RoshanStatusModel, IRoshanStatusModel) { COMPONENT(IStatesModel, States) public : RoshanStatusModel(IIdentity * id, ISchema* schema) : IRoshanStatusModel( id, schema) { auto factory = Schema->GetContext()->GetFactory(); auto guid = Schema -> GetContext() -> GetGuid(); auto statesSchema = Schema -> GetStates(); States = factory->Build<IStatesModel>( statesSchema->GetType()->GetValue(), guid->Get(), statesSchema); } ~RoshanStatusModel() { delete States; } void Resolve() { auto currentStateSchema = States->GetCurrent()->GetSchema(); Schema->GetContext()->GetLogger()->Log("RESOLVE\n"); foreach (currentStateSchema->GetTransitions()->Length()) { auto transition = currentStateSchema->GetTransitions()->GetItem(i); if (transition->GetRequirement()->Check()) { transition->GetAction()->Make(); States->SetCurrent(States->GetByName( transition->GetTo()->GetValue())); break; } } } }; 8.2. View, View State and Controller
There is nothing special to say about Presentation, Presentation Status and Controller, the implementation is similar to Models. They also consist of a schema and context. To solve the problem for the View, Canvas, ViewCollection, Label and Button are implemented; for the last two, the states corresponding to the states in which Roshan is located are also implemented.
Schematic View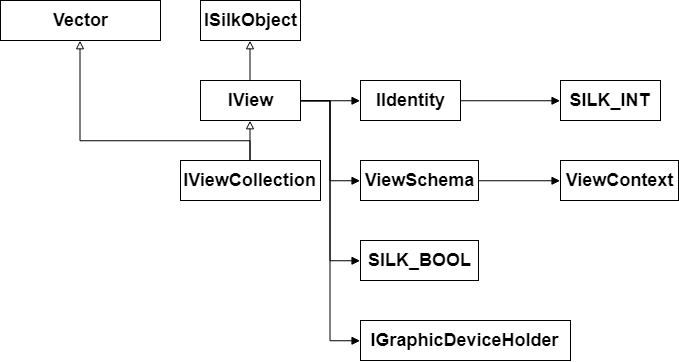
16 —
16 —
Schematic representation of the State of Presentation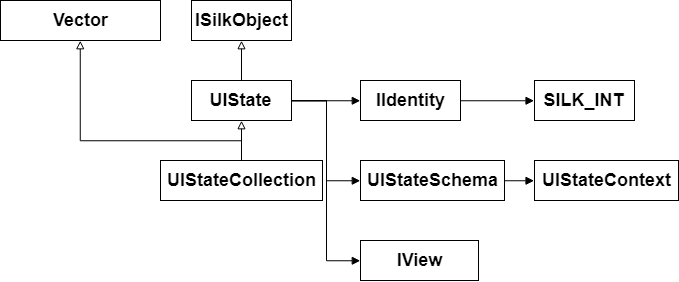
17 —
17 —
8.3. Factory
Objects are created using a factory. Factories use the interface type as a key, translating it into a string using typeid (T) .raw_name (). In general, it is bad to do so, why and how it can be properly read by Andrei Alexandrescu, Modern C ++ Design: Generic Programming. Factory implementation:
class SilkFactory { public: SilkFactory() { items = new silk_data::RBTree<SILK_STRING*, IImplementator>( new StringCompareStrategy()); } ~SilkFactory() { items->Clear(); delete items; } template <class... Args> ISILK_WAY_OBJECT* Build(const char* type, Args... args) { auto key = new SILK_STRING(type); auto impl = items->Find(key)->payload; return impl->Build(args...); } void Register(const char* type, IImplementator* impl) { auto key = new SILK_STRING(type); items->Insert(*items->MakeNode(key, impl)); } protected: silk_data::RBTree<SILK_STRING*, IImplementator>* items; }; class GigaFactory { public: GigaFactory() { items = new silk_data::RBTree<SILK_STRING*, SilkFactory>( new StringCompareStrategy()); } ~GigaFactory() { items->Clear(); delete items; } template <class T, class... Args> T* Build(const char* concreteType, Args... args) { auto key = new SILK_STRING(typeid(T).raw_name()); auto factory = items->Find(key)->payload; return (T*)factory->Build(concreteType, args...); } template <class T> void Register(SilkFactory* factory) { auto key = new SILK_STRING(typeid(T).raw_name()); items->Insert(*items->MakeNode(key, factory)); } protected: silk_data::RBTree<SILK_STRING*, SilkFactory>* items; }; Before using the factory to build objects, you need to register.
Model registration example
void ModelRegistrator::Register( GigaFactory* factory) { auto requirement = new SilkFactory(); requirement->Register("true", new SchemaImplementator<TrueRequirement>); requirement->Register("false", new SchemaImplementator<FalseRequirement>); requirement->Register("roshan_killed", new SchemaImplementator<RoshanKilledRequirement>); requirement->Register("roshan_alive_manual", new SchemaImplementator<RoshanAliveManualRequirement>); requirement->Register("time", new SchemaImplementator<TimeRequirement>); requirement->Register("roshan_state", new SchemaImplementator<RoshanStateRequirement>); factory->Register<IRequirement>(requirement); auto action = new SilkFactory(); action->Register("action", new SchemaImplementator<EmptyAction>); action->Register("set_current_time", new SchemaImplementator<SetCurrentTimeAction>); factory->Register<IAction>(action); auto transition = new SilkFactory(); transition->Register("transition", new SchemaImplementator<TransitionSchema>); factory->Register<ITransitionSchema>(transition); auto transitions = new SilkFactory(); transitions->Register("transitions", new SchemaImplementator<TransitionsSchema>); factory->Register<ITransitionsSchema>(transitions); auto stateSchema = new SilkFactory(); stateSchema->Register("state", new SchemaImplementator<StateSchema>); factory->Register<IStateSchema>(stateSchema); auto statesSchema = new SilkFactory(); statesSchema->Register("states", new SchemaImplementator<StatesSchema>); factory->Register<IStatesSchema>(statesSchema); auto roshanStatusSchema = new SilkFactory(); roshanStatusSchema->Register("roshan_status", new SchemaImplementator<RoshanStatusSchema>); factory->Register<IRoshanStatusSchema>(roshanStatusSchema); auto triggerSchema = new SilkFactory(); triggerSchema->Register("trigger", new SchemaImplementator<TriggerSchema>); factory->Register<ITriggerSchema>(triggerSchema); auto triggersSchema = new SilkFactory(); triggersSchema->Register("triggers", new SchemaImplementator<TriggersSchema>); factory->Register<ITriggersSchema>(triggersSchema); auto resourceSchema = new SilkFactory(); resourceSchema->Register("resource", new SchemaImplementator<ResourceSchema>); factory->Register<IResourceSchema>(resourceSchema); auto resourcesSchema = new SilkFactory(); resourcesSchema->Register("resources", new SchemaImplementator<ResourcesSchema>); factory->Register<IResourcesSchema>(resourcesSchema); auto gameSchema = new SilkFactory(); gameSchema->Register("game", new SchemaImplementator<GameSchema>); factory->Register<IGameSchema>(gameSchema); auto gameModel = new SilkFactory(); gameModel->Register("game", new ConcreteImplementator<GameModel>); factory->Register<IGameModel>(gameModel); auto resources = new SilkFactory(); resources->Register("resources", new ConcreteImplementator<ResourceCollection>); factory->Register<IResourceCollection>(resources); auto resource = new SilkFactory(); resource->Register("resource", new ConcreteImplementator<Resource>); factory->Register<IResource>(resource); auto triggers = new SilkFactory(); triggers->Register("triggers", new ConcreteImplementator<TriggerCollection>); factory->Register<ITriggerCollection>(triggers); auto trigger = new SilkFactory(); trigger->Register("trigger", new ConcreteImplementator<Trigger>); factory->Register<ITrigger>(trigger); auto roshanStatus = new SilkFactory(); roshanStatus->Register("roshan_status", new ConcreteImplementator<RoshanStatusModel>); factory->Register<IRoshanStatusModel>(roshanStatus); auto states = new SilkFactory(); states->Register("states", new ConcreteImplementator<StatesModel>); factory->Register<IStatesModel>(states); auto state = new SilkFactory(); state->Register("state", new ConcreteImplementator<StateModel>); factory->Register<IStateModel>(state); } Filling the scheme can be done in any way - you can use json, you can directly in the code.
Option filling scheme for models in json
{ "game": { "roshan_status": { "states": [ { "name": "alive", "transitions": [ { "from": "alive", "to": "ressurect_base", "requirement": { "typename": "roshan_killed", "action": { "typename": "set_current_time", "resource": "roshan_killed_ts" } } } ] }, { "name": "ressurect_base", "transitions": [ { "from": "ressurect_base", "to": "ressurect_extra", "requirement": { "typename": "time", "resource": "roshan_killed_ts", "offset": 480 }, "action": { "typename": "action" } } ] }, { "name": "ressurect_extra", "transitions": [ { "from": "ressurect_extra", "to": "alive", "requirement": { "typename": "time", "resource": "roshan_killed_ts", "offset": 660 }, "action": { "typename": "action" } }, { "from": "ressurect_extra", "to": "alive", "requirement": { "typename": "roshan_alive_manual" }, "action": { "typename": "action" } } ] } ] }, "triggers": { "roshan_killed": {}, "roshan_alive_manual": {} }, "resources": { "roshan_killed_ts": {} } } } The option of filling the scheme for the representation of the code
void GameController::InitViewSchema(ICanvasSchema** schema) { *schema = factory->Build<ICanvasSchema>("canvas_d9", "canvas_d9", "canvas_d9", viewContext); IViewCollectionSchema* elements = factory->Build<IViewCollectionSchema>( "elements", "elements", "elements", viewContext); (*schema)->SetElements(elements); ILabelSchema* labelSchema = factory->Build<ILabelSchema>( "label_d9", "label_d9", "roshan_status_label", viewContext); labelSchema->SetRecLeft(new SILK_INT(30)); labelSchema->SetRecTop(new SILK_INT(100)); labelSchema->SetRecRight(new SILK_INT(230)); labelSchema->SetRecDown(new SILK_INT(250)); labelSchema->SetColorR(new SILK_FLOAT(1.0f)); labelSchema->SetColorG(new SILK_FLOAT(1.0f)); labelSchema->SetColorB(new SILK_FLOAT(1.0f)); labelSchema->SetColorA(new SILK_FLOAT(1.0f)); labelSchema->SetText(new SILK_STRING("Roshan status: alive\0")); elements->PushBack((IViewSchema*&)labelSchema); IButtonSchema* buttonSchema = factory->Build<IButtonSchema>( "button_d9", "button_d9", "roshan_kill_button", viewContext); ILabelSchema* buttonLabelSchema = factory->Build<ILabelSchema>( "label_d9", "label_d9", "button_text", viewContext); buttonLabelSchema->SetRecLeft(new SILK_INT(30)); buttonLabelSchema->SetRecTop(new SILK_INT(115)); buttonLabelSchema->SetRecRight(new SILK_INT(110)); buttonLabelSchema->SetRecDown(new SILK_INT(130)); buttonLabelSchema->SetColorR(new SILK_FLOAT(1.0f)); buttonLabelSchema->SetColorG(new SILK_FLOAT(0.0f)); buttonLabelSchema->SetColorB(new SILK_FLOAT(0.0f)); buttonLabelSchema->SetColorA(new SILK_FLOAT(1.0f)); buttonLabelSchema->SetText(new SILK_STRING("Kill Roshan\0")); buttonSchema->SetLabel(buttonLabelSchema); buttonSchema->SetBorderColorR(new SILK_INT(0)); buttonSchema->SetBorderColorG(new SILK_INT(0)); buttonSchema->SetBorderColorB(new SILK_INT(0)); buttonSchema->SetBorderColorA(new SILK_INT(70)); buttonSchema->SetFillColorR(new SILK_INT(255)); buttonSchema->SetFillColorG(new SILK_INT(119)); buttonSchema->SetFillColorB(new SILK_INT(0)); buttonSchema->SetFillColorA(new SILK_INT(150)); buttonSchema->SetPushColorR(new SILK_INT(0)); buttonSchema->SetPushColorG(new SILK_INT(0)); buttonSchema->SetPushColorB(new SILK_INT(0)); buttonSchema->SetPushColorA(new SILK_INT(70)); buttonSchema->SetBorder(new SILK_FLOAT(5)); elements->PushBack((IViewSchema*&)buttonSchema); } 8.4. Developments
The view learns about changing the Model through events. You can get feedback in class methods and ordinary functions.
#define VIRTUAL_EVENT(e) public: virtual IEvent* Get##e() = 0; #define EVENT(e) private: IEvent* e; public: IEvent* Get##e() { return e; } const int MAX_EVENT_CALLBACKS = 1024; class IEventArgs {}; class ICallback { public: virtual void Invoke(IEventArgs* args) = 0; }; template <class A> class Callback : public ICallback { typedef void (*f)(A*); public: Callback(f _pFunc) { ptr = _pFunc; } ~Callback() { delete ptr; } void Invoke(IEventArgs* args) { ptr((A*)args); } private: f ptr = nullptr; }; template <typename T, class A> class MemberCallback : public ICallback { typedef void (T::*f)(A*); public: MemberCallback(f _pFunc, T* _obj) { ptr = _pFunc; obj = _obj; } ~MemberCallback() { delete ptr; obj = nullptr; } void Invoke(IEventArgs* args) { (obj->*(ptr))((A*)args); } private: f ptr = nullptr; T* obj; }; class IEvent { public: virtual void Invoke(IEventArgs* args) = 0; virtual void Add(ICallback* callback) = 0; virtual bool Remove(ICallback* callback) = 0; virtual ~IEvent() {} }; If an object wants to report events inside it, you need to add an IEvent * for each event. Another object that is interested in events occurring inside this object should create an ICallback * and pass it inside IEvent * (subscribe to the event).
Sample subscriptions occurring in the controller
void Attach() { statesChangedCallback = new MemberCallback<GameController, IEventArgs>( &GameController::OnStatesChanged, this); Model->GetRoshanStatus()->GetStates()->GetCurrentChanged()->Add( statesChangedCallback); buttonClickedCallback = new MemberCallback<GameController, IEventArgs>( &GameController::OnKillRoshanClicked, this); killButton->GetClickedEvent()->Add(buttonClickedCallback); } Example of declaring an event inside a class — each time a clock strikes (call to the Tick method), a StruckEvent event is raised
class IChrono { VIRTUAL_EVENT(Struck) public: virtual void Tick() = 0; virtual long long GetStamp() = 0; virtual long long GetDiffS(long long ts) = 0; }; class Chrono : public IChrono { EVENT(Struck) public: Chrono() { start = time(0); Struck = new Event(); } ~Chrono() { delete Struck; } void Tick() { auto cur = clock(); worked += cur - savepoint; bool isStriking = savepoint < cur; savepoint = cur; if (isStriking) Struck->Invoke(nullptr); } long long GetStamp() { return start * CLOCKS_PER_SEC + worked; } long long GetDiffS(long long ts) { return (GetStamp() - ts) / CLOCKS_PER_SEC; } private: long long worked = 0; time_t start; time_t savepoint; }; The basic primitive types (SILK_INT, SILT_FLOAT, SILK_STRING, ...) are implemented in Core.h.
9. DirectX 9
DirectX 9 is one of the graphics APIs supported by Dota 2. The device is a class inherited from IUnknown and contains virtual functions. Accordingly, having received a pointer to a virtual table of methods, we can get pointers to the functions we need. Non-virtual class functions are not included in the table and are in the .code segment, since they are the only ones, they cannot be redefined. By the way, in OpenGL and Vulkan, the interception of functions of the device is much simpler, since they are not virtual and you can get a pointer using GetProcAddress (). The architecture of DirectX 11 is more complicated than 9, but not much.
To intercept a virtual class method (as well as non-virtual) we need an instance of this class, any instance. With the help of the instance, we will get the table of virtual methods and get the necessary pointers to functions. The easiest way to find an instance of a class is to create it yourself.
To do this, we need to create an object with the IDirect3D9 interface using the Direct3DCreate9 function, and create the device itself using this object by calling the CreateDevice method. We can call these functions directly from the DirectX library, but for the sake of securing the material we will call them through pointers. As you can see from d3d9.h, Direct3DCreate9 is a normal function and a pointer to it can be obtained via GetProcAddress (just like we did in NativeInjector to get a pointer to LoadLibrary).
Figure 18 - CreateDevice description in d3d9.h
Create an instance of IDirect3D9:
typedef IDirect3D9* (WINAPI *SILK_Direct3DCreate9) (UINT SDKVersion); //IDirect3D9* pD3D = Direct3DCreate9(D3D_SDK_VERSION); SILK_Direct3DCreate9 Silk_Direct3DCreate9 = (SILK_Direct3DCreate9)GetProcAddress(GetModuleHandle("d3d9.dll"), "Direct3DCreate9"); IDirect3D9* pD3D = Silk_Direct3DCreate9(D3D_SDK_VERSION); With IDirect3D9, we can create a device by calling pD3D-> CreateDevice (...). To get a pointer to the necessary functions from VMT, we need to know the order in which these methods are defined. Figure 19 - Searching the index of the CreateDevice method of the IDirect3D9 interface. We get the 16th index. In addition to CreateDevice, we also need the Release and GetAdapterDisplayMode methods.
We realize the creation of the device in the code
typedef HRESULT(WINAPI *SILK_GetAdapterDisplayMode)(IDirect3D9* direct3D9, UINT Adapter, D3DDISPLAYMODE* pMode); typedef HRESULT(WINAPI *SILK_CreateDevice)(IDirect3D9* direct3D9, UINT Adapter, D3DDEVTYPE DeviceType, HWND hFocusWindow, DWORD BehaviorFlags, D3DPRESENT_PARAMETERS* pPresentationParameters, IDirect3DDevice9** ppReturnedDeviceInterface); typedef ULONG(WINAPI *SILK_Release)(IDirect3D9* direct3D9); const int RELEASE_INDEX = 2; const int GET_ADAPTER_DISPLAY_MODE_INDEX = 8; const int CREATE_DEVICE_INDEX = 16; BOOL CreateSearchDevice(IDirect3D9** d3d, IDirect3DDevice9** device) { if (!d3d || !device) return FALSE; *d3d = NULL; *device = NULL; //IDirect3D9* pD3D = Direct3DCreate9(D3D_SDK_VERSION); SILK_Direct3DCreate9 Silk_Direct3DCreate9 = (SILK_Direct3DCreate9)GetProcAddress(GetModuleHandle("d3d9.dll"), "Direct3DCreate9"); IDirect3D9* pD3D = Silk_Direct3DCreate9(D3D_SDK_VERSION); if (!pD3D) return FALSE; D3DDISPLAYMODE displayMode; int pointerSize = sizeof(unsigned long long); unsigned long long vmt = **(unsigned long long **)&pD3D; SILK_GetAdapterDisplayMode pGetAdapderDisplayMode = (SILK_GetAdapterDisplayMode)((*(unsigned long long *) (vmt + pointerSize * GET_ADAPTER_DISPLAY_MODE_INDEX))); pGetAdapderDisplayMode(pD3D, D3DADAPTER_DEFAULT, &displayMode); //pD3D->GetAdapterDisplayMode(D3DADAPTER_DEFAULT, &displayMode); HWND hWindow = GetDesktopWindow(); D3DPRESENT_PARAMETERS pp; ZeroMemory(&pp, sizeof(pp)); pp.Windowed = TRUE; pp.hDeviceWindow = hWindow; pp.BackBufferCount = 0; pp.BackBufferWidth = 0; pp.BackBufferHeight = 0; pp.BackBufferFormat = displayMode.Format; pp.SwapEffect = D3DSWAPEFFECT_DISCARD; IDirect3DDevice9* pDevice = NULL; SILK_CreateDevice pCreateDevice = (SILK_CreateDevice) ((*(unsigned long long *)(vmt + pointerSize * CREATE_DEVICE_INDEX))); if(SUCCEEDED(pCreateDevice(pD3D, D3DADAPTER_DEFAULT, D3DDEVTYPE_HAL, hWindow, D3DCREATE_SOFTWARE_VERTEXPROCESSING | D3DCREATE_DISABLE_DRIVER_MANAGEMENT, &pp, &pDevice))) { //if (SUCCEEDED(pD3D->CreateDevice(D3DADAPTER_DEFAULT, D3DDEVTYPE_HAL, hWindow, D3DCREATE_SOFTWARE_VERTEXPROCESSING | D3DCREATE_DISABLE_DRIVER_MANAGEMENT, &pp, &pDevice))) { if (pDevice != NULL) { *d3d = pD3D; *device = pDevice; } } BOOL result = (*d3d != NULL); if (result == FALSE) if (pD3D) { SILK_Release pRelease= (SILK_Release)((*(unsigned long long *)(vmt + pointerSize * RELEASE_INDEX))); pRelease(pD3D); //pD3D->Release(); } return result; } Great, we created the DirectX 9 device, now we need to understand what functions are used to render the scene, what we need to intercept. We need to answer the question: "How does DirectX 9 show us the scene?". To show the scene, use the Present function . It is also necessary to introduce such concepts as front buffer (a buffer that stores what is displayed (long action) on the screen), back buffer - contains what is ready for display and is preparing to become the front buffer, swap chain is the actual set of buffers that alternately (flipping) from front to back (DirectX 9 has only 1 swap chain). Before calling Present, a couple of functions BeginScene and EndScene are called , where you can change the back buffer.
Let's intercept two functions (in fact, one business will be enough for us to perform business logic): EndScene and Present. To do this, we will look at the location of these functions in the IDirect3DDevice9 class. Figure 20 - Declaring the IDirect3DDevice9 interface Let's declare pointers with the following function signatures:
typedef HRESULT(*VirtualOverloadPresent)(IDirect3DDevice9* pd3dDevice, CONST RECT* pSourceRect, CONST RECT* pDestRect, HWND hDestWindowOverride, CONST RGNDATA* pDirtyRegion); VirtualOverloadPresent oOverload = NULL; typedef HRESULT(*VirtualOverloadEndScene)(IDirect3DDevice9* pd3dDevice); VirtualOverloadEndScene oOverloadEndScene = NULL; const int PRESENT_INDEX = 17; const int END_SCENE_INDEX = 42; Let's declare a trap right away with an error handler, since HardwareBreakpoint is actually our only implemented secure interception option that VAC does not track (you can also test with Opcode Hook, but your account will most likely fly off to the ban):
silk_way::IDeferredCommands* deferredCommands; silk_way::IHook* hook; LONG OnExceptionHandler(EXCEPTION_POINTERS* exceptionPointers) { if (exceptionPointers->ExceptionRecord->ExceptionCode != EXCEPTION_SINGLE_STEP) return EXCEPTION_EXIT_UNWIND; for (int i = 0; i < silk_way::DEBUG_REG_COUNT; i++) { if (exceptionPointers->ContextRecord->Rip == (unsigned long long) hook->GetInfo()->GetItem(i)->source) { exceptionPointers->ContextRecord->Dr7 &= ~(1ULL << (2 * i)); exceptionPointers->ContextRecord->Rip = (unsigned long long) hook->GetInfo()->GetItem(i)->destination; silk_way::IDeferredCommand* cmd = new silk_way::SetD7Command(hook, GetCurrentThreadId(), i); deferredCommands->Enqueue(cmd); break; } } return EXCEPTION_CONTINUE_EXECUTION; } Zahukayem designated functions of any of our two traps:
BOOL HookDevice(IDirect3DDevice9* pDevice) { unsigned long long vmt = **(unsigned long long **)&pDevice; int pointerSize = sizeof(unsigned long long); VirtualOverloadPresent pointerPresent= (VirtualOverloadPresent) ((*(unsigned long long *)(vmt + pointerSize * PRESENT_INDEX))); VirtualOverloadEndScene pointerEndScene = (VirtualOverloadEndScene) ((*(unsigned long long *)(vmt + pointerSize * END_SCENE_INDEX))); oOverload = pointerPresent; oOverloadEndScene = pointerEndScene; deferredCommands = new silk_way::DeferredCommands(); //hook = new silk_way::HardwareBPHook(); hook = new silk_way::OpcodeHook(); hook->SetExceptionHandler(OnExceptionHandler); hook->SetHook(pointerPresent, &PresentHook); hook->SetHook(pointerEndScene, &EndSceneHook); return TRUE; } Functions receivers:
HRESULT WINAPI PresentHook(IDirect3DDevice9* pd3dDevice, CONST RECT* pSourceRect, CONST RECT* pDestRect, HWND hDestWindowOverride, CONST RGNDATA* pDirtyRegion) { Capture(pd3dDevice); auto record = hook->GetRecordBySource(oOverload); VirtualOverloadPresent pTrampoline = (VirtualOverloadPresent) record->pTrampoline; auto result = pTrampoline(pd3dDevice, pSourceRect, pDestRect, hDestWindowOverride, pDirtyRegion); deferredCommands->Run(); return result; } HRESULT WINAPI EndSceneHook(IDirect3DDevice9* pd3dDevice) { if (controller == nullptr) { controller = new GameController(); controller->SetDevice(pd3dDevice); } controller->Update(); auto record = hook->GetRecordBySource(oOverloadEndScene); VirtualOverloadEndScene pTrampoline = (VirtualOverloadEndScene) record->pTrampoline; auto result = pTrampoline(pd3dDevice); deferredCommands->Run(); return result; } In Present, each call takes a screenshot from the video card buffer (for verification) using the Capture function.
VOID WINAPI Capture(IDirect3DDevice9* pd3dDevice) { IDirect3DSurface9 *renderTarget = NULL; IDirect3DSurface9 *destTarget = NULL; HRESULT res1 = pd3dDevice->GetRenderTarget(0, &renderTarget); D3DSURFACE_DESC descr; HRESULT res2 = renderTarget->GetDesc(&descr); HRESULT res3 = pd3dDevice->CreateOffscreenPlainSurface( descr.Width, descr.Height, /*D3DFMT_A8R8G8B8*/descr.Format, D3DPOOL_SYSTEMMEM, &destTarget, NULL); HRESULT res4 = pd3dDevice->GetRenderTargetData(renderTarget, destTarget); D3DLOCKED_RECT lockedRect; ZeroMemory(&lockedRect, sizeof(lockedRect)); if (destTarget == NULL) return; HRESULT res5 = destTarget->LockRect(&lockedRect, NULL, D3DLOCK_READONLY); HRESULT res7 = destTarget->UnlockRect(); HRESULT res6 = D3DXSaveSurfaceToFile(screenshootPath, D3DXIFF_BMP, destTarget, NULL, NULL); renderTarget->Release(); destTarget->Release(); } The EndScene creates a business logic controller. After creation, the controller update is called, where all the logic is updated.
I note that now we have implemented work with DirectX 9. If we want to do some kind of mod, cheat, etc., it is necessary to support all four APIs. This is justified if there are already favorite libraries in the arsenal, presets for UI, otherwise you can use another method - a functional that uses the engine for drawing the game.
It is also worth saying that the call to update the logic from EndScene () is not the best option - you can find periodic calls to the functions of the engine or call logic in your thread. If you are satisfied with the call from EndScene, it is better to do this with lockstep.
Now we have implemented everything that we planned.
Testing recommendations
DirectX SDK , , DirectX 9 DirectX 11. DirectX 11, - SDK, ( , ) , , DXUT, , — , FPS .
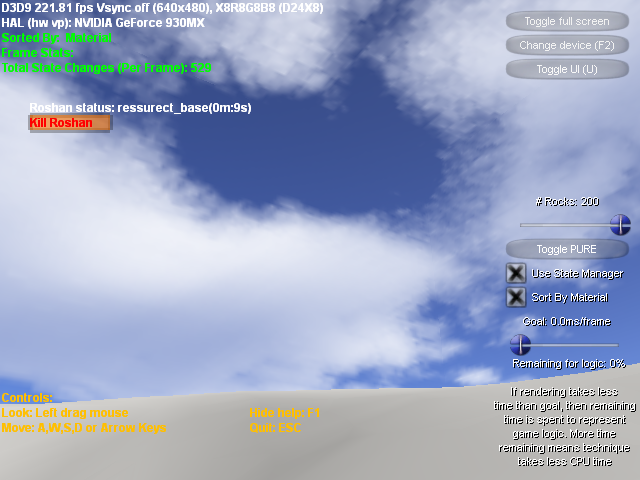
21 — DirectX SDK StateManager.exe
21 — DirectX SDK StateManager.exe
Now you can create a fake account in the incentive and inject injected.dll into the Dota 2 process. I have to say right away that I don’t know how the situation with the “iron” breakpoints is at the moment - for using the Opcode Hook (as we do in the current form) you just get a ban. I did it about six months ago - there was no ban for Hardware Breakpoint, I cannot say what the situation is at the moment. Before preparing the article, I took two accounts and tried Opcode Hook and HWBP on them, the first one flew into the ban (about 2 weeks passed), the second did not (3 weeks passed). But still there are no guarantees that the ban will not be in the future. Then do not be offended if you accidentally make an introduction from your main account or forget to log in to fake - here already watch yourself and be careful.
( )
22 —
22 —
23 —
Implementation in 1x1 mode. Figure 24 - Introduction to the match It is also worth saying that there is another way of drawing - surface drawing by creating a second window with the appropriate size. Unfortunately, I did not manage to implement the possibility of using the surface approach for the case of full-screen mode, the approach described in the article allows you to embed the drawing both in full-screen mode and in windowed mode without any problems. Our embedded UI contains only a text label and a button, implemented on pure DirectX 9 - this is all that is required to solve the problem. You can implement both on a clean API, and using ready-made libraries, complex tables, beautiful menus and diagrams - in general, a UI of any complexity. Of course, not only 2D.
10. Using engine functions
Implementing the same functionality for each API is quite a chore, the developers make convenient wrappers, providing functions for drawing, UI, etc., which the game itself uses. Valve also provides Javascript and Lua APIs for Dota 2 . This is done in order to make life easier for modders and game designers, for whom C ++ is complex (not even C ++ itself, but proper use in the context of the engine). Here there are functions for drawing, and the logic of the game - you can prescribe the behavior of the unit, for example, the selection of objects, the use of skills and stuff. Actually, with the help of this and spells are written.
We will be interested in the DoIncludeScript function, which allows you to run your Lua scripts and use the Scripting API there. I did not use it in my project, because I did not see the value in it, using functions directly from C ++, I saw the idea of using it in or_75 and decided to include it in the article. This will introduce you to what will be in the second part and save space in it, you will not have to explain certain points in the debugger’s work.
Let's get startedThe task is as follows: it is necessary to find a pointer to the DoIncludeScript function, which takes the name of the script and the handler, to examine it. We will search for the function with the help of a scanner from our library silk_way.lib. Functions, as we have already found out, are encoded in memory using a table of opcodes — let's examine this function and try to identify its storage pattern in memory. Now the scanner does not have the necessary functionality, we need the ability to search for a template in the process memory.
To speed up the search, we will search for a pattern not in the entire memory of the process, but in a specific module (our function lies in client.dll, this will be seen in the debugger and discussed below). We will look for the module using tlHelp32 by name by iterating through all the modules of the process, for which we will create a function for finding the module in the current process GetModuleInfo.
GetModuleInfo function code
int IScanner::GetModuleInfo(const char* name, MODULEENTRY32* entry) { HANDLE snapshot = CreateToolhelp32Snapshot(TH32CS_SNAPMODULE32 | TH32CS_SNAPMODULE, GetCurrentProcessId()); if (snapshot == INVALID_HANDLE_VALUE) return 1; entry->dwSize = sizeof(MODULEENTRY32); if (!Module32First(snapshot, entry)) { CloseHandle(snapshot); return 1; } do { if (!_stricmp(entry->szModule, name)) break; } while (Module32Next(snapshot, entry)); CloseHandle(snapshot); return 0; } The pattern is a string with the value of bytes, the byte skip is denoted by the symbol “??” - for example, “j9 ?? ?? ?? ??48 03 08 ?? f1 ff ”.
Parsing a string, for convenience, we will translate the pattern from the string representation to the list of unsigned char values, set the flags of the bytes to be skipped.
unsigned char* IScanner::Parse(int& len, const char* strPattern, unsigned char* skipByteMask) { int strPatternLen = strlen(strPattern); unsigned char* pattern = new unsigned char[strPatternLen]; for (int i = 0; i < strPatternLen; i++) pattern[i] = 0; len = 0; for (int i = 0; i < strPatternLen; i += 2) { unsigned char code = 0; if (strPattern[i] == SKIP_SYMBOL) skipByteMask[len] = 1; else code = Parse(strPattern[i]) * 16 + Parse(strPattern[i + 1]); i++; pattern[len++] = code; } return pattern; } unsigned char IScanner::Parse(char byte) { // some magic values if (byte >= '0' && byte <= '9') return byte - '0'; else if (byte >= 'a' && byte <= 'f') return byte - 'a' + 10; else if (byte >= 'A' && byte <= 'F') return byte - 'A' + 10; return 0; } The search engine is implemented in the FindPattern function, where the initial and final address of the search is set according to the received information about the module. Information about the memory that will be searched, is requested by the VirtualQuery function, there are a number of requirements for memory - it must be busy (it will be an error to search in free memory), the memory must be readable, executable and not contain the PageGuard flag:
void* pStart = moduleEntry.modBaseAddr; void* pFinish = moduleEntry.modBaseAddr + moduleEntry.modBaseSize; unsigned char* current = (unsigned char*)pStart; for (; current < pFinish && j < patternLen; current++) { if (!VirtualQuery((LPCVOID)current, &info, sizeof(info))) continue; unsigned long long protectMask = PAGE_READONLY | PAGE_READWRITE | PAGE_EXECUTE_READWRITE | PAGE_EXECUTE | PAGE_EXECUTE_READ; if (info.State == MEM_COMMIT && info.Protect & protectMask && !(info.Protect & PAGE_GUARD)) { unsigned long long finish = (unsigned long long)pFinish < (unsigned long long)info.BaseAddress + info.RegionSize ? (unsigned long long)pFinish : (unsigned long long) info.BaseAddress + info.RegionSize; current = (unsigned char*)info.BaseAddress; unsigned char* rip = 0; for (unsigned long long k = (unsigned long long)info.BaseAddress; k < finish && j < patternLen; k++, current++) { if (skipByteMask[j] || pattern[j] == *current) { if (j == 0) rip = current; j++; } else { j = 0; if (pattern[0] == *current) { rip = current; j = 1; } } } if (j == patternLen) { current = rip; break; } } else current += sysInfo.dwPageSize; } Now we are able to search for the desired pattern in the memory of the process, but do not yet know what to look for. Launch Steam under the Fake account and open your favorite debugger (let's say that at the time of reading the article x64dbg is one for you - I do not have a paid license for IDA Pro), run dota2.exe from the directory ... \ Steam \ steamapps \ common \ dota 2 beta \ game \ bin \ win64. In principle, I did not notice that VAC was not indifferent to the Cheat Engine and x64dbg, I do not remember that when using these tools, the account was banned. By the way, the debugger has a ScyllaHide plugin that intercepts system functions like NtCreateThreadEx, NtSetInformationThread, etc., hiding the fact of your work, you can install this plugin.
At each stop (there will be 10-15) we continue execution with the help of Run (F9). When the game starts, we will see the menu and can proceed to the study. After starting the game, perform a search by string (Search for-> All Modules-> String References), set the filter “DoIncludeScript”. Figure 25 - Search by rows in the game process memory. We will go to the disassembler (CPU tab) by double clicking on the first result. This will be our starting address, since it is located in client.dll, the other results lead to server.dll and animationsystem.dll. Let's construct the call graph from the received address. Figure 26 - Call graph After decompiling, we find the entry point where DoIncludeScript is used - the fourth node of the graph. Actually, the function itself.
Figure 27 — DoIncludeScript function
Graph. Figure 28 - Call graph from DoIncludeScript Decompiling the use of a function shows the following code and the place where it was called (we are decompiling from a graph, not from a disassembler). Figure 29 - Decompilation of the DoIncludeScript function call Let's make a template from the instructions in Figure 27 of the DoIncludeScript function call. Arguments can change, respectively, the arguments in the template we want to skip when searching, we denote them by "??". I got the following: 40 57 48 81 EC ??
?? ?? ?? 48 83 3D ?? ?? ?? ?? ??48 8B F9 0F 84. To compose the template, we used the first node of the graph from Figure 28, whose instructions can be viewed in Figure 27.
Create a script on Lua silk_way.lua, put it in “... \ Steam \ steamapps \ common \ dota 2 beta \ game \ dota \ scripts \ vscripts ".
print("SILK_WAY START") local first = Entities:First() while (first ~= nil) do local position = first:GetAbsOrigin() local strInfo = "[" .. "pos:" .. tostring(position.x) .. "," .. tostring(position.y) .. "," .. tostring(position.z) .. "]" DebugDrawText(position, strInfo, true, 300.0) first = Entities:Next(first) end print("SILK_WAY FINISH") --[[ListenToGameEvent("dota_roshan_kill",roshan_kill,nil)]] This script bypasses all entities and displays the coordinates in accordance with its position.
We declare the function using the above documentation and the decompiled code from Figure 29.
typedef bool(*fDoIncludeScript)(const char*, unsigned long long); Function call
HRESULT WINAPI EndSceneHook(IDirect3DDevice9* pd3dDevice) { if (controller == nullptr) { controller = new GameController(); controller->SetDevice(pd3dDevice); fDoIncludeScript DoIncludeScript = (fDoIncludeScript) scanner->FindPattern("client.dll", "40 57 48 81 EC ?? ?? ?? ?? 48 83 3D ?? ?? ?? ?? ?? 48 8B F9 0F 84"); DoIncludeScript("silk_way", 0); } //... } After the introduction, we will see information about the position of the game entities. Figure 30 - The result of the implementation Now we can run our scripts. But they are executed in Lua, but let's say the event that Roshan died, we need in C ++ code (since we have the main logic written on it), what should we do? We'll have to find pointers to the necessary functions in the same way (as we did for DoIncludeScript), engine functions and other functionality that we are interested in using the Source SDK and Source2Gen. But about this in the next part, where we will find a pointer to the list of entities and write more logic close to the game mechanics. If you want everything at once, you can try, I enclose this , this , this and this
links.
11. Conclusion
In conclusion, I would like to say thank you to everyone who shares their work and knowledge in the field of reverse, transferring their experience to others. Speaking only about Dota 2 without praydog, I would kill a lot of time, so that with the help of Cheat Engine I could get the structure of the game data, and the developments made could break during any flooded Valve update. Updates break both found static pointers and rarely change the structure of entities. With or75, I saw the use of the DoIncludeScript function and with its help I showed an example of text output using the game engine.
In pursuit of simplicity of presentation, I could have missed something, omitted various cases that I thought were unworthy of attention, or, on the contrary, fanned an explanation — if a careful reader finds such errors, I will be glad to correct them and listen to the comments. Source code can be found by reference .
Thanks to everyone who took the time to read the article.
Source: https://habr.com/ru/post/446516/
All Articles