The book "React quickly. Web applications on React, JSX, Redux and GraphQL »
 Hi, Habrozhiteli! The original edition came out in the fall of 2017, but is still considered the best book for exploring React. The author constantly updates and refines the code for the book in the Github repository.
We offer in the post to get acquainted with the passage "States and their role in the interactive nature of React"
If you had to read only one chapter in this book, it would be worth choosing this one! Without states, the React components remain nothing more than enhanced static templates. I hope you share my enthusiasm, because understanding the concepts of this chapter will allow you to build much more interesting applications.
')
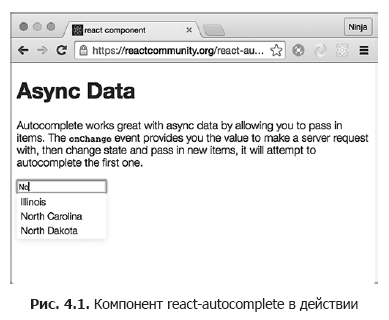
Imagine that you are building an input field with auto-completion (Fig. 4.1). When entering data, the field should issue a request to the server to get information about suitable options for displaying the output on a web page. So far you have worked with properties, and you know that changing properties allows you to get different views. However, properties cannot be changed in the context of the current component, because they are passed when the component is created.
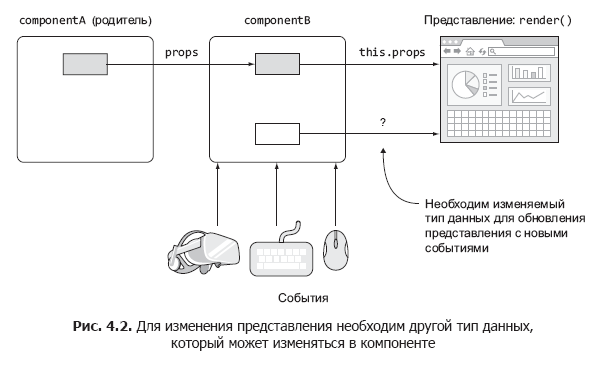
 In other words, properties are immutable in the current component, which means that you cannot change the properties in this component, unless you create the component again and transfer new values from the parent (Fig. 4.2). But the information received from the server, you need to save somewhere, and then display a new list of options in the view. How to update the view if the properties can not be changed?
One possible solution is to render the item with new properties every time you receive a new response from the server. But then you have to place the logic outside the component - and the component ceases to be self-sufficient. Obviously, if the property values cannot be changed, and auto-completion should be self-sufficient, the properties cannot be used. Then the question arises: how to update views in response to events without re-creating the component (createElement () or JSX <NAME />)? It is this problem that states solve.
After the response from the server is ready, the callback code will change the state of the component accordingly. You will have to write this code yourself. However, after the state is updated, React will automatically update the view for you (only in those places where it should be updated, that is, where state data is used).
With the state of React components, you can build interactive, meaningful React applications. State is a fundamental concept that allows you to build React components that can store data and automatically update views in accordance with changes in data.
What is the state of the React component?
A React state is a variable component data store — autonomous, function-oriented user interface and logic blocks. “Variability” means that the values of the states are subject to change. By using the state in the view (render ()) and changing the values later, you can influence the appearance of the view.
Metaphor: if we imagine a component in the form of a function, to the input of which properties and state are transmitted, then the result of the function will be a description of the user interface (presentation). Properties and states extend views, but they are used for different purposes (see Section 4.3).
By working with states, you refer to them by name. A name is an attribute (that is, an object key or an object property — not a component property) of the this.state object, for example, this.state.autocompleMatches or this.state.inputFieldValue.
State data is often used to display dynamic information in a view to extend the rendering of views. Returning to the earlier example of an auto-complete field: the state changes in response to an XHR request to the server, which, in turn, is triggered by the input of data in the field. React provides an update of views when the state used in views changes. In fact, when a state changes, only the relevant parts of the views change (up to individual elements and even the attribute values of an individual element).
Everything else in the DOM remains unchanged. This is possible due to the virtual DOM model (see Section 1.1.1), which React uses to determine the delta (set of changes) in the reconciliation process. This fact allows you to write code in a declarative style. React does all the routine work for you. The main stages of changing the presentation are discussed in Chapter 5.
React developers use states to generate new user interfaces. Component properties (this.props), ordinary variables (inputValue) and class attributes (this.inputValue) are not suitable for this, because changing their values (in the context of the current component) does not trigger changes to the view. For example, the following snippet is antipattern, which indicates that changing a value in any location other than the state will not update the view:
// : ! let inputValue = 'Texas' class Autocomplete extends React.Component { updateValues() ← { ( ) this.props.inputValue = 'California' inputValue = 'California' this.inputValue = 'California' } render() { return ( <div> {this.props.inputValue} {inputValue} {this.inputValue} </div> ) } } Now let's see how to work with the states of the React components.
Work with states
To work with states, you must be able to access values, update them, and set initial values. Let's start by referring to the states in the React components.
Appeal to states
The state object is an attribute of the component, and it should be accessed through a this link, for example this.state.name. As you remember, variables can be accessed and displayed in JSX code in curly braces ({}). Similarly, in render () you can render this.state (like any other variable or class attribute of a nonstandard component), for example {this.state.inputFieldValue}. This syntax is similar to the syntax for accessing properties in this.props.name.
 We use what you learned to implement the clock in fig. 4.3. Our goal is to create a standalone component class that anyone can import and use in their application without much hassle. The clock should display the current time.
The project has the following structure:
/clock index.html /jsx script.jsx clock.jsx /js script.js clock.js react.js react-dom.js I use the Babel CLI with the tracking flags (-w) and the directory (-d) to compile all the JSX source files from clock / jsx to the target folder clock / js and recompile when changes are detected. In addition, I saved the command as a npm script in the package.json file of the parent folder ch04 for executing the npm run build-clock command from ch04:
"scripts": { "build-clock": "./node_modules/.bin/babel clock/jsx -d clock/js -w" }, Of course, time does not stand still (whether we like it or not). Because of this, you must constantly update the view, and for this you can use the state. Name it currentTime and try to render the state as shown in listing 4.1.
Listing 4.1. Render states in JSX
class Clock extends React.Component { render() { return <div>{this.state.currentTime}</div> } } ReactDOM.render( <Clock />, document.getElementById('content') ) You will receive an error message: Uncaught TypeError: Cannot read property 'currentTime' of null. Usually, JavaScript error messages are about as good as a glass of cold water for a drowning person. Well, at least in this case, JavaScript displays a meaningful message.
The message indicates that the currentTime value is undefined. Unlike properties, states are not set in the parent. Calling setState in render () also fails, because it will create a loop (setState → render → setState ...), and React will report an error.
Purpose of the initial state
You have already seen that it is necessary to initialize the state before using state data in render (). To set the initial state, use this.state in the constructor with the syntax of the class ES6 React.Component. Remember to call super () with properties; otherwise, the logic in the parent (React.Component) will not work:
class MyFancyComponent extends React.Component { constructor(props) { super(props) this.state = {...} } render() { ... } } When assigning an initial state, you can also add other logic — for example, set the value to currentTime using new Date (). You can even use toLocaleString () to get the correct date / time format for the current location of the user, as shown below (ch04 / clock).
Listing 4.2. Clock Component Constructor
class Clock extends React.Component { constructor(props) { super(props) this.state = {currentTime: (new Date()).toLocaleString()} } ... } The value of this.state must be an object. We will not go into the details of constructor () from ES6; Refer to Appendix D and ES6 at github.com/azat-co/cheatsheets/tree/master/es6 . The bottom line is that, as in other OOP languages, the constructor (that is, the constructor ()) is called when an instance of the class is created. The name of the constructor method must be exactly that; consider this one of the rules of ES6. In addition, when creating the constructor () method, it almost always has to include a call to super (), without which the parent constructor will not be executed. On the other hand, if you do not define the constructor () method, then the super () call will be assumed by default.
The name currentTime is arbitrary; you must use the same name later when reading and updating this state.
The state object may contain nested objects or arrays. In the following example, an array with book descriptions is added to the state:
class Content extends React.Component { constructor(props) { super(props) this.state = { githubName: 'azat-co', books: [ 'pro express.js', 'practical node.js', 'rapid prototyping with js' ] } } render() { ... } } The constructor () method is called only once, when creating a React element based on a class. Thus, you can set the state directly using this.state only once - in the constructor () method. Do not install or update the state directly with this.state = ... somewhere else, as this may lead to unintended consequences.
So you only get the original value, which will very quickly become obsolete - in just 1 second. Who needs a watch that does not show the current time? Fortunately, there is a mechanism for updating the current state.
Status update
The state is changed by the method of the class this.setState (data, callback). When this method is called, React merges data with the current states and calls render (), and then calls a callback.
The definition of a callback in setState () is important because the method works asynchronously. If the operation of the application depends on the new state, you can use this callback to make sure that the new state has become available.
If you just assume that the state has been updated without waiting for the completion of setState (), that is, working synchronously when performing an asynchronous operation, an error may occur: the program’s operation depends on updating the state values, and the state remains old.
So far, we have rendered time from state. You already know how to set the initial state, but it should be updated every second, right? To do this, use the setInterval () browser's timer function (http://mng.bz/P2d6), which will update the state every n milliseconds. The setInterval () method is implemented in almost all modern browsers as a global one, which means that it can be used without any additional libraries or prefixes. Example:
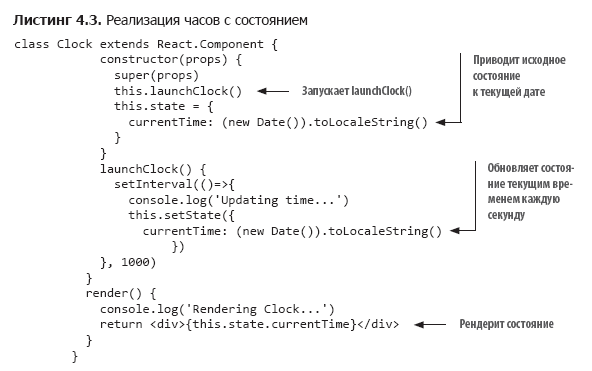
setInterval(()=>{ console.log('Updating time...') this.setState({ currentTime: (new Date()).toLocaleString() }) }, 1000) To start the countdown, you need to call setInterval () only once. Create a launchClock () method exclusively for this purpose; launchClock () will be called in the constructor. The final version of the component is shown in listing 4.3 (ch04 / clock / jsx / clock.jsx).
The setState () method can be called anywhere, not only in the launchClock () method (which is called in the constructor), as in the example. Typically, the setState () method is called from an event handler or as a callback when it arrives or updates data.
TIP An attempt to change the state in the code with a command like this.state.name = 'new name' will lead to nothing. It will not re-render and update the real DOM, whatever you want. In most cases, a direct state change without setState () is an anti-pattern and should be avoided.
It is important to note that the setState () method updates only those states that were transferred to it (partially or with merge, but without full replacement). It does not replace the entire state object every time. Therefore, if only one of the three states has changed, the other two will remain unchanged. In the following example, userEmail and userId will not be changed:
constructor(props) { super(props) this.state = { userName: 'Azat Mardan', userEmail: 'hi@azat.co', userId: 3967 } } updateValues() { this.setState({userName: 'Azat'}) } If you intend to update all three states, you will have to do this explicitly by passing the new values of these states to setState (). (Also, in the old code, which is no longer working, the this.replaceState () method is sometimes found; it is officially recognized as obsolete. As you might guess by name, it replaced the entire state object with all its attributes.)
Remember that calling setState () triggers the execution of render (). In most cases, it works. In some special cases in which the code depends on external data, you can initiate a re-render by calling this.forceUpdate (). However, such solutions are undesirable because relying on external data (instead of state) makes the components less reliable and dependent on external factors (hard linking).
As mentioned earlier, the state object can be accessed in this.state entries. In JSX, the displayed values are enclosed in curly brackets ({}), therefore, the declaration {this.state.NAME} should be applied to declare the state property in the view (that is, in the return command of the render method).
React magic occurs when you use state data in a view (for example, in output, in an if / else command, as an attribute value or the value of a child element property), and then pass new values to setState (). Bah! React updates all the necessary HTML markup for you. This can be seen in the DevTools console, where the “Updating ...” and “Rendering ...” cycles should be displayed. And the most remarkable thing is that it will only affect the absolute minimum of the required DOM elements.
»More information about the book can be found on the publisher's website.
» Table of Contents
» Excerpt
For Habrozhiteley 20% discount coupon - React
Upon payment of the paper version of the book, an electronic version of the book is sent to the e-mail.
Source: https://habr.com/ru/post/446440/
All Articles