Micropython on GSM + GPS A9G module
This time I thought about hiding a GPS tracker as a precaution in my bike. There are a lot of autonomous devices on the market for tracking cars, cargo, bicycles, luggage, children and animals. The vast majority of them interact with the user via SMS. More expensive options provide Find my phone functionality, but are tied to a specific online service.
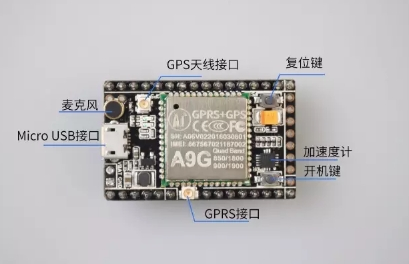
Ideally, I would like to have full control over the tracker: use it in a convenient mode without SMS and registration. Superficial googling led me to a couple of modules from the sky, one of which, the A9G pudding board, I ordered (~ $ 15).
This article is about how I got python to work on this module.
If A9G is an analogue of ESP (the manufacturer, by the way, is the same), then the pudding board itself is analogous to the NodeMCU board, except that the pudding board does not have an integrated USB-UART converter. But there are many other interesting things. Manufacturer Specifications:
- 32 bit core (RISC), up to 312MHz
- 29x GPIO (all soldered, this number includes all interfaces)
- watch and watchdog
- 1x USB 1.1 interface (I didn’t find it there, but copy from offsite) and microUSB for power
- 2x UART (+1 service)
- 2x SPI (did not try)
- 3x I2C (did not try)
- 1x SDMMC (with physical slot)
- 2x analog inputs (10 bits, perhaps one of them is used by lithium battery controllers)
- 4Mb flash
- 4Mb PSRAM
- ADC (microphone, physically exists on the board) and DAC (speaker, absent)
- battery charge controller (no battery itself)
- GSM (800, 900, 1800, 1900 MHz) with SMS, voice and GPRS
- GPS connected via UART2 (there is an "A9" module without it)
- SIM slot (nanoSIM)
- two buttons (one reset, the other - on and programmable function)
- two LEDs
The operating voltage is 3.3V, the input voltage is 5-3.8V (depending on the connection). In general, the module has all the necessary hardware in order to assemble a simple push-button mobile device from it. But from the examples one gets the impression that the Chinese buy it for sale from slot machines or slot machines with gambling or something like that. Alternatives to the module are quite popular SIM800 modules, which, unfortunately, do not have an SDK in free access (that is, modules are sold as AT modems).
Sdk
The SDK is attached to the module in satisfactory English. It is installed under Ubuntu, but Windows and containers are preferred. Everything works through poking in the GUI: ESPtool for this module is only to be overridden. The firmware itself is going to makefile. Debagger is there: before hanging, the module dumps the stack trace into the service port. But personally, I could not translate addresses into lines of code (gdb reports that addresses do not correspond to anything). It is possible that this is due to poor support for Linux itself. Accordingly, if you want to tinker with the module - try to do it under Windows (and unsubscribe at github). Otherwise, here are the instructions for Linux. After installation, you need to check the correctness of the paths in .bashrc and delete (rename) all CSDTK/lib/libQt* : otherwise, the flasher (also known as debugger) will simply not start due to a conflict with probably installed libQt.
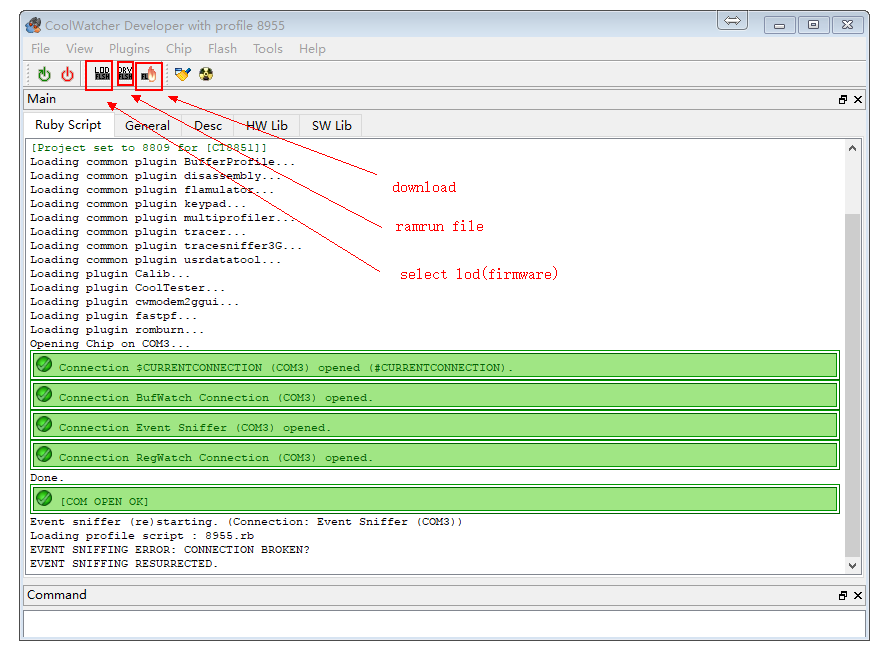
To the flasher goes instruction .
Connection
Everything is more complicated than on NodeMCU. The modules look similar, but on the pudding board there is no USB-TTY chip and microUSB is used only for power. Accordingly, you will need USB-TTY at 3.3V. And two are better: one for debugging the port and one for UART1: the first is used to fill the firmware and the second you can use as a normal terminal. In order not to drag all these snot to the computer, I additionally purchased a 4-port USB splitter with a two-meter wire and an external power supply (mandatory). The total cost of this set with the module itself will be $ 25-30 (without power supply: use from the phone).
Firmware
The module comes with AT firmware: you can connect to the 3.3V arduine and use it as a modem via UART1. Your firmware is written in C. make creates two firmware files: one is sewn for about a minute, the other is quite fast. You can sew only one of these files: the first time is large, the subsequent times are small. In total, in my development process, the Chinese SDK ( coolwatcher ) is open on the desktop for managing the module, miniterm as a stdio and code editor.
API
The API content reflects the list at the top and resembles ESP8266 in its early days: it took me 3 hours to launch HelloWorld. Unfortunately, the set of functions available to the user is very limited: for example, there is no access to the phone book on the SIM card, low-level information about connecting to a cellular network, and so on. API documentation is even less complete, so you have to rely on examples (two dozen) and include files. However, the module can do a lot down to SSL connections: obviously, the manufacturer has focused on the highest priority functions.
However, the programming of Chinese microcontrollers through the Chinese API must be loved. For all the others, the manufacturer began to port micropython to this module. I decided to try myself in an open-source project and continue this good deed (link at the end of the article).
micropython
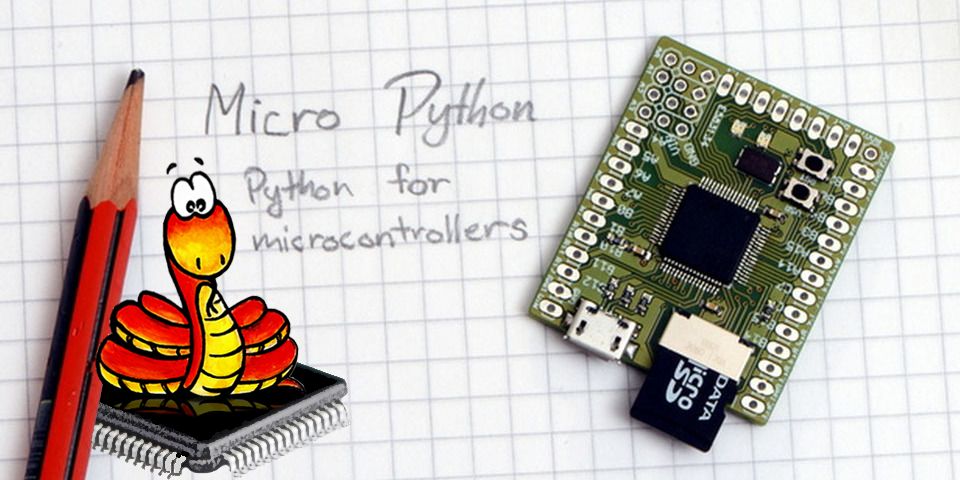
Micropython is an open-source project that port cPython to microcontrollers. Development is conducted in two directions. The first is the support and development of core libraries common to all microcontrollers that describe working with basic data types in python: objects, functions, classes, strings, atomic types, and so on. The second is, in fact, the ports: for each microcontroller, it is necessary to “teach” the library to work with the UART for I / O, select the stack for the virtual machine, specify a set of optimizations. Optionally, work with iron is described: GPIO, power, wireless communication, file system.
All this is written in pure C with macros: micropython has a set of recommended recipes starting from the declaration of strings in ROM to the writing of modules. In addition to this, samopisny modules on python are fully supported (the main thing is not to forget about the amount of memory). The project curators aim to launch jang (picture with a loaf of bread). As an advertisement: the project sells its own board for pyboard students, but ports for the ESP8266 and ESP32 modules are also popular.
When the firmware is ready and flooded - you simply connect to the microcontroller through the UART and get into the Python REPL.
$ miniterm.py /dev/ttyUSB1 115200 --raw MicroPython cd2f742 on 2017-11-29; unicorn with Cortex-M3 Type "help()" for more information. >>> print("hello") hello After that, you can start writing in almost ordinary python3 , not forgetting the memory limitations.
The A9G module is not officially supported (a list of officially supported modules is available in micropython/ports , there are about a dozen of them). Nevertheless, the iron manufacturer forked a micropython and created an environment for the A9G port: micropython/ports/gprs_a9 , for which he thanks a lot. At the moment when I became interested in this issue, the port was successfully compiled and the microcontroller welcomed me to the REPL. But, unfortunately, only the work with the file system and the GPIO was present from the third-party modules: nothing connected with the wireless network and GPS was available. I decided to correct this flaw and set myself the goal of porting all the functions necessary for the GPS tracker. The official documentation for this case is unnecessarily laconic: therefore, I had to poke around in the code.
Where to begin
First, go to micropython/ports and copy micropython/ports/minimal to the new folder where the port will be located. Then, edit main.c for your platform. Keep in mind that all the yummy is in the main function, where you need to call the initializer mp_init() , having previously prepared for it the settings of the microcontroller and the stack. Then, for event-driven API, you need to call pyexec_event_repl_init() and feed the characters entered via UART into the pyexec_event_repl_process_char(char) function. This will ensure interaction through the REPL. The second file, micropython/ports/minimal/uart_core.c describes blocking input and output in the UART. I give the original code for the STM32 for those who are too lazy to look.
main.c
int main(int argc, char **argv) { int stack_dummy; stack_top = (char*)&stack_dummy; #if MICROPY_ENABLE_GC gc_init(heap, heap + sizeof(heap)); #endif mp_init(); #if MICROPY_ENABLE_COMPILER #if MICROPY_REPL_EVENT_DRIVEN pyexec_event_repl_init(); for (;;) { int c = mp_hal_stdin_rx_chr(); if (pyexec_event_repl_process_char(c)) { break; } } #else pyexec_friendly_repl(); #endif //do_str("print('hello world!', list(x+1 for x in range(10)), end='eol\\n')", MP_PARSE_SINGLE_INPUT); //do_str("for i in range(10):\r\n print(i)", MP_PARSE_FILE_INPUT); #else pyexec_frozen_module("frozentest.py"); #endif mp_deinit(); return 0; } uart_core.c
// Receive single character int mp_hal_stdin_rx_chr(void) { unsigned char c = 0; #if MICROPY_MIN_USE_STDOUT int r = read(0, &c, 1); (void)r; #elif MICROPY_MIN_USE_STM32_MCU // wait for RXNE while ((USART1->SR & (1 << 5)) == 0) { } c = USART1->DR; #endif return c; } // Send string of given length void mp_hal_stdout_tx_strn(const char *str, mp_uint_t len) { #if MICROPY_MIN_USE_STDOUT int r = write(1, str, len); (void)r; #elif MICROPY_MIN_USE_STM32_MCU while (len--) { // wait for TXE while ((USART1->SR & (1 << 7)) == 0) { } USART1->DR = *str++; } #endif } After that, you need to rewrite the Makefile using the recommendations / compiler from the manufacturer: everything is individual. Everything, ideally, should be enough: we assemble, fill in the firmware and see the REPL in the UART.
After reviving the micropython you need to take care of its well-being: set up the garbage collector, the correct reaction to Ctrl-D (soft reset) and some other things that I will not dwell on: see the mpconfigport.h file.
Create a module
The most interesting thing is to write your own modules. So, a module (optional, but desirable) starts with its own mod[].c file mod[].c , which is added to the Makefile (variable SRC_C if you follow the convention). An empty module looks like this:
// nlr - non-local return: C , goto- . // nlr_raise . #include "py/nlr.h" // . , mp_map_elem_t, , . #include "py/obj.h" // . mp_raise_ValueError(char* msg) mp_raise_OSError(int errorcode) . // , mp_call_function_* Callable ( callback-). #include "py/runtime.h" #include "py/binary.h" // header : #include "portmodules.h" // -- . MP_QSTR_[ ]. MP_OBJ_NEW_QSTR . // RAM. // - __name__ STATIC const mp_map_elem_t mymodule_globals_table[] = { { MP_OBJ_NEW_QSTR(MP_QSTR___name__), MP_OBJ_NEW_QSTR(MP_QSTR_mymodule) }, }; // STATIC MP_DEFINE_CONST_DICT (mp_module_mymodule_globals, mymodule_globals_table); // : const mp_obj_module_t mp_module_mymodule = { .base = { &mp_type_module }, .globals = (mp_obj_dict_t*)&mp_module_mymodule_globals, }; Of course, the port itself does not recognize the constant mp_module_mymodule : it must be added to the variable MICROPY_PORT_BUILTIN_MODULES in the settings of the port mpconfigport.h . By the way non dull wallpapers Chip name and port name are also changed there. After all these changes, you can try to compile the module and import it from the REPL. The module will have only one __name__ attribute with the name of the module (a different case for checking the auto-completion in the REPL via Tab).
>>> import mymodule >>> mymodule.__name__ 'mymodule' Constants
The next stage in complexity is the addition of constants. Constants are often needed for settings ( INPUT , OUTPUT , HIGH , LOW , etc.) Everything is quite simple. Here, for example, the magic_number = 10 constant:
STATIC const mp_map_elem_t mymodule_globals_table[] = { { MP_OBJ_NEW_QSTR(MP_QSTR___name__), MP_OBJ_NEW_QSTR(MP_QSTR_mymodule) }, { MP_OBJ_NEW_QSTR(MP_QSTR_magic_number), MP_OBJ_NEW_SMALL_INT(10) }, }; Testing:
>>> import mymodule >>> mymodule.magic_number 10 Functions
Adding a function to a module follows the general principle: declare, wrap, add (I give a slightly more complicated example than in the documentation).
// STATIC mp_obj_t conditional_add_one(mp_obj_t value) { // int. - : . int value_int = mp_obj_get_int(value); value_int ++; if (value_int == 10) { // None return mp_const_none; } // int return mp_obj_new_int(value); } // . // runtime.h . STATIC MP_DEFINE_CONST_FUN_OBJ_1(conditional_add_one_obj, conditional_add_one); // STATIC const mp_map_elem_t mymodule_globals_table[] = { { MP_OBJ_NEW_QSTR(MP_QSTR___name__), MP_OBJ_NEW_QSTR(MP_QSTR_mymodule) }, { MP_OBJ_NEW_QSTR(MP_QSTR_magic_number), MP_OBJ_NEW_SMALL_INT(10) }, { MP_OBJ_NEW_QSTR(MP_QSTR_conditional_add_one), (mp_obj_t)&conditional_add_one_obj }, }; Testim:
>>> import mymodule >>> mymodule.conditional_add_one(3) 4 >>> mymodule.conditional_add_one(9) >>> Classes (types)
With classes (types), everything is also relatively simple. Here is an example from the documentation (well, almost):
// STATIC const mp_map_elem_t mymodule_hello_locals_dict_table[] = {}; // STATIC MP_DEFINE_CONST_DICT(mymodule_hello_locals_dict, mymodule_hello_locals_dict_table); // , , const mp_obj_type_t mymodule_helloObj_type = { // { &mp_type_type }, // : helloObj .name = MP_QSTR_helloObj, // .locals_dict = (mp_obj_dict_t*)&mymodule_hello_locals_dict, }; // STATIC const mp_map_elem_t mymodule_globals_table[] = { { MP_OBJ_NEW_QSTR(MP_QSTR___name__), MP_OBJ_NEW_QSTR(MP_QSTR_mymodule) }, { MP_OBJ_NEW_QSTR(MP_QSTR_magic_number), MP_OBJ_NEW_SMALL_INT(10) }, { MP_OBJ_NEW_QSTR(MP_QSTR_conditional_add_one), (mp_obj_t)&conditional_add_one_obj }, { MP_OBJ_NEW_QSTR(MP_QSTR_conditional_add_one), (mp_obj_t)&mymodule_helloObj_type }, }; Testim:
>>> mymodule.helloObj <type 'helloObj'> The resulting type can be inherited, compared, but it has neither a constructor nor any associated data. The data is added "side by side" with the designer: it is proposed to create a separate structure in which the Python type will be stored separately and a random data set separately.
// -. , typedef struct _mymodule_hello_obj_t { // mp_obj_base_t base; // - uint8_t hello_number; } mymodule_hello_obj_t; How to interact with this data? One of the most difficult ways is through the constructor.
// -, (, , mymodule_helloObj_type // , - ), (args kwargs) // : args, kwargs STATIC mp_obj_t mymodule_hello_make_new( const mp_obj_type_t *type, size_t n_args, size_t n_kw, const mp_obj_t *args ) { // mp_arg_check_num(n_args, n_kw, 1, 1, true); // mymodule_hello_obj_t *self = m_new_obj(mymodule_hello_obj_t); // self->base.type = &mymodule_hello_type; // self->hello_number = mp_obj_get_int(args[0]) // return MP_OBJ_FROM_PTR(self); // __init__, , } // make_new const mp_obj_type_t mymodule_helloObj_type = { { &mp_type_type }, .name = MP_QSTR_helloObj, .locals_dict = (mp_obj_dict_t*)&mymodule_hello_locals_dict, // .make_new = mymodule_hello_make_new, }; Of the other fields, there is another .print , and I suppose the rest of the magic of Python3 .
But make_new is not at all necessary to get an object instance: initialization can be done in an arbitrary function. Here is a good example from micropython/ports/esp32/modsocket.c :
// : STATIC mp_obj_t get_socket(size_t n_args, const mp_obj_t *args) { socket_obj_t *sock = m_new_obj_with_finaliser(socket_obj_t); sock->base.type = &socket_type; sock->domain = AF_INET; sock->type = SOCK_STREAM; sock->proto = 0; sock->peer_closed = false; if (n_args > 0) { sock->domain = mp_obj_get_int(args[0]); if (n_args > 1) { sock->type = mp_obj_get_int(args[1]); if (n_args > 2) { sock->proto = mp_obj_get_int(args[2]); } } } sock->fd = lwip_socket(sock->domain, sock->type, sock->proto); if (sock->fd < 0) { exception_from_errno(errno); } _socket_settimeout(sock, UINT64_MAX); return MP_OBJ_FROM_PTR(sock); } // 0-3 STATIC MP_DEFINE_CONST_FUN_OBJ_VAR_BETWEEN(get_socket_obj, 0, 3, get_socket); Bound methods
The next step is to add attached methods. However, this is not much different from all other methods. We return to the example from the documentation:
// : 1 (self) STATIC mp_obj_t mymodule_hello_increment(mp_obj_t self_in) { mymodule_hello_obj_t *self = MP_OBJ_TO_PTR(self_in); self->hello_number += 1; return mp_const_none; } // MP_DEFINE_CONST_FUN_OBJ_1(mymodule_hello_increment_obj, mymodule_hello_increment); // 'inc' STATIC const mp_map_elem_t mymodule_hello_locals_dict_table[] = { { MP_OBJ_NEW_QSTR(MP_QSTR_inc), (mp_obj_t)&mymodule_hello_increment_obj }, } Everything!
>>> x = mymodule.helloObj(12) >>> x.inc() All other attributes: getattr , setattr
How about adding non-functions, using @property and generally own __getattr__ ? Please: this is done manually bypassing mymodule_hello_locals_dict_table .
// ... STATIC void mymodule_hello_attr(mp_obj_t self_in, qstr attr, mp_obj_t *dest) { mymodule_hello_obj_t *self = MP_OBJ_TO_PTR(self_in); if (dest[0] != MP_OBJ_NULL) { // __setattr__ if (attr == MP_QSTR_val) { self->val = dest[1]; dest[0] = MP_OBJ_NULL; } } else { // __getattr__ if (attr == MP_QSTR_val) { dest[0] = self->val; } } } // ... attr const mp_obj_type_t mymodule_helloObj_type = { { &mp_type_type }, .name = MP_QSTR_helloObj, // //.locals_dict = (mp_obj_dict_t*)&mymodule_hello_locals_dict, .make_new = mymodule_hello_make_new, // - attr .attr = mymodule_hello_attr, }; Something hurt laconic attr turned out, you say. Where are all these mp_raise_AttributeError ( note : there is no such function)? In fact, AttributeError will be called automatically. The secret is that dest is an array of two elements. The first element has the meaning of "output", write-only: it takes the value MP_OBJ_SENTINEL if the value needs to be written and MP_OBJ_NULL if it needs to be read. Accordingly, at the output of the function MP_OBJ_NULL is expected in the first case and something mp_obj_t in the second. The second element is “input”, read-only: accepts the value of the object to be written if the value is to be written and MP_OBJ_NULL if it is to be read. You do not need to change it.
That's it, you can check:
>>> x = mymodule.helloObj(12) >>> x.val = 3 >>> x.val 3 The most interesting thing is that Tab completion in the REPL still works and suggests .val ! I honestly am not an expert in C, so I can only guess how this happens (by redefining the operator '==').
Port
Returning to the A9G module, I described the support for all the basic functions, namely, SMS, GPRS (usockets), GPS, power management. Now you can pour something like this on the module and it will work:
import cellular as c import usocket as sock import time import gps import machine # print("Waiting network registration ...") while not c.is_network_registered(): time.sleep(1) time.sleep(2) # GPRS print("Activating ...") c.gprs_activate("internet", "", "") print("Local IP:", sock.get_local_ip()) # GPS gps.on() # thingspeak host = "api.thingspeak.com" api_key = "some-api-key" fields = ('latitude', 'longitude', 'battery', 'sat_visible', 'sat_tracked') # , ! fields = dict(zip(fields, map(lambda x: "field{}".format(x+1), range(len(fields))) )) x, y = gps.get_location() level = machine.get_input_voltage()[1] sats_vis, sats_tracked = gps.get_satellites() s = sock.socket() print("Connecting ...") s.connect((host, 80)) print("Sending ...") # , HTTP. HTTP, SSL print("Sent:", s.send("GET /update?api_key={}&{latitude}={:f}&{longitude}={:f}&{battery}={:f}&{sat_visible}={:d}&{sat_tracked}={:d} HTTP/1.1\r\nHost: {}\r\nConnection: close\r\n\r\n".format( api_key, x, y, level, sats_vis, sats_tracked, host, **fields ))) print("Receiving ...") print("Received:", s.recv(128)) s.close() The project welcomes all possible assistance. If you like the project and / or this article - do not forget to leave a Like on githabe .
')
Source: https://habr.com/ru/post/446090/
All Articles