Flutter. Keys! What are they for?
The key parameter can be found in almost every constructor of the widget, but they are rarely used during development. Keys retain state when moving widgets in a tree of widgets. In practice, this means that they can be useful for saving the user's scrolling location or saving state when the collection changes.
This article is adapted from the following video . If you prefer to listen / watch rather than read, the video will provide you with the same material.
Secret information about the keys
Most of the time ... keys you don't need. In general, there is no harm in adding them, but this is also not necessary, since they simply take up space as a new keyword or type declaration on both sides of a new variable (I’m on you, Map<Foo, Bar> aMap = Map<Foo, Bar>() ).
But if you find that you add, delete or rearrange widgets in the collection that contain some state and have one type, then you should pay attention to the keys !To demonstrate why you need keys when changing a collection of widgets, I wrote an extremely simple application with two multi-colored widgets that change places when you press a button:
In this version of the application, I have two random stateless state widgets ( StatelessWidget ) in Row and a stateful PositionedTiles widget with state ( StatefulWidget ) to store the order of color widgets in it. When I click the FloatingActionButton button at the bottom, the colored widgets correctly change their place in the list:
void main() => runApp(new MaterialApp(home: PositionedTiles())); class PositionedTiles extends StatefulWidget { @override State<StatefulWidget> createState() => PositionedTilesState(); } class PositionedTilesState extends State<PositionedTiles> { List<Widget> tiles = [ StatelessColorfulTile(), StatelessColorfulTile(), ]; @override Widget build(BuildContext context) { return Scaffold( body: Row(children: tiles), floatingActionButton: FloatingActionButton( child: Icon(Icons.sentiment_very_satisfied), onPressed: swapTiles), ); } swapTiles() { setState(() { tiles.insert(1, tiles.removeAt(0)); }); } } class StatelessColorfulTile extends StatelessWidget { Color myColor = UniqueColorGenerator.getColor(); @override Widget build(BuildContext context) { return Container( color: myColor, child: Padding(padding: EdgeInsets.all(70.0))); } } But if we add a state to our color widgets (we make them StatefulWidget ) and store the color in them, then when we click on the button it looks as if nothing is happening:
List<Widget> tiles = [ StatefulColorfulTile(), StatefulColorfulTile(), ]; ... class StatefulColorfulTile extends StatefulWidget { @override ColorfulTileState createState() => ColorfulTileState(); } class ColorfulTileState extends State<ColorfulTile> { Color myColor; @override void initState() { super.initState(); myColor = UniqueColorGenerator.getColor(); } @override Widget build(BuildContext context) { return Container( color: myColor, child: Padding( padding: EdgeInsets.all(70.0), )); } } As an explanation: the code mentioned above is buggy in that it does not show the color exchange when the user presses the button. To correct this error, you need to add the key parameter to the color StatefulWidget widgets, and then the widgets will switch places as we want:
List<Widget> tiles = [ StatefulColorfulTile(key: UniqueKey()), // Keys added here StatefulColorfulTile(key: UniqueKey()), ]; ... class StatefulColorfulTile extends StatefulWidget { StatefulColorfulTile({Key key}) : super(key: key); // NEW CONSTRUCTOR @override ColorfulTileState createState() => ColorfulTileState(); } class ColorfulTileState extends State<ColorfulTile> { Color myColor; @override void initState() { super.initState(); myColor = UniqueColorGenerator.getColor(); } @override Widget build(BuildContext context) { return Container( color: myColor, child: Padding( padding: EdgeInsets.all(70.0), )); } } But this is only necessary if you have widgets with a state in the subtree that you are changing. If the entire subtree of the widget in your collection has no status, the keys are not needed.
Like this! In general, all you need to know to use the keys in Flutter . But if you want to go deep into what is happening ...
Understand why keys sometimes needed
Are you still here, huh? Well, then come closer to find out the true nature of the element trees and widgets, to become the Flutter Magician! Uhahaha! Haha Haha Um, sorry.
As you know, inside for each widget Flutter builds the corresponding element. Just as Flutter builds a tree of widgets, it also creates a tree of elements (ElementTree). ElementTree is extremely simple, it contains only information about the type of each widget and a link to its children. You can think of thinking of ElementTree as the skeleton of your Flutter application. It shows the structure of your application, but all additional information can be viewed at the link to the source widget.
The Row widget in the example above contains a set of ordered slots for each of its child elements. When we change the order of the color widgets in Row, Flutter walks over the ElementTree to check if the skeleton structure of the application is the same.
Validation begins with a RowElement, and then proceeds to child elements. ElementTree verifies that the new widget has the same type and key as the old one, and if so, the element updates its link to the new widget. In the stateless version of the code, widgets do not have a key , so Flutter simply checks only the type. (If too much information at a time, then look at the animated diagram above.)
Below the ElementTree for state widgets looks a little different. There are widgets and elements as before, but there are also a couple of state objects for the widgets, and the color information is stored in them, not in the widgets themselves.
In the case of StatefulWidget color widgets without a key , when I change the order of two widgets, Flutter walks over an ElementTree, checks the type of RowWidget, and updates the link. Then the color widget element checks that the corresponding widget is of the same type and updates the link. The same thing happens with the second widget. Since Flutter uses the ElementTree and its corresponding state to determine what is actually displayed on your device, from our point of view, it seems that the widgets have not been swapped!
In the revised version of the code in color widgets with the state in the constructor, I defined the key property. Now, if we change the widgets in Row , then by type they will match as before, but the key values of the color widget and the corresponding element in the ElementTree will be different. This causes Flutter to deactivate these elements of the color widgets and remove references to them in the ElementTree, starting with the first one that does not have a key .

Then Flutter searches for the child widgets in the Row element in the ElementTree with the corresponding key . When matched, adds a link to the item on the widget. Flutter makes for each child element without a link. Now Flutter will display what we expect, color widgets are swapped when I press the button.
Thus, keys are useful if you change the order or number of widgets with the state in the collection. In this example, I saved the color. However, often the condition is not so obvious. Playing animation, displaying user input, and scrolling a location — everything has a state.
When should I use keys ?
The short answer is: if you need to add keys to the application, you should add them at the top of the subtree of the widgets with the state you want to save.
A common mistake I’ve seen is that people think that they only need to define a key for the first widget with a state, but there are nuances. Do not believe me? To show what trouble we could get into, I wrapped my color widgets in the Padding widgets, while leaving the keys for the color widgets.
void main() => runApp(new MaterialApp(home: PositionedTiles())); class PositionedTiles extends StatefulWidget { @override State<StatefulWidget> createState() => PositionedTilesState(); } class PositionedTilesState extends State<PositionedTiles> { // Stateful tiles now wrapped in padding (a stateless widget) to increase height // of widget tree and show why keys are needed at the Padding level. List<Widget> tiles = [ Padding( padding: const EdgeInsets.all(8.0), child: StatefulColorfulTile(key: UniqueKey()), ), Padding( padding: const EdgeInsets.all(8.0), child: StatefulColorfulTile(key: UniqueKey()), ), ]; @override Widget build(BuildContext context) { return Scaffold( body: Row(children: tiles), floatingActionButton: FloatingActionButton( child: Icon(Icons.sentiment_very_satisfied), onPressed: swapTiles), ); } swapTiles() { setState(() { tiles.insert(1, tiles.removeAt(0)); }); } } class StatefulColorfulTile extends StatefulWidget { StatefulColorfulTile({Key key}) : super(key: key); @override ColorfulTileState createState() => ColorfulTileState(); } class ColorfulTileState extends State<ColorfulTile> { Color myColor; @override void initState() { super.initState(); myColor = UniqueColorGenerator.getColor(); } @override Widget build(BuildContext context) { return Container( color: myColor, child: Padding( padding: EdgeInsets.all(70.0), )); } } Now, by pressing the button, widgets get completely random colors!
This is how the tree of widgets and ElementTree looks like with Padding widgets added:
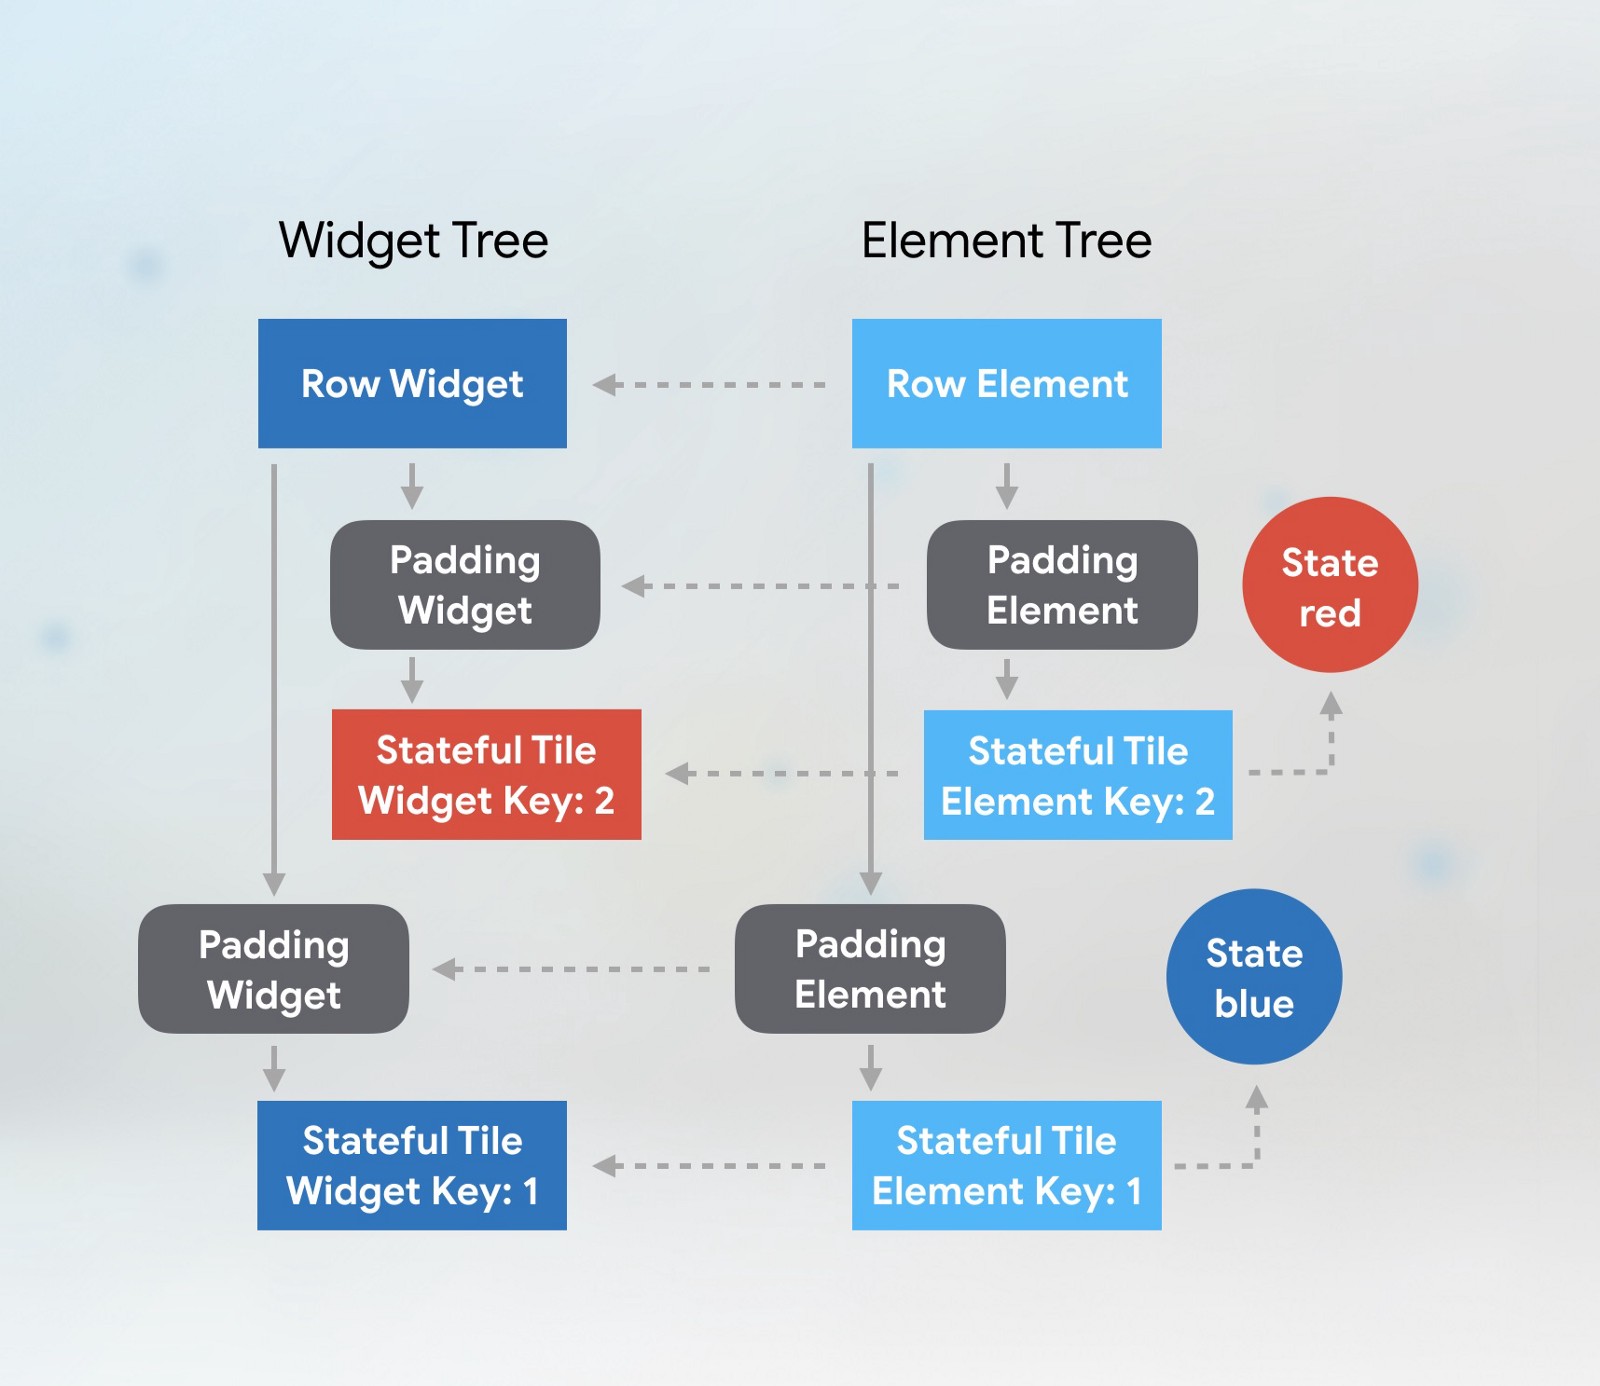
When we change the positions of child widgets, the algorithm for finding the correspondence between elements and widgets looks at one level in the element tree. In the diagram, the child elements of the child elements are darkened so that nothing distracts from the first level. At this level, everything matches correctly.
At the second level, Flutter notices that the key color element does not match the key widget, so he deactivates this element, discarding all references to it. keys we use in this example are LocalKeys . This means that when matching a widget with elements, Flutter only searches for keys at a particular tree level.
Since it cannot find the element of the color widget at this level with the corresponding key , it creates a new one and initializes the new state, making the widget orange in this case!
If we define keys for Padding widgets:
void main() => runApp(new MaterialApp(home: PositionedTiles())); class PositionedTiles extends StatefulWidget { @override State<StatefulWidget> createState() => PositionedTilesState(); } class PositionedTilesState extends State<PositionedTiles> { List<Widget> tiles = [ Padding( // Place the keys at the *top* of the tree of the items in the collection. key: UniqueKey(), padding: const EdgeInsets.all(8.0), child: StatefulColorfulTile(), ), Padding( key: UniqueKey(), padding: const EdgeInsets.all(8.0), child: StatefulColorfulTile(), ), ]; @override Widget build(BuildContext context) { return Scaffold( body: Row(children: tiles), floatingActionButton: FloatingActionButton( child: Icon(Icons.sentiment_very_satisfied), onPressed: swapTiles), ); } swapTiles() { setState(() { tiles.insert(1, tiles.removeAt(0)); }); } } class StatefulColorfulTile extends StatefulWidget { StatefulColorfulTile({Key key}) : super(key: key); @override ColorfulTileState createState() => ColorfulTileState(); } class ColorfulTileState extends State<ColorfulTile> { Color myColor; @override void initState() { super.initState(); myColor = UniqueColorGenerator.getColor(); } @override Widget build(BuildContext context) { return Container( color: myColor, child: Padding( padding: EdgeInsets.all(70.0), )); } } Flutter notices the problem and updates the links correctly, as was the case in our previous example. The order in the universe is restored.
What type of Key should i use?
Flutter APIs gave us a choice of several Key classes. The type of key that you must use depends on what is the distinguishing characteristic of the elements that need keys . Look at the information that you store in the appropriate widgets.
Consider the following To-do application [1], where you can change the order of items in the task list based on priority, and when you're done, you can delete them.
Valuekey
In this case, it can be expected that the text of the item to be executed will be permanent and unique. If so, then this is probably a good candidate for ValueKey , where the text is “value”.
return TodoItem( key: ValueKey(todo.task), todo: todo, onDismissed: (direction) => _removeTodo(context, todo), ); Objectkey
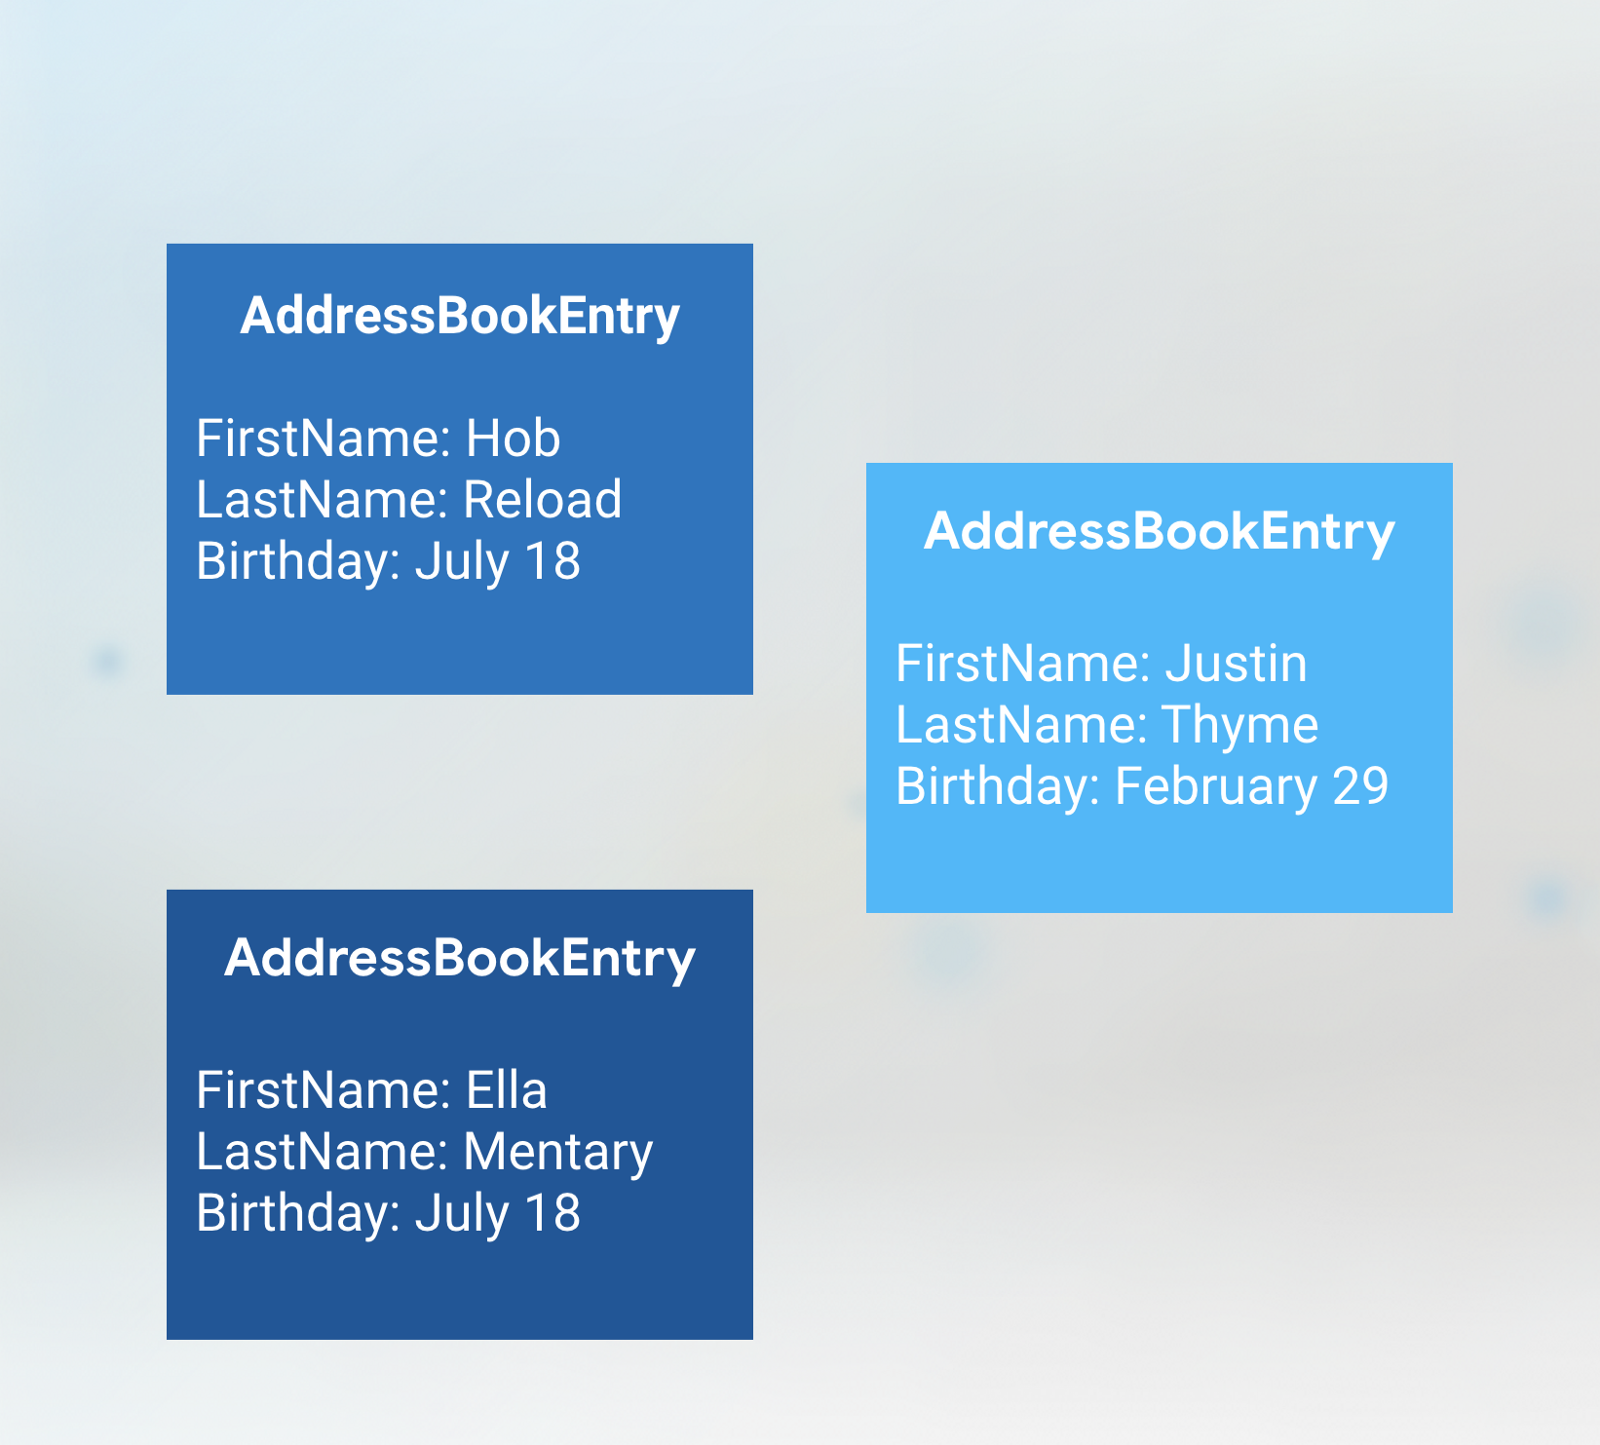
In another case, you may have the Address Book application, which lists information about each user. In this case, each child widget stores a more complex combination of data. Any of the individual fields, such as the name or birthday, may be the same as another entry, but the combination is unique. In this case, the ObjectKey is most likely best suited.
UniqueKey
If you have several widgets in the collection with the same value, or if you really want to make sure that each widget is different from all others, you can use UniqueKey . I used UniqueKey in the sample application to switch colors, because we did not have other persistent data that would be stored in our widgets, and we did not know what color the widget would have when it was created.
However, one thing you do not want to use as your key is a random number. Every time a widget is created, a new random number will be generated and you will lose consistency between frames. In this scenario, you may not use the keys at all!
PageStorageKeysPageStorageKeys are specialized keys that contain the current state of the scroll so that the application can save it for later use.
Globalkeys
There are two options for using GlobalKeys : they allow widgets to change parents anywhere in the application without losing state and can be used to access information about another widget in a completely different part of the widget tree. As an example of the first scenario, you can imagine that you want to show the same widget on two different screens, but with the same state, so that the widget data is saved, you will use GlobalKey . In the second case, a situation may arise when you need to verify the password, but you do not want to share status information with other widgets in the tree. GlobalKeys can also be useful for testing, using the key to access a specific widget and request information about its state.
Often (but not always!) GlobalKeys bit like global variables. Often, they can be replaced by the use of InheritedWidgets or something like Redux, or the BLoC template.
Brief conclusion
In general, use Keys if you want to keep the state between the subtrees of the widgets. This most often occurs when changing the collection of widgets of the same type. Place the key at the top of the subtree of the widgets that you want to save, and select the key type based on the data stored in the widget.
Congratulations, you are now on your way to becoming a Flutter Magician! Oh, I told the magician? I meant the magician [2], as the one who writes the source code of the application ... which is almost as good. …Nearly.
[1] Inspiration for writing code for to-do applications is obtained here.
https://github.com/brianegan/flutter_architecture_samples/tree/master/vanilla
[2] The author uses the word sorcerer and later adds an extra letter to it to the sourcerer
')
Source: https://habr.com/ru/post/446050/
All Articles