How to make friends Progress OpenEdge and Oracle DBMS
Since 1999, the back office in our bank has been using the integrated banking system BISQUIT on the Progress OpenEdge platform, which is widely used throughout the world, including in the financial sector. The performance of this DBMS allows you to read up to a million or more records per second in a single database (DB). We Progress OpenEdge serves about 1.5 million deposits of individuals and about 22.2 million contracts for active products (car loans and mortgages), and is also responsible for all settlements with the regulator (CB) and SWIFT.

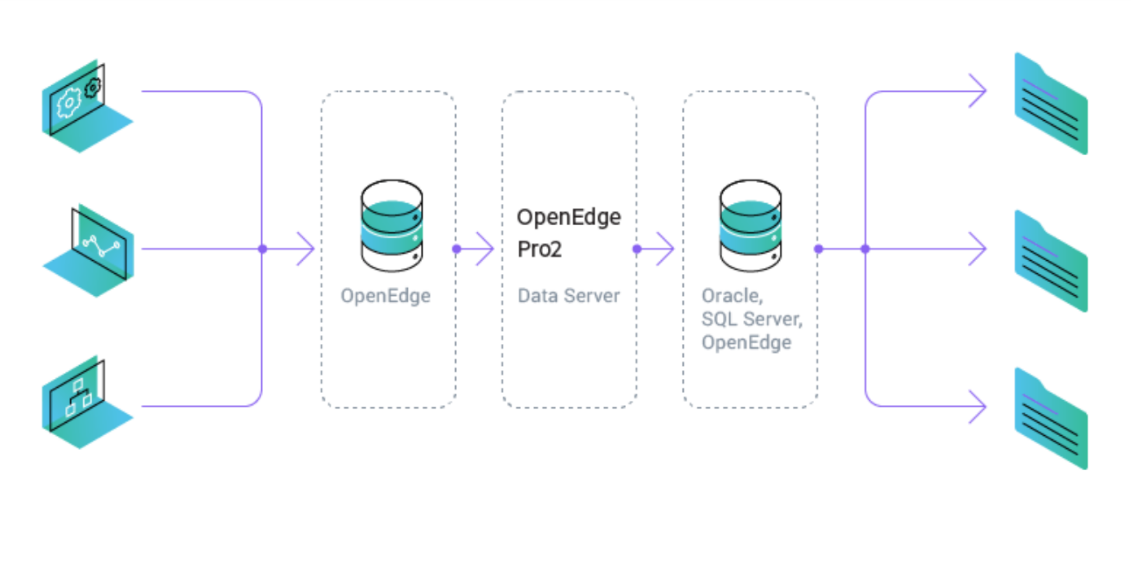
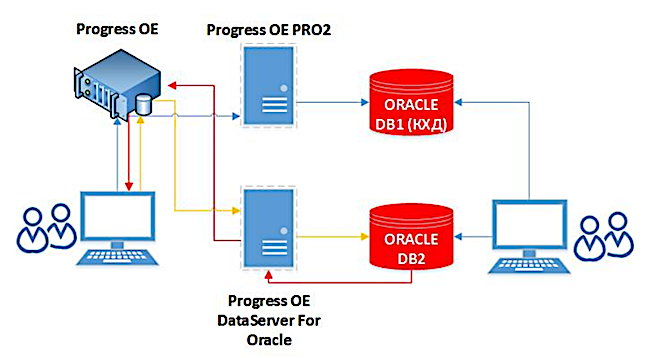
Using Progress OpenEdge, we are faced with the fact that we need to make friends with Oracle DBMS. Initially, this bundle was the “bottleneck” of our infrastructure - until we installed and configured Pro2 CDC — a Progress product that allows you to send data from the Progress DBMS to the Oracle DBMS directly, online. In this post we describe in detail, with all the pitfalls, how to effectively make friends with OpenEdge and Oracle.
First, a few facts about our infrastructure. The number of active users of the database is about 15 thousand. The volume of all productive databases, including the replica and standby, is 600 TB, the largest database is 16.5 TB. At the same time, databases are constantly replenished: only in the last year about 120 TB of productive data have been added. The system provides 150 front-servers on the x86 platform. Databases are hosted on 21 IBM platform servers.
')
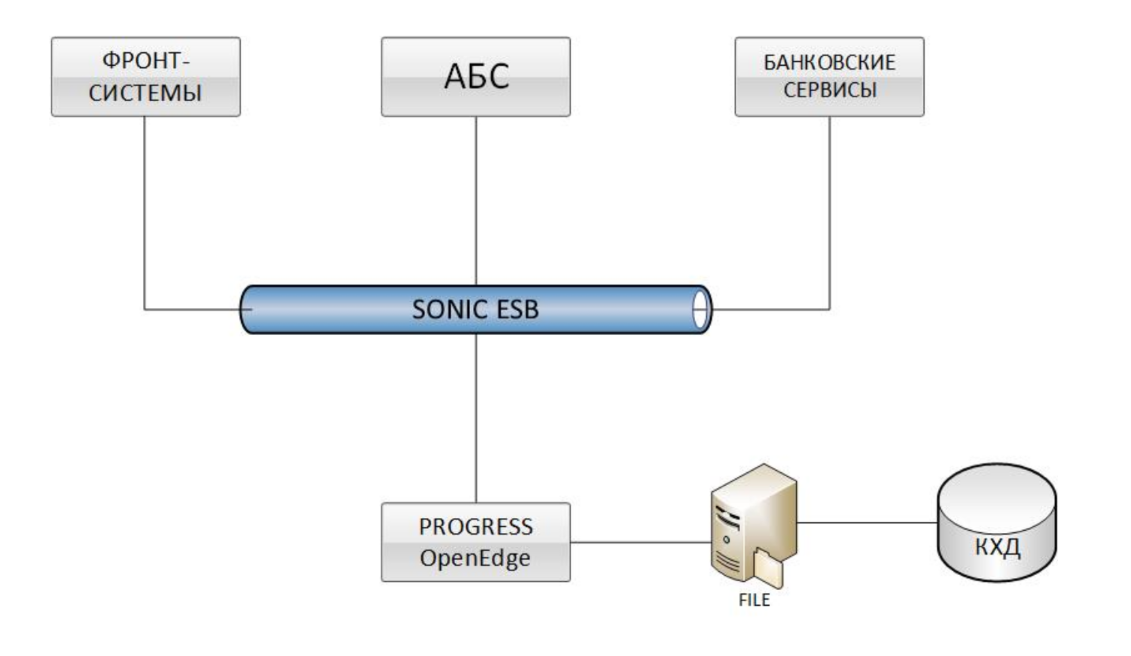
Front systems, various ABS and banking services are integrated with OpenEdge Progress (BISQUIT IAS) via the Sonic ESB bus. Data is downloaded to QCD through file sharing. Up to a certain point in time, such a solution had two major problems at once - poor performance of uploading information to the corporate data warehouse (QCD) and a long time to perform data reconciliation (reconciliation) with other systems.
Therefore, we began to look for a tool that could speed up these processes. The solution to both problems was the new Progress OpenEdge product - Pro2 CDC (Change Data Capture). So, let's begin.
For Pro2 Oracle to work on the administrator's Windows computer, it is enough to install the Progress OpenEdge Developer Kit Classroom Edition, which you can download for free. OpenEdge installation directories by default:
DLC: C: \ Progress \ OpenEdge
WRK: C: \ OpenEdge \ WRK
ETL processes require Progress OpenEdge version 11.7+ licenses — namely, OE DataServer for Oracle and 4GL Development System. Pro2 supplies these licenses. For full operation of DataServer for Oracle with a remote Oracle database, Full Oracle Client is installed.
On Oracle, you need to install a version of Oracle Database 12+, create an empty database and add a user (let's call it cdc ).
To install Pro2Oracle, download the latest distribution from the Progress Software download center. Unpack the archive into the C: \ Pro2 directory (to configure Pro2 on Unix, the same distribution kit is used and the same configuration principles apply).
The cdc replication database (repl) is used by Pro2 to store configuration information, including a replication map, names of replicable databases and their tables. It also contains a replication queue consisting of notes about the fact that a row in a table has changed in the source database. Data from the replication queue is used by ETL processes to identify the rows that need to be copied to Oracle from the source database.
We create a separate cdc database.
Now let's turn on the inclusion of the CDC mechanism itself, through which data will be replicated to an additional technological area. Separate storage areas must be added to each source Progress OpenEdge database, to which source data will be duplicated, and to activate the mechanism itself using the proutil command .
Next, we need on the server, where the data from the Progress DBMS to the Oracle DBMS will be replicated, to create the Schema Holder database. DataServer Schema Holder is an empty Progress OpenEdge database without users or application data containing a map of the correspondence between the source tables and the external, Oracle tables.
The Schema Holder base for Progress OpenEdge DataServer for Oracle for Pro2 must be located on the ETL process server, it is created separately for each branch.
The Pro2 administrative panel configures Pro2 parameters, including setting up a replication scheme and generating ETL process programs (Processor Library), primary synchronization programs (Bulk-Copy Processor), replication triggers, and OpenEdge CDC policies. There are also primary tools for monitoring and managing ETL and CDC processes. First of all we set up the parameter files.
To configure Windows shortcuts, go to the C: \ Pro2 \ bprepl \ Scripts directory and edit the “Pro2 - Administration” shortcut. To do this, open the properties of the shortcut and in the Start in line we specify the installation directory Pro2. A similar operation needs to be done for the “Pro2 - Editor” and “RunBulkLoader” shortcuts.
Run the console.
Go to the "DB Map".

To link databases in Pro2 - Administration, go to the DB Map tab. Add source database mapping - Schema Holder - Oracle .

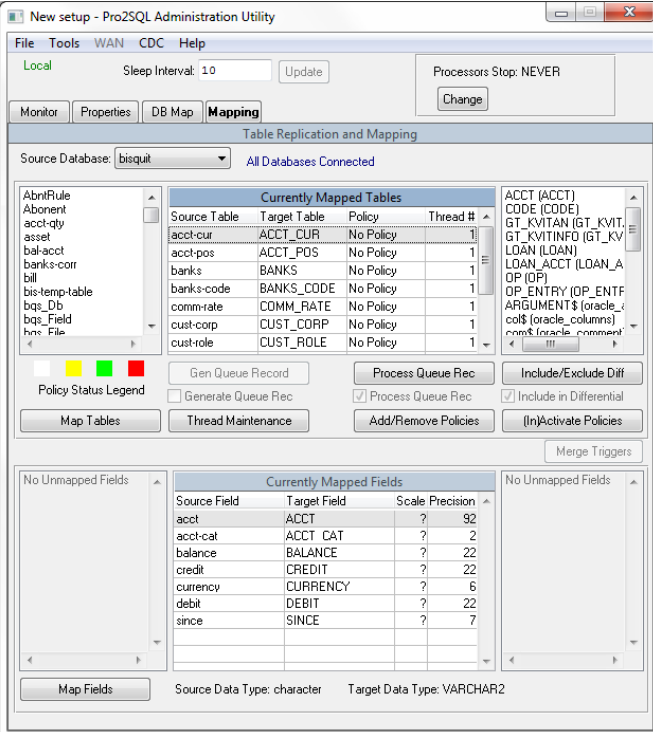
Go to the Mapping tab. In the Source Database list by default, the first connected source database is selected. To the right of the list should be the inscription All Databases Connected - the selected bases are connected. Below on the left should be a list of bisquit Progress tables. On the right is a list of tables from the Oracle database.
To create a replication map, you must first generate a SQL schema in Oracle. In Pro2 Administration, select the Tools -> Generate Code -> Target Schema menu item, then select one or several source databases in the Select Database dialog box and transfer them to the right.

Click OK and select the directory to save the SQL schemas.
Next, create a database. This can be done, for example, through Oracle SQL Developer . To do this, connect to the database and load the schema for adding tables. After changing the composition of Oracle tables, you need to update the SQL schema in Schema Holder.

After successful completion of the download, exit the bisquitsh database and open the Pro2 administration panel. On the Mapping tab, tables from the Oracle database should appear on the right.
To create a replication map in the administrative panel Pro2, go to the Mapping tab, select the source database. Click on the Map Tables, select the Select Changes tables on the left, which should be replicated to Oracle, transfer them to the right and confirm the selection. For selected tables, a map will be created automatically. Repeat the operation to create a replication map for other source databases.
The replication processor library (Processor Library) is designed for special replication processes (ETL) that process the Pro2 replication queue and transfer changes to the Oracle database. After generation, the replication processor library programs are automatically saved in the bprepl / repl_proc directory (PROC_DIRECTORY parameter) . To generate a replication processor library, go to Tools -> Generate Code -> Processor Library. After the generation is complete, the programs will appear in the bprepl / repl_proc directory .
Bulk processor programs are used to synchronize Progress source databases with the target Oracle database based on the programming language Progress ABL (4GL). To generate them, go to the menu item Tools -> Generate Code -> Bulk-Copy Processor . In the Select Database dialog box, select the source databases, transfer them to the right side of the window, and click OK . After the generation is complete, the programs will appear in the bprepl \ repl_mproc directory .
Splitting the tables into sets serviced by a separate replication stream can improve the performance and efficiency of Pro2 Oracle. By default, all connections created in the replication map for new replication tables are tied to stream number 1. It is recommended to divide the tables into different streams.
Information on the status of replication flows is displayed on the Pro2 Administration screen in the Monitor tab in the Replication Status section. A detailed description of the parameter values can be found in the Pro2 documentation (directory C: \ Pro2 \ Docs).
Policies are a set of rules for the OpenEdge CDC mechanism, according to which changes in tables are tracked. At the time of writing the post, Pro2 only supports CDC policies with a level of 0, that is, only the fact of a record change is tracked.
To create a CDC policy on the administrative panel, go to the Mapping tab, select the source database and click the Add / Remove Policies button. In the window that opens, Select Changes is selected in the left part and transferred to the right table for which you need to create or delete a CDC policy.
To activate, open the Mapping tab again, select the source database and click on the (In) Activate Policies button. Select and transfer to the right side of the table, the policies of which must be activated, click OK. After that they are marked in green. You can also deactivate CDC policies with (In) Activate Policies . All operations are performed online.

After activating the CDC policy, notes about changed records are saved to the “ReplCDCArea” storage area in accordance with the original database. These notes will be processed by a special CDCBatch process, which will use them to create notes in the Pro2 replication queue in the cdc database (repl) .
Thus, we have two queues for replication. The first stage is CDCBatch: from the source database, data first falls into the intermediate CDC database. The second stage is when data from the CDC base is overflowed into Oracle. This is a feature of the current architecture and the product itself - while the developers have not been able to establish direct replication.
After turning on the CDC mechanism and setting up the Pro2 replication server, we need to start the primary synchronization. Primary sync start command:
/pro2/bprepl/Script/replLoad.sh bisquit table-name
After the initial synchronization is complete, replication processes can be started.
To start replication processes, you need to run the replbatch.sh script. Before starting - make sure there are replbatch scripts for all threads - replbatch1, replbatch2, etc. If everything is in place, open a command prompt (for example, proenv) , go to the directory / bprepl / scripts and execute the start of the script. In the administrative panel, we check that the corresponding process has received the status RUNNING.

After implementation, we greatly accelerated the uploading of information to the corporate data warehouse. The data independently gets to Oracle online. No need to spend time on the execution of some long-playing queries to collect data from different systems. In addition, in this solution, the replication process is able to compress data, which also has a positive effect on speed. Now the daily reconciliation of the BISQUIT system with other systems began to take 15-20 minutes instead of 2-2.5 hours, and a full reconciliation took several hours instead of two days.
Using Progress OpenEdge, we are faced with the fact that we need to make friends with Oracle DBMS. Initially, this bundle was the “bottleneck” of our infrastructure - until we installed and configured Pro2 CDC — a Progress product that allows you to send data from the Progress DBMS to the Oracle DBMS directly, online. In this post we describe in detail, with all the pitfalls, how to effectively make friends with OpenEdge and Oracle.
How it all happened: uploading data in QCD through file sharing
First, a few facts about our infrastructure. The number of active users of the database is about 15 thousand. The volume of all productive databases, including the replica and standby, is 600 TB, the largest database is 16.5 TB. At the same time, databases are constantly replenished: only in the last year about 120 TB of productive data have been added. The system provides 150 front-servers on the x86 platform. Databases are hosted on 21 IBM platform servers.
')
Front systems, various ABS and banking services are integrated with OpenEdge Progress (BISQUIT IAS) via the Sonic ESB bus. Data is downloaded to QCD through file sharing. Up to a certain point in time, such a solution had two major problems at once - poor performance of uploading information to the corporate data warehouse (QCD) and a long time to perform data reconciliation (reconciliation) with other systems.
Therefore, we began to look for a tool that could speed up these processes. The solution to both problems was the new Progress OpenEdge product - Pro2 CDC (Change Data Capture). So, let's begin.
Install Progress OpenEdge and Pro2Oracle
For Pro2 Oracle to work on the administrator's Windows computer, it is enough to install the Progress OpenEdge Developer Kit Classroom Edition, which you can download for free. OpenEdge installation directories by default:
DLC: C: \ Progress \ OpenEdge
WRK: C: \ OpenEdge \ WRK
ETL processes require Progress OpenEdge version 11.7+ licenses — namely, OE DataServer for Oracle and 4GL Development System. Pro2 supplies these licenses. For full operation of DataServer for Oracle with a remote Oracle database, Full Oracle Client is installed.
On Oracle, you need to install a version of Oracle Database 12+, create an empty database and add a user (let's call it cdc ).
To install Pro2Oracle, download the latest distribution from the Progress Software download center. Unpack the archive into the C: \ Pro2 directory (to configure Pro2 on Unix, the same distribution kit is used and the same configuration principles apply).
Creating a cdc replication database
The cdc replication database (repl) is used by Pro2 to store configuration information, including a replication map, names of replicable databases and their tables. It also contains a replication queue consisting of notes about the fact that a row in a table has changed in the source database. Data from the replication queue is used by ETL processes to identify the rows that need to be copied to Oracle from the source database.
We create a separate cdc database.
Procedure for creating a base
pro2adm - to connect from the administrative panel Pro2;
pro2etl - to connect ETL-processes (ReplBatch);
pro2cdc - to connect CDC processes (CDCBatch);
- On the database server, create a directory for the cdc database — for example, on the server / database / cdc / .
- Create a dummy for the cdc database: procopy $ DLC / empty cdc
- Enable large file support: proutil cdc -C EnableLargeFiles
- Preparing the start script for the cdc database. Start parameters should be similar to the start parameters of the replicated database.
- We start the cdc database.
- Connect to the cdc database and load the Pro2 schema from the cdc.df file, which is included with the Pro2 package.
- Create the following users in the cdc database:
pro2adm - to connect from the administrative panel Pro2;
pro2etl - to connect ETL-processes (ReplBatch);
pro2cdc - to connect CDC processes (CDCBatch);
Activating OpenEdge Change Data Capture
Now let's turn on the inclusion of the CDC mechanism itself, through which data will be replicated to an additional technological area. Separate storage areas must be added to each source Progress OpenEdge database, to which source data will be duplicated, and to activate the mechanism itself using the proutil command .
The procedure for the example for the database bisquit
- Copy from the C: \ Pro2 \ db directory the cdcadd.st file to the directory of the original bisquit database.
- We describe in cdcadd.st the extents of a fixed size for the “ReplCDCArea” and “ReplCDCArea_IDX” areas . You can add new storage areas online: prostrct addonline bisquit cdcadd.st
- Activate the OpenEdge CDC:
proutil bisquit -C enablecdc area "ReplCDCArea" indexarea "ReplCDCArea_IDX" - In the source database you need to create the following users to identify the running processes:
a. pro2adm - to connect from the administrative panel Pro2.
b. pro2etl - to connect ETL-processes (ReplBatch).
c. pro2cdc - to connect CDC processes (CDCBatch).
Creating a Schema Holder for DataServer for Oracle
Next, we need on the server, where the data from the Progress DBMS to the Oracle DBMS will be replicated, to create the Schema Holder database. DataServer Schema Holder is an empty Progress OpenEdge database without users or application data containing a map of the correspondence between the source tables and the external, Oracle tables.
The Schema Holder base for Progress OpenEdge DataServer for Oracle for Pro2 must be located on the ETL process server, it is created separately for each branch.
How to create a Schema Holder
- Unpack the Pro2 distribution in the / pro2 directory
- Create and go to the directory / pro2 / dbsh
- Create a Schema Holder database using the procopy command $ DLC / empty bisquitsh
- We perform bisquitsh conversion to the required encoding - for example, in UTF-8 if the Oracle databases are encoded in UTF-8: proutil bisquitsh -C convchar convert UTF-8
- After creating an empty bisquitsh database , connect to it in single user mode: pro bisquitsh
- Go to Data Dictionary: Tools -> Data Dictionary -> DataServer -> ORACLE Utilities -> Create DataServer Schema
- We start Schema Holder
- Configuring the broker Oracle DataServer:
a. Start AdminServer.
proadsv -start
b. Start of the broker Oracle DataServer
oraman -name orabroker1 -start
Configuring the administrative panel and replication scheme
The Pro2 administrative panel configures Pro2 parameters, including setting up a replication scheme and generating ETL process programs (Processor Library), primary synchronization programs (Bulk-Copy Processor), replication triggers, and OpenEdge CDC policies. There are also primary tools for monitoring and managing ETL and CDC processes. First of all we set up the parameter files.
How to set up parameter files
- Go to the directory C: \ Pro2 \ bprepl \ Scripts
- Open to edit the file replProc.pf
- Add connection parameters to the cdc replication database:
# Replication Database
-db cdc -ld repl -H <hostname of the main databases> -S <broker's port cdc>
-U pro2admin -P <password> - Add to replProc.pf the connection parameters to the source databases and Schema Holder as parameter files. The name of the parameter file must match the name of the source database to be connected.
# Connect to all replicated source BISQUIT
-pf bprepl \ scripts \ bisquit.pf - Add to replProc.pf connection parameters to Schema Holder.
#Target Pro DB Schema Holder
-db bisquitsh -ld bisquitsh
-H <hostname of the ETL process>
-S <broker biskuitsh port>
-db bisquitsql
-ld bisquitsql
-dt ORACLE
-S 5162 -H <Oracle Broker Host Name>
-DataService orabroker1 - Save the parameters file replProc.pf
- Next, you need to create and open for editing the parameter files for each source database to be connected in the C: \ Pro2 \ bprepl \ Scripts: bisquit.pf directory . Each pf file contains connection parameters to the corresponding database, for example:
-db bisquit -ld bisquit -H <hostname> -S <broker port>
-U pro2admin -P <password>
To configure Windows shortcuts, go to the C: \ Pro2 \ bprepl \ Scripts directory and edit the “Pro2 - Administration” shortcut. To do this, open the properties of the shortcut and in the Start in line we specify the installation directory Pro2. A similar operation needs to be done for the “Pro2 - Editor” and “RunBulkLoader” shortcuts.
Configure Pro2 Administration: load initial configuration
Run the console.
Go to the "DB Map".
To link databases in Pro2 - Administration, go to the DB Map tab. Add source database mapping - Schema Holder - Oracle .
Go to the Mapping tab. In the Source Database list by default, the first connected source database is selected. To the right of the list should be the inscription All Databases Connected - the selected bases are connected. Below on the left should be a list of bisquit Progress tables. On the right is a list of tables from the Oracle database.
Creating SQL Schemas and Databases in Oracle
To create a replication map, you must first generate a SQL schema in Oracle. In Pro2 Administration, select the Tools -> Generate Code -> Target Schema menu item, then select one or several source databases in the Select Database dialog box and transfer them to the right.
Click OK and select the directory to save the SQL schemas.
Next, create a database. This can be done, for example, through Oracle SQL Developer . To do this, connect to the database and load the schema for adding tables. After changing the composition of Oracle tables, you need to update the SQL schema in Schema Holder.
After successful completion of the download, exit the bisquitsh database and open the Pro2 administration panel. On the Mapping tab, tables from the Oracle database should appear on the right.
Mapping tables
To create a replication map in the administrative panel Pro2, go to the Mapping tab, select the source database. Click on the Map Tables, select the Select Changes tables on the left, which should be replicated to Oracle, transfer them to the right and confirm the selection. For selected tables, a map will be created automatically. Repeat the operation to create a replication map for other source databases.
Generating a library of the Pro2 replication processor and bulk load processor programs (Bulk-Copy)
The replication processor library (Processor Library) is designed for special replication processes (ETL) that process the Pro2 replication queue and transfer changes to the Oracle database. After generation, the replication processor library programs are automatically saved in the bprepl / repl_proc directory (PROC_DIRECTORY parameter) . To generate a replication processor library, go to Tools -> Generate Code -> Processor Library. After the generation is complete, the programs will appear in the bprepl / repl_proc directory .
Bulk processor programs are used to synchronize Progress source databases with the target Oracle database based on the programming language Progress ABL (4GL). To generate them, go to the menu item Tools -> Generate Code -> Bulk-Copy Processor . In the Select Database dialog box, select the source databases, transfer them to the right side of the window, and click OK . After the generation is complete, the programs will appear in the bprepl \ repl_mproc directory .
Customize replication processes in Pro2
Splitting the tables into sets serviced by a separate replication stream can improve the performance and efficiency of Pro2 Oracle. By default, all connections created in the replication map for new replication tables are tied to stream number 1. It is recommended to divide the tables into different streams.
Information on the status of replication flows is displayed on the Pro2 Administration screen in the Monitor tab in the Replication Status section. A detailed description of the parameter values can be found in the Pro2 documentation (directory C: \ Pro2 \ Docs).
Create and Activate CDC Policies
Policies are a set of rules for the OpenEdge CDC mechanism, according to which changes in tables are tracked. At the time of writing the post, Pro2 only supports CDC policies with a level of 0, that is, only the fact of a record change is tracked.
To create a CDC policy on the administrative panel, go to the Mapping tab, select the source database and click the Add / Remove Policies button. In the window that opens, Select Changes is selected in the left part and transferred to the right table for which you need to create or delete a CDC policy.
To activate, open the Mapping tab again, select the source database and click on the (In) Activate Policies button. Select and transfer to the right side of the table, the policies of which must be activated, click OK. After that they are marked in green. You can also deactivate CDC policies with (In) Activate Policies . All operations are performed online.
After activating the CDC policy, notes about changed records are saved to the “ReplCDCArea” storage area in accordance with the original database. These notes will be processed by a special CDCBatch process, which will use them to create notes in the Pro2 replication queue in the cdc database (repl) .
Thus, we have two queues for replication. The first stage is CDCBatch: from the source database, data first falls into the intermediate CDC database. The second stage is when data from the CDC base is overflowed into Oracle. This is a feature of the current architecture and the product itself - while the developers have not been able to establish direct replication.
Primary sync
After turning on the CDC mechanism and setting up the Pro2 replication server, we need to start the primary synchronization. Primary sync start command:
/pro2/bprepl/Script/replLoad.sh bisquit table-name
After the initial synchronization is complete, replication processes can be started.
Start replication processes
To start replication processes, you need to run the replbatch.sh script. Before starting - make sure there are replbatch scripts for all threads - replbatch1, replbatch2, etc. If everything is in place, open a command prompt (for example, proenv) , go to the directory / bprepl / scripts and execute the start of the script. In the administrative panel, we check that the corresponding process has received the status RUNNING.
results
After implementation, we greatly accelerated the uploading of information to the corporate data warehouse. The data independently gets to Oracle online. No need to spend time on the execution of some long-playing queries to collect data from different systems. In addition, in this solution, the replication process is able to compress data, which also has a positive effect on speed. Now the daily reconciliation of the BISQUIT system with other systems began to take 15-20 minutes instead of 2-2.5 hours, and a full reconciliation took several hours instead of two days.
Source: https://habr.com/ru/post/445998/
All Articles