Termux Step by Step (Part 2)

In the last part, we met with the basic commands of Termux, set up an SSH connection with a PC, learned how to create alias, and installed several useful utilities. This time we have to step further, we are with you:
- learn about Termux: API
- install Python and nano, and also write "Hello, world!" in python
- learn about bash scripts, and write a script using Termux: API
- using bash-script, Termux: API and Python we will write a simple program
Since we now understand what the entered commands are doing, from the next step I will not describe each action in such detail, but I will definitely explain where there may be difficulties.
I often use alias, so the abbreviations used in this part are shown here:
alias updg='apt update && apt upgrade' alias py='python' The plan is ready, you can proceed! And of course, do not forget about the "magic Tab" ( See. Part 1 ).
Step 4
Plunge into the rabbit hole Termux: API
API how much in this word for the heart coder merged
If you do not touch on the topic of Termux: API, then all our steps could be reduced to a simple retelling of a brochure such as "Linux for Dummies", as was rightly noted in the comments to the first part.
To get started, install Termux: API from the Google Play Market (after that it won't hurt to restart Termux):

Next, we need to install the API package in the Termux console:
updg # alias' apt install termux-api For experiments, I use Android 5.1.1, for owners of Android 7, you need to “protect” Termux: API by going to 'Settings'> 'Protected applications', otherwise API calls, such as termux-battery-status , will hang. (See project wiki )
Now it is worth getting closer acquainted with the acquired features. The most recent and detailed description of Termux: API can be found on the project wiki . I will try to choose the most visual and interesting, which will allow you to get a hand in for independent work in the future.
Some examples of Termux: API
- termux-battery-status
Returns battery status
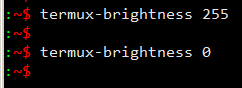
- termux-brightness
Sets the screen brightness from 0 to 255
')
- termux-toast
Shows a temporary popup notification.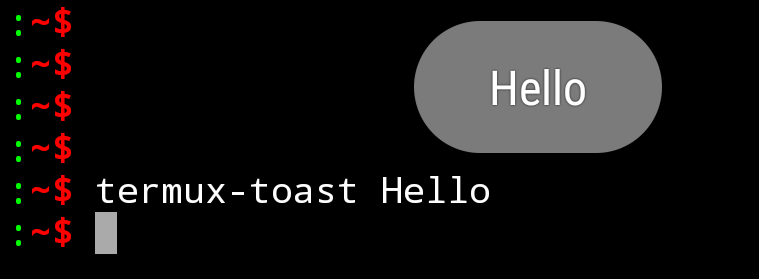
- termux-torch
Includes flashlight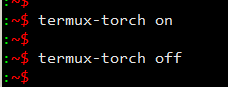
- termux-wifi-scaninfo
Returns information about the latest Wi-Fi network scan.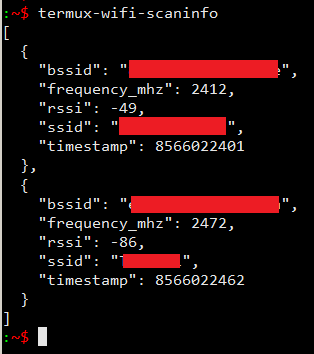
It is easy to see that the returned values are strings, dictionaries, lists of dictionaries, in general, data types with which Python works perfectly, so the next step is to install it.
Step 5
Install Python and nano
To install Python, write in the terminal:
updg apt install python apt install python2 Now we have installed 2 and 3 Python.
While I was working on the article, I discovered another text editor, nano, which I liked more than vim, let's install it:
apt install nano It's easier to use it than vim, and nano has a more user-friendly interface. On an Android device, vim is more convenient.
HelloWorld in Python at Termux
By and large, it was possible to do without this item, but to put Python in Termux and not to write HelloWorld, in my opinion, moveton.
My goal is not to teach anyone Python, so those who do not know can just copy the code (or start to study on their own, good enough literature), and those who know can do something. And I “on the sly” will show you a way to enter text in the terminal without an editor.
cat >hello-world.py # ( cat 1.txt > 2.txt) # cat , # . str = 'Hello, world!' # str "Hello, world!" print (str) # str # Ctrl + D (hello-world.py) py hello-world.py # (py alias python) 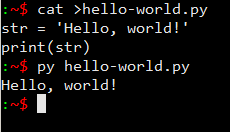
If you didn’t notice an error during the input process and have already pressed Enter, you will not be able to go to the line above, to do this, finish typing by pressing Ctrl + D (you can interrupt Ctrl + Z altogether) and repeat from the beginning. Since we used '>' the file will be rewritten completely. For this reason, I do not recommend using this input method if you are not sure that you will write the code immediately without errors.
Step 6
Bash scripts
Bash scripts are a great way to automate terminal operations. The script is a file with the .sh extension (the extension is optional) containing a set of terminal commands, some of which we have already studied. Here is a list of most commands , everything should work, but note that this is a list for “adult” Linux, and not for Termux, but simply awesome material on bash scripts .
Using scripts you can automate almost all monotonous actions. Let's write the simplest bash script outputting the value from the variable created by it, I will use the cat again, you can use a normal text editor, and those who want to train themselves can use echo.
cat >test.sh export str=", !" # str # ", !" # '=' # export (.. ) echo $str # '$' # Ctrl + D # ./test.sh , # test.sh chmod +x test.sh # chmod (+ / - ) # '+x' ./test.sh # 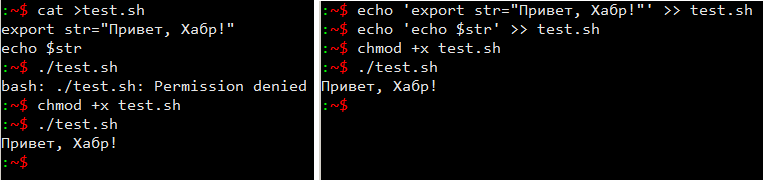
One kind person rightly noted that the
export command is superfluous if the variable is used within one script, since it will bring the variable to the environment, that is, make it available outside the script, taking up extra memory. Thus, after running test.sh we can access the $str variable from the command line.Bash script with Termux: API
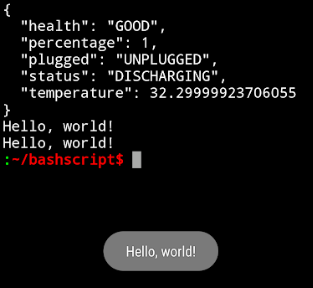
Let's write something already different from the notorious HelloWorlds, but equally useless. Our script will be:
- perform an API query termux-battery-status
- save the data to a file test.txt
- output data from file to screen
- execute the previously written program hello-world.py
- write the data from the program to the test.txt file
- output data from file to screen
- transfer data from file to clipboard
- display the contents of the clipboard
- display a popup message with data from the clipboard
First, create a folder for work and copy hello-world.py there as test.py, create test.sh and test.txt files in this folder:
mkdir bashscript cat hello-world.py >> bashscript/test.py cd bashscript/ touch test.sh test.txt # touch chmod +x test.sh Now, in any convenient way, we write the script to the test.sh file:
#!/bin/bash # #! ( ) # clear # termux-battery-status > test.txt # 1 2 cat test.txt # 3 python test.py > test.txt # 4 5 cat test.txt # 6 cat test.txt | termux-clipboard-set # 7 # | . termux-clipboard-get # 8 termux-clipboard-get | termux-toast # 9 Now, being in the bashscript folder, we write ./test.sh we observe in the terminal on the Android device:
So we wrote the planned bash script. You can dilute it with output to the console information on the execution of each action (using echo), I will leave it for readers.
Step 7
Let's do something useful
Relatively useful
We will formulate a technical task
After launch, the application should place a random string from a file on the clipboard and notify about it with a pop-up message.
We take the bash script as a basis; we will extract a random string from a file using a subroutine in Python. Make a plan for the script:
- Run subroutine
- Transfer the result of the subprogram to the clipboard
- Show popup message
Decide on the names of the directory and application files:
- rndstr folder in home directory
- source - the file from which we will take lines
- rndstr.py - a routine that outputs a random line from the source file to the console
- rndstr.sh - script file
Create an application directory and move into it create files there.
The first two points of the script plan can be combined with a pipeline, as a result, using Termux: API we get:
#!/bin/bash python ~/rndstr/rndstr.py | termux-clipboard-set # 1 2 termux-toast "OK" # 3 . "" In the source file you can put any text logically divided into lines, I decided to put aphorisms:
. . . , . . . . . . . . , , . . , . . , . . , . . . . , . . , . . - , . , . , , . . , . . , . . , . . , . , . . . . . , . . - . , . . . . , , . . . , , , . . ! ! It remains for us to create a subroutine extracting a random string from the file source.
Let us write the algorithm of the subprogram:
- Open the file source
- We count the number of lines in an open file.
- Close the file (there is nothing to keep it open for extra time)
- We generate a random integer within the number of lines of the file source
- Open the file source
- Display the string under the number of the generated number.
- Close the file
Implement the algorithm in Python (I am writing under Python 3.7):
import random # import os # path = os.path.abspath(__file__) # rndstr.py path = os.path.dirname(path) # path = path + '/source' # source f = open(path) # i = 0 # for str in f: i+=1 # f.close() # j = int(round(i * random.random())) # 0 i f = open(path) # i = 0 # for str in f: # if i == j: # print (str, end='') # break # i+=1 # 1 f.close() # After the files are created and written, you need to give the rights to execute the file rndstr.sh , and create an alias for quick launch.
alias rnst="~/rndstr/rndstr.sh" Now, entering rnst in the terminal rnst we get a random aphorism on the clipboard, which, for example, can be used in correspondence.
So we wrote at least something useful. Relatively helpful.
PS
I deliberately didn’t give screenshots in the last step and didn’t take a look at some of the actions, writing only the contents of the files so that readers could work on their own.
Initially, I planned to show in this cycle how to use nmap, sqlmap, but without me there are already a lot of articles on this topic. If you want me to continue Termux step by step, then there is a survey below, and in the comments you can suggest something else to write.
Source: https://habr.com/ru/post/445868/
All Articles