Search JS framework for generating UI

Somehow I wanted to try to implement one small client-server application. The implementation was as follows: on the client side we draw windows with some help of the JS framework, on the server side we process calls from the client using a compiled application written for example on Go.
I started to pick a framework that provides a declarative interface. In my view, at the input it should receive a description of the contents of the form (for example, in the format YAML, JSON, BEMJSON , XML, or even INF) as simplified as possible, and draw a beautiful form in the browser with working controls.
Professionally, I do not do web development and therefore did not expect to be stuck for a long time at this stage.
I did not intend to write an article, but then I thought that a fresh look from the outside on modern web technologies, even if a beginner, might be interesting to the community. Opportunity to get feedback again ...
HTML and CSS templates
Everything I found didn't work as much as I wanted. I do not want to know anything about the layout and styles. I also do not want to fill in HTML, as is done when using frameworks such as Bootstrap , Skeleton , MDL , etc.
Sample code using Bootstrap:
<div class="input-group mb-3"> <div class="input-group-prepend"> <div class="input-group-text"> <input type="checkbox" aria-label="Checkbox for following text input"> </div> </div> <input type="text" class="form-control" aria-label="Text input with checkbox"> </div> <button type="button" class="btn btn-primary btn-lg btn-block">Block level button</button> All I want to submit to the input should be something like this:
{ "main": { "prop":{}, "elements": [ { "type":"checkbox", "name":" -", "style":"classic", "checked": true }, { "type":"button", "name":"", "style":"outline", "onclick":"btnsave_onclick" } } } Well, so that you can combine elements into groups and indicate how the elements inside the group should be located: vertically or horizontally. What will be the design there, it is not particularly important to me. I expected to find even some visual editor of the windows, but - no.
Assembly technology
Then I tried to look for some assembly technology - someone probably laid a long way short and more than once.
And I found something similar to what I need: A website from scratch on a full stack of BEM technologies .
BEMJSON Example:
({ block: 'page', title: 'Hello, World!', styles: [ { elem: 'css', url: 'index.min.css' } ], scripts: [ { elem: 'js', url: 'index.min.js' } ], content: [ 'Hello, World!' ] }) When I scrolled around the 20th text screen, and the slider was still at the top, I thought that this short way was a long one. Will not go.
I read it by the way about this BEM - I liked the essence, and it was still well and well described. There are different cribs, for example, I liked this one . I looked for more information and found that not everyone likes the technology (for example, here and here ). And here in my opinion the essence of the controversial points.
Interestingly, using the search, I, besides BEM, for a long time could not find any more alternative technologies. However, they are: OOCS (it seems like the same BEM, only simpler), SMACSS , AtomicCSS , CSSinJS (found here ).
Node.js
I then thought, ok, you can abandon the original idea and implement the server part in the scripting language, i.e. just use nodejs. This is not only fashionable, stylish, youth, it is also an opportunity to write on all layers in one language. A lot of articles again (about the quick start, I liked this one ). If I understood correctly, under it is written an infinite number of NPM-packages, almost for any task. There is also such a serious thing as Electron .
Example code page using Electron:
<head> <meta charset="utf-8"> <link rel="stylesheet" href="assets/css/variables.css"> <link rel="import" href="sections/about.html"> </head> <body> <nav class="nav js-nav"> <header class="nav-header"> <h1 class="nav-title">Electron <strong>API Demos</strong></h1> </header> <div class="nav-item u-category-windows"> </div> <footer class="nav-footer"> <button type="button" id="button-about" data-modal="about" class="nav-footer-button">About</button> </footer> </nav> <main class="content js-content"></main> <script> require('./assets/normalize-shortcuts') </script> </body> </html> The only disadvantage of nodejs is that you can write a more productive thing using Go.
Suppose I want to use nodejs. There is a catalog of NPM packages so that you can choose something suitable for yourself.
There is a package that is called forms . Here is a sample code:
var forms = require('forms'); var fields = forms.fields; var validators = forms.validators; var reg_form = forms.create({ username: fields.string({ required: true }), password: fields.password({ required: validators.required('You definitely want a password') }), confirm: fields.password({ required: validators.required('don\'t you know your own password?'), validators: [validators.matchField('password')] }), email: fields.email() }); In the form itself, it is collected by the reg_form.toHTML(); command reg_form.toHTML(); . An interesting option, but not that.
There is also Element , Riot , TotalJS and iView . This can be added to the list from Bootstrap, MDL and so on.
Sample code page using Element:
<!DOCTYPE html> <html> <head> <meta charset="UTF-8"> <!-- import CSS --> <link rel="stylesheet" href="https://unpkg.com/element-ui/lib/theme-chalk/index.css"> </head> <body> <div id="app"> <el-button @click="visible = true">Button</el-button> <el-dialog :visible.sync="visible" title="Hello world"> <p>Try Element</p> </el-dialog> </div> </body> <!-- import Vue before Element --> <script src="https://unpkg.com/vue/dist/vue.js"></script> <!-- import JavaScript --> <script src="https://unpkg.com/element-ui/lib/index.js"></script> <script> new Vue({ el: '#app', data: function() { return { visible: false } } }) </script> </html> There are Blueprintsjs . This is perhaps the most similar to what I was looking for. It is possible to customize the controls separately from each other.
The code looks something like this:
/* * Copyright 2018 Palantir Technologies, Inc. All rights reserved. * * Licensed under the terms of the LICENSE file distributed with this project. */ import * as React from "react"; import { FormGroup, H5, InputGroup, Intent, Switch } from "@blueprintjs/core"; import { Example, handleBooleanChange, handleStringChange, IExampleProps } from "@blueprintjs/docs-theme"; import { IntentSelect } from "./common/intentSelect"; export interface IFormGroupExampleState { disabled: boolean; helperText: boolean; inline: boolean; intent: Intent; label: boolean; requiredLabel: boolean; } export class FormGroupExample extends React.PureComponent<IExampleProps, IFormGroupExampleState> { public state: IFormGroupExampleState = { disabled: false, helperText: false, inline: false, intent: Intent.NONE, label: true, requiredLabel: true, }; private handleDisabledChange = handleBooleanChange(disabled => this.setState({ disabled })); private handleHelperTextChange = handleBooleanChange(helperText => this.setState({ helperText })); private handleInlineChange = handleBooleanChange(inline => this.setState({ inline })); private handleLabelChange = handleBooleanChange(label => this.setState({ label })); private handleRequiredLabelChange = handleBooleanChange(requiredLabel => this.setState({ requiredLabel })); private handleIntentChange = handleStringChange((intent: Intent) => this.setState({ intent })); public render() { const { disabled, helperText, inline, intent, label, requiredLabel } = this.state; const options = ( <> <H5>Props</H5> <Switch label="Disabled" checked={disabled} onChange={this.handleDisabledChange} /> <Switch label="Inline" checked={inline} onChange={this.handleInlineChange} /> <Switch label="Show helper text" checked={helperText} onChange= {this.handleHelperTextChange} /> <Switch label="Show label" checked={label} onChange={this.handleLabelChange} /> <Switch label="Show label info" checked={requiredLabel} onChange= {this.handleRequiredLabelChange} /> <IntentSelect intent={intent} onChange={this.handleIntentChange} /> </> ); return ( <Example options={options} {...this.props}> <FormGroup disabled={disabled} helperText={helperText && "Helper text with details..."} inline={inline} intent={intent} label={label && "Label"} labelFor="text-input" labelInfo={requiredLabel && "(required)"} > <InputGroup id="text-input" placeholder="Placeholder text" disabled={disabled} intent={intent} /> </FormGroup> <FormGroup disabled={disabled} helperText={helperText && "Helper text with details..."} inline={inline} intent={intent} label={label && "Label"} labelFor="text-input" labelInfo={requiredLabel && "(required)"} > <Switch id="text-input" label="Engage the hyperdrive" disabled={disabled} /> <Switch id="text-input" label="Initiate thrusters" disabled={disabled} /> </FormGroup> </Example> ); } } The result looks like this: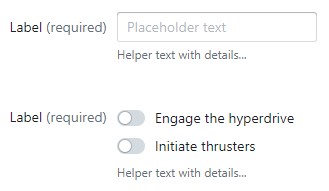
Even if we take into account only the last part: everything is somehow not very concise.
metadata.js
Here is another interesting thing found on the web - metadatajs . Quick start - here . This library has redundant functionality, and the article does not, in my opinion, have the most important thing - the description of the library itself. It is here .
The form to describe us is proposed as follows:
{ "enm": {}, "cat": { "": { "form": { "selection": { "fields": [ "is_folder", "id", "", "_t_.name as presentation", "`cat_`.name as ``", "`cat_`.name as ``" ], "cols": [ {"id": "id", "width": "120", "type": "ro", "align": "left", "sort": "server", "caption": ""}, {"id": "", "width": "150", "type": "ro", "align": "left", "sort": "server", "caption": ""}, {"id": "presentation", "width": "*", "type": "ro", "align": "left", "sort": "server", "caption": ""}, {"id": "", "width": "70", "type": "ro", "align": "left", "sort": "server", "caption": ""}, {"id": "", "width": "170", "type": "ro", "align": "left", "sort": "server", "caption": " "} ] } } }, "": { "form": { "selection": { "fields": [ "is_folder", "id", "_t_.name as presentation", "`enm_`.synonym as ``", "`cat_`.name as ``" ], "cols": [ {"id": "presentation", "width": "*", "type": "ro", "align": "left", "sort": "server", "caption": ""}, {"id": "", "width": "150", "type": "ro", "align": "left", "sort": "server", "caption": " "}, {"id": "", "width": "150", "type": "ro", "align": "left", "sort": "server", "caption": ""} ] } } } }, "doc": { "": { "form": { "selection": { "fields": [ "date", "number_doc", "", "", "posted", "", "" ], "cols": [ {"id": "date", "width": "120", "type": "ro", "align": "left", "sort": "server", "caption": ""}, {"id": "number_doc", "width": "120", "type": "ro", "align": "left", "sort": "server", "caption": ""}, {"id": "", "width": "170", "type": "ro", "align": "left", "sort": "server", "caption": ""}, {"id": "", "width": "120", "type": "ron", "align": "right", "sort": "server", "caption": ""}, {"id": "", "width": "100", "type": "ro", "align": "left", "sort": "server", "caption": ""}, {"id": "", "width": "*", "type": "ro", "align": "left", "sort": "server", "caption": ""} ] }, "obj": { "head": { " ": ["number_doc", "date", "", "", "", ""], "": ["", "", ""], "": ["", "", "", "", "", "", "", {"id": "", "path": "o.", "synonym": " ", "type": "ro"} ] }, "tabular_sections": { "": { "fields": ["row","","","","","","","","","","","","",""], "headers": "№,,,.,,,% ,,% ,,,.,,", "widths": "40,*,*,70,50,70,70,70,70,70,70,70,70,80", "min_widths": "40,200,140,70,50,70,70,70,70,70,70,70,70,80", "aligns": "", "sortings": "na,na,na,na,na,na,na,na,na,na,na,na,na,na", "types": "cntr,ref,ref,calck,refc,calck,calck,ron,refc,ron,ron,dhxCalendar,ref,txt" } } } } } }, "ireg": {}, "areg": {}, "dp": {}, "rep": {}, "cch": {}, "cacc": {} } This is very similar to what you need. However, there are questions: the set of buttons seems to be set by default? Can I change it? Where is the syntax description (what is "enm", "cat", etc.)?
It can be seen that a lot of effort has been invested in the project, but the library is still damp.
Conclusion
Let's argue. Forms can be drawn in advance on the server, compiled and given ready-made html / css / js-code to the client. In this case, you need to look quite different. But if we want the user to work in one browser window and see the child windows of the web application in this window, it would not be logical to cache the css / js code on the client, which will receive short commands from the server describing the next form and will draw them at the expense of client resources?
Colleagues, where are you hiding a framework with a declarative interface? )
He must be! Why can't I find it?
')
Source: https://habr.com/ru/post/445854/
All Articles