NanoCAD licensing
Good day!
The technical support service of Nanosoft receives quite a lot of questions concerning the licensing of the products of the nanoCAD line. In this regard, I decided to collect some interesting questions from clients and answer them in several articles. To begin with, we will look at the general principles of licensing our products, as well as get acquainted with some features of the License Server operation - FlexLm.
First I want to clarify what types of licenses exist in the nanoCAD product line.
A local license is requested for one PC and is tied to its ID-1 or ID-2. At the same time, the license cannot be transferred, and if the iron fails, then the possibility to re-activate the license is carried out only through an official contact with the technical support of Nanosoft.
Let me remind you what is meant by ID-1 and ID-2. ID-1 is the Mac address: a unique identifier for network equipment that is usually assigned to a network card. ID-2 is a hard disk volume label.
It is also possible to supply a local license tied to the hardware protection key. Currently, this is the key type Wibukey. With this delivery option, the license is rigidly attached to the key and can be transferred from one PC to another. Accordingly, the license works only in conjunction with the key.
The network license does not differ from the local one in the way of attachment (to ID-1 / ID-2 or to the hardware protection key). Its main difference is that it is deployed only on one PC, which becomes the license server, and all other users connect to this server to receive their license. The number of workplaces with nanoCAD installed in this case can be unlimited, but only a certain number of users corresponding to the number of purchased licenses can be licensed at a time.
Since there are usually no special problems with local licenses, I would like to pay more attention to network licensing.
The network licensing mechanism of Nanosoft JSC consists of a set of utilities related to the installation, maintenance and control of network licenses.
Network licensing tools include:
- License Server Installation Wizard
The main purpose of the Wizard is to install / remove / maintain the server part of the network licensing mechanism (Fig. 1).

Fig. one
Users often confuse it with the Registration Wizard, as they are visually similar. Below we analyze what they differ in and when the Registration Wizard (RegWizard.exe) is used, and in which License Server Installation Wizard (LicServSetup.exe) is used.
- Nanosoft License Server (Nanosoft License Server ) - the server part of the network licensing mechanism: a set of programs and services to control the network licenses used. In other words, it is a set of service utilities that control the distribution of network licenses on a local network and provide some reporting materials.
To start network licensing, you need to run the License Server Setup Wizard (file LicServSetup.exe).
When you launch the wizard, you will see the window shown in Figure. one.
The main branch of the License Server is the first option - Request a license . It is the passage of this branch that will lead to both obtaining a license file and registering a new user on the site www.nanocad.ru (if the user is not yet registered), and installing the License Server (if it is not already installed). In addition, in the same paragraph, you can add a license file for a new software product. When adding a new license file, it is necessary that the server name and binding IDs be identical to the existing license file. Also, the first option is used if the user does not yet have a network license file and is only starting to work with the License Server.
If you have a license file and you are ready to install the server part, or if you already have a License Server installed, but you need to add a license for another software product, select the second option: License Server Maintenance .
License request
Many users initially do not understand the difference between the license file and the license number / serial number of the product. They contact technical support with the question: “Why does the program require registration after it starts?” And answer technical support questions: “Did you request the license file?” Answer: “Why should I again request a license if I have it in My Account? "So, in the Personal Account there is not a license file, but the serial number of your product. In other words, this is the license number, and you should get the license file for this serial number / license number.
You can start the Registration Wizard using the Start -> Nanosoft -> -> Registration Wizard.
Fig. 2
Select Request license (fig. 2).
Enter the serial number, which should be either on your certificate or in the “My licenses” section of your account (Fig. 3).
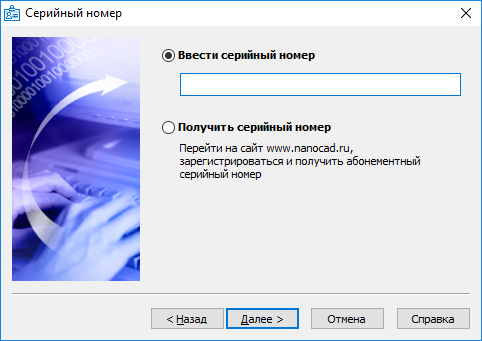
Fig. 3
In the next window (Fig. 4), you need to enter information about the user, as well as your username and password to log into your Personal Account on the website www.nanocad.ru .
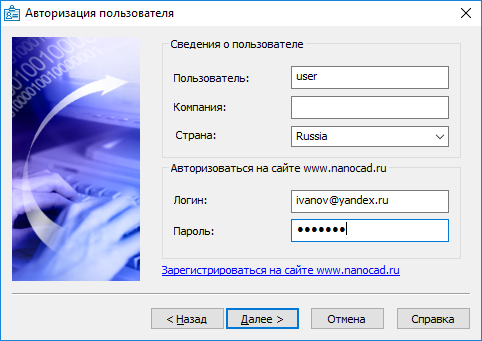
Fig. four
Filling in the appropriate fields and clicking the Next button, we go to the Confirmation of Registration Data window (Fig. 5).

Fig. five
Here you can check, just in case, if we made a mistake when entering the serial number or login from the Personal Area. You also need to make sure that the hardware protection key is inserted in the PC. If the window displays the items ID-1 and ID-2, this means that the Registration Wizard does not see your key. Click Cancel to prevent your license from sticking to the hardware of this computer. Then you need to check the operation of the key: for example, reinstall the driver, use a different port for the key and repeat the license request procedure. This should be done until the Registration Wizard sees the key.
After clicking the Next button, the Registration Wizard will remind you that the license file will be tied to the parameters of this PC (Fig. 6). At this stage, the license request can still be canceled.

Fig. 6
But when the Yes button is pressed, all is not lost. The registration wizard gives you another chance to remember that we, for example, forgot to install the driver on the key or insert the key into the PC port. Here in the next, but the final time, you can click Cancel .
Everything is good, and you are ready to request a license file? Then you need to choose the most appropriate method of inquiry (Fig. 7).

Fig. 7
If on this PC there are no problems with the Internet, it is best to select the item “Request an on-line license”. In this case, the Registration Wizard will automatically place the license file in the required directory, after which no additional actions are required and you can immediately launch the program (Fig. 8-9).

Fig. eight

Fig. 9
After requesting a license, the online lic file of the lic format is saved in the following folders:
For Windows 10, Windows 8.1, Windows 7, Windows Vista:
C: \ ProgramData \ Nanosoft \ RegWizard \ Licenses \
For Windows XP, Windows 2000:
C: \ Documents and Settings \ All Users \ Application Data \ Nanosoft \ RegWizard \ Licenses \
You can also request a license via e-mail (Fig. 10), but this requires that you have an e-mail client installed on your PC.

Fig. ten
Otherwise, you can get the message shown in Fig. eleven.
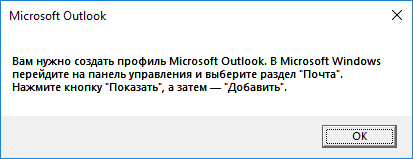
Fig. eleven
If you have an e-mail client installed and the license request was completed without any problems, you will receive a lic file of lic format. This file will need to be activated through the Registration Wizard and then launch the product.
Start the Registration Wizard and select the item “Activate license” (Fig. 12).

Fig. 12
In the window that opens, specify the path to the license file (Fig. 13), and then click the Next button.

Fig. 13
The last item presented in the Method of requesting a license window (Fig. 14) - “Save license request” - is usually used in cases when the two previous options did not fit one reason or another: for example, you do not have Internet access or you do not have mail customer. Having created a license request (file in the eml format), you can transfer it to a PC that is connected to the Internet or on which an email client is installed, and then perform a license request (Figure 15-16). If it is not possible to independently request a license for some reason, this license request can be sent to the technical support service and receive a lic file generated by its specialists.

Fig. 14

Fig. 15

Fig. sixteen
After receiving the answer from the technical support, the lic file sent in the lic format will need to be added through the Registration Wizard and then launch the product.
Further configuration of the License Server
Further behavior of the License Server Wizard depends on the current status of the Server. The following options are possible:
License Server is not installed on the computer. In this case, the Wizard will automatically switch to the branch associated with the installation / update of the License Server (on the Configure TCP ports and Windows Firewall tab - Fig. 17).

Fig. 17
In the window that opens, you can specify TCP ports of the License Server service by default (address range: 27000-27009) or specify a specific TCP port.
Also in this window you can leave the automatic selection of the TCP port of the manufacturer’s service or specify a specific one.
Usually, users leave this section by default, but in some enterprises certain ports may be blocked or occupied by another application, therefore, it is possible to specify open ports.
Whether or not to add an exception to Windows Firewall is up to you. We recommend not to clear this check box: it happens that Windows Firewall blocks the operation of the License Server.
You decide for yourself whether or not to substitute the name of the server instead of THIS_HOST. By default, in the “Server Name” section of the network license file, after the line SERVER, “THIS_HOST” is entered, but in this section, you can automatically change the line to the corresponding server name. There is absolutely no difference: the license file will work in the first and second cases. But if in your organization it is customary to change the names of the PC periodically, it is better to uncheck the checkbox and leave “THIS_HOST”, since this mode allows you to work with any PC name. If a PC name is registered in the license file, and then it was changed on the server, then the license file may become unusable and to fix it you will need to write a new server name using the Notepad ++ text editor or write “THIS_HOST” instead of the name.
Let's go further.
The License Server is installed and uses the license file. In this case, the wizard will automatically add a new license to the file and re-read the file on the server (Fig. 18).

Fig. 18
In any case, after receiving the license file, we arrive at the final License Server window, which needs to be closed by clicking the Finish button (Fig. 19).

Fig. nineteen
On this, perhaps, everything. If the installation was completed without errors, we obtained a working License Server, on which our licenses are running, and to which we now need to set up connections from user PCs, so that these machines can “pick up” licenses from the server while the program is being used.
It will not be superfluous to check the status of the server. Start LicServSetup - License Server service - and look at the status: Started or Stopped (fig. 20-21). In the same window, you will see the license server version number installed for you.

Fig. 20

Fig. 21
Connecting to the server is usually not difficult: all you need to do is to run the Registration Wizard on a user PC and specify the name of the License Server PC or its IP address (Figure 22-23).

Fig. 22

Fig. 23
If you have specified the License Server to start from a specific port, this port must be specified when connecting to the License Server. As an example, in fig. 24 we specify the path to the server on port 27003. In this case, the connection will look like this: Port @ PC name or IP address.

Fig. 24
Note.
To connect to the License Server all PCs must be on the same network. Otherwise, it will not be possible to connect, or you will need to deploy VPN for the remote PC and configure the connection separately. There are also other means, but these are rather special cases and we will not consider them here.
The license server installed, the user PC connected. It would seem, run the program and work. But the question arises: “How can I understand which users have just launched the program and received a license? How many licenses are in use at the moment? ”The built-in tools of the License Server will help you with this information: Flex.log and the Lmtools utility. They are located in the License Server installation folder: C: \ Program Files (x86) \ Nanosoft \ Nanosoft License Server (Fig. 25).

Fig. 25
We will dwell on each of these tools in a bit more detail.
Flex.log looks like it is shown in fig. 26
The log records which PC won the license and which product. (In our case, IVANOV-PK took the license nanoCAD SPDS. The inscription "OUT" was entered from the server: he gave the license to the user.)
As soon as the IVANOV-PK user closes the application on his computer, the license will return to the server and “IN” will appear in the log.
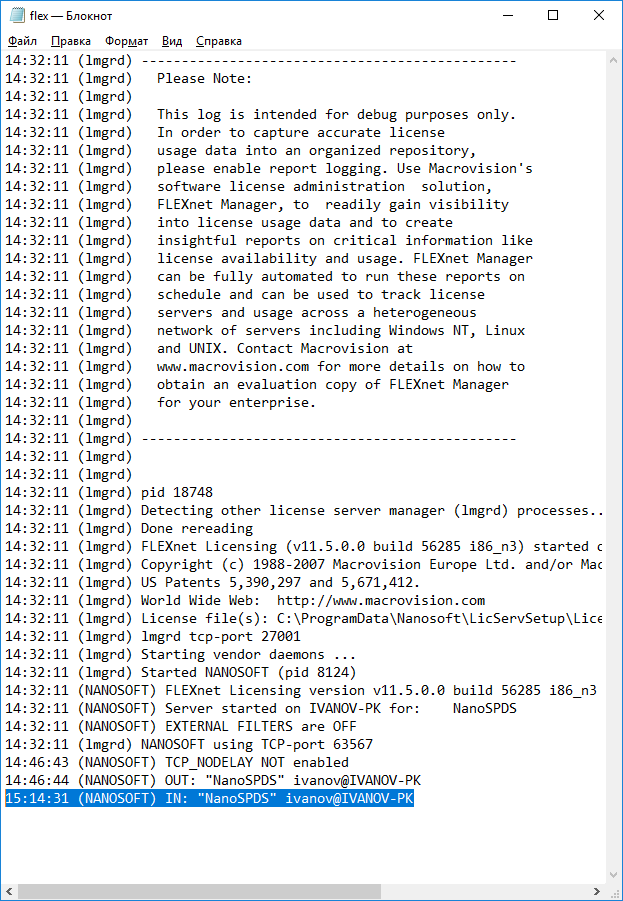
Fig. 26
Using the Lmtools application (Fig. 27), you can customize the operation of your License Server, view logs, restart the server, and perform many other steps to configure it. Here we confine ourselves to the main tabs of this application.

Fig. 27
On the Service / License File tab, we can see which server is currently being used (in our case, this is Nanosoft License Sever). If on this PC you have deployed License Servers of third-party CAD applications that also use the FlexLm server for licensing, they can be displayed in the same window.
The main windows for working with the server are Start / Stop / Reread and Server Status . The rest are used much less frequently, so let's take a closer look at these two.
In the Start / Stop / Reread tab (fig. 28) we can stop the License Server service ( Stop Server button), re-read the license file ( ReRead License File ) and start the server ( Start Server ).
When working with these buttons, you need to pay attention to the log. If we stop or start the server, the log displays the corresponding captions: Stopping Server, Start Server Failed, Start Server Successful.

Fig. 28
By clicking on the Perform Status Inquiry button in the Server Status tab, we can see the total number of our licenses, as well as the number of employees and free. In the example (Fig. 29), it can be seen that at the moment of the two licenses that are on the server, both are not occupied.
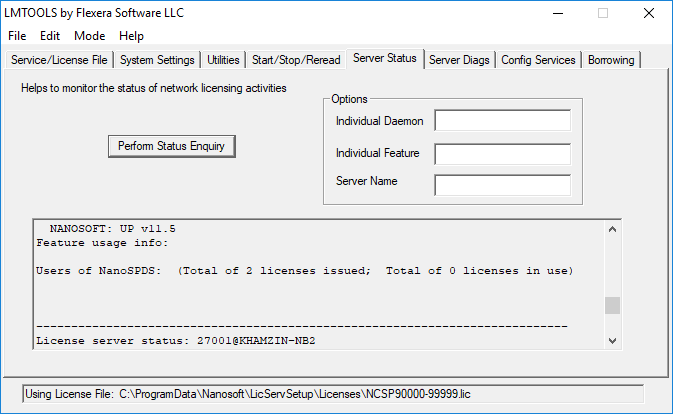
Fig. 29
On the Config Services tab (Fig. 30) you can check all the settings of your server: the path to the executable file (lmgrd.exe), the path to the license file (.lic) and the path to the log of this server (flex.log).

Fig. thirty
Also in this window, by clicking on the View Log button (Fig. 31), we can view our flex.log (Fig. 32), which we talked about a little higher.

Fig. 31

Fig. 32
If in the section “Path to the license file” you need to specify a different license file, do not forget to click the Save Service button and restart the server via Stop / Start.
In principle, two applications are enough to manage the License Server: LicServSetup and Lmtools.
I would also like to draw your attention to the “Knowledge Base” , located on our technical support portal and available 24/7.
For keywords in the search, you will find here answers to many questions concerning both the licensing of products and other topics related to the area of technical support activities. We try to constantly replenish the base and keep it up to date.
In conclusion, I would like to note that the licensing of Nanosoft products is not as difficult as it may seem at first glance, and all its nuances are mastered quite quickly. And this article can be used as a kind of instruction, which is always in the public domain. If you have any questions or suggestions related to the licensing of Nanosoft products, please write to us in the comments. We plan to sort out interesting user questions on this topic, and perhaps we will devote the following article to the answers to these questions.
Shamil Khamzin, D_Sham
Technical support "Nanosoft"
')
Source: https://habr.com/ru/post/445698/
All Articles