An overview of the capabilities of PlayCanvas for creating Web VR applications
PlayCanvas is a visual platform for developing interactive web applications. Everything developed with PlayCanvas is based on HTML5 features. PlayCanvas is a web application, which means you do not need to install special programs and you can access your project from any device anywhere in the world via the Internet. All projects that you create can be placed on the network with just one click.
Workflow in PlayCanvas
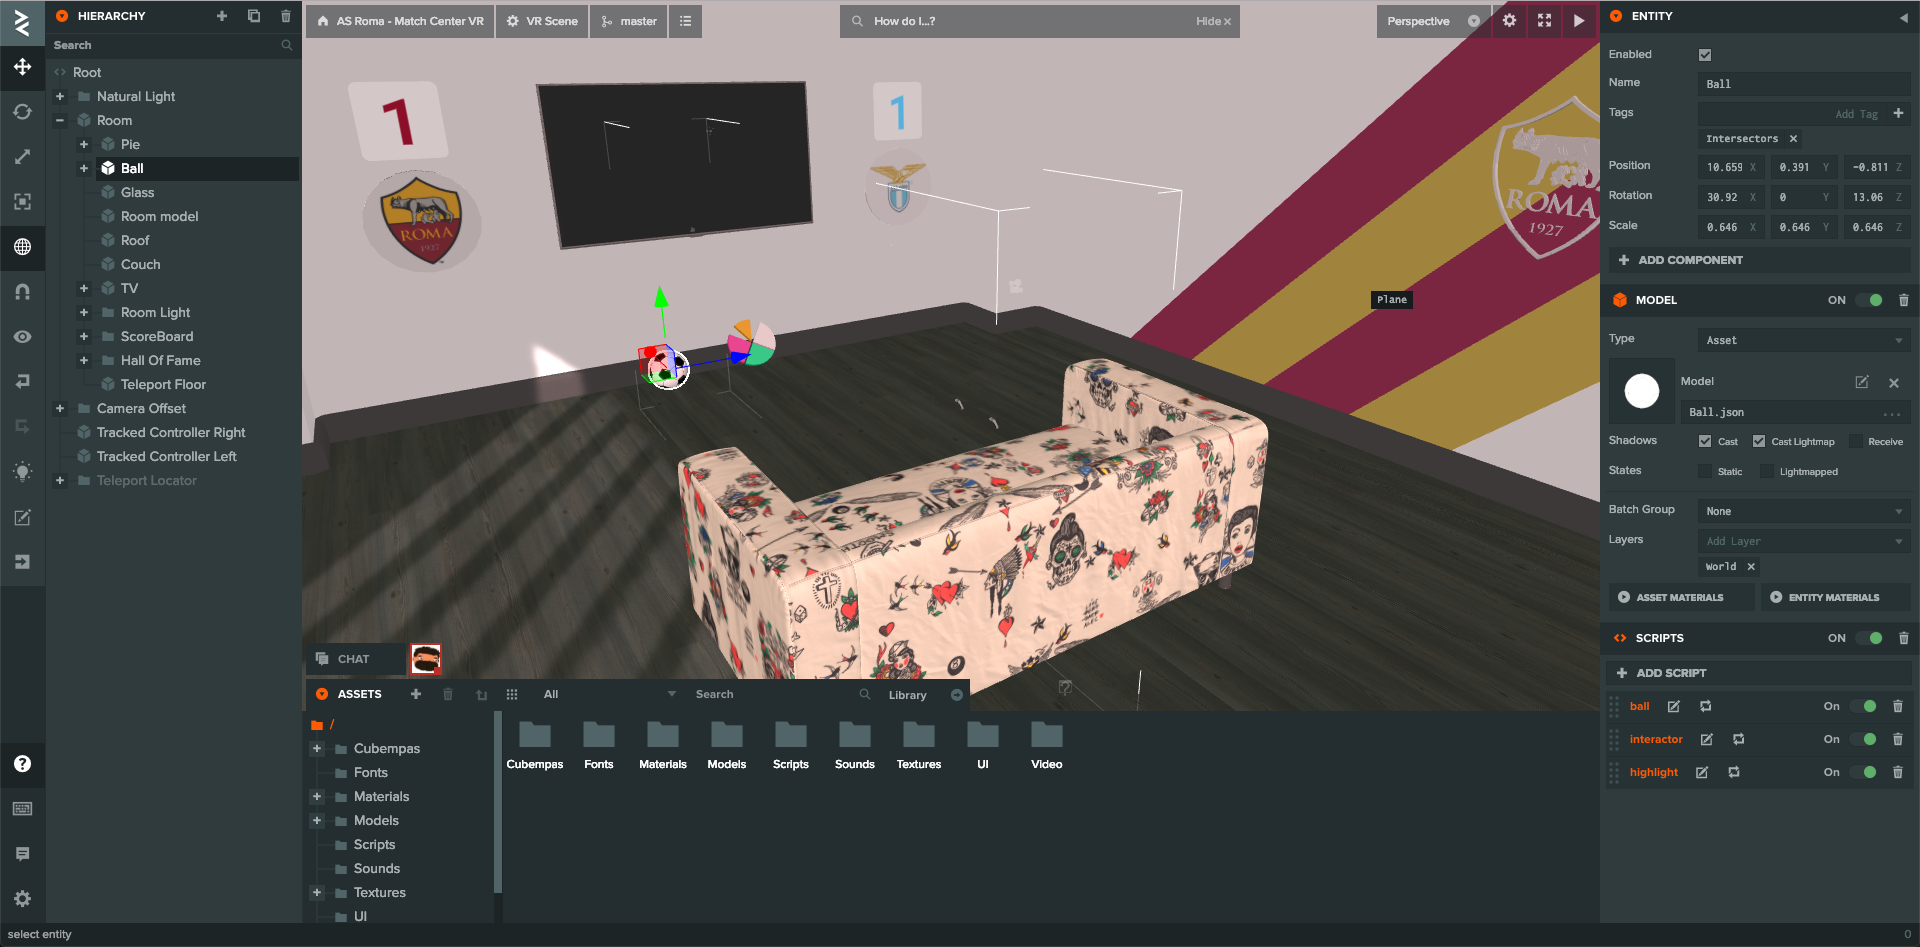
Everything in PlayCanvas starts with a visual editor.
')
On the left side of the screen is the entity hierarchy section. It allows you to create as empty entities, and already pre-installed, such as: cameras, light, primitives, audio, interfaces, particle systems or models. Any entity added to the hierarchy automatically enters the scene.
In the center of the screen is the scene editor. Here you can change the location of the entities, select them for editing and simply view what your application's scene will look like.
At the bottom of the scene editor is the Assets section. Assets are all files and other elements that can be added to your entities. There are several types of assets in PlayCanvas: folder, css, cubemap, HTML, JSON, material, script, shader and text. They all have a different purpose.
And finally, on the right side of the screen is the section of the properties of the entity. An entity has basic properties: location, rotation, scale, name, tags, settings for added components. Properties change depending on which entity is added. For example, if we add a cube, it will have the following properties: type, material, shadow settings, layers, and groups.
The overall process of developing applications and games in PlayCanvas looks something like this:
- We add the necessary assets. For example: models, materials, audio, video.
- Create the environment of our scene. For example: city, house, landscape.
- Add interactive elements. For example: the player and his enemies.
- Add application logic using scripts.
- We publish a game or application online.
PlayCanvas and JavaScript

To add logic to our game or application in PlayCanvas there is a special component: a script. Scripts can be global, in which case they should be added to the root of the scene hierarchy. Local scripts are added directly to the entity within the hierarchy (for example, to the game character model). All scripts must be written in JavaScript. after all we write games in the browser. Lovers of ES6, unfortunately, are disappointed, because PlayCanvas is still using ES5, and when I try to write any construction from ES6, the built-in linter will start to swear. In general, the script anatomy is the following pattern:
var NewScript = pc.createScript('newScript'); NewScript.attributes.add('someString', { type: 'string', default: 'any', title: 'Some string' }); NewScript.prototype.initialize = function() { this.startPosition = this.entity.getPosition(); }; NewScript.prototype.update = function(dt) { this.entity.setLocalPosition(this.newPosition); }; NewScript.prototype.calcaulateNewPosition = function() { this.newPosition = this.startPosition.dot(pc.Vec3.ZERO) }; Here we create a new script. It gets two main methods: initialize - will be called when the entity is added to the scene. Update - every frame is called. The dt parameter in update is delta time -% of the second for which the last frame was drawn. This is well illustrated by the following example: you need to rotate a certain object in one second by 360 degrees. We write the following code:
this.entity.rotate(0, 360 * dt, 0); Finally, the last calcaulateNewPosition method is a custom method and can be used to structure the code.
Also in the code there is the ability to add a new attribute someString . This design allows you to define parameters that can later be set through the editor interface. To add a script to the selected entity and click the “Parse” button. If the script had a construction with attributes, then a special field will appear to fill in the value. This value will override the default value. PlayCanvas supports many different types of attributes for the script. Read more about this here .
You can edit scripts both in the built-in editor and on your local machine in an IDE that is convenient for you. But in the second case, you will have to play around with the settings, because you need to raise the server associated with PlayCanvas.
Well, now that we’ve sorted out the main features of PlayCanvas, we can talk about how to create virtual reality scenes in PlayCanvas.
VR out of the box

PlayCanvas allows you to create a VR scene out of the box. To do this, select the appropriate option (VR Starter Kit) when creating a new project. So, let's see what PlayCanvas offers to us by default (spoiler: not as much as we would like).
Running the scene, you will see three cubes in front of you. When you look at them (gaze control), the progress bar will be launched, which will make the cube transparent. No controllers and WASD control for PC. In fact, this control allows you to create a small application for cardboards, because there, by default, there is support for touch events.
The code of our starting VR set is actually not very well structured and some parts of it are directly tied to the logic of this scene. That is, to make something of your own, you will have to figure out how it all works and adapt it to your needs. There is no API that allows you to connect any functionality separately.
Now let's try to go through the start-up files to figure out what is responsible for what and how it can be used for your purposes.
- look-camera.js . Here is the logic that is responsible for the pairing of the VR display and the camera. In addition, using mouse-controller.js or touch-controller.js, we can transmit pitch and yaw to control the camera from a PC or mobile phone.
- selector-camera.js . This file has hidden logic for the implementation of eye control. Each element that is available for interaction must be added through the selectorcamera event: add. Moreover, its AABB must be calculated manually. Also here you can find the logic of the ray (ray \ raycaster). In PlayCanvas there is a special object this._ray = new pc.Ray (); which is able to find intersections with BoundingBox or BoundingSphere .
- web-vr-ui.js . Just adds a VR login interface. Frankly, this is not done very elegantly. All styles and HTML are right in this script. Apparently this was done due to the fact that the 2D Screen for interfaces has its limitations, and the button should be located strictly in the lower right corner.
- box.js Here we will find all the logic associated with the cube - management of the scale of progress, etc.
As can be seen from the above, in the starting VR set there’s nothing to count on. All that can be done is an application for a cardboard and this, in my opinion, is not very interesting, because cardboards are a kind of toy that does not give an idea of the normal experience of using VR. You can really dive into virtual reality with Oculus Go, Oculus Rift or HTC Vive.
And now let's talk about how we can add controller support to our application.
VR controllers

It would be nice if PlayCanvas adapted its storage so that with one button you can connect various elements to your application that are connected with the necessary logic. But today it is impossible to do so, so let's try to do it differently. In order not to write all the logic for comparing the position of the controllers, we can use already existing solutions. There is a great example of Web VR Lab . There are many interesting things there, but according to the code ... the devil himself will break his leg. There is also a small VR Tracked Controllers scene - just a base scene with two controllers. Here it is just the same and is suitable for borrowing items in your project.
Open the VR Tracked Controllers scene for editing. First we need to move the controller:
- Select the controller, in the properties section we find the model, click on it, get on it as an asset.
- In the settings there will be a Download button, which we click and download the model and textures.
- Unzip the assets and load them into your application. To do this, simply drag them to the asset window, which is located below. You need to transfer everything: a model in JSON format and all textures.
- The model will appear in our list of assets. Drag it onto the stage. And now she is already there. Let's call it Left Controller.
Now we need to add material:
- Create a new material by clicking on the “+” button on the asset panel. Let's call the material Controller Material.
- Now you need to open the source project and find the tracked-controller material there and copy all the settings into our material, including normals, emissive, specular and diffuse maps (maps).
Now you can copy the controller using the special Duplicate button on the hierarchy panel and name the second controller Right Controller.
Everything, controllers at us on a scene. But for now these are just two models and in order for it to work, we need to move the scripts. Let's take a closer look at what is needed there and how it works:
- vr-gamepad-manager.js - essentially contains all the necessary logic for your controllers to get the position and rotation of the real controller. There is a fake elbow logic implemented for 3-dof helmets such as Oculus Go, Gear VR or Daydream. _updatePadToHandMappings here is responsible for detecting controllers and mapping them to our controllers. The whole logic of mapping a real and virtual controller is in the _poseToWorld function. In fact, the data from the WebXR API is taken through the controller instance itself - padPose.position, padPose.poseRotation. The logic, which is further, is responsible for the nuances associated with different types of devices. The script itself must be global (that is, added to the root of the hierarchy).
- input-vr.js - responsible for registering our controllers and working with buttons. In fact, it simply determines the pressing of the buttons and sends the number of the pressed button. This is not very convenient, since different devices may have different buttons and the GamePad API , and it’s not a fact that the first button on the Oculus Go will be the trigger for the HTC Vive controller. Therefore, you have to manually map. This script needs to be connected to the controller element.
If everything is done correctly, you will be able to enter virtual reality and wave your controllers. Not bad, although the process of integrating the necessary functionality is rather inconvenient and tedious.
Total
PlayCanvas is an excellent engine that you can use to create WebGL games or applications. But, you have to admit that it is poorly adapted for WebVR. It seems that the task was set to demonstrate that PlayCanvas can, in order to stir up the interest of the public. But the development of this direction, apparently, has not received. Therefore, you can make a VR game or application, but you will have to copy a lot and understand the confusing code that was created only for demonstration (Web VR Lab).
In the next article, I would like to conduct a small lesson on how to create a teleport control, so that we have some kind of set that allows you to start a Web VR game or application. Thank you all for your attention!
Source: https://habr.com/ru/post/445692/
All Articles