Cluster storage for small web clusters based on drbd + ocfs2
What we will tell about:
How to quickly deploy shared storage for two servers based on drbd + ocfs2 solutions.
For whom it will be useful:
Tutorial will be useful for system administrators and anyone who chooses a way to implement storage or want to try a solution.
Often we are faced with a situation where we need to implement shared storage on a small web cluster with good read-write performance. We tried various options for the implementation of a common repository for our projects, but little was able to satisfy us at once by several indicators. Now tell you why.
')
One of the most convenient solutions for us was a bunch of ocfs2 + drbd . Now we will tell you how you can quickly deploy shared storage for two servers based on solution data. But first, a little about the components:
DRBD is a storage system from a standard Linux distribution that allows data to be replicated between servers in blocks. The main application is to build fault-tolerant storage.
OCFS2 is a file system that provides shared use of the same storage by multiple systems. Included in the delivery of Linux and is a kernel module and userspace toolkit for working with filesystems. OCFS2 can be used not only on top of DRBD, but also on top of iSCSI with multiple connections. In our example, we use DRBD.
All actions are performed on ubuntu server 18.04 in the minimum configuration.
Step 1. Configure DRBD:
In the /etc/drbd.d/drbd0.res file we describe our virtual block device / dev / drbd0:
meta-disk internal - use the same block devices to store metadata
device / dev / drbd0 - use / dev / drbd0 as the path to drbd volume.
disk / dev / vdb1 - use / dev / vdb1
syncer {rate 1000M; } - use gigabit bandwidth
allow-two-primaries is an important option allowing the adoption of changes on two primary servers
after-sb-0pri, after-sb-1pri, after-sb-2pri are the options that are responsible for the actions of the node when a splitbrain is detected. More details can be found in the documentation.
become-primary-on both - sets both nodes in primary.
In our case, we have two absolutely identical VMs, with a 10 Gigabit bandwidth allocated to a virtual network.
In our example, the network names of the two nodes of the cluster are drbd1 and drbd2. To work properly, you need to map the names and ip addresses of the nodes in / etc / hosts.
Step 2. Configure the nodes:
On both servers we execute:
We get the following:

You can run a sync. On the first node you need to run:
We look at the status:

Ok, sync started. We are waiting for the end and see the picture:

Step 3. We start synchronization on the second node:
We get the following:

Now we can write to drbd from two servers.
Step 4. Install and configure ocfs2.
We will use a rather trivial configuration:
It needs to be written in /etc/ocfs2/cluster.conf on both nodes.
Create a FS on drbd0 on any node:
Here we created a file system labeled testVol on drbd0 using default parameters.
In / etc / default / o2cb must be set (as in our configuration file)
and execute on each node:
After that, we include and add to the autorun all the units we need:
Some of this will already be launched during the setup process.
Step 5. Add mount points in fstab on both nodes:
Directory / media / shared should be created in advance.
Here we use the noauto options, which means that the file system will not be mounted at startup (I prefer to mount network fs via systemd) and heartbeat = local, which means using the heartbeat service on each node. There is also a global heartbeat, which is more suitable for large clusters.
Then you can mount / media / shared and check the sync content.
Done! As a result, we get a more or less fault-tolerant storage with scalability and decent performance.
How to quickly deploy shared storage for two servers based on drbd + ocfs2 solutions.
For whom it will be useful:
Tutorial will be useful for system administrators and anyone who chooses a way to implement storage or want to try a solution.
What decisions are we abandoned and why
Often we are faced with a situation where we need to implement shared storage on a small web cluster with good read-write performance. We tried various options for the implementation of a common repository for our projects, but little was able to satisfy us at once by several indicators. Now tell you why.
')
- Glusterfs did not suit us with read and write performance, there were problems with simultaneously reading a large number of files, there was a high load on the CPU. The problem with reading files could be solved by contacting them directly in the brick-and, but this is not always applicable and generally wrong.
- Ceph did not like excessive complexity, which can be harmful on projects with 2-4 servers, especially if the project is subsequently serviced. Again, there are serious performance constraints, forcing to build separate storage clusters, as with glusterfs.
- Using a single nfs server to implement shared storage raises issues in terms of fault tolerance.
- s3 is a great popular solution for a range of tasks, but it’s not a file system either, which narrows the scope.
- lsyncd. If we have already started talking about “non-file systems”, then it is worth going through this popular solution. Not only is it not suitable for two-way exchange (but if you really want, you can), it also does not work stably on a large number of files. A nice addition to everything is that it is single-threaded. The reason is in the program architecture: it uses inotify to monitor objects of work that it hangs at startup and during rescan. Rsync is used as a transmission medium.
Tutorial: how to deploy shared storage based on drbd + ocfs2
One of the most convenient solutions for us was a bunch of ocfs2 + drbd . Now we will tell you how you can quickly deploy shared storage for two servers based on solution data. But first, a little about the components:
DRBD is a storage system from a standard Linux distribution that allows data to be replicated between servers in blocks. The main application is to build fault-tolerant storage.
OCFS2 is a file system that provides shared use of the same storage by multiple systems. Included in the delivery of Linux and is a kernel module and userspace toolkit for working with filesystems. OCFS2 can be used not only on top of DRBD, but also on top of iSCSI with multiple connections. In our example, we use DRBD.
All actions are performed on ubuntu server 18.04 in the minimum configuration.
Step 1. Configure DRBD:
In the /etc/drbd.d/drbd0.res file we describe our virtual block device / dev / drbd0:
resource drbd0 { syncer { rate 1000M; } net { allow-two-primaries; after-sb-0pri discard-zero-changes; after-sb-1pri discard-secondary; after-sb-2pri disconnect; } startup { become-primary-on both; } on drbd1 { meta-disk internal; device /dev/drbd0; disk /dev/vdb1; address 10.10.10.192:7789; } on drbd2 { meta-disk internal; device /dev/drbd0; disk /dev/vdb1; address 10.10.10.193:7789; } } meta-disk internal - use the same block devices to store metadata
device / dev / drbd0 - use / dev / drbd0 as the path to drbd volume.
disk / dev / vdb1 - use / dev / vdb1
syncer {rate 1000M; } - use gigabit bandwidth
allow-two-primaries is an important option allowing the adoption of changes on two primary servers
after-sb-0pri, after-sb-1pri, after-sb-2pri are the options that are responsible for the actions of the node when a splitbrain is detected. More details can be found in the documentation.
become-primary-on both - sets both nodes in primary.
In our case, we have two absolutely identical VMs, with a 10 Gigabit bandwidth allocated to a virtual network.
In our example, the network names of the two nodes of the cluster are drbd1 and drbd2. To work properly, you need to map the names and ip addresses of the nodes in / etc / hosts.
10.10.10.192 drbd1 10.10.10.193 drbd2 Step 2. Configure the nodes:
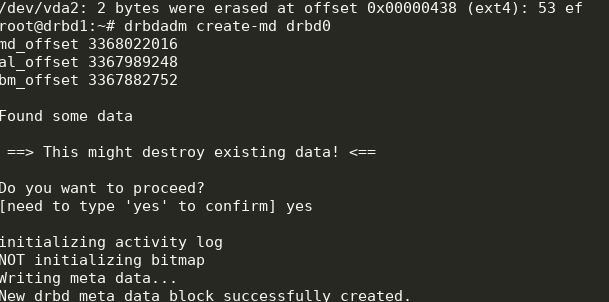
On both servers we execute:
drbdadm create-md drbd0 modprobe drbd drbdadm up drbd0 cat /proc/drbd We get the following:
You can run a sync. On the first node you need to run:
drbdadm primary --force drbd0 We look at the status:
cat /proc/drbd Ok, sync started. We are waiting for the end and see the picture:
Step 3. We start synchronization on the second node:
drbdadm primary --force drbd0 We get the following:
Now we can write to drbd from two servers.
Step 4. Install and configure ocfs2.
We will use a rather trivial configuration:
cluster: node_count = 2 name = ocfs2cluster node: number = 1 cluster = ocfs2cluster ip_port = 7777 ip_address = 10.10.10.192 name = drbd1 node: number = 2 cluster = ocfs2cluster ip_port = 7777 ip_address = 10.10.10.193 name = drbd2 It needs to be written in /etc/ocfs2/cluster.conf on both nodes.
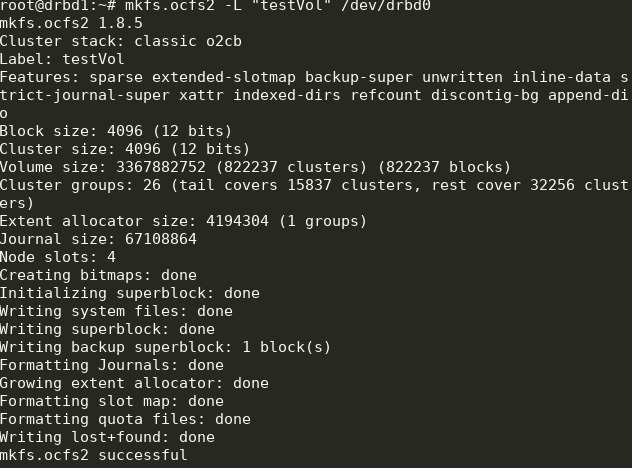
Create a FS on drbd0 on any node:
mkfs.ocfs2 -L "testVol" /dev/drbd0 Here we created a file system labeled testVol on drbd0 using default parameters.
In / etc / default / o2cb must be set (as in our configuration file)
O2CB_ENABLED=true O2CB_BOOTCLUSTER=ocfs2cluster and execute on each node:
o2cb register-cluster ocfs2cluster After that, we include and add to the autorun all the units we need:
systemctl enable drbd o2cb ocfs2 systemctl start drbd o2cb ocfs2 Some of this will already be launched during the setup process.
Step 5. Add mount points in fstab on both nodes:
/dev/drbd0 /media/shared ocfs2 defaults,noauto,heartbeat=local 0 0 Directory / media / shared should be created in advance.
Here we use the noauto options, which means that the file system will not be mounted at startup (I prefer to mount network fs via systemd) and heartbeat = local, which means using the heartbeat service on each node. There is also a global heartbeat, which is more suitable for large clusters.
Then you can mount / media / shared and check the sync content.
Done! As a result, we get a more or less fault-tolerant storage with scalability and decent performance.
Source: https://habr.com/ru/post/445612/
All Articles