Remote monitoring and management of devices based on Linux / OpenWrt / Lede through the 80th port ...
Hello everyone, this is my first experience on Habré. I want to write about how to control the network equipment in an external network outside the box. What does it mean outside the box: in most cases, to control equipment in an external network, you need:
Therefore, you will need “my bike” when standard methods do not suit you, for example:
So, I tried to describe to you my typical situation: “somewhere far, far away, there is a very important, lonely and small router running Linux. It is important to know at least once a day that he is “alive” and, if necessary, commands were sent to him, for example, “sun, reboot!”
')
Let's proceed to the implementation:
1) On the side of the router, by cron every 5/10/1440 minutes, or whenever you need to send an http request to the server using wget, save the result of the request to a file, make the file executable, and execute it.
My cron line looks like this:
File / etc / crontabs / root:
where:
xn - 80abgfbdwanb2akugdrd3a2e5gsbj.xn - p1ai is the domain of my server. Immediately, I note: yes, you can also specify the specific ip-address of the server, we did it before, while our state, in a righteous rush of struggle, told the same way — did not close access to the lion’s share of the clouds of DigitalOcean and Amazon. In the case of using a symbolic domain, if a similar incident occurs, you can easily raise the backup cloud, redirect the domain to it and restore the monitoring of devices.
a.php - server side script name. Yes, I know that this is wrong, call variables and file names in one letter ... I suggest that we save a few bytes when sending a request :)
u - user name, login
p - password
“-O /tmp/wa.sh” is a file on a remote router where the server response will be saved, for example, the reboot command.
2) On the server side (I have this Ubuntu), we will use Zabbix. Why: I want it to be beautiful (with graphs) and convenient (send commands via the context menu). Zabbix has such a lovely thing as a zabbix agent. Through the agent, we will call a php script on the server, which will return information about whether our router was registered in the required time period. To store information about the registration time, the commands for the devices, I use MySQL, a separate users table with some such fields:
All sources can be picked up from the Git repository at: https://github.com/BazDen/iotnet.online.git
Now PHP scripts that are hosted on the server side (for convenience, you can put them in the / usr / share / zabbix / folder):
File a.php:
The agent.php file (this is the script of the called zabbix agent):
Well, the final stage: the writing of the agent and the addition of graphs.
If you have not installed a zabbix agent yet, then:
Edit the file /etc/zabbix/zabbix_agentd.conf.
Add a line:
where:
test - the name of our agent
"Php /usr/share/zabbix/agent.php user password" is a called script with indication of device registration data.
Adding charts: open the zabbix web interface, select from the menu:
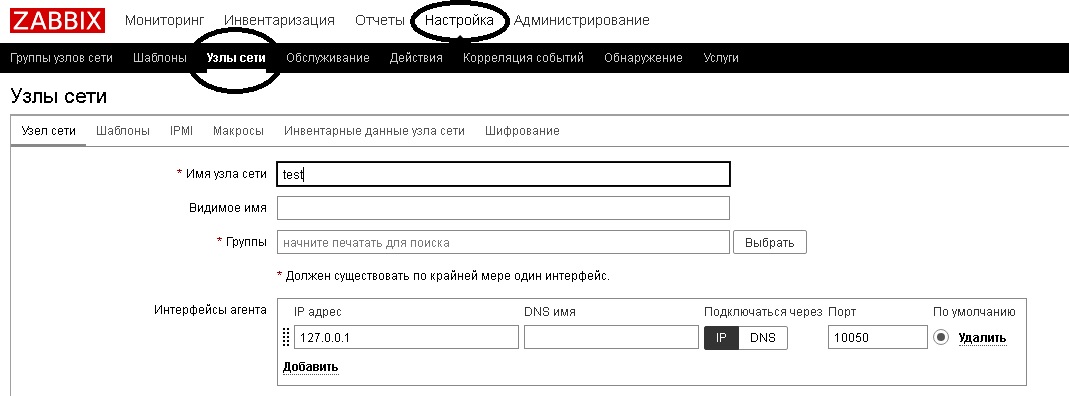
Settings -> Hosts -> Create Hub. Here it is enough to specify the host name, its group, the default agent interface:
Now we need to add a data item for this node. Pay attention to two fields: the “key” is just the parameter that we wrote in the /etc/zabbix/zabbix_agentd.conf file (in our case, this is a test), and the “update interval” - I set 5 minutes, because and the equipment is registered on the server also once every five minutes.

Well, add the schedule. I recommend to select “Fill” as the style of drawing.

The output is something very concise, like this:

To a reasonable question: “was it worth it?”, I will answer: well, of course, see the “reasons for creating a bicycle” at the beginning of the article.
If my first grafomansky experience will arouse the interest of readers, then in the following articles I want to describe how to send commands to remote equipment. We also managed to implement the whole scheme for devices based on RouterOS (Mikrotik).
- Public IP address. Well, or if the equipment is behind someone else's NAT, then the public IP and the “forwarded” port.
- Tunnel (PPTP / OpenVPN / L2TP + IPSec, etc.) to the central site through which it would be available.
Therefore, you will need “my bike” when standard methods do not suit you, for example:
- The equipment is behind NAT and, apart from the usual http (port 80), everything is closed. The situation is quite normal for large federal corporate networks. Register ports - they can, but not immediately, not quickly and not to you.
- Unstable and / or "narrow" communication channel. Little speed, constant loss. Pain and frustration when trying to organize a tunnel.
- Dear communication channel, where literally every megabyte counts. For example, satellite communications. Plus big delays and a "narrow" strip.
- The situation when you need to “juggle” with a large number of small routers, on which, on the one hand, OpenWrt / Lede is installed to expand its capabilities, and on the other hand, the router’s resources do not suffice for everything.
Note number of times
And what prevents the USB port of the router from installing a “flash drive” and expanding the memory of the router?
Most often, the requirements for the cost of the solution as a whole, but sometimes the form factor also plays a key role. For example, the TP-Link ML3020 is on site, its only USB port is used for a 2G / 3G modem, all this is wrapped in a thread of a small plastic case and placed somewhere high-high (on the mast), far, far away (in field, 30 km from the nearest base station of the mobile operator). Yes, you can plug in a USB hub and expand the number of ports, but experience shows that it is cumbersome and unreliable.
Most often, the requirements for the cost of the solution as a whole, but sometimes the form factor also plays a key role. For example, the TP-Link ML3020 is on site, its only USB port is used for a 2G / 3G modem, all this is wrapped in a thread of a small plastic case and placed somewhere high-high (on the mast), far, far away (in field, 30 km from the nearest base station of the mobile operator). Yes, you can plug in a USB hub and expand the number of ports, but experience shows that it is cumbersome and unreliable.
So, I tried to describe to you my typical situation: “somewhere far, far away, there is a very important, lonely and small router running Linux. It is important to know at least once a day that he is “alive” and, if necessary, commands were sent to him, for example, “sun, reboot!”
')
Let's proceed to the implementation:
1) On the side of the router, by cron every 5/10/1440 minutes, or whenever you need to send an http request to the server using wget, save the result of the request to a file, make the file executable, and execute it.
My cron line looks like this:
File / etc / crontabs / root:
*/5 * * * * wget "http://xn--80abgfbdwanb2akugdrd3a2e5gsbj.xn--p1ai/a.php?u=user&p=password" -O /tmp/wa.sh && chmod 777 /tmp/wa.sh && /tmp/wa.sh where:
xn - 80abgfbdwanb2akugdrd3a2e5gsbj.xn - p1ai is the domain of my server. Immediately, I note: yes, you can also specify the specific ip-address of the server, we did it before, while our state, in a righteous rush of struggle, told the same way — did not close access to the lion’s share of the clouds of DigitalOcean and Amazon. In the case of using a symbolic domain, if a similar incident occurs, you can easily raise the backup cloud, redirect the domain to it and restore the monitoring of devices.
a.php - server side script name. Yes, I know that this is wrong, call variables and file names in one letter ... I suggest that we save a few bytes when sending a request :)
u - user name, login
p - password
“-O /tmp/wa.sh” is a file on a remote router where the server response will be saved, for example, the reboot command.
Note number two:
Ahhh, why do we use wget, not curl, because through curl you can send https requests and not GET, but POST? Ahhh, because, like in the old joke, “It doesn’t climb in the pot!”. The composition of curl includes encryption libraries of about 2 MB in size and, by virtue of this, you will hardly be able to assemble an image for a small TP-LINK ML3020 for example. And with wget, please.
2) On the server side (I have this Ubuntu), we will use Zabbix. Why: I want it to be beautiful (with graphs) and convenient (send commands via the context menu). Zabbix has such a lovely thing as a zabbix agent. Through the agent, we will call a php script on the server, which will return information about whether our router was registered in the required time period. To store information about the registration time, the commands for the devices, I use MySQL, a separate users table with some such fields:
CREATE TABLE `users` ( `id` varchar(25) NOT NULL, `passwd` varchar(25) NOT NULL, `description` varchar(150) NOT NULL, `category` varchar(30) NOT NULL, `status` varchar(10) NOT NULL, `last_time` varchar(20) NOT NULL, // `last_ip` varchar(20) NOT NULL, // IP `last_port` int(11) NOT NULL, // `task` text NOT NULL, // `reg_task` varchar(150) NOT NULL, // "" , `last_task` text NOT NULL, // `response` text NOT NULL, // `seq` int(11) NOT NULL ) ENGINE=InnoDB DEFAULT CHARSET=utf8; All sources can be picked up from the Git repository at: https://github.com/BazDen/iotnet.online.git
Now PHP scripts that are hosted on the server side (for convenience, you can put them in the / usr / share / zabbix / folder):
File a.php:
<?php // : , // message ? , $user=$_REQUEST['u']; $password=$_REQUEST['p']; $message=$_REQUEST['m']; // (MySQL) $conn=new mysqli("localhost","db_login","db_password","DB_name"); if (mysqli_connect_errno()) { exit(); } $conn->set_charset("utf8"); // $sql_users=$conn->prepare("SELECT task, reg_task, response, last_time FROM users WHERE id=? AND passwd=? AND status='active';"); $sql_users->bind_param('ss', $user, $password); $sql_users->bind_result($task, $reg_task, $response, $last_time); $sql_users->execute(); $sql_users->store_result(); if (($sql_users->num_rows)==1){ $sql_users->fetch(); // echo $task; echo "\n"; echo $reg_task; // $response_history="[".date("Ymd H:i")."] ".$message; // , , , - $last_ip=$_SERVER["REMOTE_ADDR"]; $last_port=$_SERVER["REMOTE_PORT"]; $ts_last_conn_time=$last_time; $sql_users=$conn->prepare("UPDATE users SET task='', seq=1 WHERE (id=?);"); $sql_users->bind_param('s', $user); $sql_users->execute(); if (strlen($message)>1){ $sql_users=$conn->prepare("UPDATE users SET response=?, seq=1 WHERE (id=?);"); $sql_users->bind_param('ss', $response_history, $user); $sql_users->execute(); } // , . $ts_now=time(); $sql_users=$conn->prepare("UPDATE users SET last_time=?, last_ip=?, last_port=? WHERE (id=?);"); $sql_users->bind_param('ssss', $ts_now, $last_ip, $last_port, $user); $sql_users->execute(); } // , "", ... reboot.... // ? , " ". else { echo "reboot"; } $sql_users->close(); ?> The agent.php file (this is the script of the called zabbix agent):
<?php // Zabbix. users "1" // user password - $user = $argv[1]; $password = $argv[2]; // $conn=new mysqli("localhost","db_user","db_password","db_name"); if (mysqli_connect_errno()) { exit(); } $conn->set_charset("utf8"); $sql_users=$conn->prepare("SELECT seq FROM users WHERE id=? AND passwd=? AND status='active';"); $sql_users->bind_param('ss', $user, $password); $sql_users->bind_result($seq); $sql_users->execute(); $sql_users->store_result(); // seq. "1" if (($sql_users->num_rows)==1){ $sql_users->fetch(); echo $seq; } // $seq. $sql_users=$conn->prepare("UPDATE users SET seq=0 WHERE id=? AND passwd=? AND status='active';"); $sql_users->bind_param('ss', $user, $password); $sql_users->execute(); $sql_users->close(); ?> Well, the final stage: the writing of the agent and the addition of graphs.
If you have not installed a zabbix agent yet, then:
apt-get install zabbix-agent Edit the file /etc/zabbix/zabbix_agentd.conf.
Add a line:
UserParameter=test,php /usr/share/zabbix/agent.php user password where:
test - the name of our agent
"Php /usr/share/zabbix/agent.php user password" is a called script with indication of device registration data.
Adding charts: open the zabbix web interface, select from the menu:
Settings -> Hosts -> Create Hub. Here it is enough to specify the host name, its group, the default agent interface:
Now we need to add a data item for this node. Pay attention to two fields: the “key” is just the parameter that we wrote in the /etc/zabbix/zabbix_agentd.conf file (in our case, this is a test), and the “update interval” - I set 5 minutes, because and the equipment is registered on the server also once every five minutes.
Well, add the schedule. I recommend to select “Fill” as the style of drawing.
The output is something very concise, like this:
To a reasonable question: “was it worth it?”, I will answer: well, of course, see the “reasons for creating a bicycle” at the beginning of the article.
If my first grafomansky experience will arouse the interest of readers, then in the following articles I want to describe how to send commands to remote equipment. We also managed to implement the whole scheme for devices based on RouterOS (Mikrotik).
Source: https://habr.com/ru/post/445568/
All Articles