How to visit Korean University using the Network File System

Foreword
A long time ago in the early 2000s, many were entertained by regularly “scanning” their provider's networks, and sometimes even farther targets for detecting Windows machines and resources for them (SMB) available for reading (writing). The search process was primitive: a range of IP addresses or a network mask was specified, and using various tools — LANguard Network Scanner, xIntruder, and the like — addresses were scanned and servers were located. Often, on the detected machines, various network resources (disks, printers, directories) were available for reading, less often for writing. Through an anonymous session, using IPC $ and the “Guest” user, it was possible to transfer resources on the machine, sometimes there were “Administrators” members without passwords, and sometimes, after a more “active” impact on the detected machines, it was possible to find servers running Windows NT 4.0 or Windows 2000 Server. If luck deigned to detect machines with Windows 98 then common, it became easier - at that time, the specified OS contained many different vulnerabilities, including in the implementation of working with SMB, brute force to gain access to the resource was carried out in a matter of minutes even on dial-up connections. For those who want to plunge into the old days here it is written in detail about the "access" to Windows 9x - Hacking Exposed: Network Security Secrets & Solutions. Chapter 4: Hacking Windows 95/98 and Me . But later in the article it's not about that.
I would never have thought that in 2019 such “entertainment” was possible. The similarity lies in the ease of finding other people's available resources for all curious. The following discussion will focus not on the trend popular in the past 2 years - the search for open access databases of MongoDB or Elasticsearch - but a somewhat more mundane service.
Further, I suggest not to evaluate the whole procedure of actions, their ethical standards, I note that this post is not a call for actions that can be attributed to some articles of the Criminal Code of the Russian Federation or similar norms from the laws of other states.
Network File System (NFS)
Network File System (NFS) is a network file access protocol that allows you to connect (mount) remote file systems through a network, provides users with access to files, and allows them to work with these files in the same way as with local ones.
Most Network-attached storage (NAS) on the market, of course, support NFS, and provide access to local resources as well as on any server with an operating system where it is possible to deploy the NFS service.
The settings for access to server resources with some Ubuntu OS and IP address 192.168.1.1 are contained in the / etc / exports file and are records of the form:
- / data / place1 192.168.1.0/255.255.255.0(rw, no_subtree_check,nohide,async) 192.168.101.0/255.255.255.0(rw,no_subtree_check,nohide,async)
- data / place2 192.168.1.0/255.255.255.0(rw,no_subtree_check,nohide,async) 192.168.101.0/255.255.255.0(rw,no_subtree_check,nohide,async)
In this case, NFS access to the server and its resource / data / place1 is possible for clients with IP addresses from networks 192.168.1.0/255.255.255.0, 192.168.101.0/255.255.255.0.
Mount a remote resource to a local directory, for example, / home / user / example, if the client is on an allowed subnet and the client for NFS is installed, possibly via the (Ubuntu) command:mount -t nfs 192.168.1.1:/data/place1 /home/user/example
If instead of IP addresses, * or (everyone) is specified, then, often, any client can mount the remote resource into his system.
The user (for example, under Ubuntu) just dial in the terminal: showmount -e ip-target and get information about available resources on the server (server's export list).
For example:showmount -e 81.24..Export list for 81.24..:/home/admin 192.168.52.1/24
Thus, the following scenario is formed: to detect servers with a running NFS service, determine available resources on servers, consolidate the result into a single output form, and continue to act on the situation.
What can be on the resources - obviously, anything:
- personal files of Internet users, for example, in cases of "open" NAS devices;
- directories with files of entire enterprises, databases, database archives;
- often directories with / home / * addresses (sometimes with keys in .ssh and available for writing);
- directories with CCTV files;
- other ...
Getting IPs
Regarding the discovery of servers with the NFS service on the global Internet, there are two possible ways: independently, using various tools, and out-of-the-box third-party scan results, databases and services. In fact, it all comes down to getting a list of IP addresses. In the local network, I think the option is obvious - to act independently.
Evidence of the operation of the NFS service can be open TCP ports 111, 2049.
To obtain a list of server IP addresses yourself, just scan the range of addresses or the entire subnet for the presence of the specified open ports. Any tool will do for this: nmap, masscan, and so on.
For example, masscan -p111,2049 200.26.1XX.0/24 —rate=10000 command masscan -p111,2049 200.26.1XX.0/24 —rate=10000 network 200.26.1XX.0 / 24 will be scanned in a few seconds for open ports 111, 2049:Scanning 256 hosts [2 ports/host]Discovered open port 2049/tcp on 200.26.1XX.28Discovered open port 111/tcp on 200.26.1XX.15Discovered open port 111/tcp on 200.26.1XX.20Discovered open port 111/tcp on 200.26.1XX.28
Further to each of the detected IP addresses it is possible to apply the command:showmount --no-headers -e 200.26.1XX.28
Result:/usr/common *
Obviously, it is possible to scan millions of IP addresses on the Internet itself, but this is not the fastest way and then the excellent service Shodan can be a subtask solution, there are of course others, but this one with a very convenient syntax and API . To delve into the description of the capabilities of the service is not the purpose of the article. In short - the service provides an advanced search for devices connected to the Internet. Search criteria can be network identifiers and other metadata: certificate serial numbers and the like. In Shodan, there are many target search capabilities, but I did not find a separate NFS search, for example, by the product criterion with the product name indicated: mongodb, elastic or apache. Therefore, through the Web NFS it is possible to search for the following queries: nfs, tcp 2049, tcp 111, Portmap: 2049, and so on, as you like.

Or install the Shodan client (CLI), initialize your API KEY to the service and call the search from the command line, for example:
- shodan search --fields ip_str, port Portmap: 2049
- shodan search --fields ip_str, port --separator, nfs
Result:
139.196.154.23,111,
198.27.116.37,111,
95.211.192.96,111,
80.23.66.122,111,
210.116.82.97,111,
192.198.82.3,111,
165.227.67.242,111,
116.12.48.9,111,
85.34.250.102,111,
182.75.249.197,111,
192.151.212.175,111,
119.216.107.127,111,
217.59.68.2,111,
178.159.12.97,111,
...
So, how to get the lists of IP addresses of devices with a valid NFS service is understandable.
Get information about available NFS service resources on specific servers.
There are many ways to solve this task en masse: write bash-scripts, organize a cunning pipeline from a chain of commands with the showmount call, and other options - what do you like?
In my research, I solved this problem in Python, and in two different ways. The first is to connect via ssh to your personal Ubuntu server with an NFS client and then invoke the showmount command on it with the desired pool of IP addresses. The second solution is pure Python.
I suppose the question may arise: why is it so difficult, why in Python?
Because, like in my previous article on Habr, I will use the tool Lampyre, to which an API was published on February 26 that allows you to write your own modules for the platform in Python.
Briefly about Lampyre - a software platform for OSINT and data analysis with a “fat” client under Windows, an analogue of the well-known and popular tool for the same purposes - Maltego. As in Maltego, a set of requests for various services is provided out of the box in Lampyre. Requests are conceptually analogous to the transformations from a better known product. If something is missing, it is now possible to write your own requests. The queries that come with Lampyre are executed on the platform infrastructure, written independently - on the machine. That is, the user must have Python installed and all the necessary libraries used in the code.
I decided to test the capabilities of the API. The key point is that there are already several “requests” to Shodan in Lampyre, especially since you do not need to have your API KEY from the service. Thus, in one request you can get lists of IP addresses with a raised NFS service, and with the second request, the module I wrote will check the available resources and visualize the result with the characteristics of the resources on the same graph.
And here Korea
During the search from Shodan and testing of the module, it became interesting to see the situation with the quality and quantity of results of scanning by the Shodan service in Asian countries, how things are with unprotected resources. The choice fell on the Republic of Korea, I think there is no need to say that South Korea is a very technologically advanced country, and I suggested that something interesting could be found in its networks.
Search by Shodan, in Query: nfs , in Country: Republic of Korea code, kr

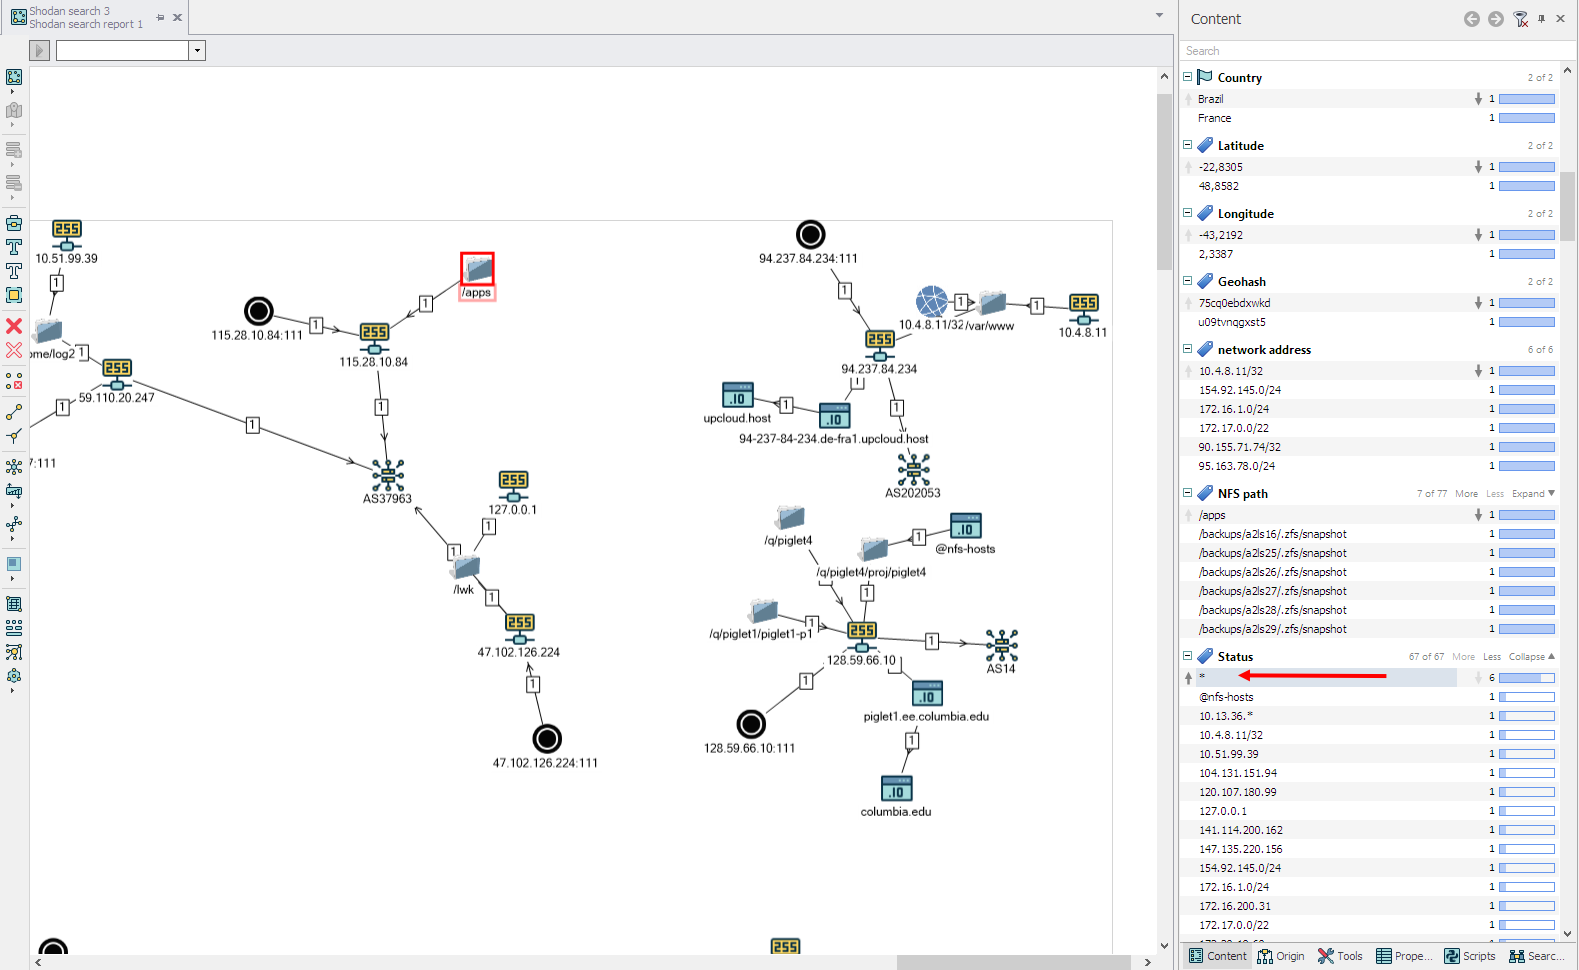
The result was not long in coming (in the image below, only part of the overall scheme).

List of hosts:
- psi.kaist.ac.kr
- hulk.kaist.ac.kr
- messi.kaist.ac.kr
- marvel.kaist.ac.kr
- kaist.ac.kr
- ai1.kaist.ac.kr
- jarvis3.kaist.ac.kr
- baraddur.kaist.ac.kr
- rho.kaist.ac.kr
- jarvis.kaist.ac.kr
All of them, as can be seen on the graph, and by name - are listed as AS1781 - Korea Advanced Institute of Science and Technology

The Korea Advanced Technology Institute is the leading educational and research university in South Korea, located in Daejeon, located on the second line of the national ranking in South Korea. The university is consistently included in 5% of top educational institutions in South Korea.
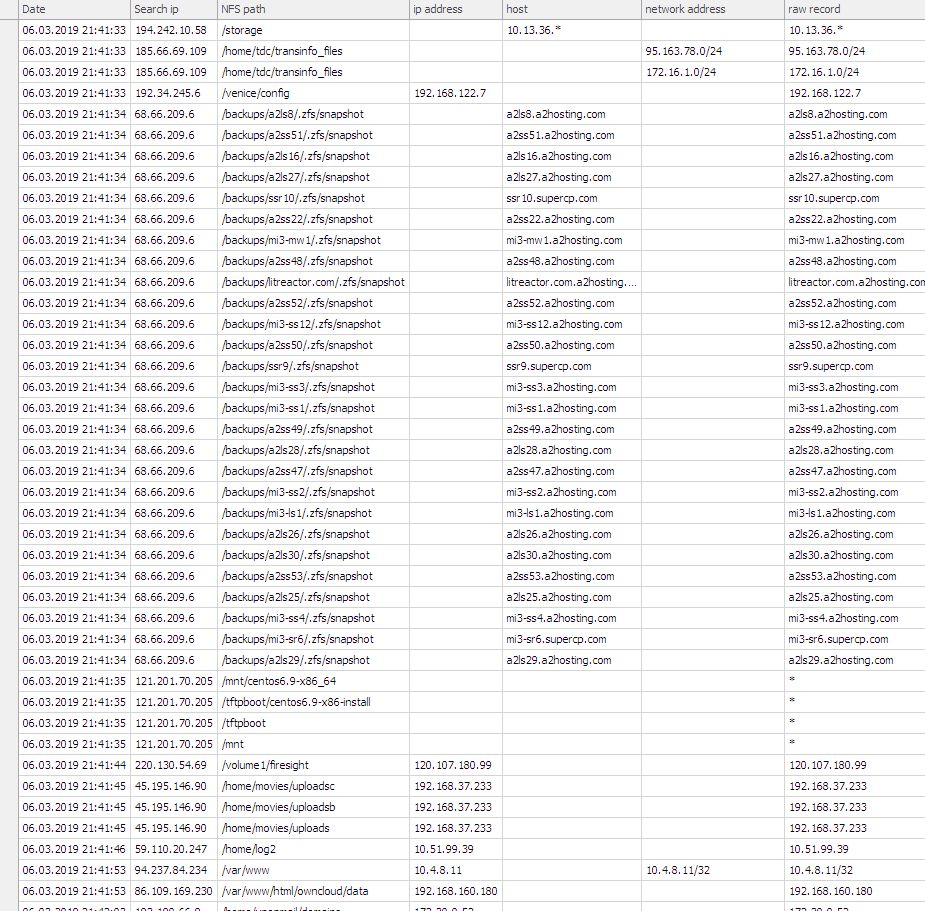
These IP addresses are used as input arguments to the written module “Explore: NFS (SSH)” and as a result:

I quickly made such a scheme for displaying the results of a table in a graph (on the schemes and principles for constructing graphs further down the text of the article).
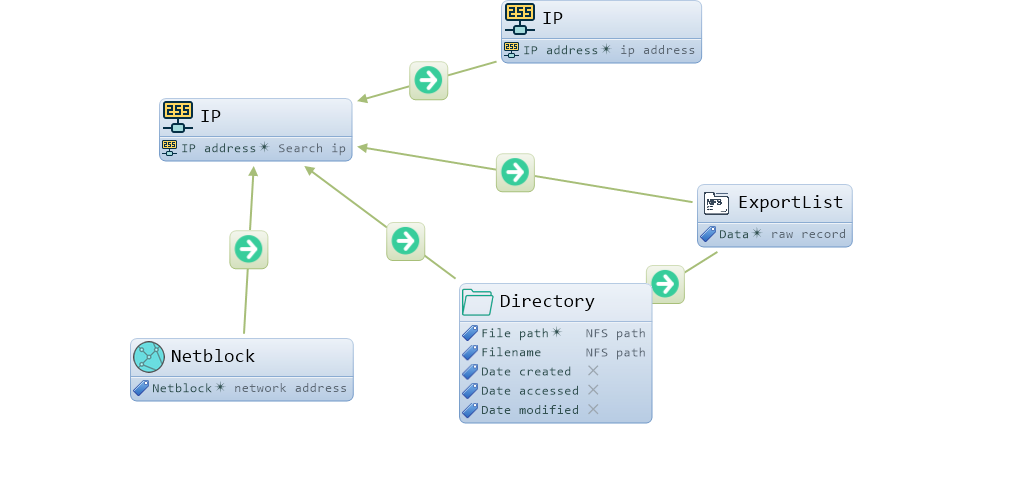
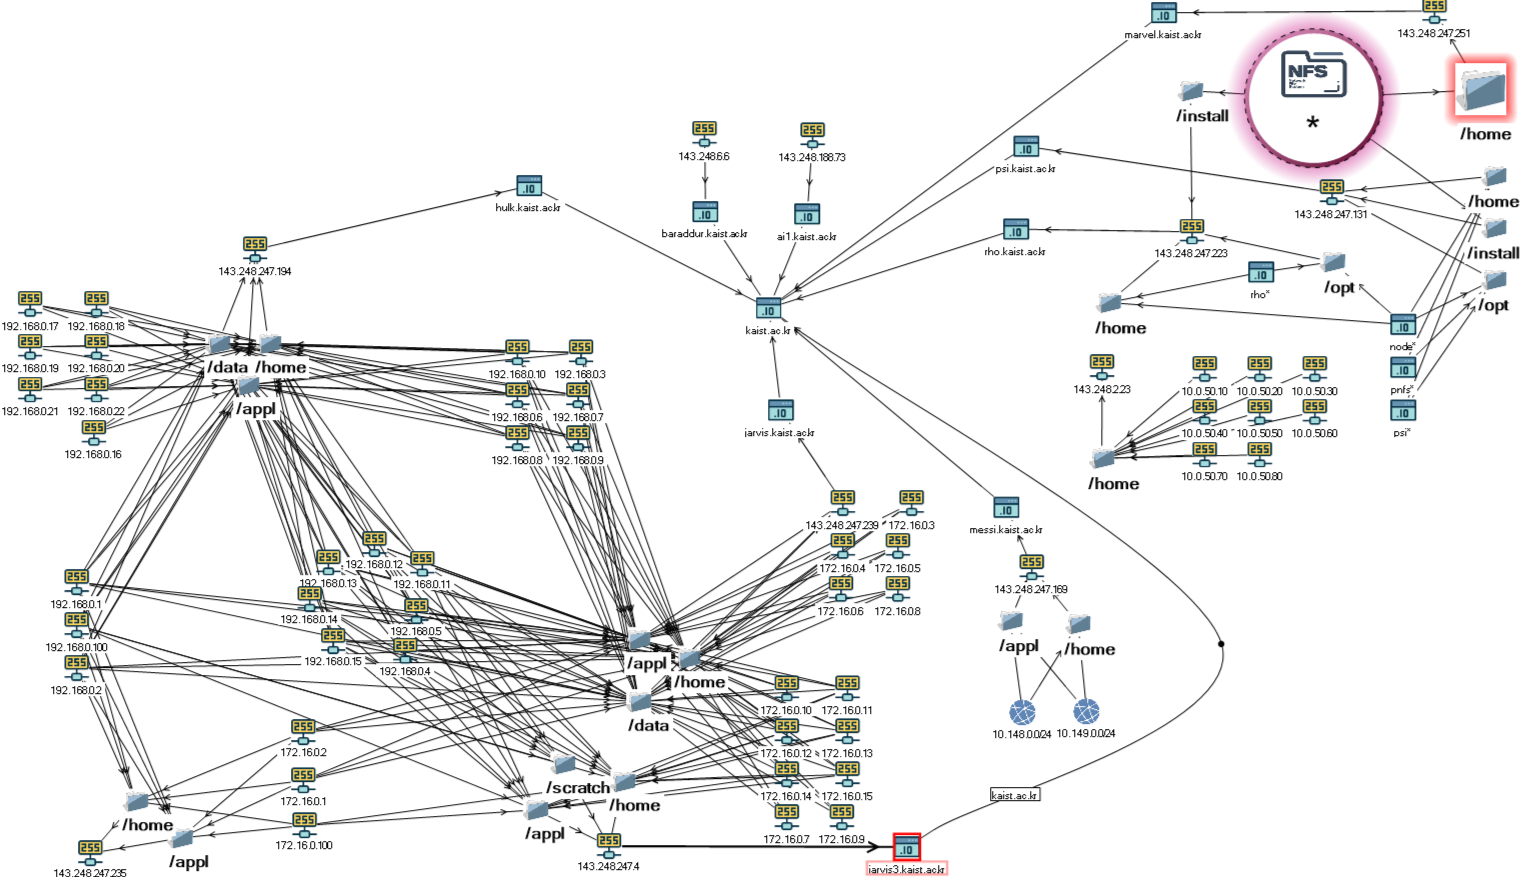
The result of combining with the scheme Shodan

When analyzing the vertices and connections of the graph, it becomes obvious at what addresses the resource / home is located, accessible to all (*).
For better visual perception, we change the properties of graph objects and other settings of the scheme:

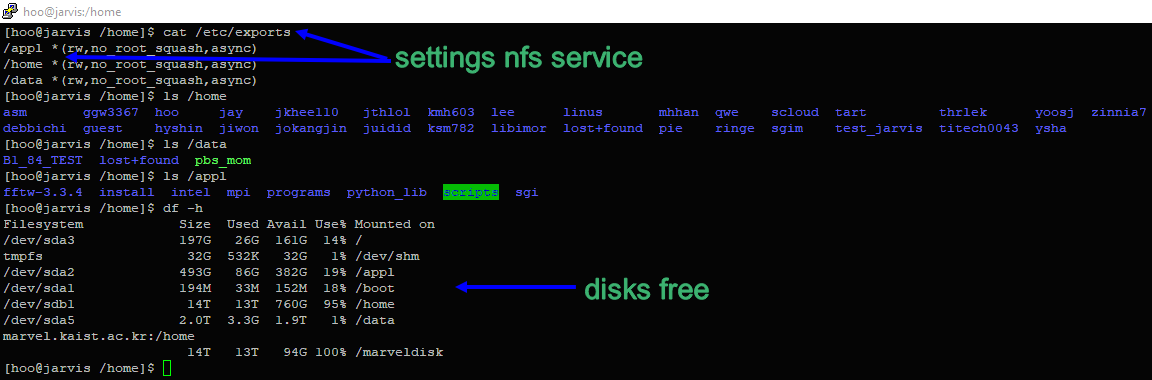
Of course, I in turn mounted some of the resources on one of my servers and began to study. Everywhere it was almost the same - user directories: asm, hoo, hyshin, jay, jiwon, jkhee110, jokangjin, kmh603, ksm782, lee, linus, lost + found, marvel_guest, pie, qwe, scloud, seokmin, sgim, thrlek, yoosj, ysha, zinnia7.
Almost all file directories were readable and writable. Some users in .ssh had available the authorized_keys files with the ability to write to them.
I generated my key, copied it to the authorized_keys of one of the users and connected to the server via ssh on port 2222, I got the port number from the data from Shodan.
Users, network settings:

Hosts Online:

File / etc / exports and drives:
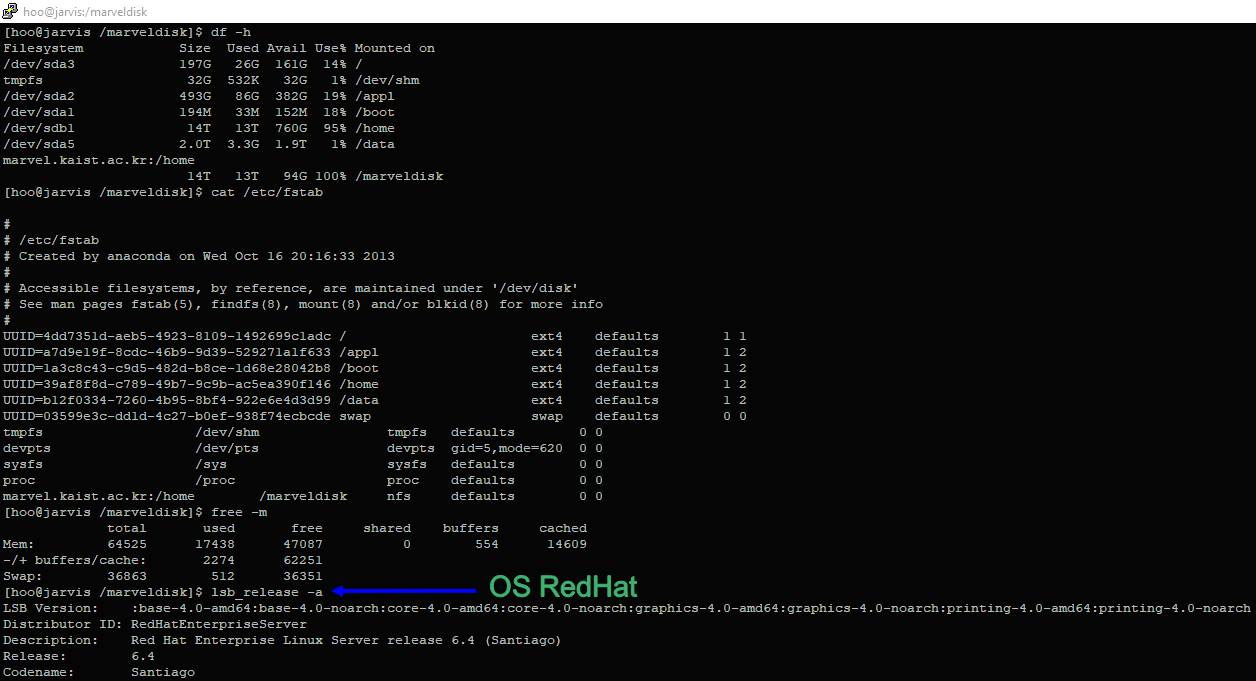
File / etc / fstab and OS:
I believe that this is a network of some department for graduate students or students, and on the servers they make some kind of calculations, because there are many different sources in Python, something related to the GPU and the Anaconda distribution, and so on. I did not study everything and began to think what to do with all this, of course, I could “walk” for the most part (it could be something more exotic) , but it didn’t cause much interest for me. And I thought of the following: once the institute is scientific and advanced, there should be directions in information security. Indeed, even the whole lab: Software Security Lab and its head Sang Kil Cha
I decided to write him a letter, so they say, so it’s very possible to allow everyone on the Internet to connect NFS resources with read and write rights, it’s very likely that you need to fix something, attached screenshots and sent them.
Dear Sang Kil Cha,
I’m writing how to use it.
The following servers were detected:
143.248.247.131 - psi.kaist.ac.kr
143.248.247.4 - jarvis3.kaist.ac.kr
143.248.247.169
143.248.247.223
143.248.247.235
143.248.247.251 - marvel.kaist.ac.kr
143.248.247.239 - jarvis.kaist.ac.kr
143.248.247.194 - hulk.kaist.ac.kr
143.248.2.23
All these servers have the NFS (Network File System) service up and running.
This server is incredibly low.
It can be accessed by anyone using the Internet.
For example, settings nfs - / etc / exports 143.248.247.251 -> / home or for 143.248.247.239
showmount -e 143.248.247.239
Export list for 143.248.247.239:
/ data
/ home / appl
For example, the access control keys are not available.
KAIST subnets.
No modifications, no modifications, no modifications made, no data, no changes, no data, no corrections,
Please note
I recommend your network security level.
Soon I was told a free translation: thank you, we will send it to anyone.
Thanks for letting me know! I will forward this email to someone in charge of our network and security. Best, Sang Kil
Before publishing this article, I decided to check, see what has changed:

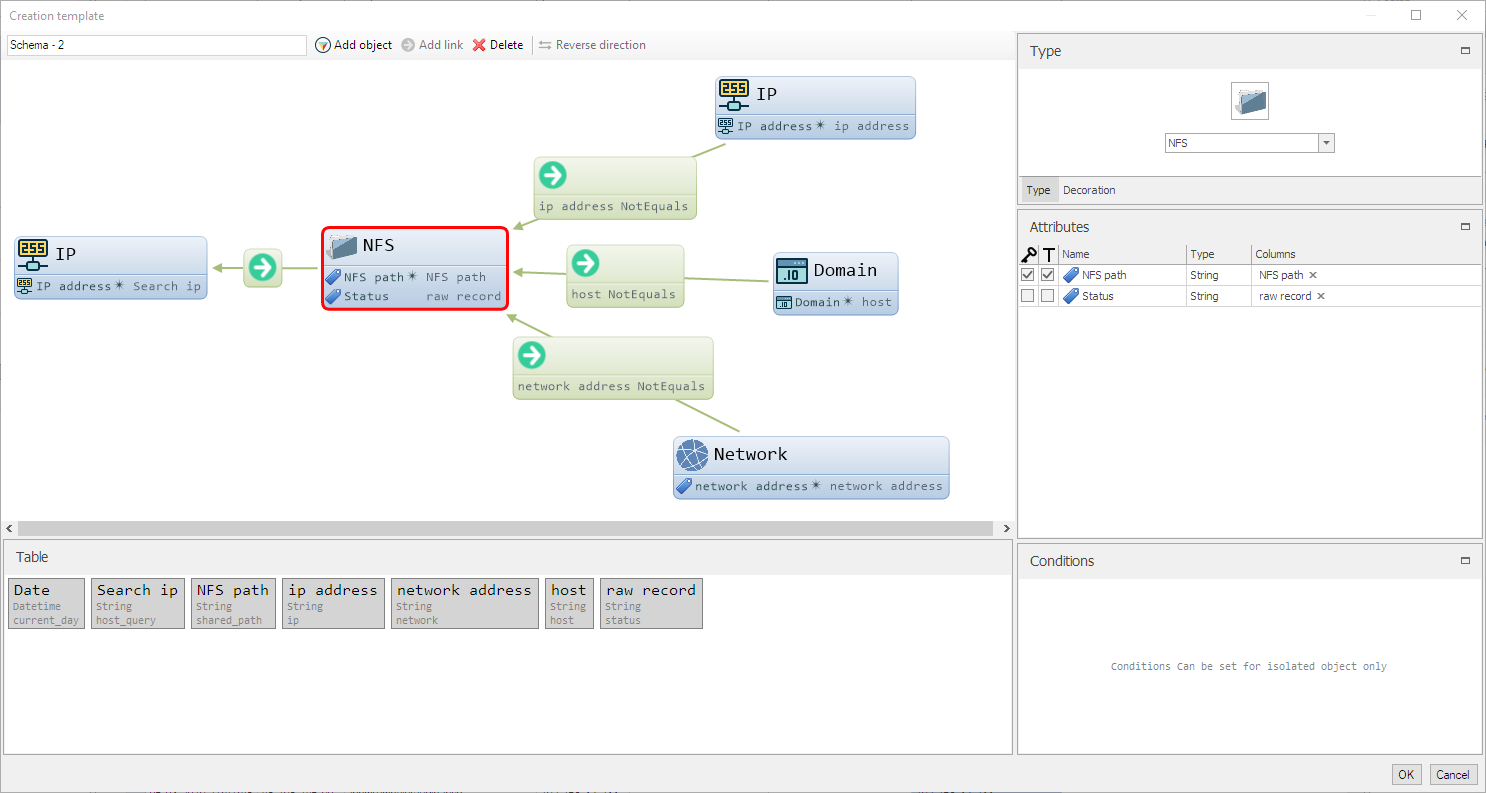
Indeed, access to resources was allowed only from machines on the internal network, but what about the server 143.248.247.251. According to the entries in the table to the host resources in the NFS settings, it still remains *. I sketched another version of the "mapping" of the table in the graph:
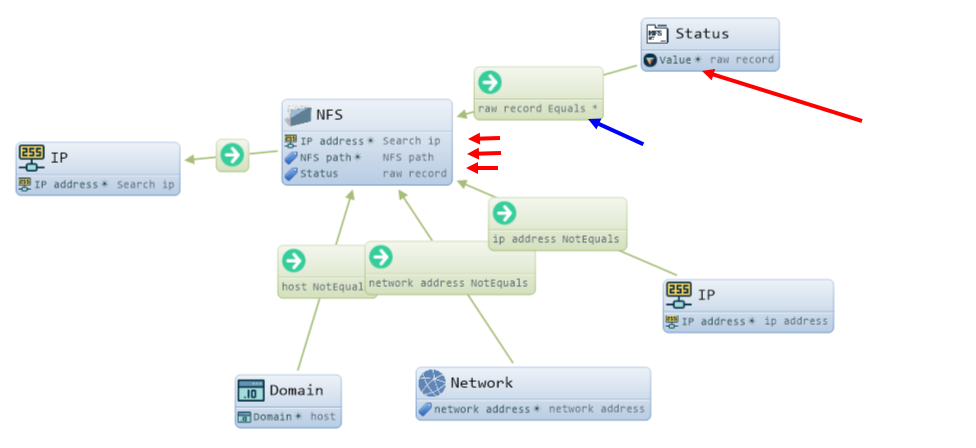
What are the changes in "mapping": NFS objects are now "glued together" with 2 identical attributes - IP and NFS path. The Status object is created only when the Value attribute, which contains the contents of the raw record column, contains the value " * "
And the graph on the table appears in a new form:
Now, by the way, the addressing of the internal network has become clearly visible, and on the server 143.248.247.251 it is also possible to edit the contents of user directories and files; in principle, the possibilities remain the same as before.
And here I am writing a second letter to Mr. Sang Kil Cha, with similar first content, noting that some of the events will be presented in an article on the popular resource habr.com:
Dear Sang Kil Cha, good day to you.
I’ve decided to take a look at it if I’ve got it. 143.248.247.251 ip address stayed the same. No strangers could access it.
I’m writing an article on https://habr.com . This is a very popular website in Russia. There will be a number of ways to manage your server. When it's posted.
How to use the Lampyre API and write your own module
The module will be required to accept a list of IP addresses or a list of subnets as 192.168.0 / 24 - at this stage, it will be necessary in the code to validate the input data on the involvement of strings to IP addresses, in the case of a subnet - convert to IP list.
The next step, via the paramiko Python library, will be to access the personal ssh server and sequential (an asynchronous attempt is present in the module concept code) to invoke the command:timeout {timeouts} showmount --no-headers -e {ip}
The output of the result will be understood by means of Python code in the output structure, the table: a list of dictionaries in Python.
Keys in the dictionary:
- current_day - date of user request
- host_query - IP in relation to which we receive information
- shared_path - NFS resource
- status_ip - information about access to the resource, if IP addresses are listed through “,”, the dictionary line is duplicated within the list.
Further, as conceived by the concept, a primitive attempt is made to parse the value of the status_ip key to the subject: IP address, host entry, “*” or “everyone” values
According to the API documentation and explanations from support Lampyre.io - each module must return data to a table, one or more, but the table must be described within the framework of the API (Task headers, table header). In fact - this is the main result of the module.
Thus, the final result, taking into account the keys of the dictionary, will be the table:
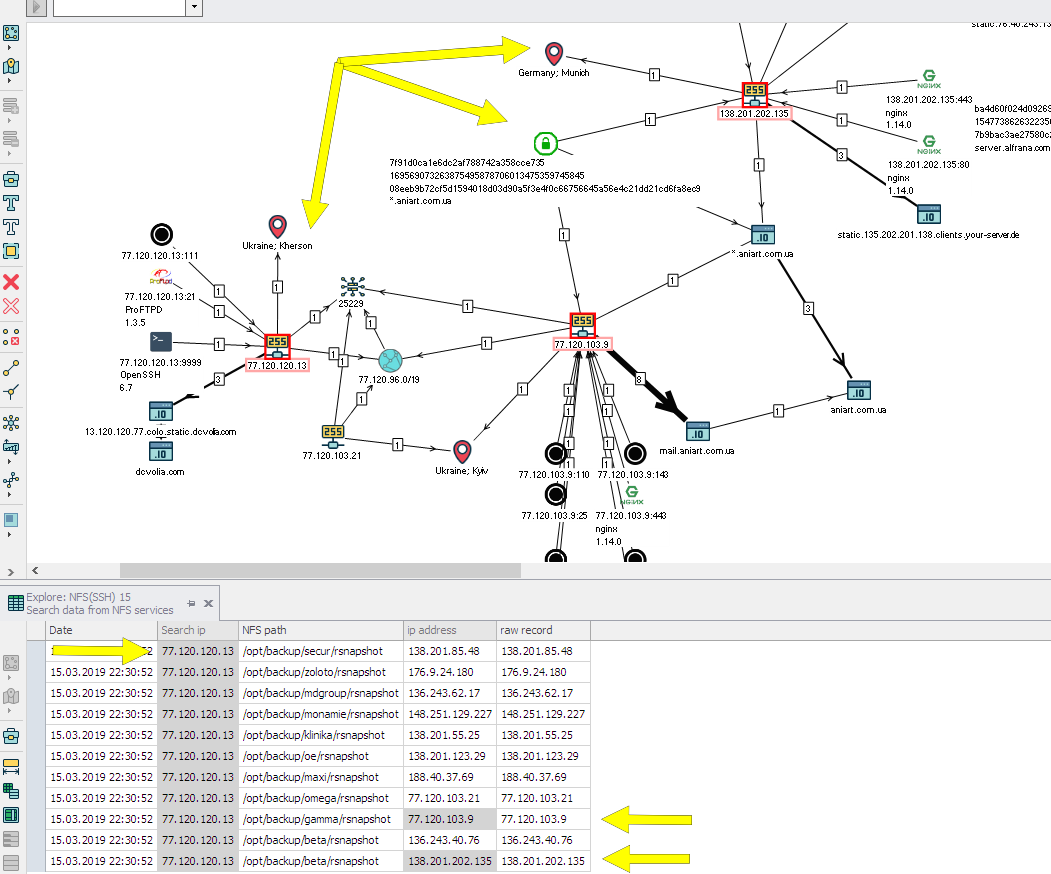
class NFSHeader(metaclass=Header): display_name = 'Search data from NFS services' current_day = Field('Date', ValueType.Datetime) host_query = Field('Search ip', ValueType.String) shared_path = Field('NFS path', ValueType.String) ip = Field('ip address', ValueType.String) network = Field('network address', ValueType.String) host = Field('host', ValueType.String) status = Field('raw record', ValueType.String) The values (slightly modified) from parsing the result of the showmount command on the server will be written to the table. The names of the class fields speak for themselves, the raw record column will store information about the access to the resource. Such analysis of data on NFS resources can be considered in some sense as OSINT, information about possible access from different IP addresses gives some idea about the owners of the resource or the addressing inside the network of the resource. For example, the IP address of the server with the NFS service is located in Ukraine, and the IP address allowed for access is in Germany:

And if you expand the study of this example, then immediately there is a confirmation of the connection of servers not only through NFS, but also through one certificate at the addresses: 77.120.103.9, 138.201.202.135 and the domain * .aniart.com.ua:
How to transfer data to the module and write to the table:
create own class SearchDataNFS from class Task:
class SearchDataNFS(Task) In the get_id method, get_id return a unique random UUID:
def get_id(self): return 'bf51fd57-3fec-4416-9d07-905935a484b4' In the get_display_name method, get_display_name specify how the Task will be called, and in the get_description method, according to the name, the Task description:
def get_display_name(self): return 'Explore: NFS(SSH)' def get_description(self): return 'Explore NFS resourses' In the get_headers method, get_headers specify which tables we will use:
def get_headers(self): return NFSHeader The get_enter_params method will determine the appearance of the input data window. It is obvious from the code that a list of strings is supplied to the input, which later on will be automatically converted into IP addresses:
def get_enter_params(self): ep_coll = EnterParamCollection() ep_coll.add_enter_param('ips', 'IP', ValueType.String, is_array=True, value_sources=[Attributes.System.IPAddress], description='IPs, networks') return ep_coll In the execute method, the main execution of the task takes place:
ips = [] for input_ip in set(map(lambda z: z.strip(), enter_params.ips)): ips.extend(reparse_ip_hosts(input_ip)) Input parameters are accessed via enter_params.ips. In the reparse_ip_hosts method, a self-implemented validation of strings into IP addresses occurs.
targets = ((ip, port) for ip in ips for port in ports) lines = thread_async_nfs_one_client(targets) info = reparse_result_rows(lines) fields_table = NFSHeader.get_fields() for data_id in info: tmp = NFSHeader.create_empty() for field in fields_table: if field in data_id: tmp[fields_table[field]] = data_id[field] result_writer.write_line(tmp, header_class=NFSHeader) The thread_async_nfs_one_client function connects to the server with ssh (IP address, login and password are set to hardcode) and runs showmount, as previously indicated, the result is parsed, then it is modified again in the reparse_result_rows function. It is important to note, info is a list of dictionaries, in each dictionary the keys are named as fields of the NFSHeader class. That is, the dictionary looks like this:
{ 'current_day': datetime.datetime(2019, 3, 6, 16, 48, 17), 'host_query': '192.168.1.1', 'shared_path': '/volume1/workspace', 'ip': '192.168.10.10', 'network': '', 'host': '', 'status': '192.168.10.10' } It is important to observe the data types in the dictionary, they should be the same as in the table description.
Later in the loop, iteration occurs over the elements of the list and write them through the API method ( result_writer.write_line ) into a specific NFSHeader table.
For a more detailed description, you must read the documentation.
In principle, the module is already ready to be added to Lampyre.
Using your module in Lampyre
Due to the fact that using ssh and executing the showmount command, of course, you need to have access to your server via ssh. For my tests, this role was played by the virtual machine in Virtualbox with Ubuntu and the NFS client installed on it.
To work with its own modules on the user's machine, Python 3.6 is required, the path to the interpreter must be in the system variables, or the path to it is specified in the Lampyre\config\appSettings.config . By default, the pythonPath key in the settings is commented out.
The module is loaded into Lampyre in the following steps:
- In the Scripts window, download the Lampyre file \ user_tasks \ ontology.py (supplied with the application)
- In the same window load your module, in this case nfs_via_ssh.py. If something went wrong, the Details button should help.
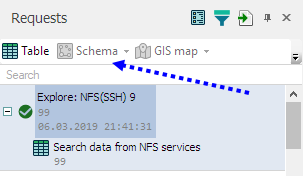
- After loading, the Local tasks section appears in the List of requests window (in the module code it could be called differently), in it the name Explore: NFS (SSH) :

Updated List of requests window:
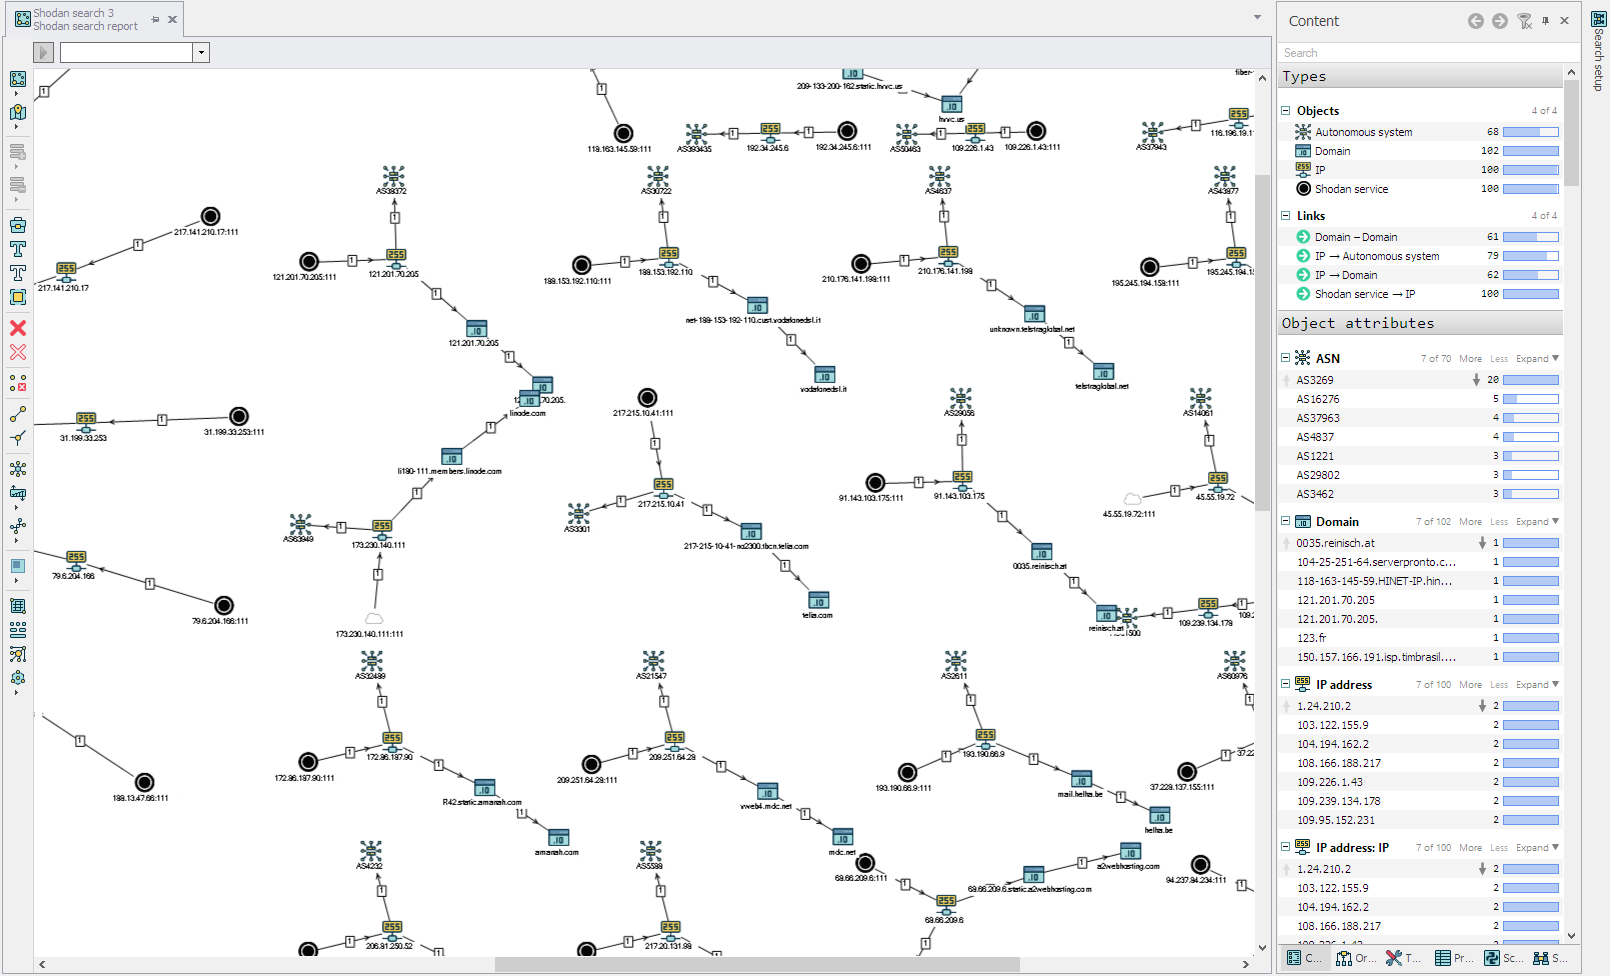
- IP addresses of servers with NFS, as I said earlier, it is better to get after running the query Shodan search with the parameters Query: tcp 2049 (you can simply specify nfs ). The Page or range parameter set to 1 by default means that 1 page of responses from the Shodan service will be returned, on a page usually 100 results (lines).
Result of execution Shodan:
')
- Copy IP addresses from the table or from the scheme to the clipboard and paste it into the IP Explore: NFS (SSH) window. Run and wait for the result:
Of course, it is necessary to take into account the bandwidth from one's own and someone else's servers, and the timeout, which are strictly specified in the module code.
The result is obtained in the form of a table, but you can continue and combine the result of the table with the results graph from the execution of Shodan search. It will be somewhat difficult to understand at first.
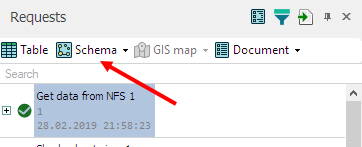
Visualization of the table with the result
Let's get started There is a table with a set of columns with values from the execution of the user module. But if you pay attention to the Requests window Schema button - it is inactive. Because it is not set to display the table in the graph and it must be set.
Scheme 1 (not the best)
With an open table from the result of the module in the bottom right corner there is an interface element “Add creation template”, clicking on which the “Creation template” window appears. In it, you can also set the mapping of the rows of the table to the objects of the graph, I will not describe the process in detail within the article, the link on the platform’s channel on Youtube shows how to do this, I’m going to limit myself to images of what should happen:

Template for the graph:
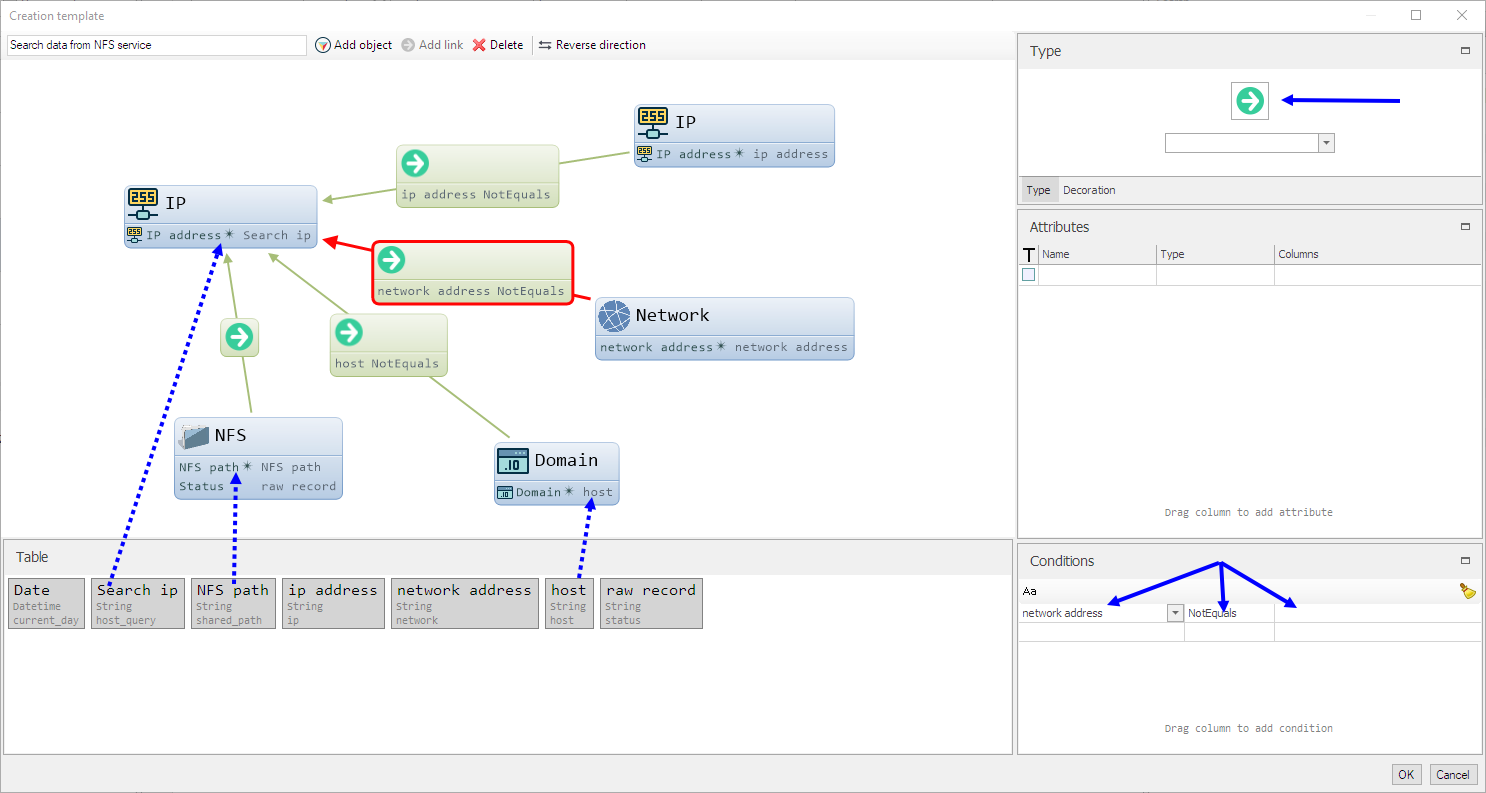
It is important to note that IP, Domain objects are in Lampyre, and I created NFS and Network objects. , «» . , , — «» — , — - , . , NFS – 2 , NFS path Status, — NFS path. — . «» — Schema .
:
:
«» — i2 (IBM i2 Analyst's Notebook) :

«» , : IP- IP- , , NFS , IP. ( ).
2
. — , IP- :

, , (csv) . , «» . «» , .
Shodan NFS Shodan search, add to active tab — :

:
— , NFS .
Source: https://habr.com/ru/post/444382/
All Articles