10 steps to a successful Python project
The material, the translation of which we are publishing today, is devoted to tools that allow you to equip Python projects with means of code formatting, testing, continuous integration and dependency analysis. This helps speed up the development process, contributes to the quality, uniformity and security of the code. It is assumed that the reader of this material already has some experience in Python-development and a project in Python, with which he, in the course of reading, will experiment. If you do not have such a project, here you can learn how to prepare a development environment and create a Python package. Examples that will be given here are prepared using macOS and Python 3.7.


Project code must follow code style conventions. Black is a Python package that automatically formats the code, bringing its appearance to the PEP 8 standard. Black is a relatively new project, but it already has more than a million downloads. Its use quickly became a sign of good form in Python development. Here is a guide to Black.
I use Atom as a code editor, so I added a
')
While we are talking about Black - let's equip with this tool the development environment of those who are working with us on the project. As a result, all those working on the project will use the same code formatting rules, otherwise their pull requests will not be accepted.
Add the
Black, by default, sets the length of the code line to 88 characters. Some style guides, for example, in Sphinx , require a string length of 79 characters. In the settings of the
Now that we’ve got a tool to help us save time on formatting the code, we’ll think about how to speed up and simplify sending the code to PyPI.
When you use twine to send application builds to TestPyPI and PyPI, you need to enter the login information manually. If you are not familiar with twine, take a look at this material. Now we will automate this process.
Twine can work with the
So, create a
Add the following text to it:
It is clear that you need to enter your real username and password here. Also, make sure that this file is saved in your home directory, and not in the current working directory. If you want to protect this file from other users, you can use the command line tools to configure its permissions:
Now you can upload your package to TestPyPI using the following command:
You can load packages into regular PyPI like this:
Once you have the
Now let's add testing tools to our development environment that will verify the correctness of the package we are building.

Pytest is the most popular, easy-to-use library for testing code written in Python. In this example, we will add simple tests to the project. Here , if you are interested in details about pytest, a good introductory guide to this tool.
Add the pytest information to the
Perform the package installation:
Now run the following command, which will allow pytest to discover our package:
If you deactivate your virtual development environment, then you need to run both
Add the
I added the following test to the
What's going on here?
First we import our module here. Then we create a function, the name of which is built on the template
After that, we call the function (
Pytest checks if
Run the test by typing
An error was detected during the test.
It is recommended to check the tests for correctness, describing them so that, under certain conditions, they would end with an error. It is not necessary to write tests that give out only green messages, because otherwise it may turn out that the tests do not check what they are written to check.
After we made sure that the test failed, we change the

Successful completion of the test
Now everything is fine. The test allows you to make sure that if someone passes a string to our function, this string will fall into the text that this function displays.
You can also write a test that checks the function for how it handles the data passed to it. Namely, if it receives data whose type is different from string, it should cause a TypeError error. Here is some good stuff about exceptions and error handling in Python.
When we created the previous test, we wrote code that leads to the successful completion of the test. This is called test-driven development (TDD). TDD is a proven programming approach that helps write code with fewer errors than it would be without using TDD. Here is some useful TDD material.
Now, as an exercise, try to write a test that checks the
After the package has successfully passed the tests - we are ready to take advantage of the system of continuous integration.
Travis CI is a “distributed web service for building and testing software.” It was recently bought by Idera . There are other continuous integration systems, but the Travis CI is a popular, free for open source application and well-documented tool, so we will use it.
Travis CI allows you to integrate into your project only the code that passes the tests and meets the standards. Here you can read more about Travis CI, and here about continuous integration .
Create an account at https://travis-ci.org/ . Next, click the
Setting up a Travis CI account
I needed to synchronize my account so that the account would have information about the

Repository Activation
Now you need to click on the
Customize build project
Now it's time to set up the project we are working on, which will enable Travis to build the project for each pull request.
In the project root folder, create a
The
The
Commit the changes, send them to GitHub, and execute the PR. Travis should, within a few seconds, start work.
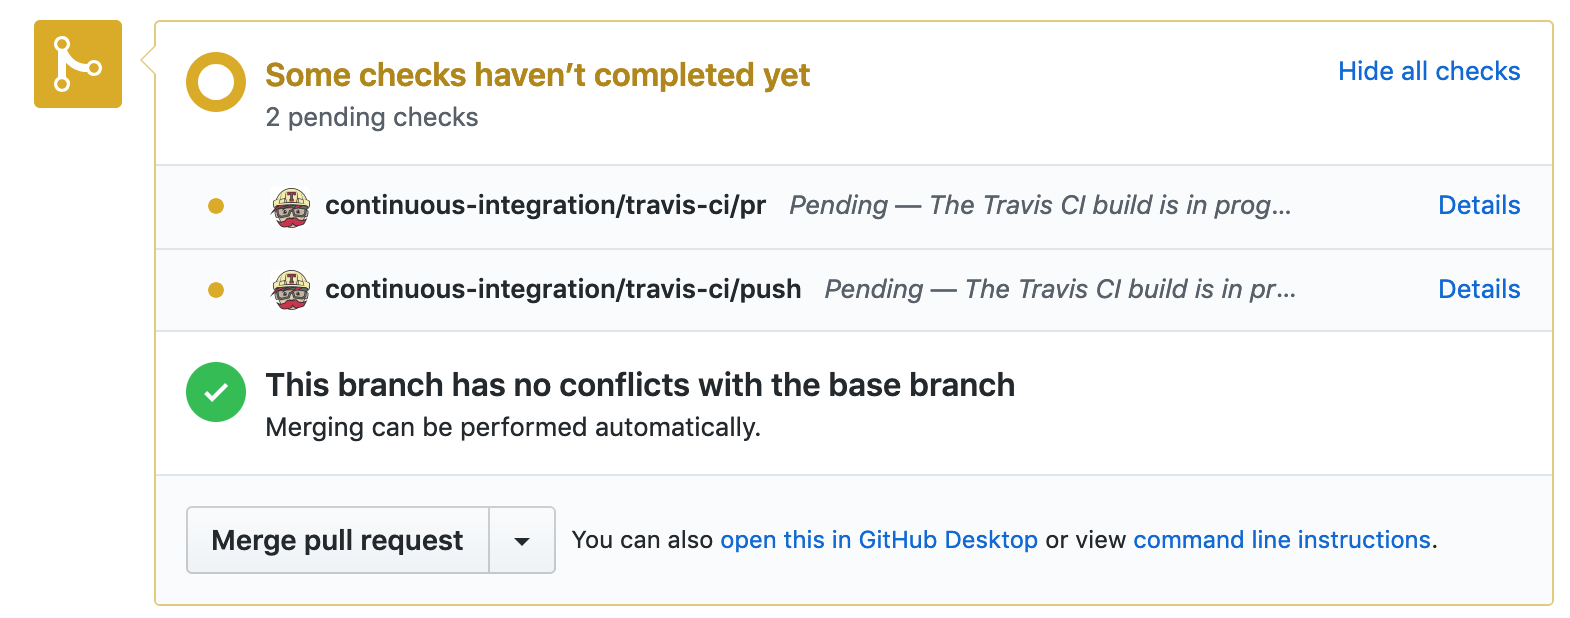
Travis at work
This is what Travis does when processing a project.

Actions performed by Travis during project processing
If PR was unsuccessful - Travis will report this. Please note that if the pull request was unsuccessful, you can send changes to the same branch and Travis will automatically start working.
Go to your repository page on the Travis website and look there. Here you can find a lot of interesting things about assemblies. Probably in the future you will become a frequent visitor to this page when you try to understand what caused the failed assembly.
If we assume that everything went well, if there are green inscriptions on the page, then the project is checked and assembled successfully.

Project build completed successfully
If the page has neither green nor red inscriptions, open the
Travis sends users emails in cases where the project build fails and in cases where this can be fixed.
Remember that you can send commits to an open PR and Travis will automatically restart the project build process.
Now let's analyze our project to cover the code with tests.
Report on the coverage of code tests allows you to know how much of the project code, albeit small, tested. To create such reports, we will use the pytest-cov package.
Add the following line to the
Run this command:
In my case, after running the command

Test Coverage Report
As it turned out, the entire project code is provided with tests. Such indicators are very easy to achieve if the whole project consists of several lines of code.
Now let's talk about the tool that allows you to keep a public history of the state of the project in terms of covering its code with tests.
The Coveralls project allows you to maintain historical information about code coverage tests.

Coveralls
In order to take advantage of the opportunities of this project, you need to register on the site https://coveralls.io/ , using the data from your GitHub account. Then you need to connect the repository.
In the
Edit the file
Now that Travis will build the project, he will install the necessary packages, run the tests, and create a report about the code coverage of the tests. Then this report will be sent to the service Coveralls.
Make a commit, send the code to GitHub and watch what happens. It may take a few minutes for the test coverage report to be included in the Coveralls.

Project processing, test coverage report
Now among PR checks there is a check performed by Coveralls.
On the Coveralls page you can make sure that the project is covered with tests for 100%.

Code Coverage Information
Now let's equip our project with another useful tool.
The PyUp.io service allows the developer to find out if the dependencies used by him are outdated and whether they have vulnerabilities. This service automatically executes pull requests to update the package on GitHub. In order to take advantage of the opportunities of this project, you need to register using the GitHub account on its website - https://pyup.io/ . When adding a repository, it is recommended to set the update frequency (

Update setting
Here's what the package details look like, some of which are outdated, on PyUp.io.

Package Information
Using this service, you will always know about when the latest versions of the packages you use come out. Knowledge, as they say, is half the victory. And the second half is, obviously, automatic pull-requests for updating dependencies.
From this material, you learned how to use such tools as Black, pytest, Travis CI, Coveralls and PyUp when developing Python projects. They help control project dependencies, format and test code, check and build projects. We hope you find these tools useful.
Dear readers! What tools do you use when developing Python projects?

Step 1. Install Black
Project code must follow code style conventions. Black is a Python package that automatically formats the code, bringing its appearance to the PEP 8 standard. Black is a relatively new project, but it already has more than a million downloads. Its use quickly became a sign of good form in Python development. Here is a guide to Black.
I use Atom as a code editor, so I added a
Python-Black package to Atom. Learn how to install it here . After installing this package, Atom will reformat the code after saving the file.')
While we are talking about Black - let's equip with this tool the development environment of those who are working with us on the project. As a result, all those working on the project will use the same code formatting rules, otherwise their pull requests will not be accepted.
Add the
black==18.9b0 to the first free line of the requirements_dev.txt file and execute the install -r requirements_dev.txt command install -r requirements_dev.txt .Black, by default, sets the length of the code line to 88 characters. Some style guides, for example, in Sphinx , require a string length of 79 characters. In the settings of the
Black-Atom package, you can specify the desired length of the string.Now that we’ve got a tool to help us save time on formatting the code, we’ll think about how to speed up and simplify sending the code to PyPI.
Step 2. Create a .pypirc file
When you use twine to send application builds to TestPyPI and PyPI, you need to enter the login information manually. If you are not familiar with twine, take a look at this material. Now we will automate this process.
Twine can work with the
.pypirc file, which should be in our home directory. This tool, unloading data, takes from this file the URL, login and password.So, create a
.pypirc file in your home directory: touch ~/.pypirc Add the following text to it:
[distutils] index-servers = pypi testpypi [testpypi] repository: https://test.pypi.org/legacy username = your_username password = your_pypitest_password [pypi] username = your_username password = your_pypi_password It is clear that you need to enter your real username and password here. Also, make sure that this file is saved in your home directory, and not in the current working directory. If you want to protect this file from other users, you can use the command line tools to configure its permissions:
chmod 600 ~/.pypirc Now you can upload your package to TestPyPI using the following command:
twine upload -r testpypi dist/* You can load packages into regular PyPI like this:
twine upload dist/* Once you have the
.pypirc file, you will no longer have to manually enter your username and password.Now let's add testing tools to our development environment that will verify the correctness of the package we are building.
Step 3. Install and configure pytest
Pytest is the most popular, easy-to-use library for testing code written in Python. In this example, we will add simple tests to the project. Here , if you are interested in details about pytest, a good introductory guide to this tool.
Add the pytest information to the
requirements_dev.txt file: pytest==4.3.0 Perform the package installation:
pip install requirements_dev.txt Now run the following command, which will allow pytest to discover our package:
pip install -e . If you deactivate your virtual development environment, then you need to run both
pip commands again to run the tests.Step 4. Creating tests
Add the
test folder to the root directory of your project. Put the test_your_package_name.py file into it. My file is called test_notebookc.py . If the file name starts with test_ , pytest can automatically detect such a file.I added the following test to the
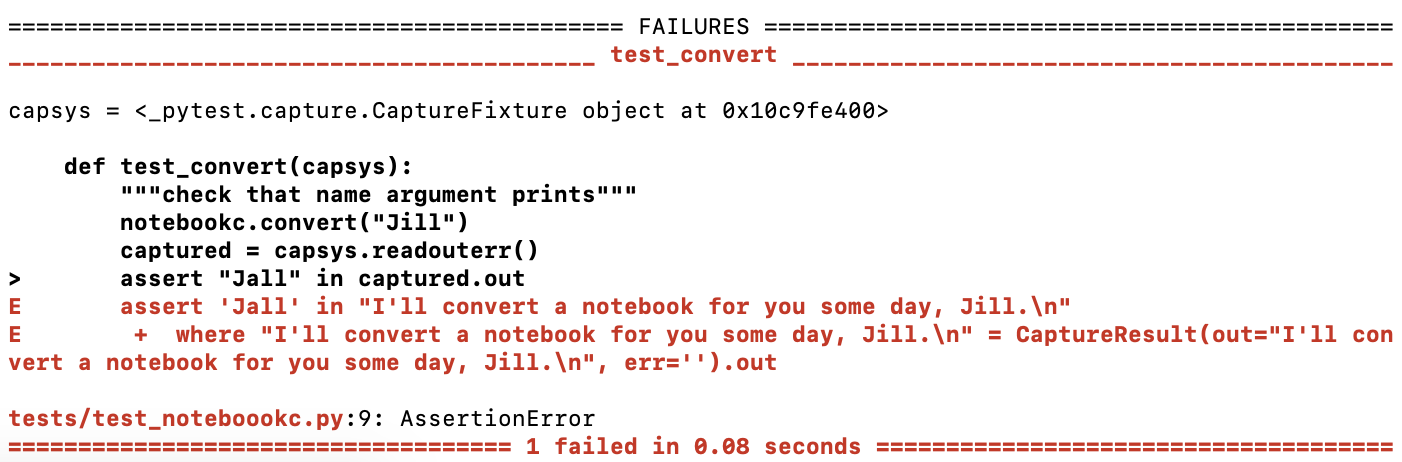
test_notebookc.py file, which aims to check whether the function displays the correct name. Modify this code so that the names of files and functions used in it would match yours, describe your own tests in it. """Tests for `notebookc` package.""" import pytest from notebookc import notebookc def test_convert(capsys): """Correct my_name argument prints""" notebookc.convert("Jill") captured = capsys.readouterr() assert "Jall" in captured.out What's going on here?
First we import our module here. Then we create a function, the name of which is built on the template
test_my_function_name . This naming convention allows other people who read the code for your project to quickly understand what is being tested in tests. In addition, it is necessary for a package that helps control the coverage of the code with tests, which we will discuss below.After that, we call the function (
convert ), passing it the name Jill as an argument. Next - grab what the function prints. It is worth saying that the function in question is extremely simple. It takes the parameter my_name and does the following: print(f"I'll convert a notebook for you some day, {my_name}.") Pytest checks if
Jall is Jall in the function output. There should not be this line, since we are passing to the Jill function. Here is the pytest documentation, where you can find information about intercepting output.Run the test by typing
pytest on the command line. This test should fail. Error information is displayed in red.An error was detected during the test.
It is recommended to check the tests for correctness, describing them so that, under certain conditions, they would end with an error. It is not necessary to write tests that give out only green messages, because otherwise it may turn out that the tests do not check what they are written to check.
After we made sure that the test failed, we change the
Jall statement on Jill and run the test again. Now it should complete successfully.Successful completion of the test
Now everything is fine. The test allows you to make sure that if someone passes a string to our function, this string will fall into the text that this function displays.
You can also write a test that checks the function for how it handles the data passed to it. Namely, if it receives data whose type is different from string, it should cause a TypeError error. Here is some good stuff about exceptions and error handling in Python.
When we created the previous test, we wrote code that leads to the successful completion of the test. This is called test-driven development (TDD). TDD is a proven programming approach that helps write code with fewer errors than it would be without using TDD. Here is some useful TDD material.
Now, as an exercise, try to write a test that checks the
convert() function so that when passing something different from the string to it, it would produce an error, and implement the appropriate mechanisms of this function. Note that integers, lists and dictionaries are converted to strings.After the package has successfully passed the tests - we are ready to take advantage of the system of continuous integration.
Step 5. Registration in the Travis CI service and its setting
Travis CI is a “distributed web service for building and testing software.” It was recently bought by Idera . There are other continuous integration systems, but the Travis CI is a popular, free for open source application and well-documented tool, so we will use it.
Travis CI allows you to integrate into your project only the code that passes the tests and meets the standards. Here you can read more about Travis CI, and here about continuous integration .
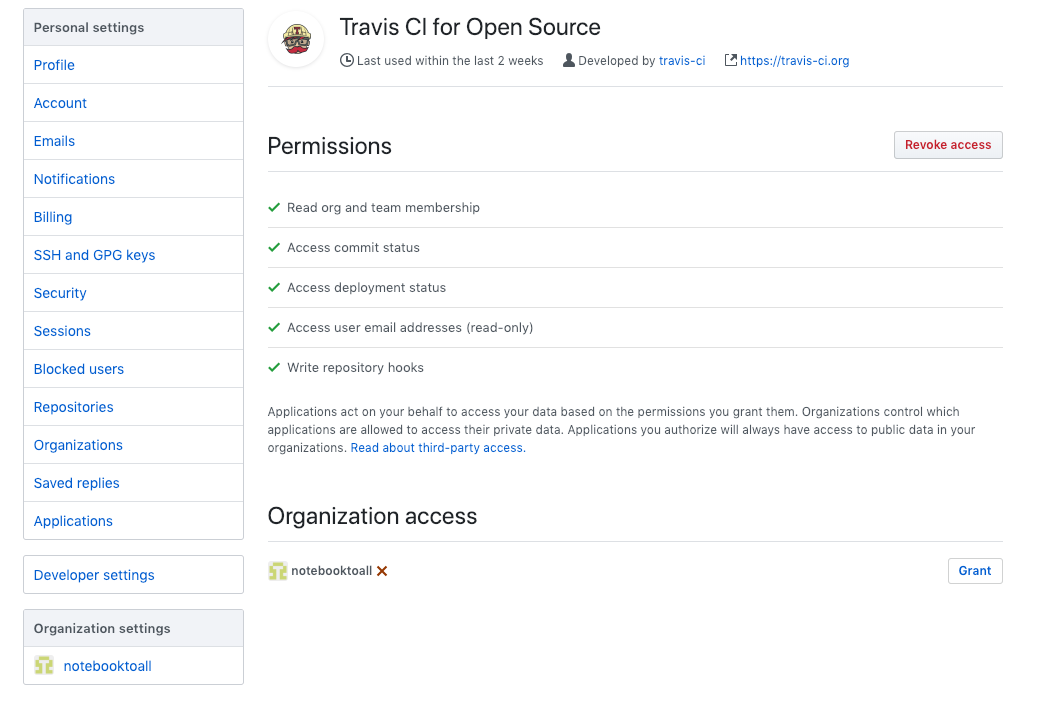
Create an account at https://travis-ci.org/ . Next, click the
Review and add your authorized organizations link on the profile page. You will be prompted to enter a password to access GitHub. Click on Grant in the Organization access section.Setting up a Travis CI account
I needed to synchronize my account so that the account would have information about the
notebooktoall and the notebookc repository. Usually it takes about a minute to process the code with Travis CI tools. After that, you need to activate the repository, using the switch shown in the following figure.Repository Activation
Now you need to click on the
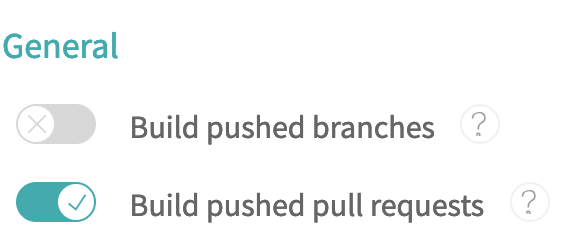
Settings button. Here you need to specify whether Travis can build on the basis of pull requests or threads sent to the repository.Customize build project
Now it's time to set up the project we are working on, which will enable Travis to build the project for each pull request.
Step 6. Create the .travis.yml file
In the project root folder, create a
.travis.yml file with the following contents: dist: xenial language: python python: 3.7.2 install: - pip install -r requirements_dev.txt - pip install -e . script: - pytest The
dist: xenial needed to tell Travis to use Ubuntu Xenial 16.04 to create a virtual environment. To test the Python 3.7 code, you need Ubuntu Xenial, you can read more about it here .The
install section allows you to install packages used in project development. pip install -e . command performs the installation of our package in the virtual environment of Travis. After that, Travis, running pytest, will be able to find our package.Step 7. Testing in Travis CI
Commit the changes, send them to GitHub, and execute the PR. Travis should, within a few seconds, start work.
Travis at work
This is what Travis does when processing a project.
Actions performed by Travis during project processing
If PR was unsuccessful - Travis will report this. Please note that if the pull request was unsuccessful, you can send changes to the same branch and Travis will automatically start working.
Go to your repository page on the Travis website and look there. Here you can find a lot of interesting things about assemblies. Probably in the future you will become a frequent visitor to this page when you try to understand what caused the failed assembly.
If we assume that everything went well, if there are green inscriptions on the page, then the project is checked and assembled successfully.
Project build completed successfully
If the page has neither green nor red inscriptions, open the
More options menu and select Requests . If you see error messages displayed in red here, analyze them. If you see the Build config file is required error message, it means that Travis cannot find your .travis.yml file in the repository. Correct it and the error will disappear.Travis sends users emails in cases where the project build fails and in cases where this can be fixed.
Remember that you can send commits to an open PR and Travis will automatically restart the project build process.
Now let's analyze our project to cover the code with tests.
Step 8. Evaluation of code coverage by tests
Report on the coverage of code tests allows you to know how much of the project code, albeit small, tested. To create such reports, we will use the pytest-cov package.
Add the following line to the
requirements_dev.txt file: pytest-cov==2.6.1 Run this command:
pytest --cov=my_project_name In my case, after running the command
pytest --cov=notebookc , the following report was displayed.Test Coverage Report
As it turned out, the entire project code is provided with tests. Such indicators are very easy to achieve if the whole project consists of several lines of code.
Now let's talk about the tool that allows you to keep a public history of the state of the project in terms of covering its code with tests.
Step 9. Using Coveralls
The Coveralls project allows you to maintain historical information about code coverage tests.
Coveralls
In order to take advantage of the opportunities of this project, you need to register on the site https://coveralls.io/ , using the data from your GitHub account. Then you need to connect the repository.
In the
requirements_dev.txt file, add the line coveralls==1.6.0 . This file, by the way, at this stage of the project should look like this: pip==19.0.3 wheel==0.33.0 twine==1.13.0 pytest==4.3.0 pytest-cov==2.6.1 coveralls==1.6.0 Edit the file
.travis.yml , bringing it to this form (in your case, here will be the name of your project): dist: xenial language: python python: 3.7.2 install: — pip install -r requirements_dev.txt — pip install -e . script: — pytest --cov=my_package_name after_success: — coveralls Now that Travis will build the project, he will install the necessary packages, run the tests, and create a report about the code coverage of the tests. Then this report will be sent to the service Coveralls.
Make a commit, send the code to GitHub and watch what happens. It may take a few minutes for the test coverage report to be included in the Coveralls.
Project processing, test coverage report
Now among PR checks there is a check performed by Coveralls.
On the Coveralls page you can make sure that the project is covered with tests for 100%.
Code Coverage Information
Now let's equip our project with another useful tool.
Step 10. Work with PyUp
The PyUp.io service allows the developer to find out if the dependencies used by him are outdated and whether they have vulnerabilities. This service automatically executes pull requests to update the package on GitHub. In order to take advantage of the opportunities of this project, you need to register using the GitHub account on its website - https://pyup.io/ . When adding a repository, it is recommended to set the update frequency (
Update Schedules ) to the value every week . With this approach, if your project has many dependencies, you will not encounter too many pull requests.Update setting
Here's what the package details look like, some of which are outdated, on PyUp.io.
Package Information
Using this service, you will always know about when the latest versions of the packages you use come out. Knowledge, as they say, is half the victory. And the second half is, obviously, automatic pull-requests for updating dependencies.
Results
From this material, you learned how to use such tools as Black, pytest, Travis CI, Coveralls and PyUp when developing Python projects. They help control project dependencies, format and test code, check and build projects. We hope you find these tools useful.
Dear readers! What tools do you use when developing Python projects?
Source: https://habr.com/ru/post/444344/
All Articles