Development of simple modern JavaScript applications using Webpack and progressive web technologies
Did you think about using the simplest existing set of technologies when developing your next web project? If this is so, then the material, the translation of which we publish today, is written specifically for you.
JavaScript frameworks exist to help us build applications that have similar capabilities using a generic approach. However, many applications do not need all the power that frameworks provide. Using a framework in a small or medium-sized project, to which certain specific requirements are made, may well be an unnecessary waste of time and effort.

')
In this article we will talk about the use of modern technologies in the development of web applications, the capabilities of which are not limited by the capabilities of the frameworks. By the way, if you need it, then you, using the technologies described here, will be able to create your own highly specialized framework. Pure JavaScript and other basic web technologies give developers the ability to do what they need without limiting themselves to the scope of the tools they use.
Before we get down to business, let's discuss the tools that we need.
In order to ensure a high download speed of the application and ease of working with it, we will use the following design patterns:
In our project, we need a quality, customized system for the assembly. Here we will use Webpack, imposing the following requirements on the project's build system:
We will use a minimal set of modern JavaScript features that allow us to develop what we need. Here are the possibilities:
Now, having a general idea of what we need, we are ready to start developing our project.
The emergence of progressive web applications (Progressive Web Application, PWA) also contributed to the arrival of new architectural solutions to web development. This allowed web applications to load and display faster. The combination of the App Shell architecture and the PRPL pattern can make a web application fast and responsive, similar to a regular application.
App Shell is an architectural pattern used for developing PWA, which, when used, sends a minimal amount of critical resources for a site to the user's browser when the site loads. The composition of these materials usually includes all the resources necessary for the first output of the application to the screen. Such resources can also be cached using a service worker.
The abbreviation PRPL stands for:
App Shepp and PRPL patterns are shared. This allows you to implement advanced approaches to the development of web projects. Here is the App Shell pattern in the code:
After studying this code, you can understand that the App Shell template provides for the creation of an “shell” of an application, which is its “skeleton”, containing a minimum of markup. Let us analyze this code (hereinafter, the code snippets to which we will refer when parsing are marked with comments, like
The above “skeleton” of the application implements the steps Push and Render of the PRPL pattern. This happens when the browser parses the HTML code to form a visual representation of the page. At the same time, the browser quickly finds the resources that are critical for displaying the page. In addition, here are the scripts (fragment number 3), responsible for the withdrawal of the original route by manipulating the DOM (at the Render step).
However, if we do not use the service worker for caching the “shell” of the application, we will not get a performance gain, for example, when the page is re-loaded.
Below is the code of the service worker caching the "skeleton" and all the static resources of the application.
Let's sort this code.
To date, we have discussed most of the architectural solutions that will be used in our application. The only thing we haven’t talked about yet is the Lazy loading step of the PRPL pattern. We will return to it later, but for now we will work on the project assembly system.
Good architecture alone, without a decent project build system, is not enough to create a quality application. This is where Webpack comes in handy. There are other tools for building projects (bundlers), for example - Parcel and Rollup. But what we will implement on the basis of Webpack can be done using other means.
Here we will talk about how the features of interest to us are related to plugins for the Webpack. This will allow you to quickly grasp the essence of our build system. Selection of plug-ins for the bandler and its proper configuration is the most important step on the way to a high-quality project build system. Having mastered these principles, you will be able to use them in the future when working on your own applications.
It’s not easy to set up tools like the Webpack from scratch. In such cases, it is helpful to have some good reference manual on hand. This guide, with which the relevant part of this material was written, was this article. If you have any difficulties with Webpack - please contact her. Now let's remember and implement those requirements for the project's build system, which we spoke about at the very beginning.
Babel, a popular transpiler that allows you to translate code written using ES6 capabilities into code that can run in ES5 environments, will help us to realize these capabilities. In order to make Babel work with Webpack, we can use the following packages:
Here is an example of a
During the Babel setup, the
Here is how Babel is used with Webpack (here is a fragment of the Webpack configuration file —
The
To support our build system for SASS and CSS projects, we will need the following plugins:
This is how the Webpack settings file looks like, which includes data about these plugins:
Boot loaders are registered in the
This is an extremely important part of the application building process. Everyone knows that when creating an application, some settings are used to build the version that is used during development, and others - for its production version. Here is a list of packages that will be useful to us here:
Here’s what the final
The entire Webpack configuration is represented as a function that takes two arguments. It uses the
As a result, if we execute the
The
In the section that begins with the
We all know that manually compiling lists of files, for example, intended for caching, is rather boring. Therefore, here we will use a special service worker build script that finds files in the
Let's sort this code.
To run this script, use the
The script presented here for assembling a service worker greatly simplifies the task of organizing file caching. It should be noted that this script has already found application in a real project.
If you want to use a special library designed to solve the problem of the work of progressive web applications in offline mode - take a look at the Workbox . It has very interesting customizable features.
Here is the file
If we talk about the support of such projects, it should be noted that the tools in the Webpack ecosystem are updated quite often. It often happens that the existing plugins are replaced with new ones. Therefore, it is important when deciding whether to use newer ones instead of some packages, to focus not on the packages themselves, but on those opportunities that they should implement. As a matter of fact, this is why the above we talked about the role a particular package plays.
During the development of a web application, the programmer has a choice whether to write his own implementations of features such as change detection, routing, data storage, or use existing packages.
Now we will talk about the minimum set of technologies needed to ensure the operation of our project. If necessary, this set of technologies can be expanded using existing frameworks or packages.
We will use the ES6 capabilities for importing and exporting modules, viewing each file as an ES6 module. This feature is often found in popular frameworks, such as Angular and React, and is very convenient to use. Thanks to our Webpack configuration, we can use expressions for importing and exporting resources. Here’s what it looks like in the
Component creation is an important part of our application development process. Here you can use some modern tool, like web components, but we, in order not to complicate the project, will use common JavaScript objects, which can be created either using object literals or using the class syntax, which appeared in the ES6 standard .
The peculiarity of using classes to create objects is that after describing a class, you need to create an object instance on its basis, and then export this object. In order to simplify everything even stronger, we will use here the usual objects created using object literals. Here is the code for the
Here we
You can easily use ES6 classes or web components in such situations, developing a project in a style that is closer to declarative than the one used here. Here, in order not to complicate the educational project, the imperative approach is used.
Remember that when we talk about the PRPL pattern, we have not yet figured out the part that is represented by the letter L (Lazy loading)? Dynamic import of resources is what will help us organize lazy loading of components or modules. Since we share the App Shell architecture and the PRPL pattern for caching the “skeleton” of the application and its resources, during the dynamic import, resources are loaded from the cache, not from the network.
Please note that if we used only the App Shell architecture, then the remaining application resources, that is, the contents of the
An example of dynamic import of resources can be seen in the above code snippet of the
Arrow functions are especially useful in cases where it is necessary for the keyword
, , .
, . . , , .
:
. , , — .
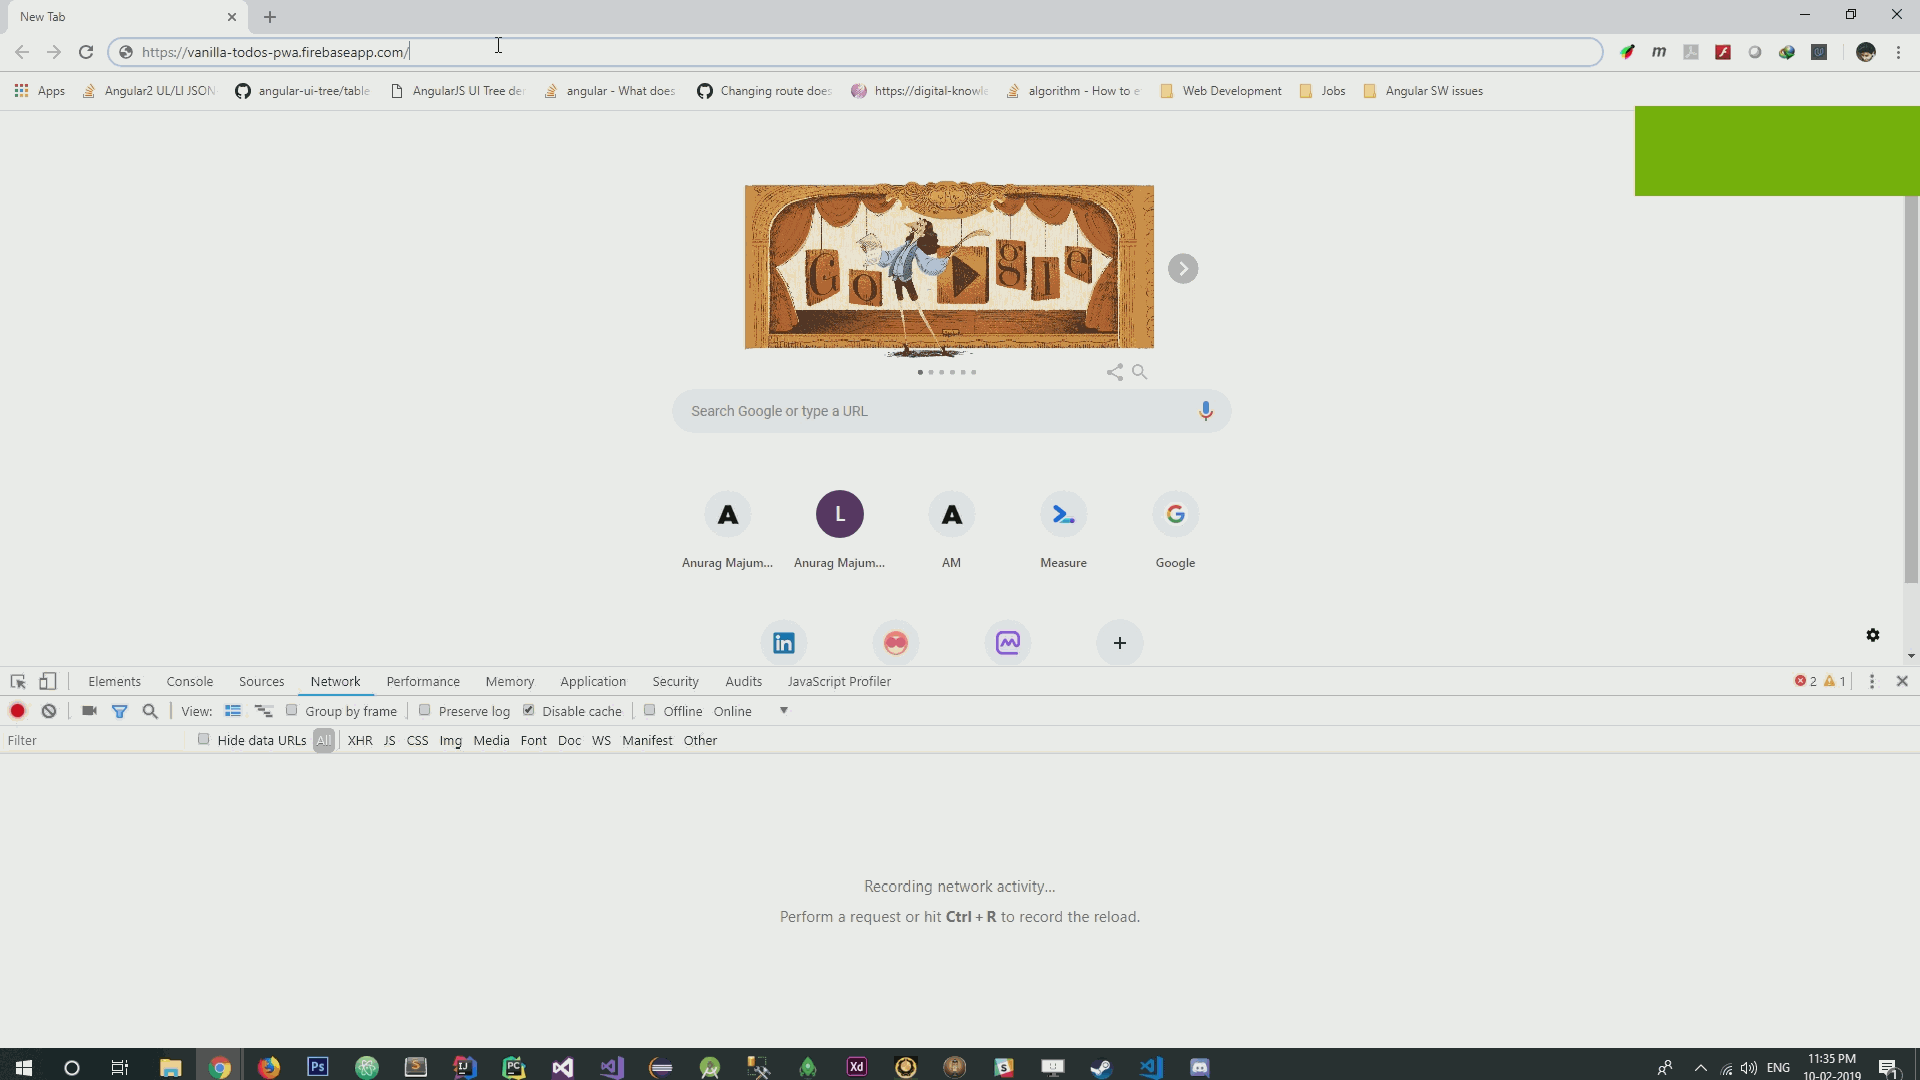
Todo-, . .
. . , , , .
-, , -, . , , . , JavaScript -, .
, .
-
. Lighthouse.
, , JavaScript, . , , , .
Dear readers! -, ?

JavaScript frameworks exist to help us build applications that have similar capabilities using a generic approach. However, many applications do not need all the power that frameworks provide. Using a framework in a small or medium-sized project, to which certain specific requirements are made, may well be an unnecessary waste of time and effort.
')
In this article we will talk about the use of modern technologies in the development of web applications, the capabilities of which are not limited by the capabilities of the frameworks. By the way, if you need it, then you, using the technologies described here, will be able to create your own highly specialized framework. Pure JavaScript and other basic web technologies give developers the ability to do what they need without limiting themselves to the scope of the tools they use.
Overview
Before we get down to business, let's discuss the tools that we need.
Architecture application
In order to ensure a high download speed of the application and ease of working with it, we will use the following design patterns:
- App Shell Architecture.
- PRPL pattern (Push, Render, Pre-cache, Lazy loading).
Project Build System
In our project, we need a quality, customized system for the assembly. Here we will use Webpack, imposing the following requirements on the project's build system:
- Support for ES6 and dynamic resource import capabilities.
- SASS and CSS support.
- Separate setting development modes and the actual operation of the application.
- Ability to automatically configure service workers.
▍ Modern JavaScript features
We will use a minimal set of modern JavaScript features that allow us to develop what we need. Here are the possibilities:
- Modules.
- Different ways to create objects (object literals, classes).
- Dynamic import of resources.
- Arrow functions.
- Pattern literals.
Now, having a general idea of what we need, we are ready to start developing our project.
Application architecture
The emergence of progressive web applications (Progressive Web Application, PWA) also contributed to the arrival of new architectural solutions to web development. This allowed web applications to load and display faster. The combination of the App Shell architecture and the PRPL pattern can make a web application fast and responsive, similar to a regular application.
▍What is the App Shell and PRPL?
App Shell is an architectural pattern used for developing PWA, which, when used, sends a minimal amount of critical resources for a site to the user's browser when the site loads. The composition of these materials usually includes all the resources necessary for the first output of the application to the screen. Such resources can also be cached using a service worker.
The abbreviation PRPL stands for:
- Push - sending critical resources to the client for the source route (in particular, using HTTP / 2).
- Render - output the original route.
- Pre-cache — proactively caching remaining routes or resources.
- Lazy load - "lazy" loading of parts of the application as they become necessary (in particular - at the request of the user).
▍ App Shell and PRPL implementation in code
App Shepp and PRPL patterns are shared. This allows you to implement advanced approaches to the development of web projects. Here is the App Shell pattern in the code:
<!DOCTYPE html> <html lang="en"> <head> <meta charset="utf-8" /> <meta name="viewport" content="width=device-width, initial-scale=1.0" /> <meta http-equiv="X-UA-Compatible" content="ie=edge" /> <!-- Critical Styles --> <!-- №1 --> <style> html { box-sizing: border-box; } *, *:after, *:before { box-sizing: inherit; } body { margin: 0; padding: 0; font: 18px 'Oxygen', Helvetica; background: #ececec; } header { height: 60px; background: #512DA8; color: #fff; display: flex; align-items: center; padding: 0 40px; box-shadow: 1px 2px 6px 0px #777; } h1 { margin: 0; } .banner { text-decoration: none; color: #fff; cursor: pointer; } main { display: flex; justify-content: center; height: calc(100vh - 140px); padding: 20px 40px; overflow-y: auto; } button { background: #512DA8; border: 2px solid #512DA8; cursor: pointer; box-shadow: 1px 1px 3px 0px #777; color: #fff; padding: 10px 15px; border-radius: 20px; } .button { display: flex; justify-content: center; } button:hover { box-shadow: none; } footer { height: 40px; background: #2d3850; color: #fff; display: flex; align-items: center; padding: 40px; } </style> <!-- №1 --> <title>Vanilla Todos PWA</title> </head> <body> <body> <!-- Main Application Section --> <!-- №2 --> <header> <h3><font color="#3AC1EF">▍<a class="banner"> Vanilla Todos PWA </a></font></h3> </header> <main id="app"></main> <footer> <span>© 2019 Anurag Majumdar - Vanilla Todos SPA</span> </footer> <!-- №2 --> <!-- Critical Scripts --> <!-- №3 --> <script async src="<%= htmlWebpackPlugin.files.chunks.main.entry %>"></script> <!-- №3 --> <noscript> This site uses JavaScript. Please enable JavaScript in your browser. </noscript> </body> </body> </html> After studying this code, you can understand that the App Shell template provides for the creation of an “shell” of an application, which is its “skeleton”, containing a minimum of markup. Let us analyze this code (hereinafter, the code snippets to which we will refer when parsing are marked with comments, like
<!-- №1 --> ).- Fragment number 1. The most important styles are embedded in the markup, rather than presented as separate files. This is done so that the CSS code would be processed directly when loading the HTML page.
- Fragment number 2. Here is the "shell" of the application. These areas will be managed later by JavaScript code. This is especially true of what will be in the
maintag with theappidentifier (<main id="app"></main>). - Fragment number 3. This is where scripts come in. The
asyncattribute allows not to block the parser while loading scripts.
The above “skeleton” of the application implements the steps Push and Render of the PRPL pattern. This happens when the browser parses the HTML code to form a visual representation of the page. At the same time, the browser quickly finds the resources that are critical for displaying the page. In addition, here are the scripts (fragment number 3), responsible for the withdrawal of the original route by manipulating the DOM (at the Render step).
However, if we do not use the service worker for caching the “shell” of the application, we will not get a performance gain, for example, when the page is re-loaded.
Below is the code of the service worker caching the "skeleton" and all the static resources of the application.
var staticAssetsCacheName = 'todo-assets-v3'; var dynamicCacheName = 'todo-dynamic-v3'; // №1 self.addEventListener('install', function (event) { self.skipWaiting(); event.waitUntil( caches.open(staticAssetsCacheName).then(function (cache) { cache.addAll([ '/', "chunks/todo.d41d8cd98f00b204e980.js","index.html","main.d41d8cd98f00b204e980.js" ] ); }).catch((error) => { console.log('Error caching static assets:', error); }) ); }); // №1 // №2 self.addEventListener('activate', function (event) { if (self.clients && clients.claim) { clients.claim(); } event.waitUntil( caches.keys().then(function (cacheNames) { return Promise.all( cacheNames.filter(function (cacheName) { return (cacheName.startsWith('todo-')) && cacheName !== staticAssetsCacheName; }) .map(function (cacheName) { return caches.delete(cacheName); }) ).catch((error) => { console.log('Some error occurred while removing existing cache:', error); }); }).catch((error) => { console.log('Some error occurred while removing existing cache:', error); })); }); // №2 // №3 self.addEventListener('fetch', (event) => { event.respondWith( caches.match(event.request).then((response) => { return response || fetch(event.request) .then((fetchResponse) => { return cacheDynamicRequestData(dynamicCacheName, event.request.url, fetchResponse.clone()); }).catch((error) => { console.log(error); }); }).catch((error) => { console.log(error); }) ); }); // №3 function cacheDynamicRequestData(dynamicCacheName, url, fetchResponse) { return caches.open(dynamicCacheName) .then((cache) => { cache.put(url, fetchResponse.clone()); return fetchResponse; }).catch((error) => { console.log(error); }); } Let's sort this code.
- Fragment number 1. Handling a service worker's
installevent helps to cache static resources. Here you can put in the cache the resources of the “skeleton” of the application (CSS, JavaScript, images, and so on) for the first route (in accordance with the content of the “skeleton”). In addition, you can download other application resources by making it work without an internet connection. Resource caching, in addition to skeleton caching, corresponds to the Pre-cache step of the PRPL pattern. - Fragment number 2. When processing the
activateevent, unused caches are cleared. - Fragment number 3. These lines of code load resources from the cache if they are there. Otherwise, network requests are performed. In addition, if a network request for a resource is made, this means that this resource is not yet cached. Such a resource is placed in a new separate cache. This script helps to cache dynamic application data.
To date, we have discussed most of the architectural solutions that will be used in our application. The only thing we haven’t talked about yet is the Lazy loading step of the PRPL pattern. We will return to it later, but for now we will work on the project assembly system.
Project Build System
Good architecture alone, without a decent project build system, is not enough to create a quality application. This is where Webpack comes in handy. There are other tools for building projects (bundlers), for example - Parcel and Rollup. But what we will implement on the basis of Webpack can be done using other means.
Here we will talk about how the features of interest to us are related to plugins for the Webpack. This will allow you to quickly grasp the essence of our build system. Selection of plug-ins for the bandler and its proper configuration is the most important step on the way to a high-quality project build system. Having mastered these principles, you will be able to use them in the future when working on your own applications.
It’s not easy to set up tools like the Webpack from scratch. In such cases, it is helpful to have some good reference manual on hand. This guide, with which the relevant part of this material was written, was this article. If you have any difficulties with Webpack - please contact her. Now let's remember and implement those requirements for the project's build system, which we spoke about at the very beginning.
▍Supporting ES6 and dynamic resource import capabilities
Babel, a popular transpiler that allows you to translate code written using ES6 capabilities into code that can run in ES5 environments, will help us to realize these capabilities. In order to make Babel work with Webpack, we can use the following packages:
@babel/core@babel/plugin-syntax-dynamic-import@babel/preset-envbabel-corebabel-loaderbabel-preset-env
Here is an example of a
.babelrc file designed for use with a Webpack: { "presets": ["@babel/preset-env"], "plugins": ["@babel/plugin-syntax-dynamic-import"] } During the Babel setup, the
presets string of this file is used to tune Babel for ES6 to ES5 transpiling, and the plugins string is used to enable dynamic import in the Webpack.Here is how Babel is used with Webpack (here is a fragment of the Webpack configuration file —
webpack.config.js ): module.exports = { entry: { // }, output: { // }, module: { rules: [ { test: /\.js$/, exclude: /node_modules/, use: { loader: 'babel-loader' } } ] }, plugins: [ // ] }; The
rules section of this file describes the use of the babel-loader to customize the transpiling process. For the sake of brevity, the remaining parts of this file are omitted.▍SASS and CSS support
To support our build system for SASS and CSS projects, we will need the following plugins:
sass-loadercss-loaderstyle-loaderMiniCssExtractPlugin
This is how the Webpack settings file looks like, which includes data about these plugins:
module.exports = { entry: { // }, output: { // }, module: { rules: [ { test: /\.js$/, exclude: /node_modules/, use: { loader: 'babel-loader' } }, { test: /\.scss$/, use: [ 'style-loader', MiniCssExtractPlugin.loader, 'css-loader', 'sass-loader' ] } ] }, plugins: [ new MiniCssExtractPlugin({ filename: '[name].css' }), ] }; Boot loaders are registered in the
rules section. Since we use the plugin to extract CSS styles, the corresponding entry is made in the plugins section.▍Separate configuration of the development modes and the actual operation of the application
This is an extremely important part of the application building process. Everyone knows that when creating an application, some settings are used to build the version that is used during development, and others - for its production version. Here is a list of packages that will be useful to us here:
clean-webpack-plugin: to clean the contents of thedistfolder.compression-webpack-plugin: to compress the contents of thedistfolder.copy-webpack-plugin: to copy static resources, for example, files, from folders with application source data to thedistfolder.html-webpack-plugin: to create anindex.htmlfile in thedistfolder.webpack-md5-hash: for hashing application files in thedistfolder.webpack-dev-server: to run a local server used during development.
Here’s what the final
webpack.config.js file looks like: const path = require('path'); const MiniCssExtractPlugin = require('mini-css-extract-plugin'); const HtmlWebpackPlugin = require('html-webpack-plugin'); const WebpackMd5Hash = require('webpack-md5-hash'); const CleanWebpackPlugin = require('clean-webpack-plugin'); const CopyWebpackPlugin = require('copy-webpack-plugin'); const CompressionPlugin = require('compression-webpack-plugin'); module.exports = (env, argv) => ({ entry: { main: './src/main.js' }, devtool: argv.mode === 'production' ? false : 'source-map', output: { path: path.resolve(__dirname, 'dist'), chunkFilename: argv.mode === 'production' ? 'chunks/[name].[chunkhash].js' : 'chunks/[name].js', filename: argv.mode === 'production' ? '[name].[chunkhash].js' : '[name].js' }, module: { rules: [ { test: /\.js$/, exclude: /node_modules/, use: { loader: 'babel-loader' } }, { test: /\.scss$/, use: [ 'style-loader', MiniCssExtractPlugin.loader, 'css-loader', 'sass-loader' ] } ] }, plugins: [ new CleanWebpackPlugin('dist', {}), new MiniCssExtractPlugin({ filename: argv.mode === 'production' ? '[name].[contenthash].css' : '[name].css' }), new HtmlWebpackPlugin({ inject: false, hash: true, template: './index.html', filename: 'index.html' }), new WebpackMd5Hash(), new CopyWebpackPlugin([ // { // from: './src/assets', // to: './assets' // }, // { // from: 'manifest.json', // to: 'manifest.json' // } ]), new CompressionPlugin({ algorithm: 'gzip' }) ], devServer: { contentBase: 'dist', watchContentBase: true, port: 1000 } }); The entire Webpack configuration is represented as a function that takes two arguments. It uses the
argv argument, which represents the arguments passed to this function when executing webpack or webpack-dev-server commands. Here is how the description of these commands looks in the package.json project file: "scripts": { "build": "webpack --mode production && node build-sw", "serve": "webpack-dev-server --mode=development --hot", }, As a result, if we execute the
npm run build , the production version of the application will be built. If you run the npm run serve command, the development server will be launched that supports the process of working on the application.The
plugins and devServer the file above show the configuration of plug-ins and the development server.In the section that begins with the
new CopyWebpackPlugin , specify the resources that need to be copied from the source materials of the application.▍Setting service worker
We all know that manually compiling lists of files, for example, intended for caching, is rather boring. Therefore, here we will use a special service worker build script that finds files in the
dist folder and adds them as cache contents in the service worker template. After that, the service worker file will be recorded in the dist folder. The concepts that we talked about for service workers do not change. Here is the build-sw.js script code: const glob = require('glob'); const fs = require('fs'); const dest = 'dist/sw.js'; const staticAssetsCacheName = 'todo-assets-v1'; const dynamicCacheName = 'todo-dynamic-v1'; // №1 let staticAssetsCacheFiles = glob .sync('dist/**/*') .map((path) => { return path.slice(5); }) .filter((file) => { if (/\.gz$/.test(file)) return false; if (/sw\.js$/.test(file)) return false; if (!/\.+/.test(file)) return false; return true; }); // №1 const stringFileCachesArray = JSON.stringify(staticAssetsCacheFiles); // №2 const serviceWorkerScript = `var staticAssetsCacheName = '${staticAssetsCacheName}'; var dynamicCacheName = '${dynamicCacheName}'; self.addEventListener('install', function (event) { self.skipWaiting(); event.waitUntil( caches.open(staticAssetsCacheName).then(function (cache) { cache.addAll([ '/', ${stringFileCachesArray.slice(1, stringFileCachesArray.length - 1)} ] ); }).catch((error) => { console.log('Error caching static assets:', error); }) ); }); self.addEventListener('activate', function (event) { if (self.clients && clients.claim) { clients.claim(); } event.waitUntil( caches.keys().then(function (cacheNames) { return Promise.all( cacheNames.filter(function (cacheName) { return (cacheName.startsWith('todo-')) && cacheName !== staticAssetsCacheName; }) .map(function (cacheName) { return caches.delete(cacheName); }) ).catch((error) => { console.log('Some error occurred while removing existing cache:', error); }); }).catch((error) => { console.log('Some error occurred while removing existing cache:', error); })); }); self.addEventListener('fetch', (event) => { event.respondWith( caches.match(event.request).then((response) => { return response || fetch(event.request) .then((fetchResponse) => { return cacheDynamicRequestData(dynamicCacheName, event.request.url, fetchResponse.clone()); }).catch((error) => { console.log(error); }); }).catch((error) => { console.log(error); }) ); }); function cacheDynamicRequestData(dynamicCacheName, url, fetchResponse) { return caches.open(dynamicCacheName) .then((cache) => { cache.put(url, fetchResponse.clone()); return fetchResponse; }).catch((error) => { console.log(error); }); } `; // №2 // №3 fs.writeFile(dest, serviceWorkerScript, function(error) { if (error) return; console.log('Service Worker Write success'); }); // №3 Let's sort this code.
- Fragment number 1. Here, the list of files from the
distfolder is placed in the arraystaticAssetsCacheFiles. - Fragment number 2. This is the service worker template we talked about. When forming the finished code variables are used. This makes the template universal, allowing it to be used in the future as the project progresses. We also need the template because we add information about the contents of the
distfolder to it, which can change over time. To do this, use thestringFileCachesArrayconstant. - Fragment number 3. Here, the newly generated service worker code stored in the
serviceWorkerScriptconstant is written to the file located atdist/sw.js
To run this script, use the
node build-sw command. It needs to be executed after the execution of the webpack --mode production command is completed.The script presented here for assembling a service worker greatly simplifies the task of organizing file caching. It should be noted that this script has already found application in a real project.
If you want to use a special library designed to solve the problem of the work of progressive web applications in offline mode - take a look at the Workbox . It has very interesting customizable features.
▍ Package Overview used in the project
Here is the file
package.json our project, where you can find information about the packages used in this project: { "name": "vanilla-todos-pwa", "version": "1.0.0", "description": "A simple todo application using ES6 and Webpack", "main": "src/main.js", "scripts": { "build": "webpack --mode production && node build-sw", "serve": "webpack-dev-server --mode=development --hot" }, "keywords": [], "author": "Anurag Majumdar", "license": "MIT", "devDependencies": { "@babel/core": "^7.2.2", "@babel/plugin-syntax-dynamic-import": "^7.2.0", "@babel/preset-env": "^7.2.3", "autoprefixer": "^9.4.5", "babel-core": "^6.26.3", "babel-loader": "^8.0.4", "babel-preset-env": "^1.7.0", "clean-webpack-plugin": "^1.0.0", "compression-webpack-plugin": "^2.0.0", "copy-webpack-plugin": "^4.6.0", "css-loader": "^2.1.0", "html-webpack-plugin": "^3.2.0", "mini-css-extract-plugin": "^0.5.0", "node-sass": "^4.11.0", "sass-loader": "^7.1.0", "style-loader": "^0.23.1", "terser": "^3.14.1", "webpack": "^4.28.4", "webpack-cli": "^3.2.1", "webpack-dev-server": "^3.1.14", "webpack-md5-hash": "0.0.6" } } If we talk about the support of such projects, it should be noted that the tools in the Webpack ecosystem are updated quite often. It often happens that the existing plugins are replaced with new ones. Therefore, it is important when deciding whether to use newer ones instead of some packages, to focus not on the packages themselves, but on those opportunities that they should implement. As a matter of fact, this is why the above we talked about the role a particular package plays.
Modern JavaScript features
During the development of a web application, the programmer has a choice whether to write his own implementations of features such as change detection, routing, data storage, or use existing packages.
Now we will talk about the minimum set of technologies needed to ensure the operation of our project. If necessary, this set of technologies can be expanded using existing frameworks or packages.
Modules
We will use the ES6 capabilities for importing and exporting modules, viewing each file as an ES6 module. This feature is often found in popular frameworks, such as Angular and React, and is very convenient to use. Thanks to our Webpack configuration, we can use expressions for importing and exporting resources. Here’s what it looks like in the
app.js file: import { appTemplate } from './app.template'; import { AppModel } from './app.model'; export const AppComponent = { // App... }; ▍Different ways to create objects
Component creation is an important part of our application development process. Here you can use some modern tool, like web components, but we, in order not to complicate the project, will use common JavaScript objects, which can be created either using object literals or using the class syntax, which appeared in the ES6 standard .
The peculiarity of using classes to create objects is that after describing a class, you need to create an object instance on its basis, and then export this object. In order to simplify everything even stronger, we will use here the usual objects created using object literals. Here is the code for the
app.js file in which you can see their use. import { appTemplate } from './app.template'; import { AppModel } from './app.model'; export const AppComponent = { init() { this.appElement = document.querySelector('#app'); this.initEvents(); this.render(); }, initEvents() { this.appElement.addEventListener('click', event => { if (event.target.className === 'btn-todo') { import( /* webpackChunkName: "todo" */ './todo/todo.module') .then(lazyModule => { lazyModule.TodoModule.init(); }) .catch(error => 'An error occurred while loading Module'); } }); document.querySelector('.banner').addEventListener('click', event => { event.preventDefault(); this.render(); }); }, render() { this.appElement.innerHTML = appTemplate(AppModel); } }; Here we
AppComponent and export the AppComponent component, which can immediately be used in other parts of the application.You can easily use ES6 classes or web components in such situations, developing a project in a style that is closer to declarative than the one used here. Here, in order not to complicate the educational project, the imperative approach is used.
▍ Dynamic import of resources
Remember that when we talk about the PRPL pattern, we have not yet figured out the part that is represented by the letter L (Lazy loading)? Dynamic import of resources is what will help us organize lazy loading of components or modules. Since we share the App Shell architecture and the PRPL pattern for caching the “skeleton” of the application and its resources, during the dynamic import, resources are loaded from the cache, not from the network.
Please note that if we used only the App Shell architecture, then the remaining application resources, that is, the contents of the
chunks folder, would not be cached.An example of dynamic import of resources can be seen in the above code snippet of the
AppComponent component, in particular, where the event handler for clicking a button is configured (this is a method of the object initEvents() ). Namely, if the application user clicks on the btn-todo button, the btn-todo module will be loaded. This module is a regular JavaScript file that contains a set of components represented as objects.Shooting Functions and Pattern Literals
Arrow functions are especially useful in cases where it is necessary for the keyword
this in such functions to indicate the context in which the function is declared. In addition, the arrow functions allow you to write code that is more compact than when using ordinary functions. Here is an example of such a function: export const appTemplate = model => ` <section class="app"> <h3><font color="#3AC1EF">▍ ${model.title} </font></h3> <section class="button"> <button class="btn-todo"> Todo Module </button> </section> </section> `; appTemplate ( model ) HTML-, , . . , - ., , .
reduce() HTML-: const WorkModel = [ { id: 1, src: '', alt: '', designation: '', period: '', description: '' }, { id: 2, src: '', alt: '', designation: '', period: '', description: '' }, //... ]; const workCardTemplate = (cardModel) => ` <section id="${cardModel.id}" class="work-card"> <section class="work__image"> <img class="work__image-content" type="image/svg+xml" src="${ cardModel.src }" alt="${cardModel.alt}" /> </section> <section class="work__designation">${cardModel.designation}</section> <section class="work__period">${cardModel.period}</section> <section class="work__content"> <section class="work__content-text"> ${cardModel.description} </section> </section> </section> `; export const workTemplate = (model) => ` <section class="work__section"> <section class="work-text"> <header class="header-text"> <span class="work-text__header"> Work </span> </header> <section class="work-text__content content-text"> <p class="work-text__content-para"> This area signifies work experience </p> </section> </section> <section class="work-cards"> ${model.reduce((html, card) => html + workCardTemplate(card), '')} </section> </section> `; , . . , , .
:
model. — ,reduce(), .model.reduce, HTML-, , . , , , — .
. , , — .
Todo-, . .
. . , , , .
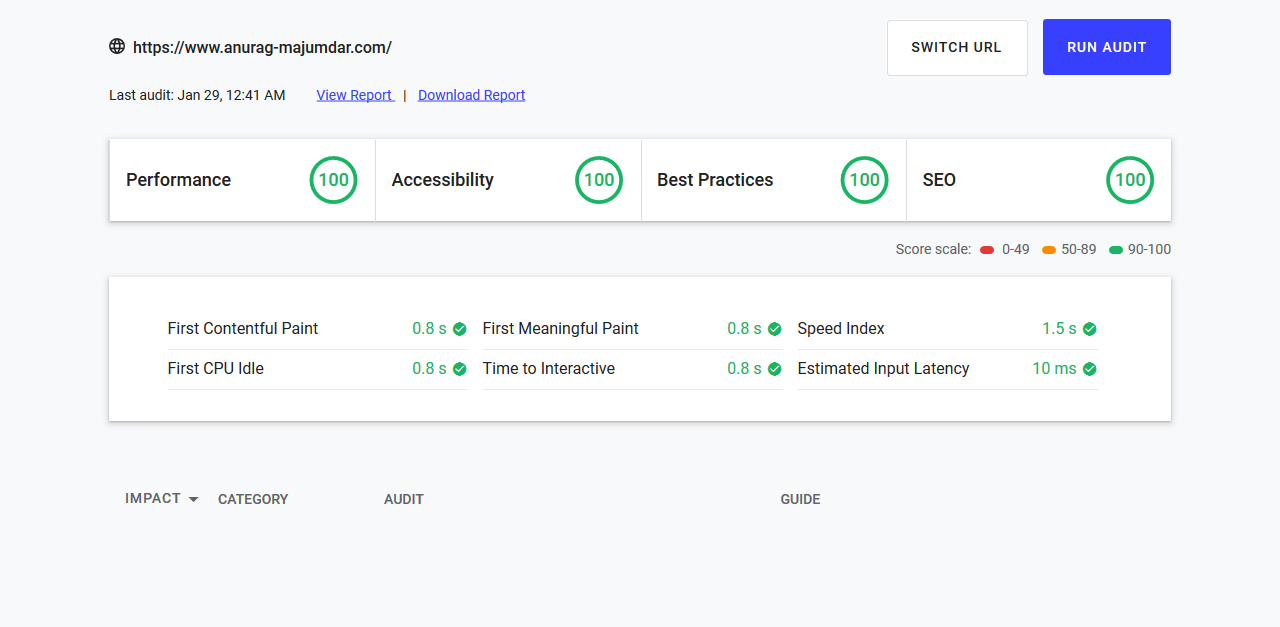
-
-, , -, . , , . , JavaScript -, .
, .
-
. Lighthouse.
Results
, , JavaScript, . , , , .
Dear readers! -, ?
Source: https://habr.com/ru/post/444342/
All Articles