Introduction to Testing in Python. Part 3
Friends, we have great news for you. Firstly, the sun is finally shining on the street, and this means that spring begins to fully enter into its rights. The second news is more specialized - already on March 20, the first lesson in the new thread of the Python Developer course starts;
Multi-Media Testing
So far, you have been testing for a single version of Python using a virtual environment with a specific set of dependencies. But there may always be a need to test the operation of the application on several versions of Python or several versions of a package. Tox is an application that automates testing in multiple environments.
')

Install Tox
Tox is available on PyPl as a package for installation via pip:
After installation, you can proceed to configure Tox.
Configuring Tox For Your Dependencies
Tox is configured via the configuration file in the project directory. It contains the following:
Instead of learning the syntax for setting up Tox, you can start by running the quickstart application.
The Tox configuration tool will ask you questions and create a file similar to the following in
Before you start Tox, make sure that there is a
And if your project is not intended for distribution to PyPl, you can skip this requirement by adding the following line to the tox.ini file under the
If you do not create setup.py, and the application has some dependencies on PyPl, you will need to clarify them in the
At the end of this stage, you can run tests.
Now you can run Tox, and it will create two virtual environments: one for Python 2.7 and one for Python 3.6. The Tox directory is called
You can start this process by calling Tox from the command line:
Tox will issue test results for each environment. When you first start Tox, you need time to create virtual environments, but at the second start, everything will work much faster.
The results of Tox are pretty simple. Environments are created for each version, dependencies are established, and then test commands are run.
There are some more command line options to remember.
Run a single environment, for example, Python 3.6:
Re-create a virtual environment when changing dependencies or side-packages damage:
Run Tox with less detailed findings:
Run Tox with a more verbose output:
For more information about Tox, see the Tox documentation site.
Test Automation
So far, you have performed tests manually, running the command. But there are tools to automatically perform tests when making changes and commit them to a repository with a version control system, for example, Git. Testing automation tools are often called CI / CD tools, which means “Continuous Integration / Continuous Deployment” (Continuous Integration / Continuous Deployment). They can run tests, compile and publish applications, and even deploy them to production.
Travis CI is one of the many CI services available.
Travis CI works well with Python, and now you can automate the execution of all the tests you created in the cloud! Travis CI is free for any open source projects on GitHub and GitLab and is available for a fee for private projects.
To get started, log in and authenticate with your GitHub or GitLab credentials. Then create a file called
This configuration gives the Travis CI the following guidelines:
After committing and pushing this file, Travis CI will run these commands each time you push to your remote Git repository. The results can be viewed on their website.
What's next
Now you know how to write tests, add them to your project, execute them, and even do it automatically, so you can become familiar with advanced methods that can come in handy as your test library grows.
Introduction of Linter to the Application
Tox and Travis CI have a test command setup. In this tutorial, we used python -m unittest discover as a test command.
You can provide one or more commands in these tools, which will allow you to add new tools to improve the quality of the application.
One of these applications is the linter. He will look at your code and leave comments. Thus, he can give advice about errors, correct trailing spaces, and even anticipate potential bugs.
To learn more about linters, read the Python Code Quality Tutorial .
Passive lint with flake8
flake8 is a popular linter that leaves comments about the style of your code in accordance with the PEP 8 specification.
You can install
You can then run
You will see a list of errors and warnings in your code found by
In this example, the .git and __pycache__ directories are ignored, as well as the E305 rule. In addition, the maximum string length increases from 80 characters to 90. You will at some point understand that the standard limit of 79 characters per line is not suitable for tests that may contain long method names, string literals with test values and other long pieces of data. Typically, tests increase the length of the string to 120 characters:
You can also provide these parameters on the command line:
A complete list of settings can be found on the Documentation Site .
Now you can add
Travis will read the configuration in
Aggressive Lint with Code Formatter
You can install
Then, to run from the command line, specify the file or directory that you want to format:
Keep your Test Code Clean
You may notice that when writing tests copy-paste code snippets, you will be much more likely than when creating ordinary applications. From time to time, tests can be very monotonous, but this is not a reason to throw the code in an inaccurate and fragmented form.
Over time, your test code will accumulate technical debt , and it will be very difficult to make changes to the tests that are necessary for significant changes in the application code because of the structure.
When writing tests, try to follow the DRY principle: Don't Repeat Yourself (Do Not Repeat).
Test fixtures and functions are a great way to write code that is easy to maintain. In addition, do not forget about the ease of reading. Consider deploying lint tools, for example,
Testing for Detecting Decreased Performance Between Edits
There are many ways to benchmark code in Python. The standard library has a timeit module, which schedules functions several times and shows you the distribution. In this example, test () will be executed 100 times, and then output will be given using print ():
If you decide to use pytest as a test performer, pay attention to the pytest-benchmark plugin. It provides a pytest fixture called benchmark. Any callable object can be passed to benchmark (), it will log the time of the pytest called in the results.
You can install pytest-benchmark from PyPl using pip:
Then you can add a test that uses fixture and passes the callee to be executed:
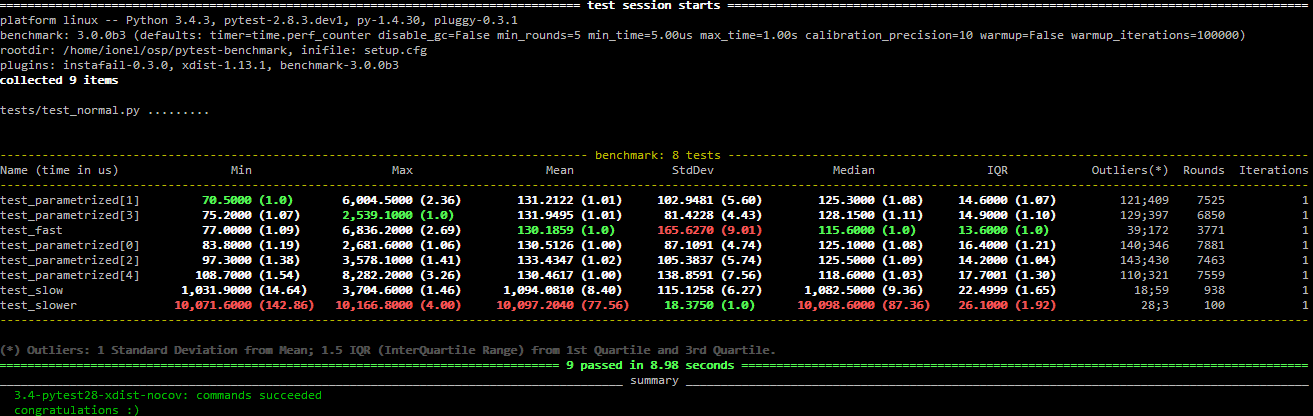
Running pytest will give you benchmark results:
You can learn more on the Documentation Site .
Testing for Security Bug Detection
Another test to run on your application is checking for common errors and security vulnerabilities.
Install the
Then you can pass the name of your application module with the
As in the case of
More information on GitHub .
Conclusion
Python has made testing available thanks to built-in commands and libraries needed to verify the correctness of applications. Starting to test in Python is easy: you can use unittest and write small, easy-to-support methods to test the code.
As you learn more about testing and expand your application, consider switching to one of the test frameworks, such as pytest, to start using more advanced features.
Thanks for reading. I wish an unmistakable future with Python!
And for those who have read the article, we have another great news. Right now you can have time to purchase the course "Developer Python" with a discount of 10,000 rubles!
First part
The second part of
Multi-Media Testing
So far, you have been testing for a single version of Python using a virtual environment with a specific set of dependencies. But there may always be a need to test the operation of the application on several versions of Python or several versions of a package. Tox is an application that automates testing in multiple environments.
')
Install Tox
Tox is available on PyPl as a package for installation via pip:
$ pip install tox After installation, you can proceed to configure Tox.
Configuring Tox For Your Dependencies
Tox is configured via the configuration file in the project directory. It contains the following:
- The command to run to run the tests;
- Any additional packages required to run;
- Target Python versions selected for testing.
Instead of learning the syntax for setting up Tox, you can start by running the quickstart application.
$ tox-quickstart The Tox configuration tool will ask you questions and create a file similar to the following in
tox.ini : [tox] envlist = py27, py36 [testenv] deps = commands = python -m unittest discover Before you start Tox, make sure that there is a
setup.py file in the application folder with the package installation steps. If not, use the setup.py creation guide .And if your project is not intended for distribution to PyPl, you can skip this requirement by adding the following line to the tox.ini file under the
tox header: [tox] envlist = py27, py36 skipsdist=True If you do not create setup.py, and the application has some dependencies on PyPl, you will need to clarify them in the
testenv section. For example, Django will require the following: [testenv] deps = django At the end of this stage, you can run tests.
Now you can run Tox, and it will create two virtual environments: one for Python 2.7 and one for Python 3.6. The Tox directory is called
.tox/ . In it, Tox will perform -m unittest discover for each virtual environment.You can start this process by calling Tox from the command line:
$ tox Tox will issue test results for each environment. When you first start Tox, you need time to create virtual environments, but at the second start, everything will work much faster.
The results of Tox are pretty simple. Environments are created for each version, dependencies are established, and then test commands are run.
There are some more command line options to remember.
Run a single environment, for example, Python 3.6:
$ tox -e py36 Re-create a virtual environment when changing dependencies or side-packages damage:
$ tox -r Run Tox with less detailed findings:
$ tox -q Run Tox with a more verbose output:
$ tox -v For more information about Tox, see the Tox documentation site.
Test Automation
So far, you have performed tests manually, running the command. But there are tools to automatically perform tests when making changes and commit them to a repository with a version control system, for example, Git. Testing automation tools are often called CI / CD tools, which means “Continuous Integration / Continuous Deployment” (Continuous Integration / Continuous Deployment). They can run tests, compile and publish applications, and even deploy them to production.
Travis CI is one of the many CI services available.
Travis CI works well with Python, and now you can automate the execution of all the tests you created in the cloud! Travis CI is free for any open source projects on GitHub and GitLab and is available for a fee for private projects.
To get started, log in and authenticate with your GitHub or GitLab credentials. Then create a file called
.travis.yml with the following content: language: python python: - "2.7" - "3.7" install: - pip install -r requirements.txt script: - python -m unittest discover This configuration gives the Travis CI the following guidelines:
- Testing for Python 2.7 and 3.7 (Optionally, you can replace them with any others.)
- Install all packages listed in requirements.txt (You can remove this section if you have no dependencies.)
- Run python -m unittest discover to run tests.
After committing and pushing this file, Travis CI will run these commands each time you push to your remote Git repository. The results can be viewed on their website.
What's next
Now you know how to write tests, add them to your project, execute them, and even do it automatically, so you can become familiar with advanced methods that can come in handy as your test library grows.
Introduction of Linter to the Application
Tox and Travis CI have a test command setup. In this tutorial, we used python -m unittest discover as a test command.
You can provide one or more commands in these tools, which will allow you to add new tools to improve the quality of the application.
One of these applications is the linter. He will look at your code and leave comments. Thus, he can give advice about errors, correct trailing spaces, and even anticipate potential bugs.
To learn more about linters, read the Python Code Quality Tutorial .
Passive lint with flake8
flake8 is a popular linter that leaves comments about the style of your code in accordance with the PEP 8 specification.
You can install
flake8 using pip: $ pip install flake8 You can then run
flake8 for a single file, folder, or template: $ flake8 test.py test.py:6:1: E302 expected 2 blank lines, found 1 test.py:23:1: E305 expected 2 blank lines after class or function definition, found 1 test.py:24:20: W292 no newline at end of file You will see a list of errors and warnings in your code found by
flake8 .flake8 can be configured on the command line or in the project configuration file. If you want to ignore some rules, for example E305, shown above, you can specify this in the configuration. flake8 will check the flake8 file in the project folder or the setup.cfg file. If you want to use Tox, you can add the flake8 settings flake8 in tox.ini .In this example, the .git and __pycache__ directories are ignored, as well as the E305 rule. In addition, the maximum string length increases from 80 characters to 90. You will at some point understand that the standard limit of 79 characters per line is not suitable for tests that may contain long method names, string literals with test values and other long pieces of data. Typically, tests increase the length of the string to 120 characters:
[flake8] ignore = E305 exclude = .git,__pycache__ max-line-length = 90 You can also provide these parameters on the command line:
$ flake8 --ignore E305 --exclude .git,__pycache__ --max-line-length=90 A complete list of settings can be found on the Documentation Site .
Now you can add
flake8 to the CI setting. For Travis CI, it will look like this: matrix: include: - python: "2.7" script: "flake8" Travis will read the configuration in
.flake8 and will not be able to complete the build if there are lint errors. Make sure you add the flake8 dependency to the requirements.txt file.Aggressive Lint with Code Formatter
flake8 is a passive linter that only recommends edits; you will have to add them to the code yourself. The formatter of the code is a more aggressive approach. It changes code automatically according to styles and layouts.black is a very unforgiving formatter. It has no settings and it is very meticulous. Which makes it a great tool to insert into your test pipeline.Please note: black requires Python version 3.6 and higher.
You can install
black using pip: $ pip install black Then, to run from the command line, specify the file or directory that you want to format:
$ black test.py Keep your Test Code Clean
You may notice that when writing tests copy-paste code snippets, you will be much more likely than when creating ordinary applications. From time to time, tests can be very monotonous, but this is not a reason to throw the code in an inaccurate and fragmented form.
Over time, your test code will accumulate technical debt , and it will be very difficult to make changes to the tests that are necessary for significant changes in the application code because of the structure.
When writing tests, try to follow the DRY principle: Don't Repeat Yourself (Do Not Repeat).
Test fixtures and functions are a great way to write code that is easy to maintain. In addition, do not forget about the ease of reading. Consider deploying lint tools, for example,
flake8 to your test code: $ flake8 --max-line-length=120 tests/ Testing for Detecting Decreased Performance Between Edits
There are many ways to benchmark code in Python. The standard library has a timeit module, which schedules functions several times and shows you the distribution. In this example, test () will be executed 100 times, and then output will be given using print ():
def test(): # ... your code if __name__ == '__main__': import timeit print(timeit.timeit("test()", setup="from __main__ import test", number=100)) If you decide to use pytest as a test performer, pay attention to the pytest-benchmark plugin. It provides a pytest fixture called benchmark. Any callable object can be passed to benchmark (), it will log the time of the pytest called in the results.
You can install pytest-benchmark from PyPl using pip:
$ pip install pytest-benchmark Then you can add a test that uses fixture and passes the callee to be executed:
def test_my_function(benchmark): result = benchmark(test) Running pytest will give you benchmark results:
You can learn more on the Documentation Site .
Testing for Security Bug Detection
Another test to run on your application is checking for common errors and security vulnerabilities.
Install the
bandit from PyPl with pip: $ pip install bandit Then you can pass the name of your application module with the
-r flag and get brief information: $ bandit -r my_sum [main] INFO profile include tests: None [main] INFO profile exclude tests: None [main] INFO cli include tests: None [main] INFO cli exclude tests: None [main] INFO running on Python 3.5.2 Run started:2018-10-08 00:35:02.669550 Test results: No issues identified. Code scanned: Total lines of code: 5 Total lines skipped (#nosec): 0 Run metrics: Total issues (by severity): Undefined: 0.0 Low: 0.0 Medium: 0.0 High: 0.0 Total issues (by confidence): Undefined: 0.0 Low: 0.0 Medium: 0.0 High: 0.0 Files skipped (0): As in the case of
flake8 , the rules of the bandit flags can be configured, and if you want to ignore some of them, you can add the following snippet to the setup.cfg file with parameters: [bandit] exclude: /test tests: B101,B102,B301 More information on GitHub .
Conclusion
Python has made testing available thanks to built-in commands and libraries needed to verify the correctness of applications. Starting to test in Python is easy: you can use unittest and write small, easy-to-support methods to test the code.
As you learn more about testing and expand your application, consider switching to one of the test frameworks, such as pytest, to start using more advanced features.
Thanks for reading. I wish an unmistakable future with Python!
And for those who have read the article, we have another great news. Right now you can have time to purchase the course "Developer Python" with a discount of 10,000 rubles!
First part
The second part of
Source: https://habr.com/ru/post/444204/
All Articles