Features settings Palo Alto Networks: SSL VPN

Despite all the advantages of the Palo Alto Networks firewalls, in RuNet there are not so many materials on how to configure these devices, as well as texts describing the experience of their implementation. We decided to summarize the materials we have accumulated during our work with the equipment of this vendor and talk about the features that we encountered during the implementation of various projects.
In order to familiarize yourself with Palo Alto Networks, this article will look at the settings required for one of the most common firewalling tasks, SSL VPN for remote access. We will also talk about support functions for general firewall configuration, user, application, and security policy identification. If the topic is of interest to readers, in the future we will release materials with Site-to-Site VPN parsing, dynamic routing and centralized management using Panorama.
Firewalls Palo Alto Networks use a number of innovative technologies, including App-ID, User-ID, Content-ID. The use of this functionality allows for a high level of security. For example, using the App-ID, it is possible to identify application traffic based on signatures, decoding, and heuristics, regardless of the port and protocol used, including inside the SSL tunnel. User-ID allows you to identify network users through integration with LDAP. Content-ID allows you to scan traffic and identify the transmitted files and their contents. Other functions of firewalls include intrusion protection, protection against vulnerabilities and DoS attacks, built-in anti-spyware, URL filtering, clustering, and centralized management.
')
For the demonstration, we will use an isolated stand, with a configuration identical to the real one, with the exception of device names, AD domain name and IP addresses. In reality, everything is more complicated - there may be a lot of branches. On the borders of the central sites, in this case, instead of one firewall, a cluster will be installed, dynamic routing may also be required.
The stand uses PAN-OS 7.1.9 . As a typical configuration, consider a network with a Palo Alto Networks firewall at the border. Firewall provides remote SSL VPN access to the head office. The Active Directory domain will be used as the user database (Figure 1).
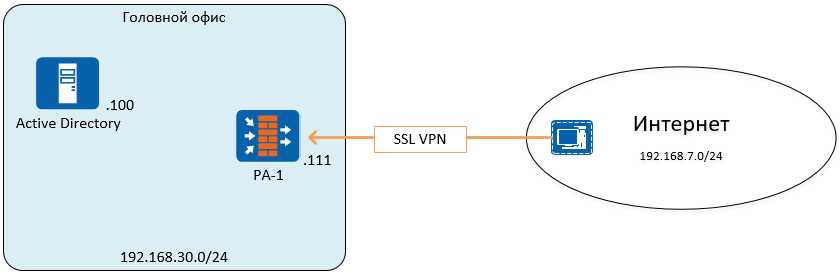
Figure 1 - Network block diagram
Setup steps:
- Presetting device. Set name, management IP address, static routes, administrator accounts, management profiles
- Installing licenses, configuring and installing updates
- Configure security zones, network interfaces, traffic policies, address translation
- Configure LDAP Authentication Profile and User Identification Features
- Configure SSL VPN
1. Pre-tuning
The main tool for setting up the Palo Alto Networks firewall is a web interface, and control via the CLI is also possible. By default, the management interface has the IP address 192.168.1.1/24, login: admin, password: admin.
You can change the address either by connecting to the web interface from the same network, or using the command set deviceconfig system ip-address <> netmask <> . It runs in configuration mode. To switch to configuration mode, use the configure command. All changes on the firewall occur only after the commit is confirmed by the commit command, both in the command line mode and in the web interface.
To change the settings in the web interface, use the section Device -> General Settings and Device -> Management Interface Settings. Name, banners, time zone and other settings can be set in the General Settings section (Fig. 2).
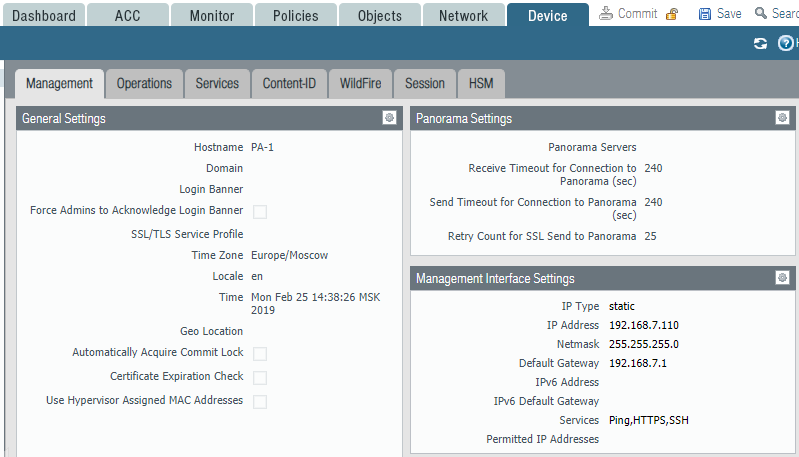
Figure 2 - Management Interface Parameters
If a virtual firewall is used in an ESXi environment, in the General Settings section you need to enable the use of the MAC address assigned by the hypervisor, or configure the MAC addresses set on the firewall interfaces on the hypervisor, or change the settings of the virtual switches to allow MAC changes addresses. Otherwise, the traffic will not pass.
The management interface is configured separately and is not displayed in the list of network interfaces. The Management Interface Settings section specifies the default gateway for the management interface. Other static routes are configured in the virtual routers section; this will be described later.
To allow access to the device through other interfaces, you must create a Management Profile in the Network -> Network Profiles -> Interface Mgmt section and assign it to the appropriate interface.
Next, you need to configure DNS and NTP in the Device -> Services section in order to receive updates and correctly display the time (Fig. 3). By default, all traffic created by the firewall uses the management interface's IP address as the source IP address. You can assign a different interface for each specific service in the Service Route Configuration section.
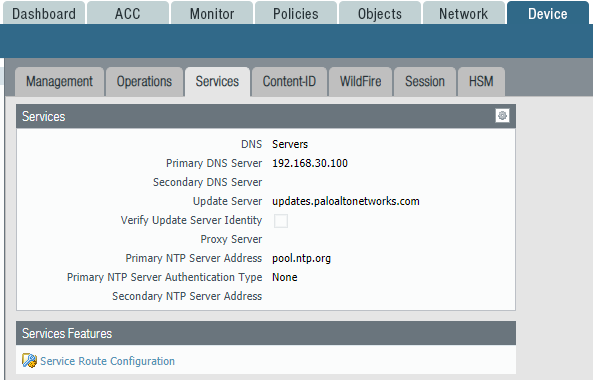
Figure 3 - Parameters of DNS, NTP and system routes services
2. Installing licenses, configuring and installing updates
For full operation of all functions of the firewall, you must install a license. You can use a trial license by requesting it from Palo Alto Networks partners. Its validity period is 30 days. The license is activated either through a file or using Auth-Code. Licenses are configured in the Device -> Licenses section (Fig. 4).
After installing the license, you must configure the installation of updates in the section Device -> Dynamic Updates .
In the Device -> Software section, you can download and install new versions of PAN-OS.
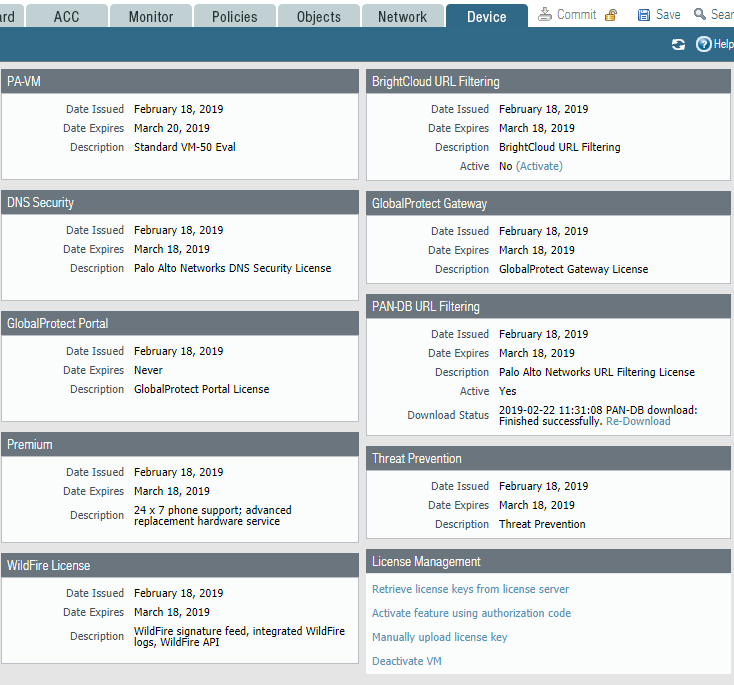
Figure 4 - License control panel
3. Configure security zones, network interfaces, traffic policy, address translation
Palo Alto Networks firewalls apply zone logic when setting up network rules. Network interfaces are assigned to a specific zone, and it is used in traffic rules. This approach allows in the future, when changing interface settings, not to change the traffic rules, but instead reassign the necessary interfaces to the corresponding zones. By default, traffic inside the zone is allowed, traffic between zones is prohibited, the preset rules intrazone-default and interzone-default are responsible for this.
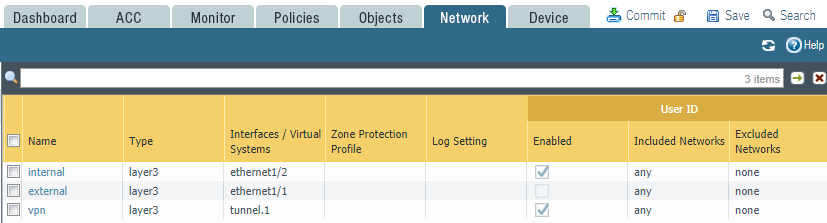
Figure 5 - Security Zones
In this example, the interface on the internal network is assigned to the internal zone, and the interface directed to the Internet is assigned to the external zone. For SSL VPN, a tunnel interface has been created, assigned to the vpn zone (Fig. 5).
The network interfaces of the Palo Alto Networks firewall can operate in five different modes:
- Tap - used to collect traffic for monitoring and analysis
- HA - used for cluster operation.
- Virtual Wire - in this mode, Palo Alto Networks combines two interfaces and transparently allows traffic between them without changing the MAC and IP addresses
- Layer2 - switch mode
- Layer3 - router mode
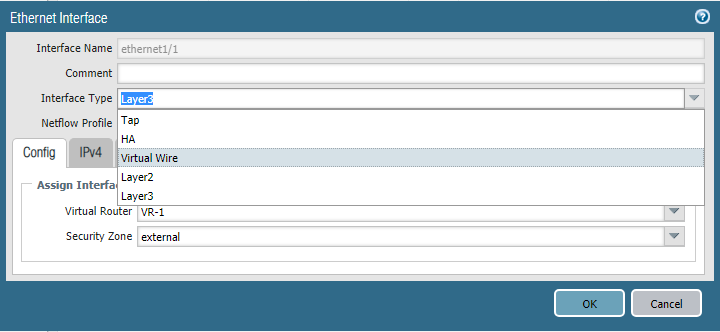
Figure 6 - Setting the interface operation mode
In this example, the Layer3 mode will be used (Fig. 6). The parameters of the network interface indicate the IP address, mode of operation and the corresponding security zone. In addition to the interface operation mode, you must assign it to the Virtual Router virtual router, this is an analog of the VRF instance in Palo Alto Networks. Virtual routers are isolated from each other and have their own routing tables and network protocol settings.
In the virtual router settings, static routes and routing protocol settings are specified. In this example, only the default route was created for access to external networks (Fig. 7).
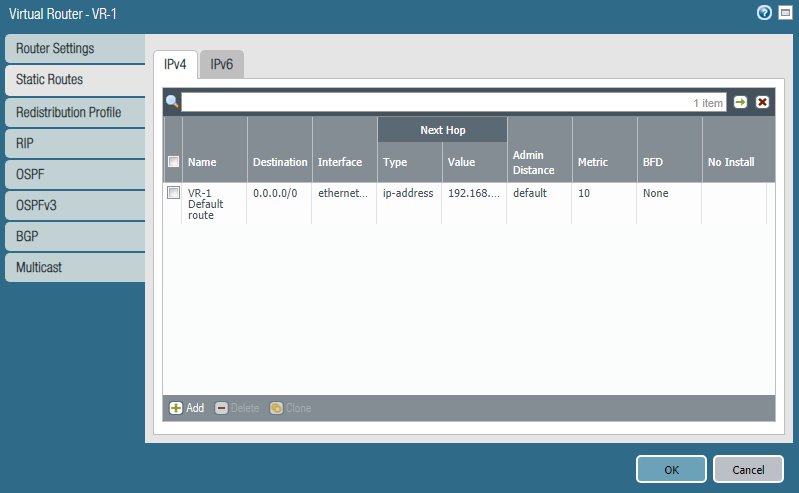
Figure 7 - Configuring a Virtual Router
The next configuration step is traffic policies, the Policies -> Security section. An example of the setting is shown in Figure 8. The logic of the rules is the same as for all firewalls. Rules are checked from top to bottom, before the first match. Brief description of the rules:
1. SSL VPN Access to Web Portal. Allows access to the web portal for authenticating remote connections
2. VPN traffic - allowing traffic between remote connections and the head office
3. Basic Internet - permission of dns, ping, traceroute, ntp applications. The firewall allows signature-based, decoding, and heuristic-based applications, not port and protocol numbers, so application-default is indicated in the Service section. The default port / protocol for this application
4. Web Access - allowing access to the Internet via HTTP and HTTPS without application control
5.6. Default rules for other traffic.
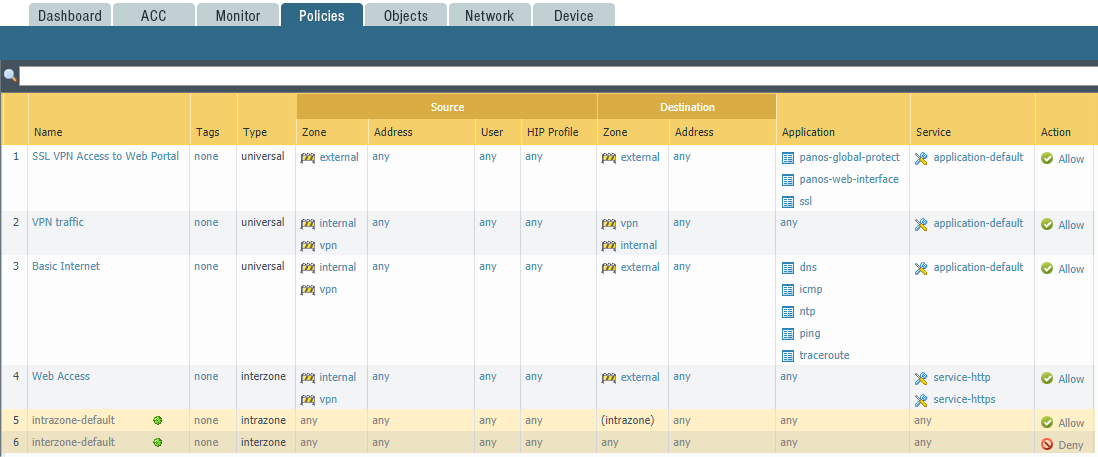
Figure 8 - An example of setting up network rules
To configure the NAT, use the Policies -> NAT section. An example of the NAT setup is shown in Figure 9.

Figure 9 - Example of NAT Setup
For any traffic from internal to external, you can change the source address to the external IP address of the firewall and use the dynamic port address (PAT).
4. Configure LDAP Authentication Profile and User Identification Functions
Before connecting users via SSL-VPN, you need to configure the authentication mechanism. In this example, authentication will take place on an Active Directory domain controller through the Palo Alto Networks web interface.

Figure 10 - LDAP Profile
In order for authentication to work, you need to configure the LDAP Profile and Authentication Profile . In the Device -> Server Profiles -> LDAP section (Figure 10), you need to specify the IP address and port of the domain controller, the type of LDAP and the user account of the Server Operators , Event Log Readers , Distributed COM Users groups. Then, in the Device -> Authentication Profile section, create an authentication profile (Fig. 11), mark the previously created LDAP Profile, and in the Advanced tab, specify the group of users (Fig. 12) that are allowed remote access. It is important to mark the User Domain parameter in the profile, otherwise group-based authorization will not work. The field must contain the NetBIOS domain name.
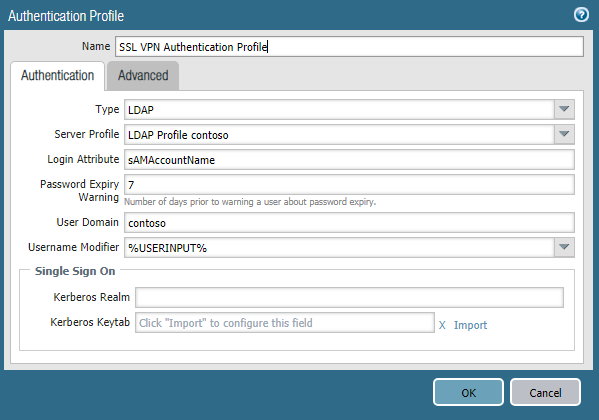
Figure 11 - Authentication Profile
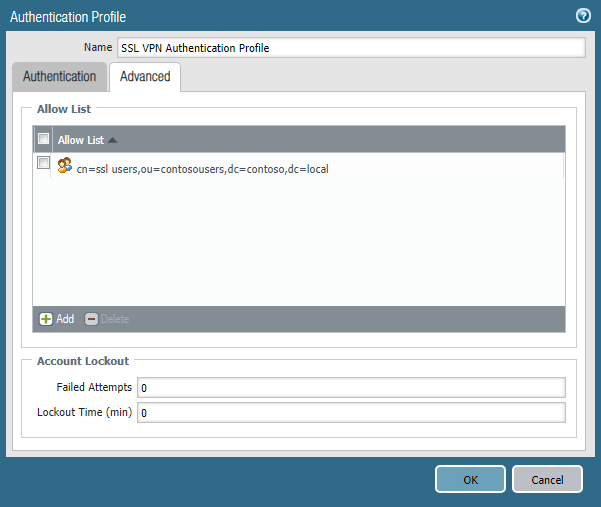
Figure 12 - Select AD group
The next step is to configure Device -> User Identification . Here you need to specify the IP address of the domain controller, the credentials for the connection, as well as configure the parameters Enable Security Log , Enable Session , Enable Probing (Fig. 13). In the Group Mapping section (Fig. 14), you need to note the identification parameters of objects in LDAP and the list of groups that will be used for authorization. As in the Authentication Profile, here you need to set the User Domain parameter.
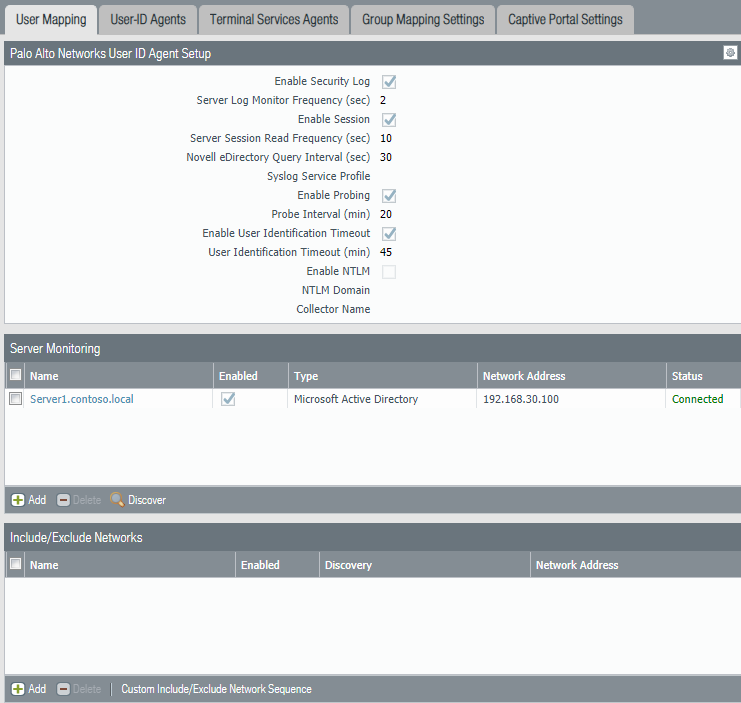
Figure 13 - User Mapping options
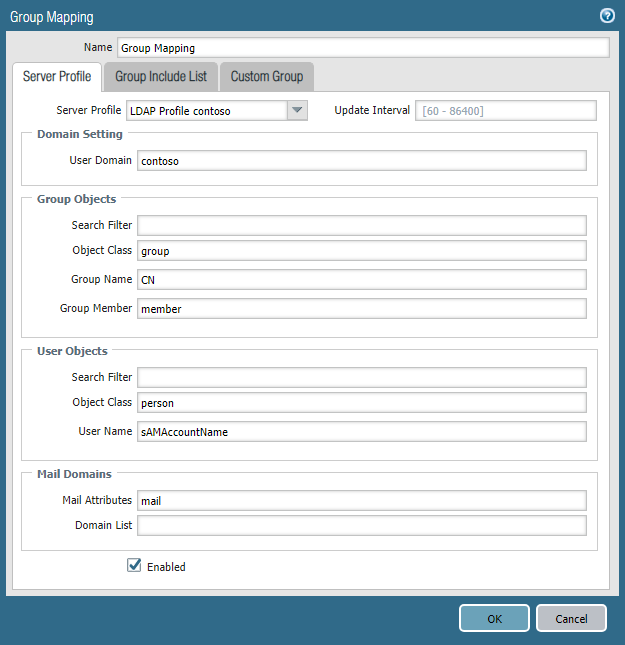
Figure 14 - Group Mapping Parameters
The last step at this stage will be the creation of a VPN zone and an interface for this zone. On the interface, you must enable the Enable User Identification parameter (Fig. 15).
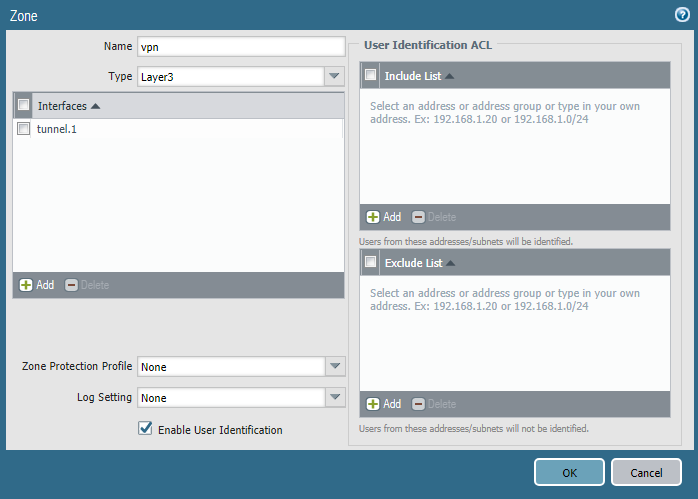
Figure 15 - Configure the VPN zone
5. Configure SSL VPN
Before connecting to an SSL VPN, a remote user must log into the web portal, authenticate and download the Global Protect client. Next, this client will request credentials and connect to the corporate network. The web portal works in https mode and, accordingly, it is necessary to install a certificate for it. Use a public certificate if available. Then the user will not be issued a warning about the invalidity of the certificate on the site. If it is not possible to use a public certificate, then you need to release your own, which will be used on the web page for https. It can be self-signed or issued through a local certificate authority. The remote computer must have a root or self-signed certificate in the list of trusted root centers so that the user is not given an error when connecting to the web portal. In this example, a certificate issued through an Active Directory Certificate Services certificate will be used.
To issue a certificate, you need to create a certificate request in the section Device -> Certificate Management -> Certificates -> Generate . In the request, we indicate the name of the certificate and the IP address or FQDN of the web portal (Fig. 16). After generating the request, download the .csr file and copy its contents into the certificate request field into the AD CS Web Enrollment web form. Depending on the configuration of the certificate authority, the certificate request must be approved and downloaded in Base64 Encoded Certificate format. Additionally, you need to download the certificate authority's root certificate. Then you need to import both certificates to the firewall. When importing a certificate for a web portal, you must select the request in the pending status and click import. The certificate name must match the name specified earlier in the request. The name of the root certificate can be specified arbitrarily. After importing the certificate, you need to create an SSL / TLS Service Profile in the Device -> Certificate Management section. In the profile, specify the previously imported certificate.
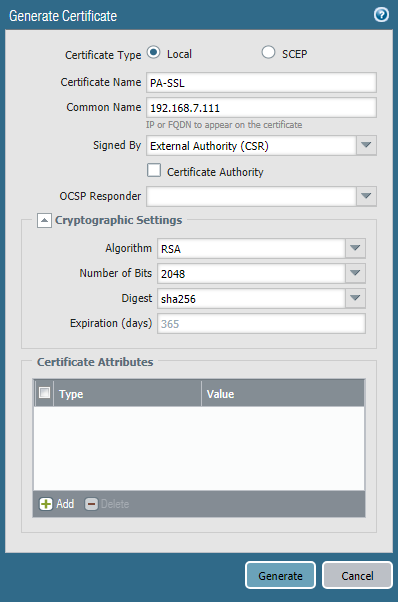
Figure 16 - Certificate Request
The next step is to configure the Global Protect Gateway and Global Protect Portal objects in the Network -> Global Protect section. In the settings of Glbal Protect Gateway, we specify the external IP address of the firewall, as well as the previously created SSL Profile , Authentication Profile , tunnel interface and client IP settings. You need to specify a pool of IP addresses from which the client’s address will be assigned, and the Access Route is the subnets to which the client’s route will be. If the task is to wrap all user traffic through the firewall, then you need to specify the subnet 0.0.0.0/0 (Fig. 17).
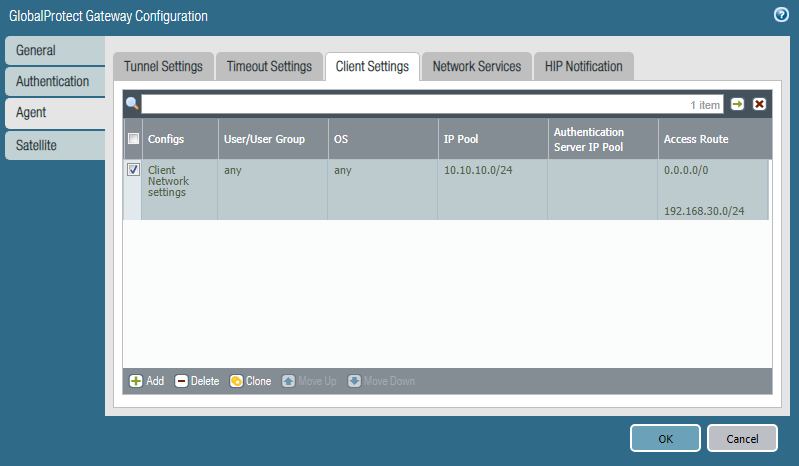
Figure 17 - Setting up a pool of IP addresses and routes
Then you need to configure the Global Protect Portal . Specify the IP address of the firewall, the SSL Profile and Authentication Profile and the list of external IP addresses of the firewalls to which the client will connect. If there are several firewalls, you can set a priority for each according to which users will choose a firewall to connect.
In the Device -> GlobalProtect Client section, you need to download the VPN client distribution kit from the Palo Alto Networks servers and activate it. To connect, the user must go to the portal web page, where he will be offered to download the GlobalProtect Client . After downloading and installation, you will be able to enter your credentials and connect to the corporate network via SSL VPN.
Conclusion
This completes the part of the Palo Alto Networks setup. We hope the information was useful, and the reader got an idea about the technologies used in Palo Alto Networks. If you have questions about customization and suggestions on topics for future articles - write them in the comments, we will be happy to answer.
Source: https://habr.com/ru/post/443726/
All Articles