Weather Station Arduino
Weather Station Arduino
I decided to write a detailed article describing all aspects of creating an Arduino meteorological station, since it is difficult to immediately cover the whole process. My performance of the weather station is convenient because its data is stored on a computer.
- local network built using a wifi router
- computer
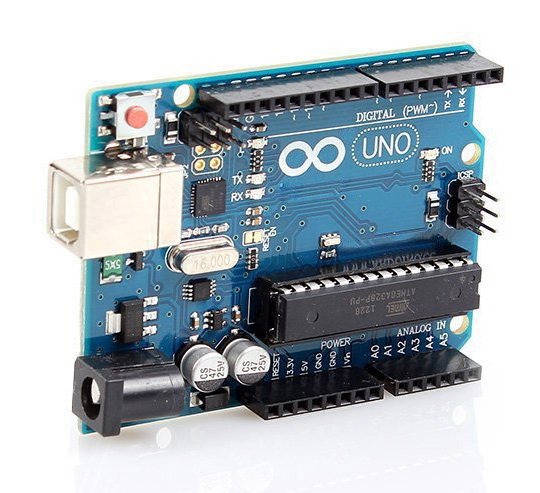 Arduino UNO (I used a Chinese replica.)
- USB cable, for connecting to Arduino.
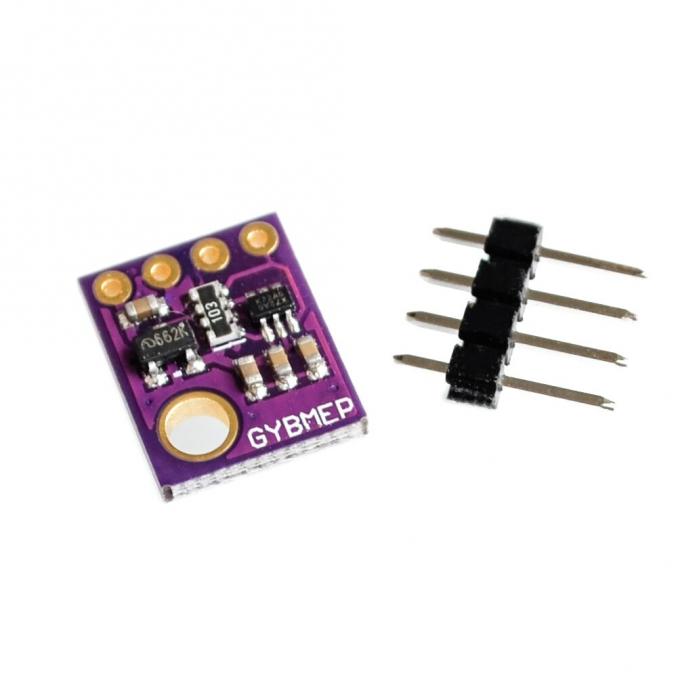 Barometer BME280 5V I2C (temperature, humidity, pressure sensor)
- soldering station with hairdryer
- solder 0.7 mm
- flux.
 Wi-Fi module ESP8266 version ESP-01
- 4 cables mom-dad for a breadboard.
- 4 papa dad cables for breadboard
- 4 cables 50 cm long for a breadboard.
- 8 thin shrinkable tubes of length 10 cm each.
- 1 large heat shrink tubing with a diameter such that it includes “4 cables 50 cm long for a breadboard” along with other heat shrink tubes
Network configuration
Every computer on the network must see the device on which the server is located. It is advisable to install the same work groups on all computers on the network.

Click to enlarge.
It should disable the bradmauzer and other firewalls.
In the network settings, in the properties of the wireless adapter, in the access account, put a tick at the beginning “allow other users access” and then click the settings;
in the settings we put all the checkboxes, instead of numbers you will see the names of the services.
Click to enlarge.

Click to enlarge.
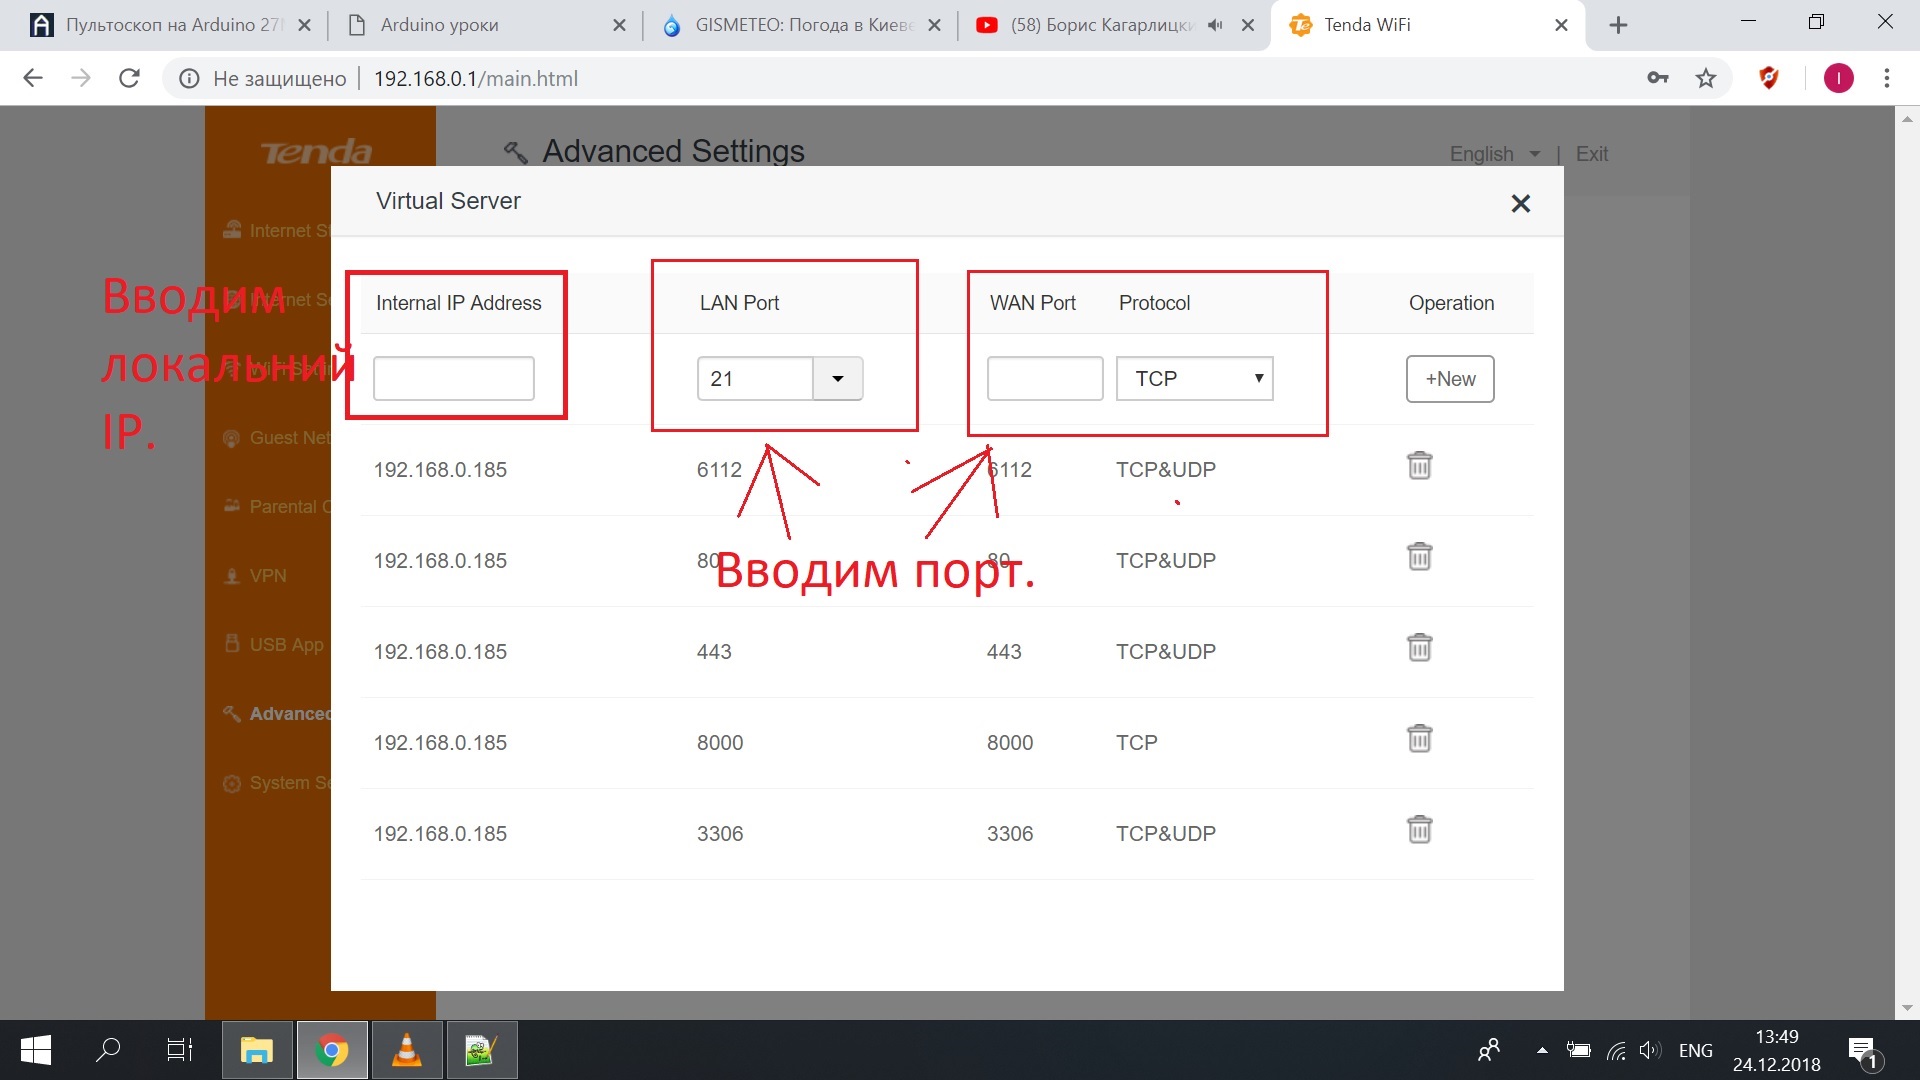
It is necessary to open port 80 and 3306 in the router. I will show with the example of the Tenda router: first, to find out your Local IP address , to do this, click on the wireless network icon. Next, in the opened panel, next to the name of your network, Properties will appear. After, scroll down.

Click to enlarge.
Next, open the web page of the router, I have it http://192.168.0.1 , enter the password from the router, click Advanched settings, then Virtal Server. Then enter Local IP first, and port 80. Then repeat the operation, but enter port 3306 .

Click to enlarge.
Click to enlarge.
We need the following components:
- Apache - data from the weather station will be sent here.
- PHP - will pick up data from the weather station, and save the database.
- Mysql is the database where the temperature will be saved, since only PHP cannot provide mapping for several computers and other devices.
- HeidiSQL - viewer and editor of the database (you can use any other, for example: "PhpMyAdmin").
I will not describe the Apache server setup in detail, there is a lot of information on the Internet. The main thing is to configure Apache and MySQL for visibility on the local network.
')
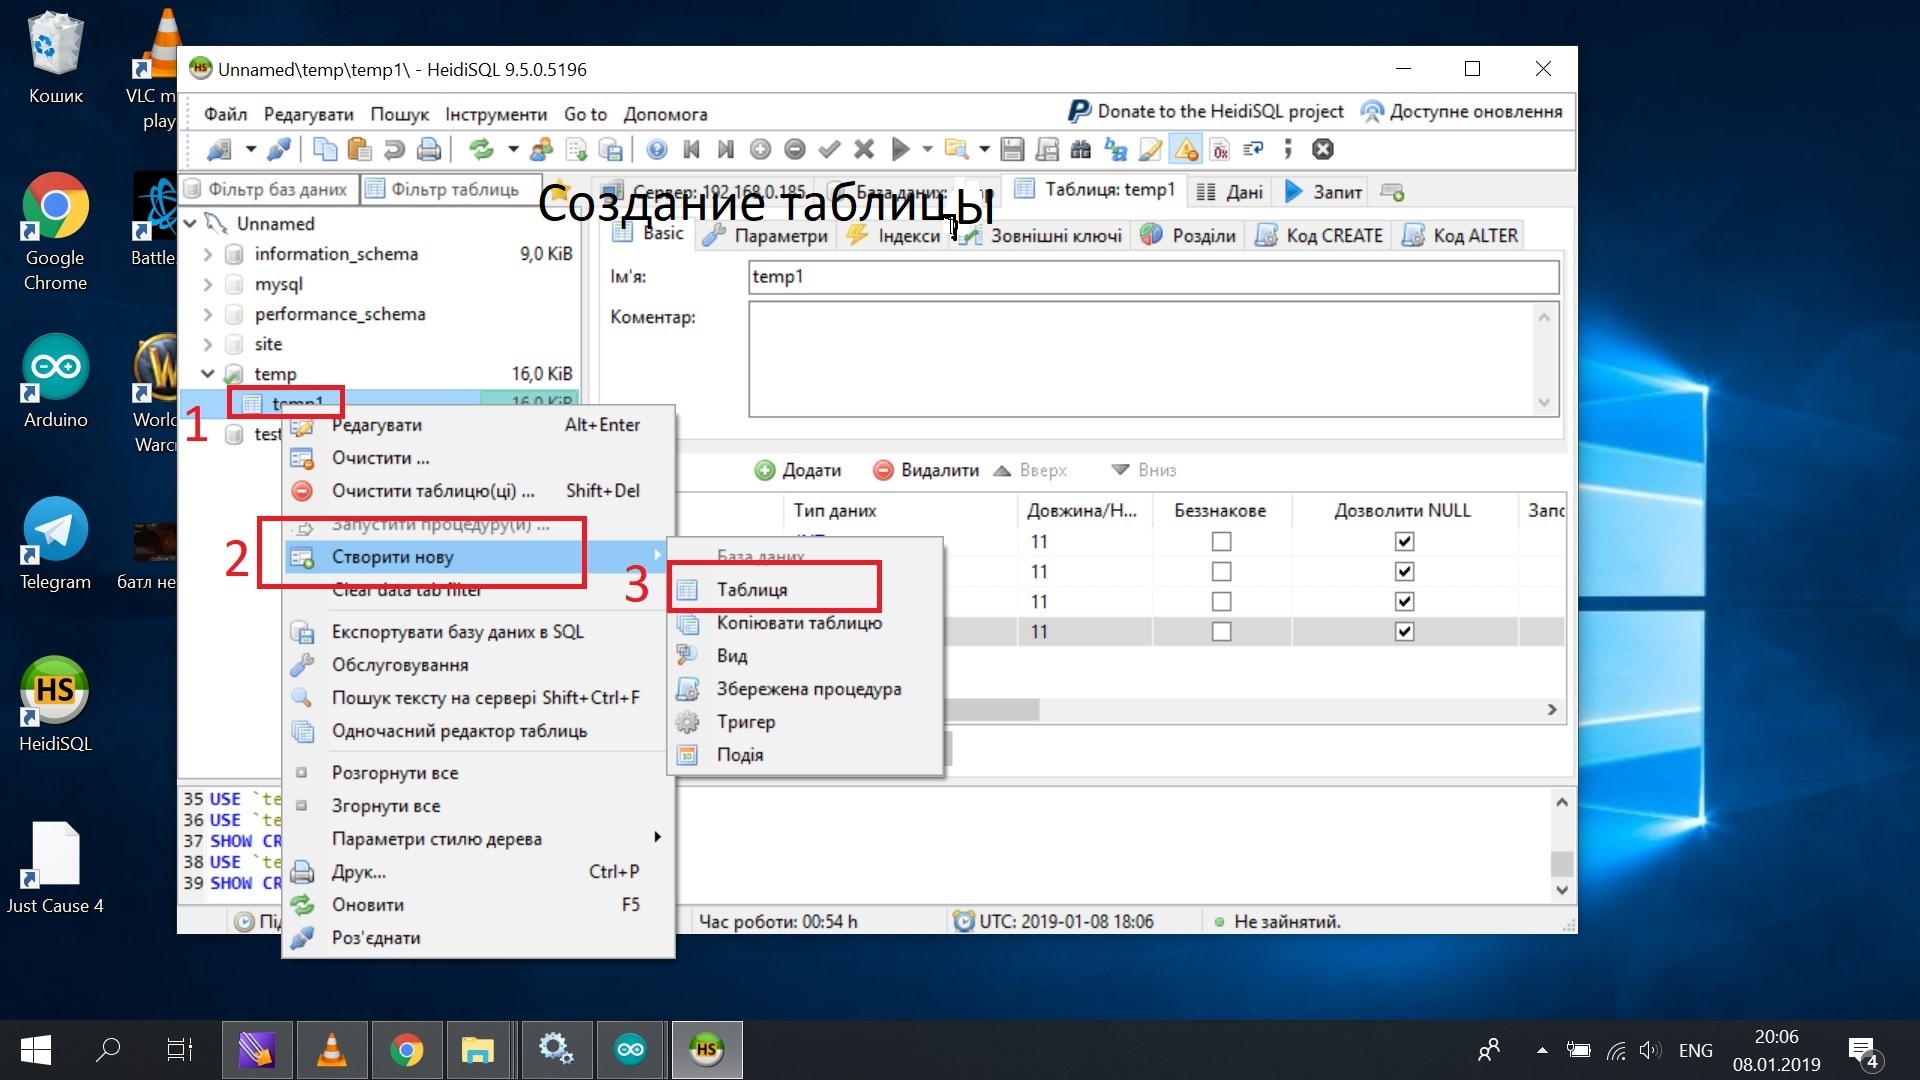
After that, create a table in the database - the temperature will be stored there.
An example of my handler page (sensor readings) on the server:
$link = mysqli_connect(" ", "root", " ", " "); if (!$link) { echo ": MySQL." . PHP_EOL; echo " errno: " . mysqli_connect_errno() . PHP_EOL; echo " error: " . mysqli_connect_error() . PHP_EOL; exit; } echo " MySQL !" . PHP_EOL; echo " : " . mysqli_get_host_info($link) . PHP_EOL; if(isset($_GET['temp'])){ $c=$_GET['temp']; $vlah=$_GET['vlah']; $davlen=$_GET['davlen']; $sql = "UPDATE `temp1` SET `C`='$c',`vlah`='$vlah',`davlen`='$davlen' WHERE `id`='1'";// mysqli_query($link,$sql); } echo"<br>"; $sql1="SELECT * FROM `temp1`";// $result = mysqli_query($link,$sql1); $row = mysqli_fetch_all($result,MYSQLI_NUM); echo " "; echo $row[count($row)-1][0]; echo " C"; echo"<br>"; echo " "; echo $row[count($row)-1][1]; echo "hPa"; echo"<br>"; echo " "; echo $row[count($row)-1][2]; echo "%"; 3. Configuring esp8266
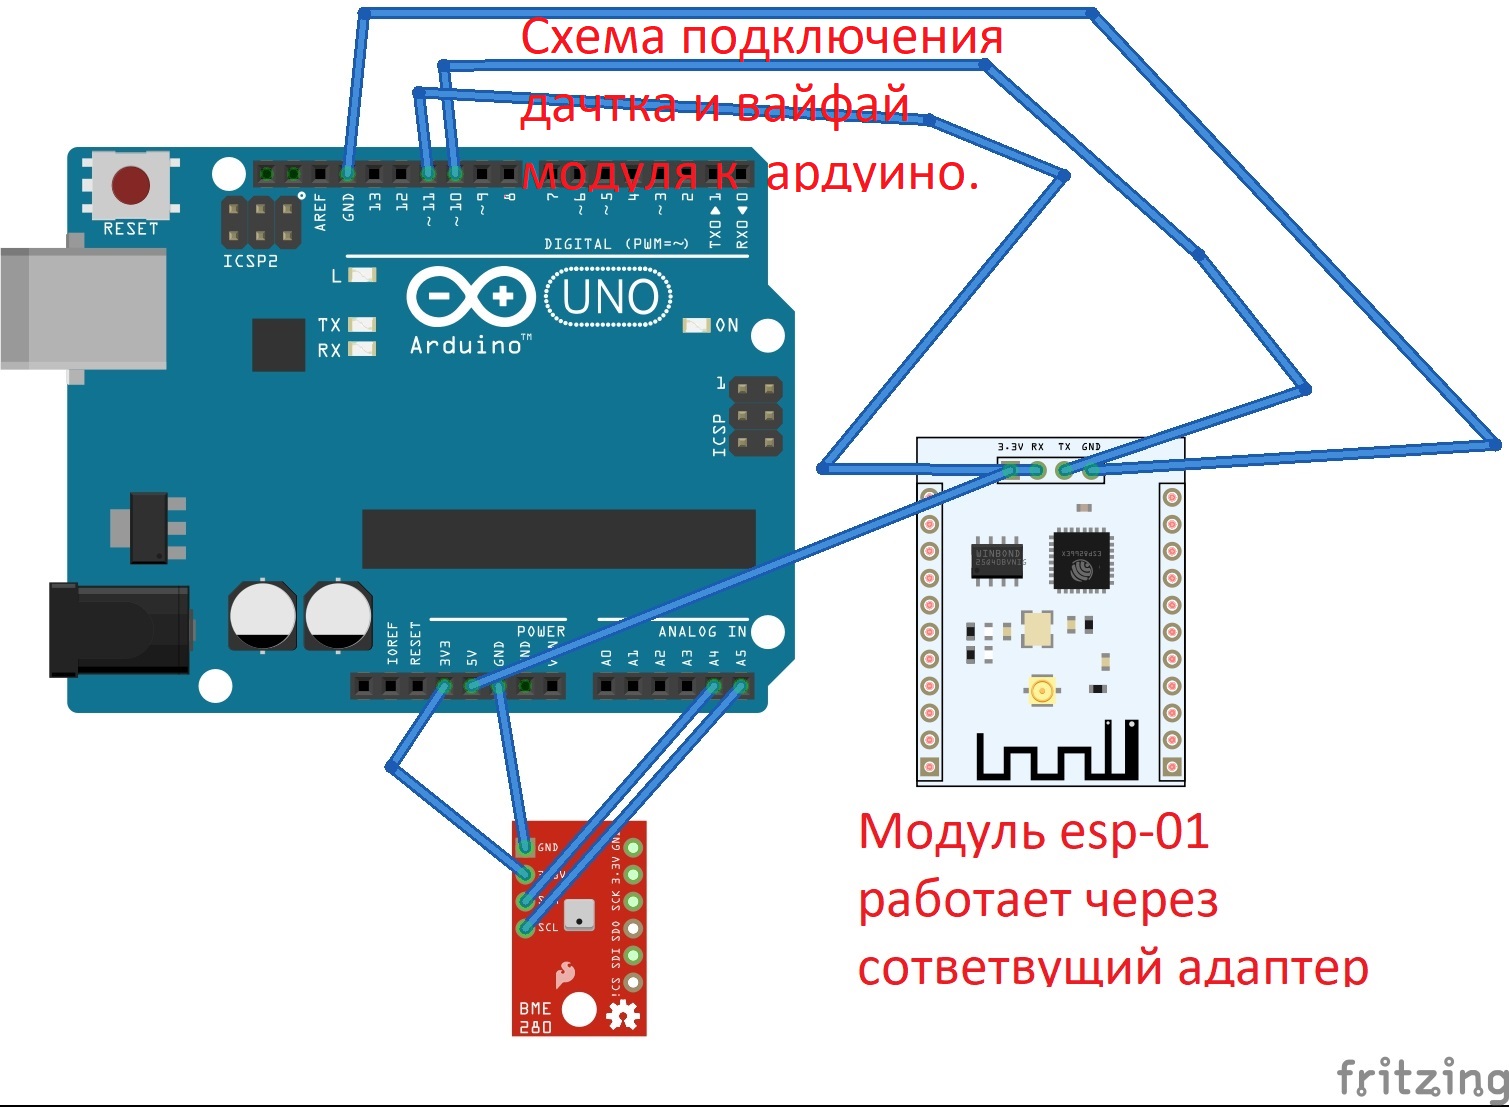
Connect the esp-01 to the adapter and connect it to the Arduino as follows: Rx-RX, TX-TX, GND-GND, VCC-5V ;
Ground the RESET Arduino port to GND ;

Connect the arduino to the computer, open the Arduino IDE , then the Serial Monitor . Then select the Rate 115200 , and
Both NL & CR .
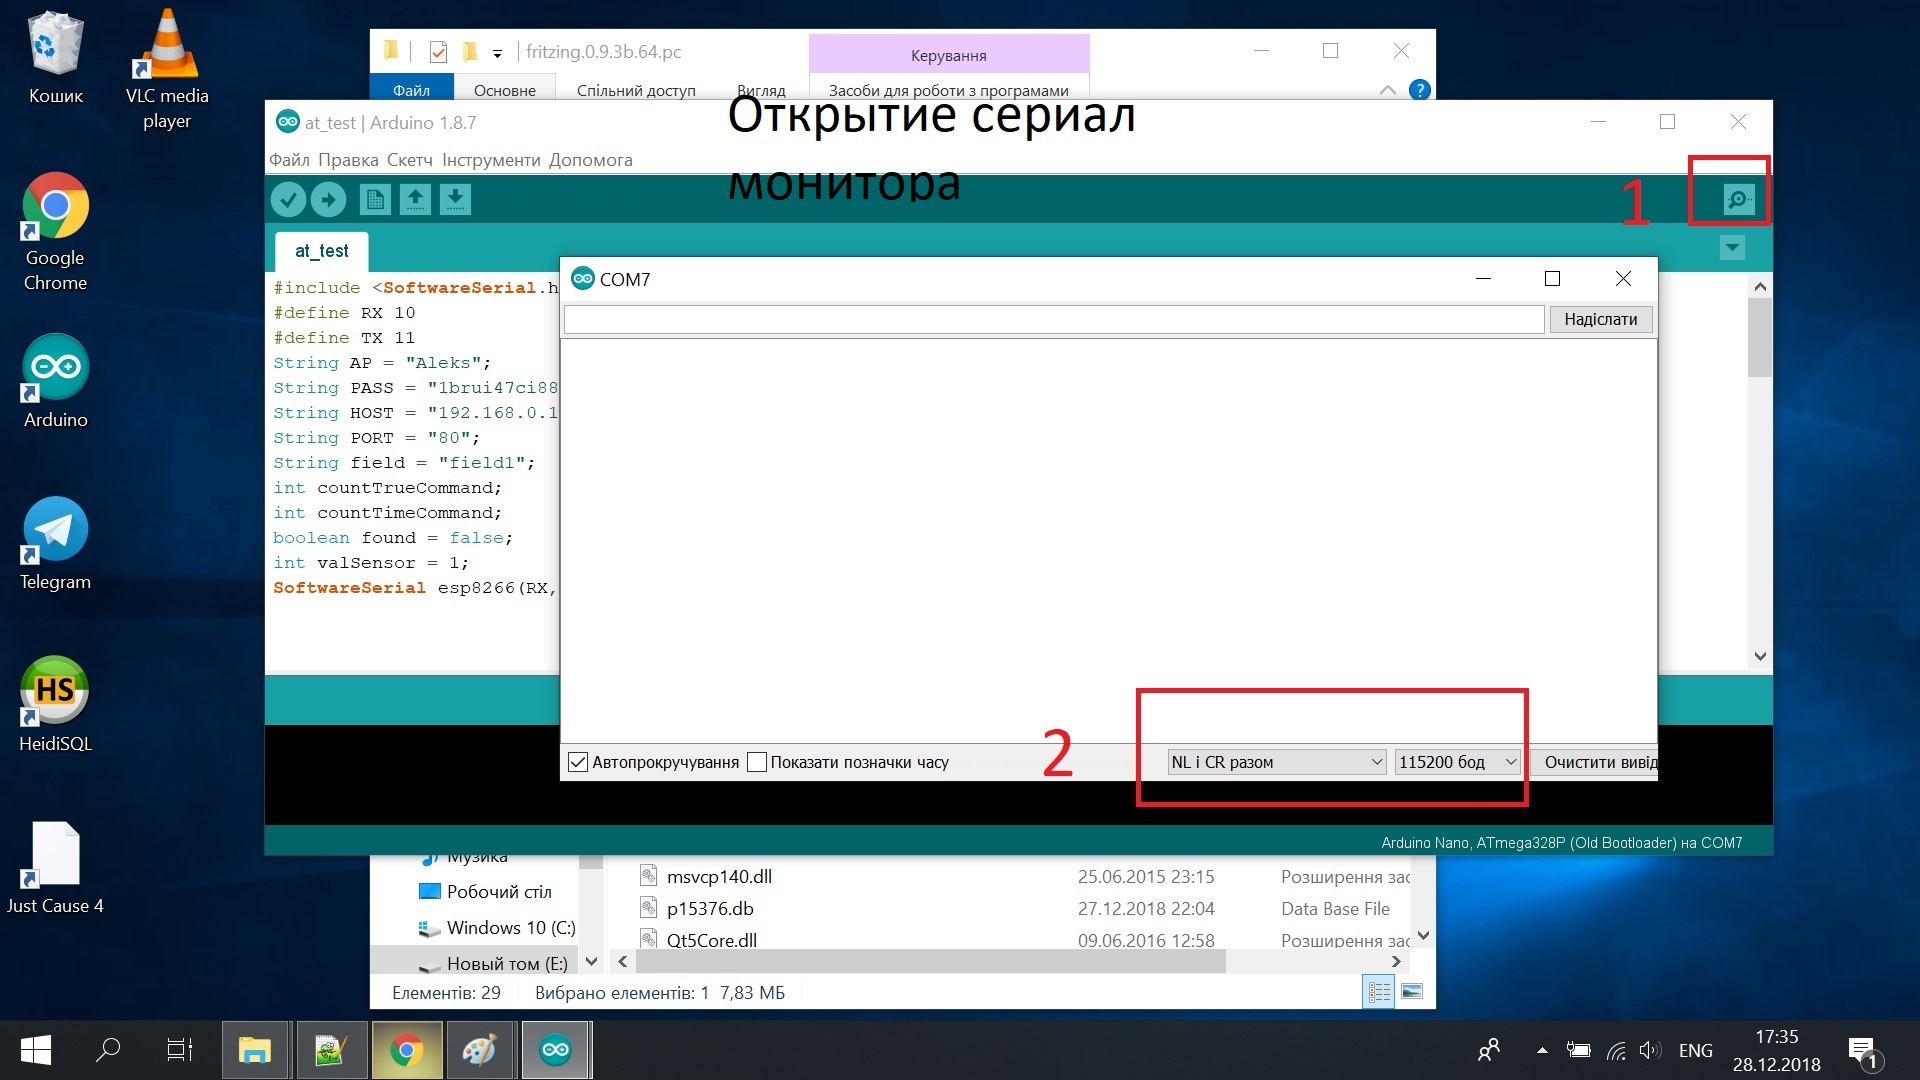
- Enter the AT command.
- Flashing OK .
- Enter AT + RESTORE , this will ask the module for factory settings.
- Enter AT + CWMODE_CUR = 1 , this puts the module in client mode.
- Enter AT + CWJAP_CUR = “Network_Name”, “Password” - connection to Wi-Fi .
- Flashing OK if a connection has occurred.
Bme280 setup and final build
Connect the pins according to the diagram (attention is shown on the diagram esp8266 without an adapter, but in reality it must be connected to an adapter, and already from
Adapter 4 outputs have the same function as shown in the diagram. )
Open the Arduino IDE and paste the following code:
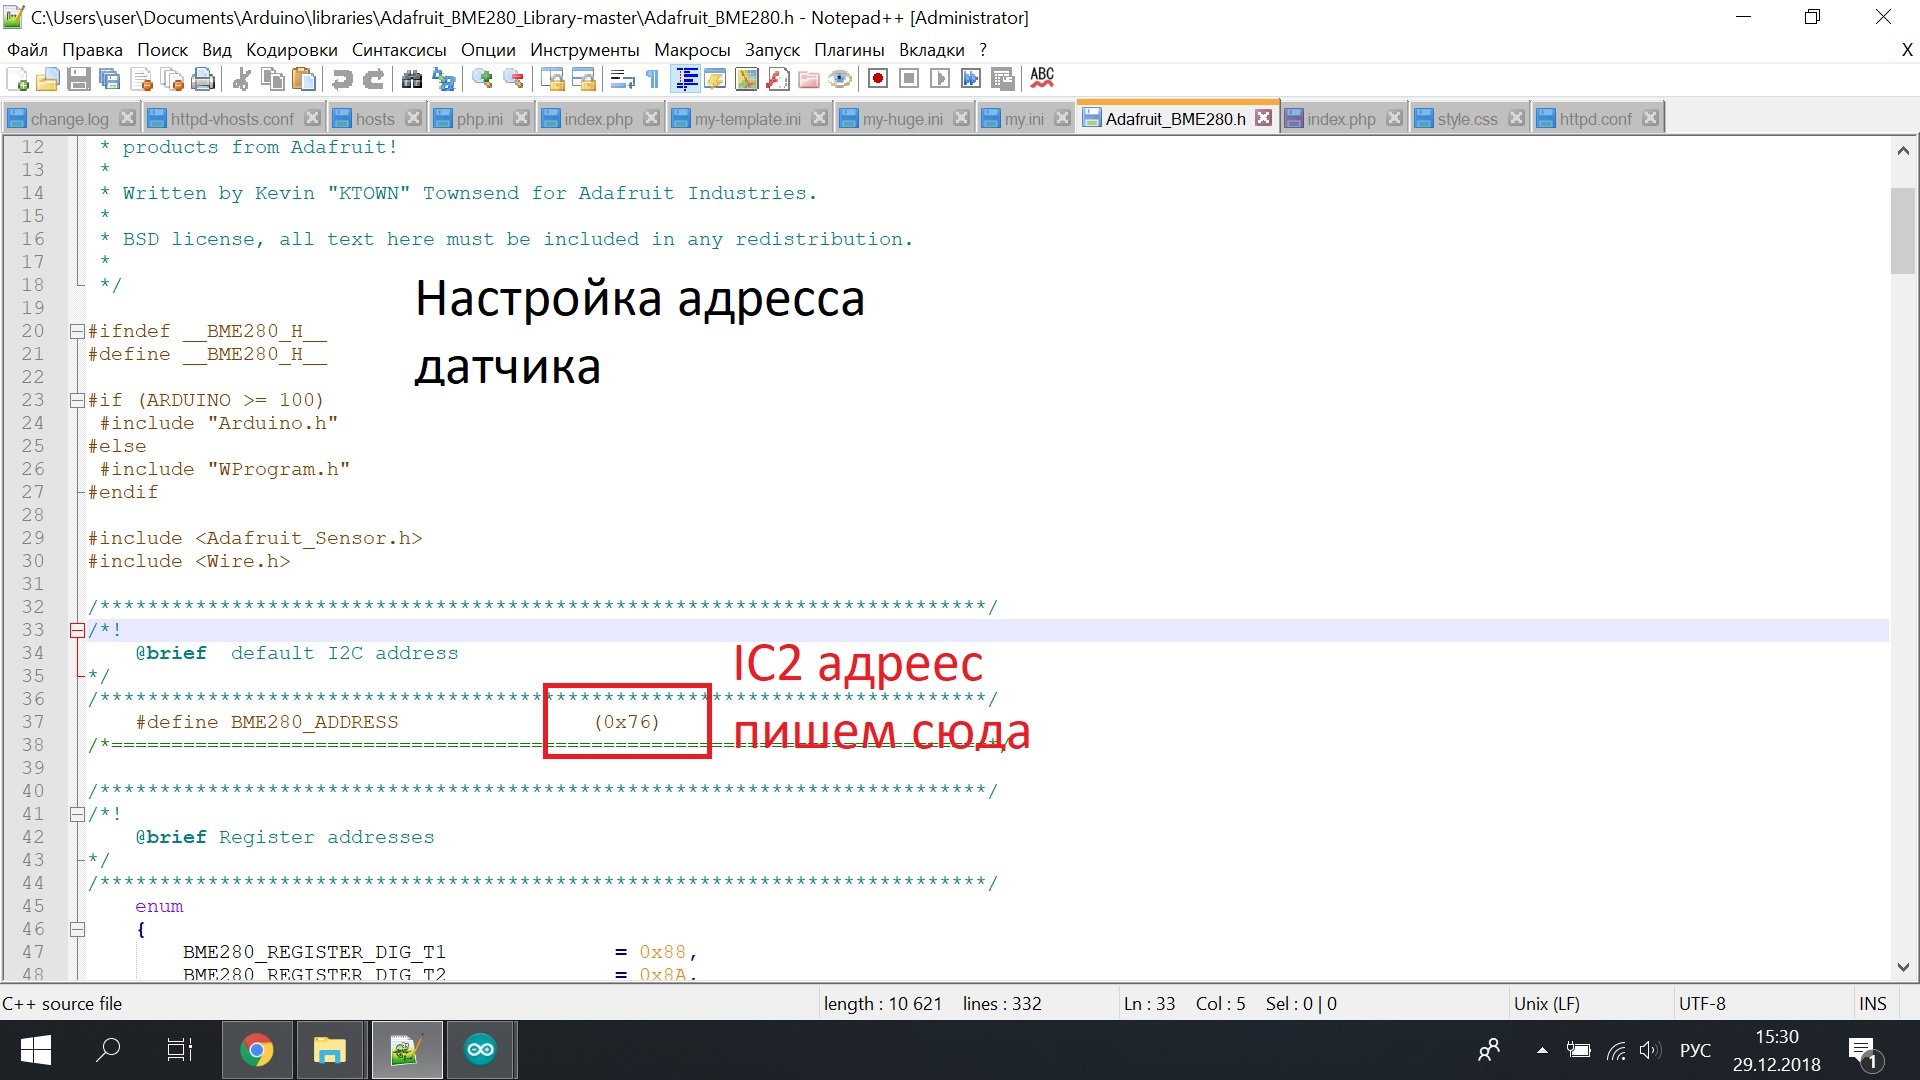
#include <Wire.h> void setup(){ Wire.begin(); Serial.begin(9600); while (!Serial); Serial.println("\nI2C Scanner"); } void loop(){ byte error, address; int nDevices; Serial.println("Scanning..."); nDevices = 0; for(address = 8; address < 127; address++ ){ Wire.beginTransmission(address); error = Wire.endTransmission(); if (error == 0){ Serial.print("I2C device found at address 0x"); if (address<16) Serial.print("0"); Serial.print(address,HEX); Serial.println(" !"); nDevices++; } else if (error==4) { Serial.print("Unknow error at address 0x"); if (address<16) Serial.print("0"); Serial.println(address,HEX); } } if (nDevices == 0) Serial.println("No I2C devices found\n"); else Serial.println("done\n"); delay(5000); Open Serial Monitor , and remember the highlighted IC2 adress.
Download Libraries Library Sensor , Touch Library and unpack them in C: \ Users \ user \ Documents \ Arduino . Open up
C: \ Users \ user \ Documents \ Arduino \ libraries \ Adafruit_BME280_Library-master and change the address:
Open the Arduino IDE and place the code:
#include <SoftwareSerial.h> #define RX 10// esp8266 #define TX 11// esp8266 String AP = "Aleks"; // String PASS = "1brui47ci881"; // String HOST = "192.168.0.185";// String PORT = "80";// String field = "field1"; int countTrueCommand; int countTimeCommand; boolean found = false; int valSensor = 1; SoftwareSerial esp8266(RX,TX); #include <Wire.h> #include <SPI.h> #include <Adafruit_Sensor.h> #include <Adafruit_BME280.h> #define BME_SCK 13 #define BME_MISO 12 #define BME_MOSI 11 #define BME_CS 10 #define SEALEVELPRESSURE_HPA (1013.25) Adafruit_BME280 bme; // I2C //Adafruit_BME280 bme(BME_CS); // hardware SPI //Adafruit_BME280 bme(BME_CS, BME_MOSI, BME_MISO, BME_SCK); // software SPI unsigned long delayTime; void setup() { Serial.begin(9600); bool status; // default settings // (you can also pass in a Wire library object like &Wire2) status = bme.begin(); if (!status) { Serial.println("Could not find a valid BME280 sensor, check wiring!"); while (1); } esp8266.begin(115200); sendCommand("AT",5,"OK"); sendCommand("AT+CWMODE=1",5,"OK"); sendCommand("AT+CWJAP=\""+ AP +"\",\""+ PASS +"\"",20,"OK"); sendCommand("AT+CIPMUX=1",5,"OK"); } void loop() { float vlah=bme.readPressure() / 100.0F; sendCommand("AT+CIPSTART=0,\"TCP\",\""+ HOST +"\","+ PORT,15,"OK"); String cmd = "GET /?temp="+String(bme.readTemperature())+"&vlah="+String(vlah)+"&davlen="+String(bme.readHumidity())+" HTTP/1.1\r\nHost: 192.168.0.185\r\n\r\n";// GET ,temp,vlah,davlen . sendCommand("AT+CIPSEND=0," +String(cmd.length()+4),4,">"); esp8266.println(cmd);delay(1500);countTrueCommand++; sendCommand("AT+CIPCLOSE=0",5,"OK"); delay(100000); } void printValues() { Serial.print("Temperature = "); Serial.print(bme.readTemperature()); Serial.println(" *C"); Serial.print("Pressure = "); Serial.print(bme.readPressure() / 100.0F); Serial.println(" hPa"); Serial.print("Humidity = "); Serial.print(bme.readHumidity()); Serial.println(" %"); Serial.println(); } void sendCommand(String command, int maxTime, char readReplay[]) { Serial.print(countTrueCommand); Serial.print(". at command => "); Serial.print(command); Serial.print(" "); while(countTimeCommand < (maxTime*1)) { esp8266.println(command);//at+cipsend if(esp8266.find(readReplay))//ok { found = true; break; } countTimeCommand++; } if(found == true) { Serial.println("OYI"); countTrueCommand++; countTimeCommand = 0; } if(found == false) { Serial.println("Fail"); countTrueCommand = 0; countTimeCommand = 0; } found = false; } Is done. These temperatures are transmitted as variables to the database.
As you can see, my weather station requires a basic knowledge of web programming, but the result is worth it.
Source: https://habr.com/ru/post/443664/
All Articles