We write our network layer on Swift: a protocol-oriented approach
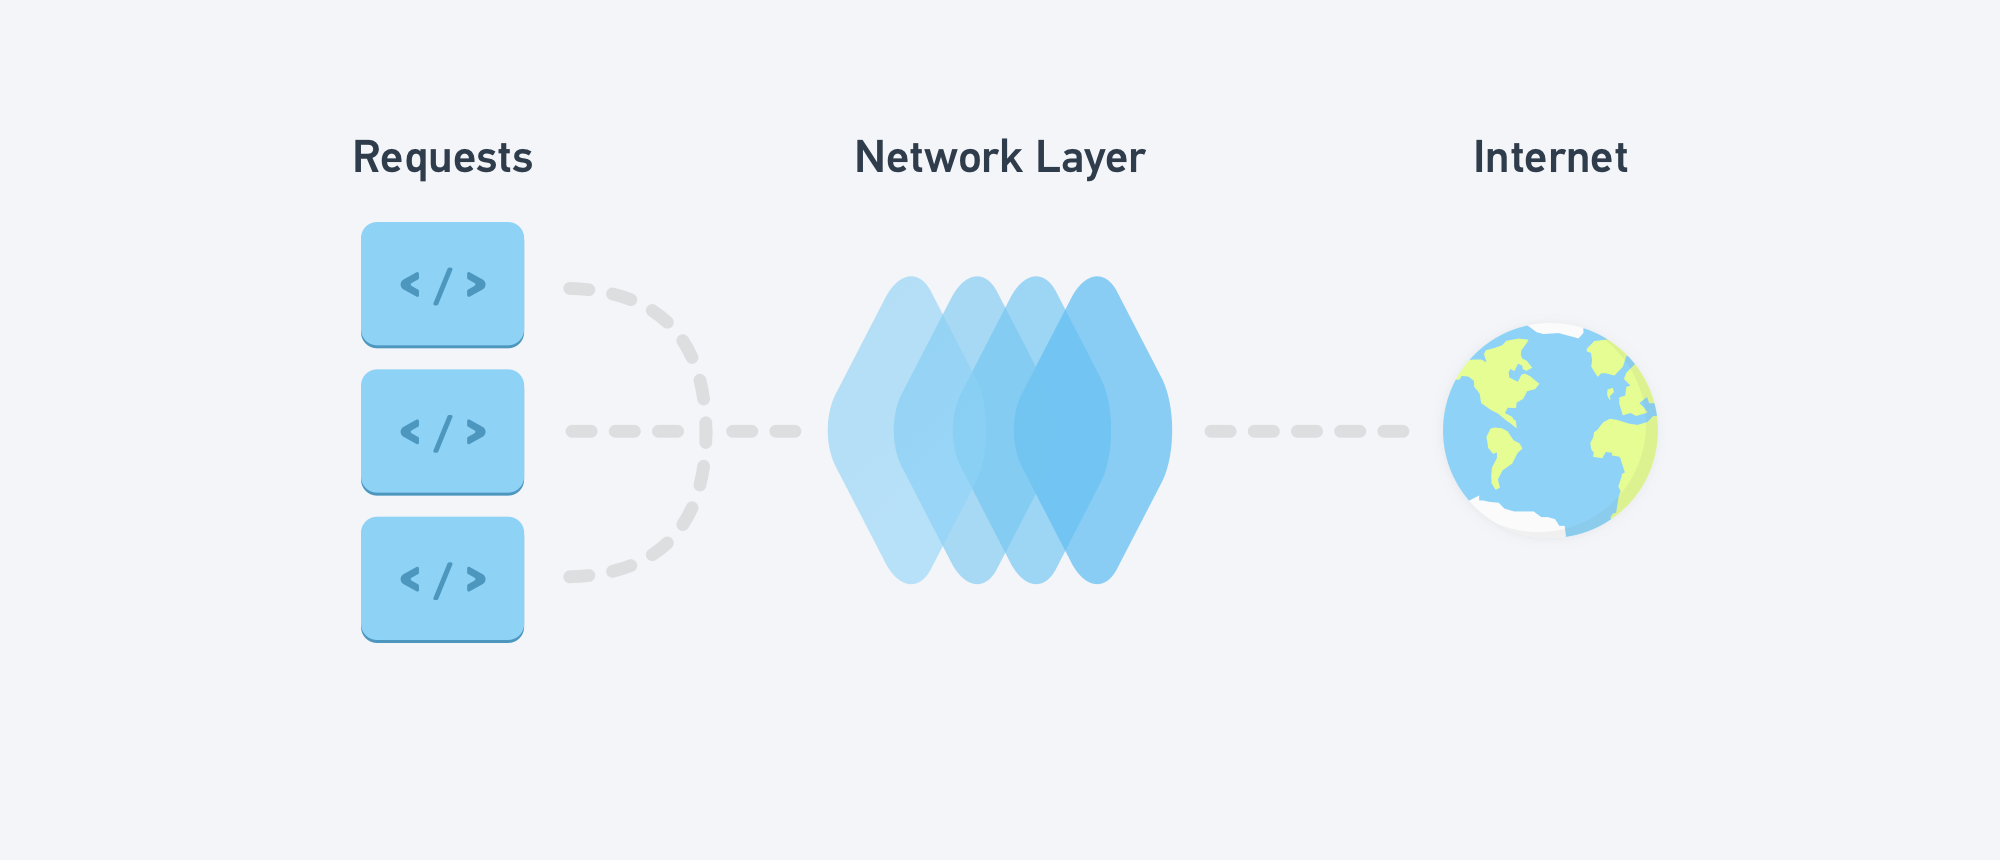
Now almost 100% of applications use networking, so the question of organizing and using the network layer arises before everyone. There are two main approaches to solving this problem, it is either the use of third-party libraries, or your own implementation of the network layer. In this article, we will look at the second option, and we will try to implement the network layer using all the latest features of the language, using protocols and enumerations. This will save the project from unnecessary dependencies in the form of additional libraries. Those who have ever seen Moya will immediately recognize many similar details in implementation and use, the way it is, only this time we will do everything with our own hands, without touching Moya and Alamofire.
In this guide, we will look at how to implement the network layer on pure Swift, without using any third-party libraries. After you get acquainted with this article, your code will be
')
- protocol-oriented
- easy to use
- easy to use
- type safe
- endpoints will use enumerations
Below is an example of how the use of our network layer will look like after its implementation:

By writing just router.request (. And using the full power of the enumerations, we will see all the variations of possible queries and their parameters.
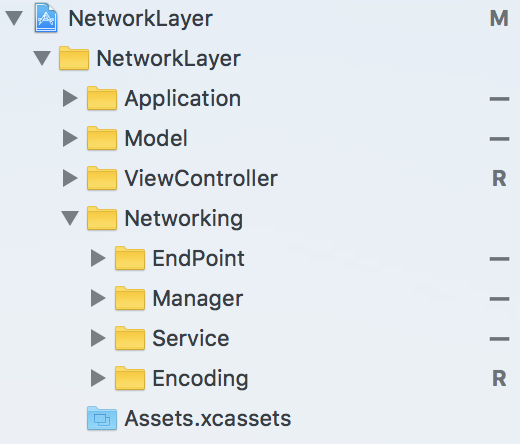
First, a little about the project structure
Whenever you create something new, and in order to be able to understand everything easily in the future, it is very important to organize and structure everything correctly. I adhere to the belief that a properly organized folder structure is an important detail when building an application architecture. In order for everything to be correctly arranged in folders, let's create them in advance. This is how the general folder structure in the project will look like:
EndPointType Protocol
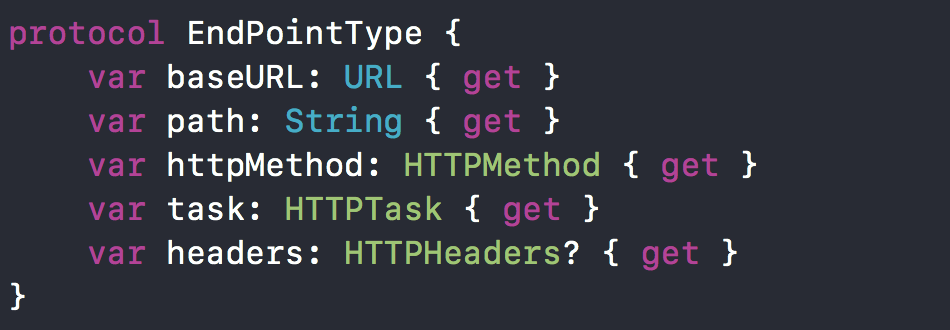
First of all, we need to define our EndPointType protocol. This protocol will contain all the necessary information for configuring the request. What is a request (endpoint)? In essence, this is a URLRequest with all related components, such as headers, request parameters, request body. The EndPointType protocol is the most important part of our network layer implementation. Let's create a file and name it EndPointType . Put this file in the Service folder (not in the EndPoint folder, why - it will be clear a little later)
HTTP Protocols
Our EndPointType contains several protocols that we need to create a request. Let's see what these protocols are.
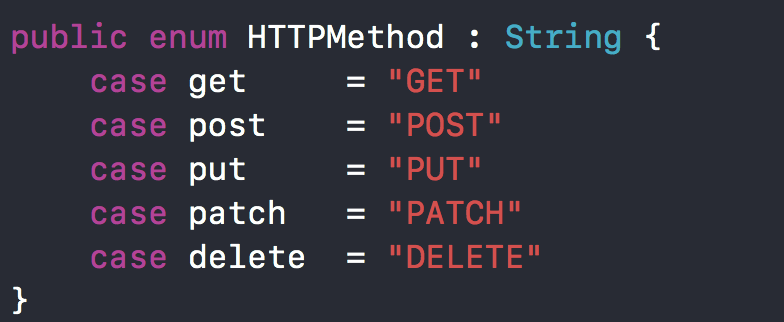
HTTPMethod
Create a file, name it HTTPMethod and place it in the Service folder. This enumeration will be used to set the HTTP method of our request.
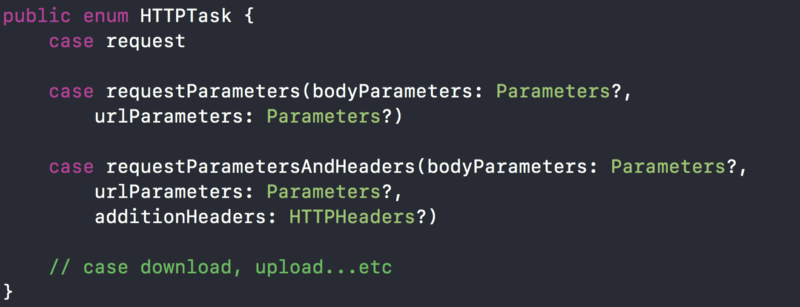
HTTPTask
Create a file, name it HTTPTask and place it in the Service folder. HTTPTask is responsible for configuring the parameters of a particular request. You can add as many different query options to it as you need, but I, in turn, am going to make regular queries, queries with parameters, queries with parameters and headers, so I will only make these three types of queries.
In the next section, we will discuss Parameters and how we will work with them.
Httpheaders
HTTPHeaders is just a typealias for a dictionary. You can create it at the top of your HTTPTask file.
public typealias HTTPHeaders = [String:String] Parameters & Encoding
Create a file, name it ParameterEncoding and place it in the Encoding folder. Create typealias for Parameters , this will again be a regular dictionary. We do this to make the code look clearer and readable.
public typealias Parameters = [String:Any] Next, we define the ParameterEncoder protocol with a single encode function. The encode method has two parameters: inout URLRequest and Parameters . INOUT is a keyword in Swift that defines a function parameter as a link. Typically, parameters are passed to the function as values. When you write inout before a function parameter in a call, you define this parameter as a reference type. To learn more about inout arguments, you can follow this link. If in brief, inout allows you to change the value of the variable itself, which was passed to the function, and not just to get its value in the parameter and work with it inside the function. ParameterEncoder protocol will be implemented in JSONParameterEncoder and in URLPameterEncoder .
public protocol ParameterEncoder { static func encode(urlRequest: inout URLRequest, with parameters: Parameters) throws } ParameterEncoder contains a single function whose task is to encode parameters. This method can produce an error that needs to be processed, so we use throw.
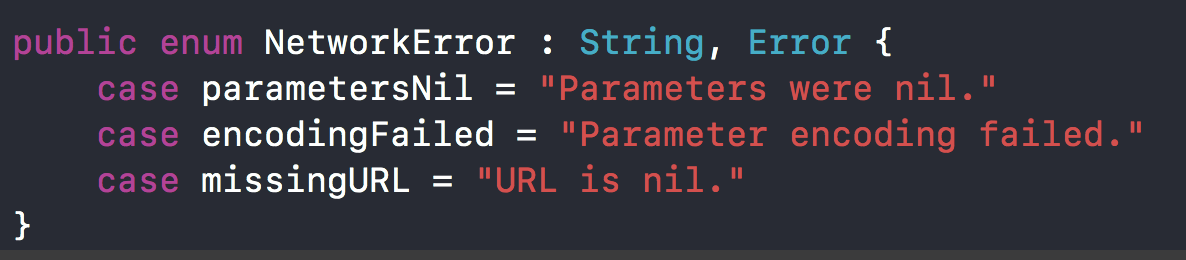
It may also be useful to produce not standard errors, but customized ones. It's always pretty hard to decipher what Xcode gives you. When you have all the errors customized and described, you always know exactly what happened. To do this, let's define an enumeration that inherits from Error .
Create a file, name it URLParameterEncoder and place it in the Encoding folder.
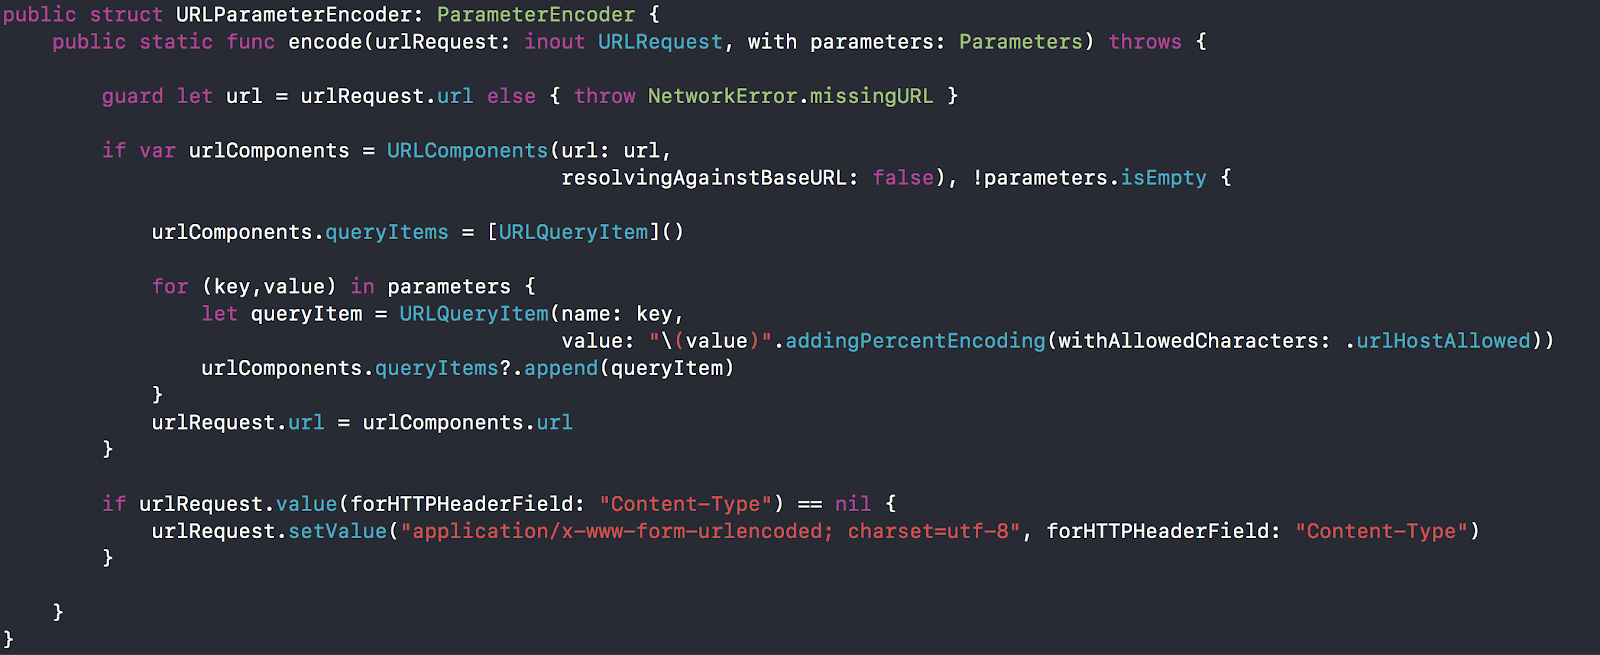
This code takes a list of parameters, converts and formats them for use as URL parameters. As you know, some characters are not allowed in the URL. Parameters are also separated by the "&" symbol, therefore we must take care of this. We also need to set the default value for headers if they are not set in the request.
This is the part of the code you intend to cover with unit tests Building a URL request is key, otherwise we can provoke many unnecessary errors. If you use an open API, you obviously do not want to use all possible requests for failed tests. If you have a desire to learn more about Unit tests, you can start with this article.
JSONParameterEncoder
Create a file, name it JSONParameterEncoder and place it in the Encoding folder.
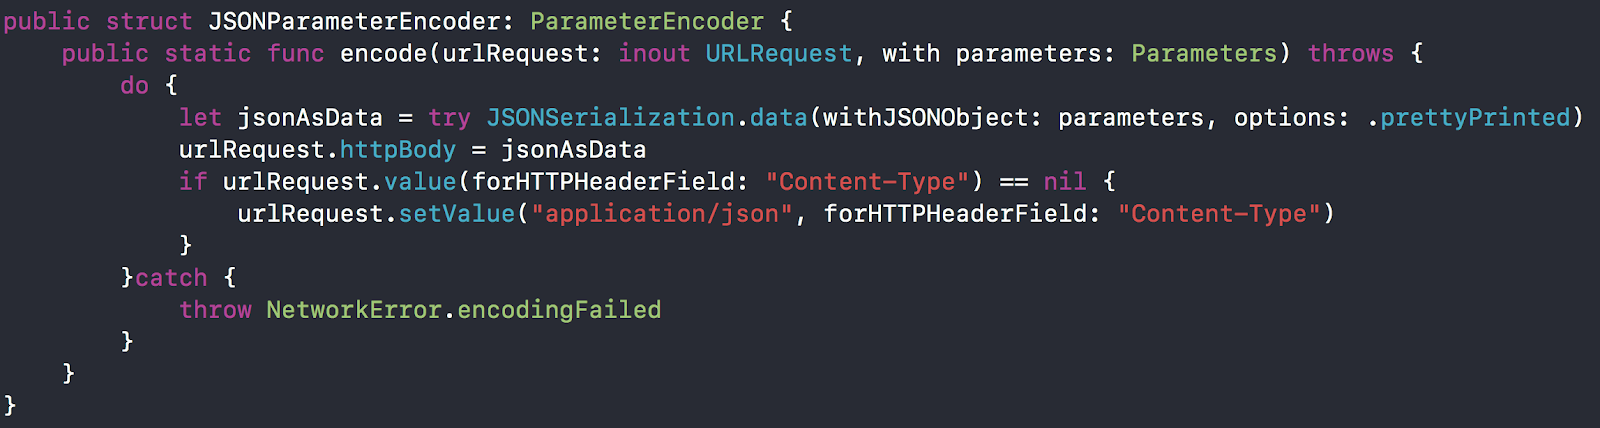
Everything is the same as in the case of URLParameter , here we simply convert the parameters for JSON and again add the parameters defining the “application / json” encoding into a header.
Networkrouter
Create a file, name it NetworkRouter and place it in the Service folder. We start by defining a typealias for closure.
public typealias NetworkRouterCompletion = (_ data: Data?,_ response: URLResponse?,_ error: Error?)->() Next, we define the NetworkRouter protocol.

NetworkRouter has EndPoint , which it uses for requests, and as soon as the request is completed, the result of this request is passed to the NetworkRouterCompletion closure. The protocol also has a cancel function that can be used to interrupt lengthy load and unload requests. We also used the associatedtype here because we want our Router to support any type of EndPointType . Without the associatedtype, the router would have to have some specific type implementing EndPointType . If you want to learn more about the associatedtype, you can read this article .
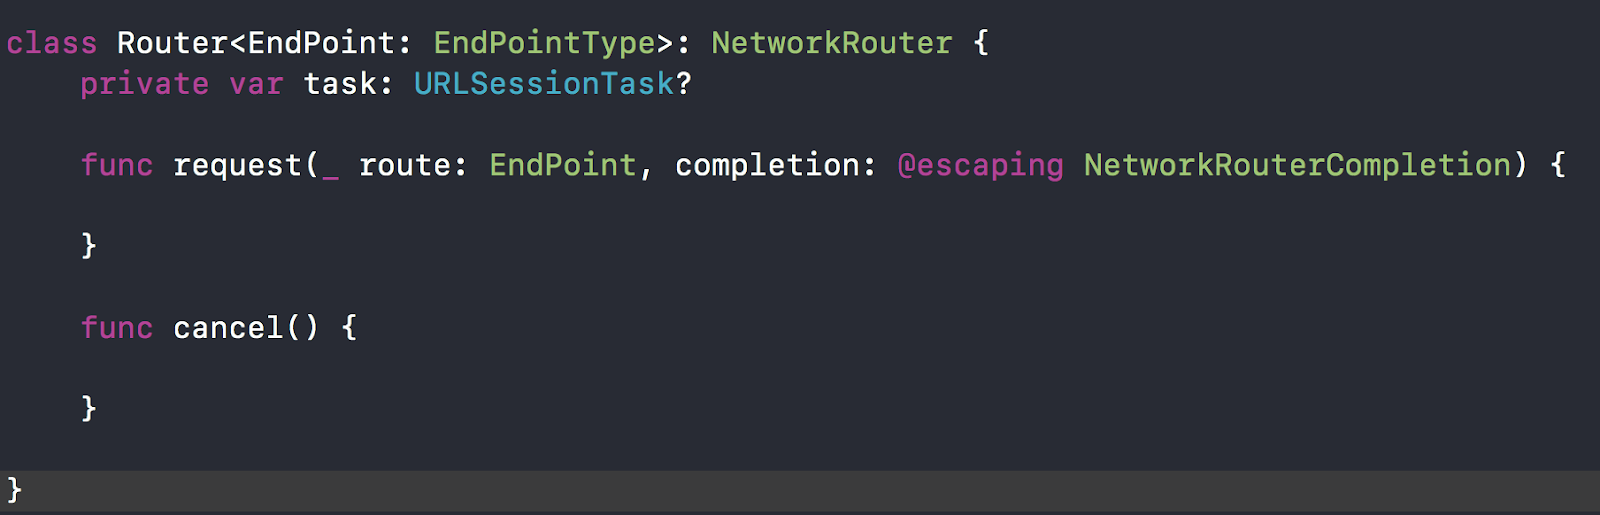
Router
Create a file, name it Router and place it in the Service folder. We declare a private variable of type URLSessionTask . All the work will be on it. We make it private, because we don’t want someone from outside to change it.
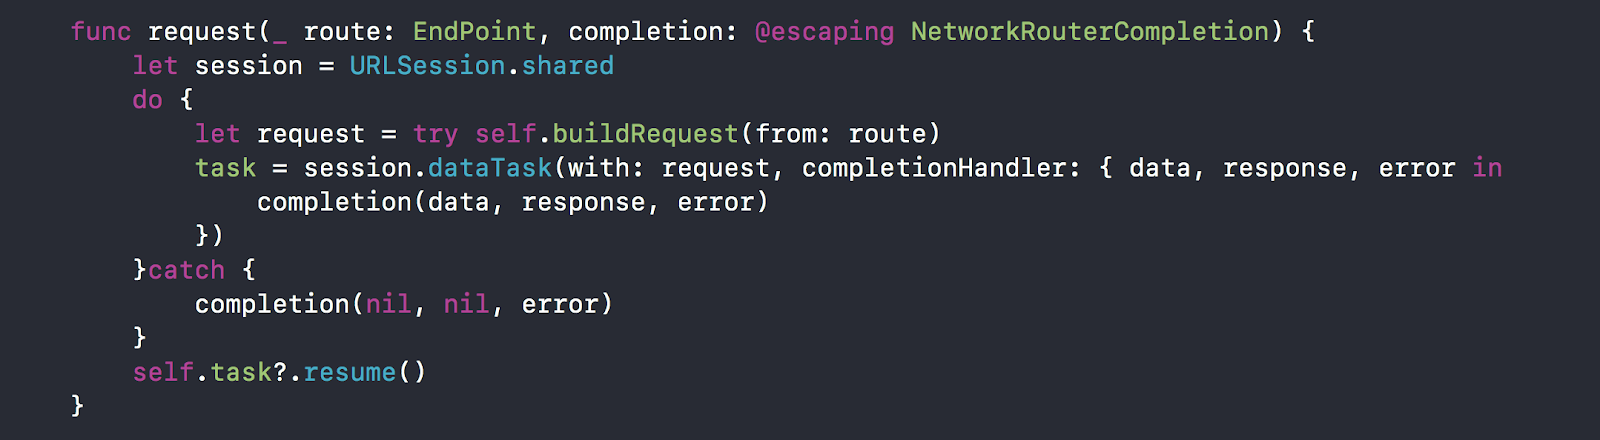
Request
Here we create URLSession using URLSession.shared , this is the easiest way to create. But remember that this method is not the only one. You can also use more complex URLSession configurations that can change its behavior. More on this in this article .
The request is created by calling the buildRequest function . The function call is wrapped in do-try-catch, because the encoding functions inside buildRequest can throw exceptions. In completion, the response , data, and error are transmitted.
Build request
We create our request using the buildRequest function. This function is responsible for all the vital work in our network layer. Essentially, converts EndPointType to URLRequest . And as soon as EndPoint is turned into a request, we can pass it to the session . There is a lot going on here, so let's break it down by methods. First we analyze the buildRequest method:
1. We initialize the URLRequest request variable. We set our base URL in it and add to it the path of a specific request to be used.
2. Assign the request.httpMethod http method from our EndPoint .
3. Create a do-try-catch block, because our encoders may generate an error. By creating one big do-try-catch block, we eliminate the need to create a separate block for each try.
4. In the switch, check route.task .
5. Depending on the type of task, call the appropriate encoder.

Configure Parameters
Create a configureParameters function in the Router.

This function is responsible for converting our request parameters. Since our API assumes the use of bodyParameters in the form of JSON and URLParameters converted to a URL format, we simply pass the corresponding parameters to the appropriate conversion functions that we described at the beginning of the article. If you are using an API that includes various types of encoding, then in this case I would recommend complementing HTTPTask with an additional listing with the encoding type. This listing should contain all possible types of encodings. After that, add another argument to the configureParameters with this enumeration. Depending on its value, switch with the help of switch and produce the necessary encoding.
Add Additional Headers
Create the addAdditionalHeaders function in the Router.

Just add all the necessary headers to the request.
Cancel
The cancel function will look pretty simple:

Usage example
Now let's try to use our network layer with a real example. We connect to TheMovieDB to get data for our application.
MovieEndPoint
Create a MovieEndPoint file and place it in the EndPoint folder. MovieEndPoint is the same as
and TargetType in Moya. Here we implement our own EndPointType instead. An article describing how to use Moya with a similar example can be found at this link .
import Foundation enum NetworkEnvironment { case qa case production case staging } public enum MovieApi { case recommended(id:Int) case popular(page:Int) case newMovies(page:Int) case video(id:Int) } extension MovieApi: EndPointType { var environmentBaseURL : String { switch NetworkManager.environment { case .production: return "https://api.themoviedb.org/3/movie/" case .qa: return "https://qa.themoviedb.org/3/movie/" case .staging: return "https://staging.themoviedb.org/3/movie/" } } var baseURL: URL { guard let url = URL(string: environmentBaseURL) else { fatalError("baseURL could not be configured.")} return url } var path: String { switch self { case .recommended(let id): return "\(id)/recommendations" case .popular: return "popular" case .newMovies: return "now_playing" case .video(let id): return "\(id)/videos" } } var httpMethod: HTTPMethod { return .get } var task: HTTPTask { switch self { case .newMovies(let page): return .requestParameters(bodyParameters: nil, urlParameters: ["page":page, "api_key":NetworkManager.MovieAPIKey]) default: return .request } } var headers: HTTPHeaders? { return nil } } MovieModel
To parse the MovieModel data model and JSON into the model, the Decodable protocol is used. Place this file in the Model folder.
Note : for a more detailed acquaintance with the Codable, Decodable and Encodable protocols, you can read my other article , which describes in detail all the features of working with them.
import Foundation struct MovieApiResponse { let page: Int let numberOfResults: Int let numberOfPages: Int let movies: [Movie] } extension MovieApiResponse: Decodable { private enum MovieApiResponseCodingKeys: String, CodingKey { case page case numberOfResults = "total_results" case numberOfPages = "total_pages" case movies = "results" } init(from decoder: Decoder) throws { let container = try decoder.container(keyedBy: MovieApiResponseCodingKeys.self) page = try container.decode(Int.self, forKey: .page) numberOfResults = try container.decode(Int.self, forKey: .numberOfResults) numberOfPages = try container.decode(Int.self, forKey: .numberOfPages) movies = try container.decode([Movie].self, forKey: .movies) } } struct Movie { let id: Int let posterPath: String let backdrop: String let title: String let releaseDate: String let rating: Double let overview: String } extension Movie: Decodable { enum MovieCodingKeys: String, CodingKey { case id case posterPath = "poster_path" case backdrop = "backdrop_path" case title case releaseDate = "release_date" case rating = "vote_average" case overview } init(from decoder: Decoder) throws { let movieContainer = try decoder.container(keyedBy: MovieCodingKeys.self) id = try movieContainer.decode(Int.self, forKey: .id) posterPath = try movieContainer.decode(String.self, forKey: .posterPath) backdrop = try movieContainer.decode(String.self, forKey: .backdrop) title = try movieContainer.decode(String.self, forKey: .title) releaseDate = try movieContainer.decode(String.self, forKey: .releaseDate) rating = try movieContainer.decode(Double.self, forKey: .rating) overview = try movieContainer.decode(String.self, forKey: .overview) } } Networkmanager
Create a NetworkManager file in the Manager folder. Currently NetworkManager contains only two static properties: an API key and an enumeration describing the type of server to connect to. NetworkManager also contains a Router , which is of type MovieApi .

Network response
Create a NetworkResponse enumeration in NetworkManager.
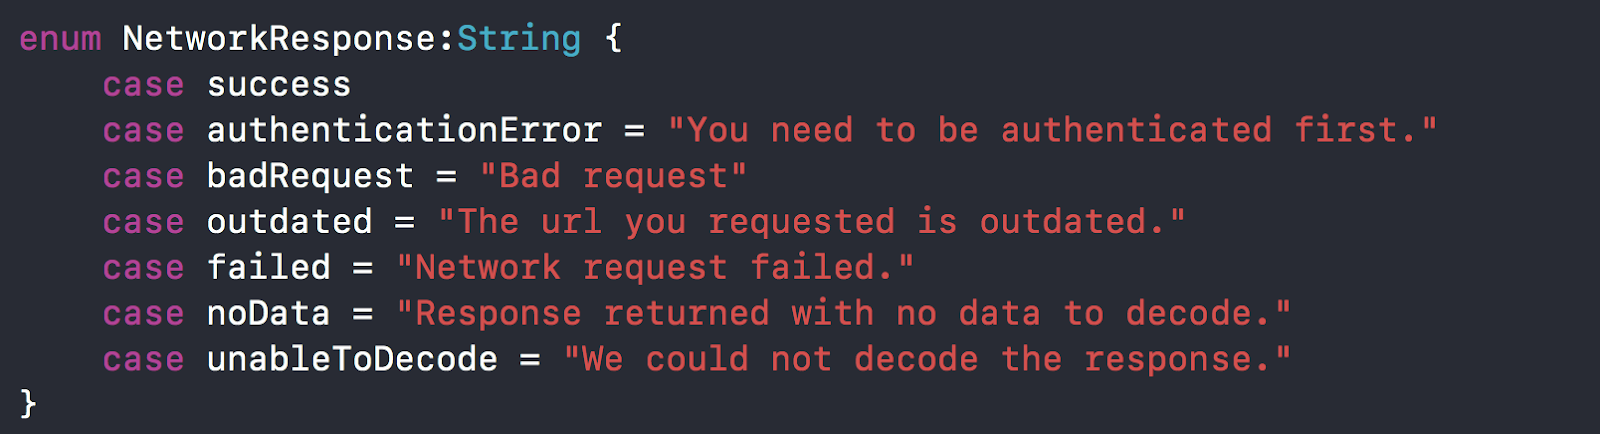
We use this enumeration when processing responses to requests and we will display a corresponding message.
Result
Create a Result enumeration in NetworkManager.
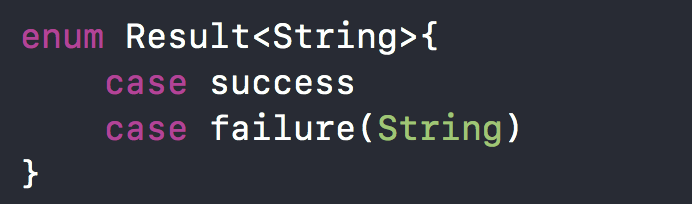
We use Result to determine if the request was successful, or not. If not, we will return an error message with the cause.
Processing responses to the request
Create the handleNetworkResponse function. This function takes one argument, such as HTTPResponse, and returns Result.
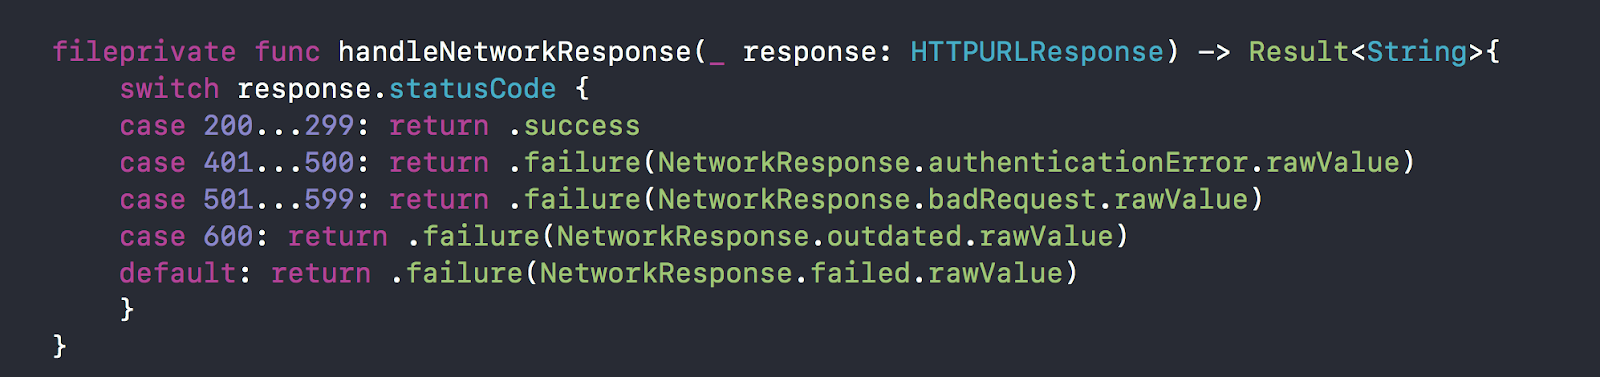
In this function, depending on the statusCode received from HTTPResponse, we return an error message, or a sign of a successful request. Typically, a code in the range of 200..299 means success.
Making a network request
So, we did everything to start using our network layer, let's try to make a request.
We will request a list of new films. Create a function and name it getNewMovies .
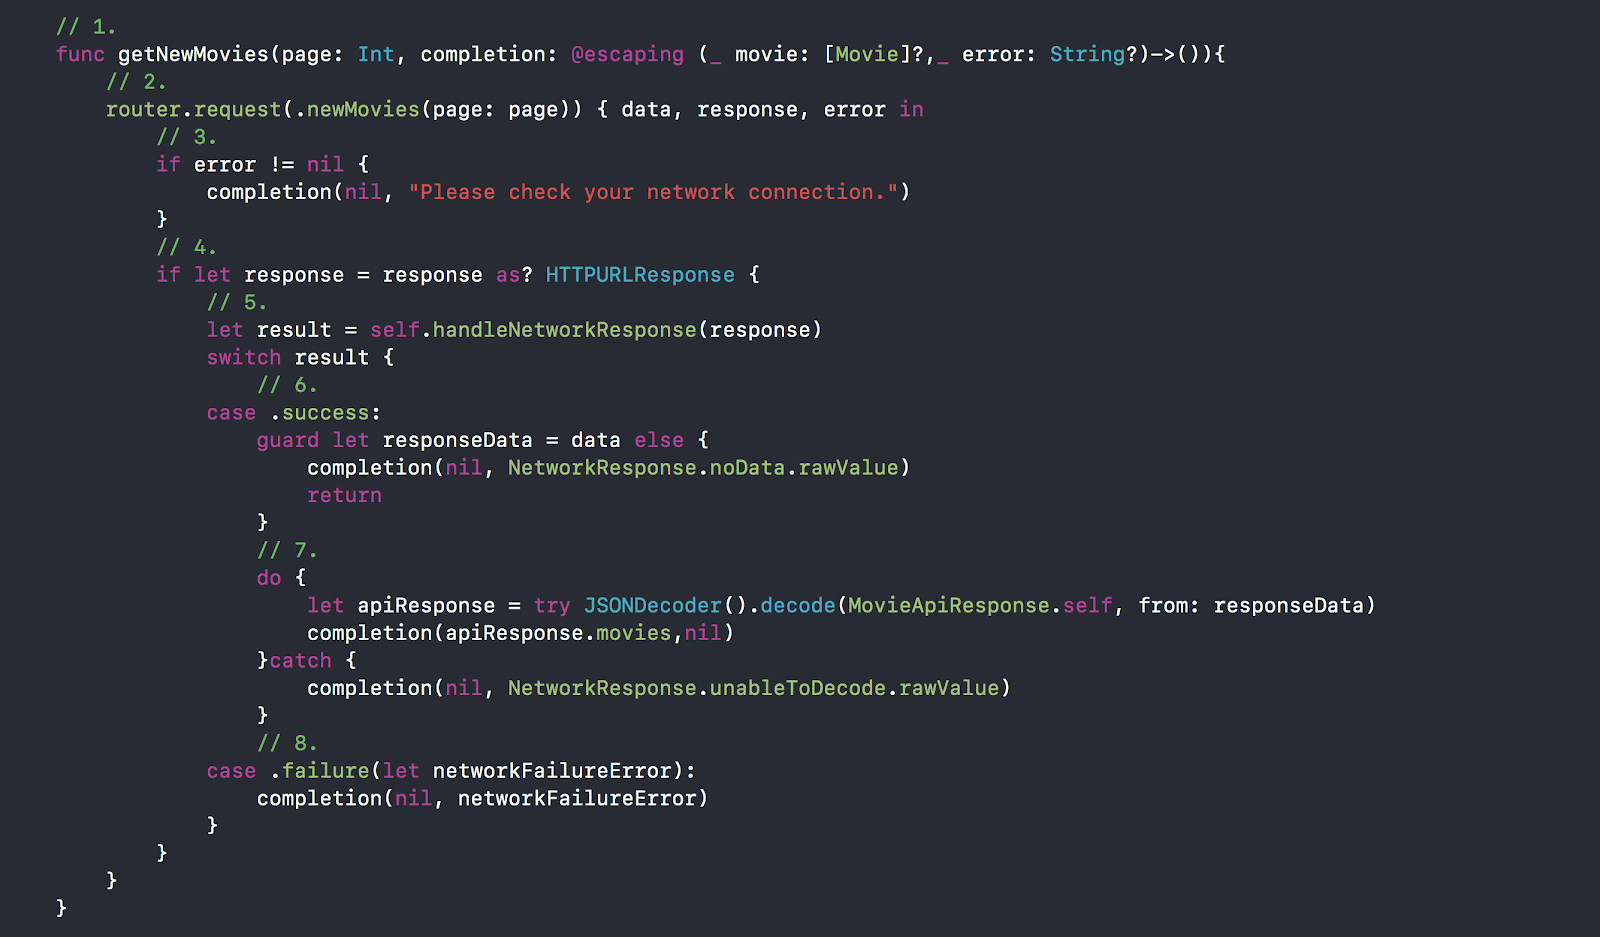
Let's take everything in steps:
1. We define the getNewMovies method with two arguments: the pagination page number and the completion handler, which returns an optional array of Movie models, or an optional error.
2. Call the Router . Pass the page number and process the completion in the closure.
3. URLSession returns an error if there is no network or it was not possible to make a request for any reason. Please note that this is not an API error, such errors occur on the client and usually occur due to the poor quality of the Internet connection.
4. We need to bring our response to an HTTPURLResponse , because we need to access the statusCode property.
5. Declare result and initialize it using the handleNetworkResponse method
6. Success means that the request was successful and we received the expected response. Then we check to see if the data came with the response, and if not, then just end the method with return.
7. If the answer comes with data, then it is necessary to parse the obtained data into the model. After that we transfer the received array of models to completion.
8. In case of an error, just pass the error to completion .
Everything, this is how our own network layer works on pure Swift, without using any dependencies in the form of third-party platforms and libraries. In order to make a test api-request to get a list of movies, create a MainViewController with the NetworkManager property and call the getNewMovies method through it.
class MainViewController: UIViewController { var networkManager: NetworkManager! init(networkManager: NetworkManager) { super.init(nibName: nil, bundle: nil) self.networkManager = networkManager } required init?(coder aDecoder: NSCoder) { fatalError("init(coder:) has not been implemented") } override func viewDidLoad() { super.viewDidLoad() view.backgroundColor = .green networkManager.getNewMovies(page: 1) { movies, error in if let error = error { print(error) } if let movies = movies { print(movies) } } } } Small bonus
Did you have a situation in Xcode when you did not understand what kind of placeholder is being used in a particular place? For example, take a look at the code that we have just written for Router .

We ourselves have defined NetworkRouterCompletion , but even in this case it is easy to forget what type it is and how to use it. But our favorite Xcode has taken care of everything, and it is enough just to make a doubleclick on the placeholder and Xcode will substitute the desired type.

Conclusion
Now we have an implementation of a protocol-oriented network layer, which is very easy to use and which can always be customized to fit your needs. We understood its functionality and how all mechanisms work.
Source code can be found in this repository .
Source: https://habr.com/ru/post/443514/
All Articles