Python & Arduino. Simple, fast and beautiful
Very often, beginners and not only developers have questions. How to manage with Arduino from a computer? And if the computer is not a Raspberry Pi, but an ordinary home computer? And if you do not want to suffer from ESP8266 and manage through the web interface? Is it really necessary to open the Arduino IDE each time and send commands via the Port Monitor ? I will tell you exactly how to create your own GUI application for managing Arduino.
I recently got a very interesting board: Arduino SS Micro . This board, which looks like a Digispark Attiny 85, is nevertheless a Chinese version of the Arduino Micro, with a USB output.

I will not talk about it in detail, because this was already done by a YouTube user with the nickname iomoio , and his review can be viewed here .
')
As it seems to me, this is a pretty cool and convenient device for small home projects, because wires have a super-property: to get lost at the most inappropriate moment.
MacBook Pro with macOS Mojave operating system was used as a control computer, but do not close the article if you are using Windows or Linux - everything described in the article will work without changes on any operating system.
As an example, we will use a sketch that turns on and off the LED, upon a command from the Serial-port.
WARNING
The LED in the Arduino SS Micro hangs on the SS port and therefore it turns off automatically. Despite this, the standard Blink example - the flashing LED is working.
If you use another Arduino - do not forget to change the pin of the LED.
One of the advantages of Python, in addition to its cross-platform - the presence of a huge number of libraries. We will need:
For installation, we will use the built-in package manager - pip.
For the convenience of creating a GUI, you can install the QTDesigner program.
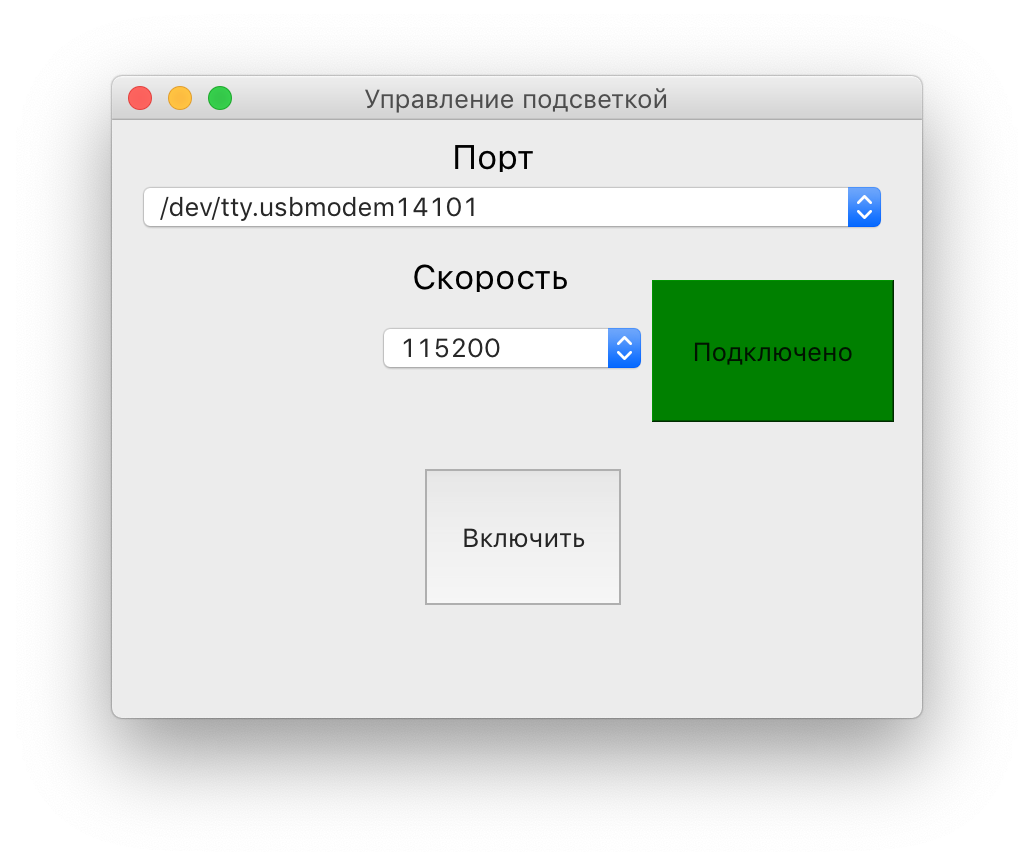
Since this program is intended more likely to demonstrate the capabilities, the user can select the port from those offered, as well as the speed with which the communication will occur.

All work with the device takes place thanks to the PySerial library. But there are a few nuances. For example, how to find out which port the device is connected to?
On the well-known stackoverflow site, a user with the nickname Thomas suggested a ready-made solution, which I used.
In addition, you must keep a list of available speeds:
Now let's put together the design (created in QtDesigner and converted using pyuic5 utility to .py file), functions for scanning ports and the main program code .
The main class that contains all the logic of the program
The variables self.Port and self.Speed are drop-down lists containing the values of the available ports and speeds.
When you click on the self.ConnectButton button, the connect function is called, in which you attempt to connect to the specified port with the specified speed. If the connection is successful, the button turns green and the label changes.
The send function sends a byte string to our port - forcing the flashing mode to be enabled.
In this way, you can control various devices connected to USB.
This article is an introductory and overview, more complete information can be found for example here:
The full source code, both a sketch for Arduino, and the program is posted on GitHub .
Equipment
I recently got a very interesting board: Arduino SS Micro . This board, which looks like a Digispark Attiny 85, is nevertheless a Chinese version of the Arduino Micro, with a USB output.
I will not talk about it in detail, because this was already done by a YouTube user with the nickname iomoio , and his review can be viewed here .
')
As it seems to me, this is a pretty cool and convenient device for small home projects, because wires have a super-property: to get lost at the most inappropriate moment.
MacBook Pro with macOS Mojave operating system was used as a control computer, but do not close the article if you are using Windows or Linux - everything described in the article will work without changes on any operating system.
Sketch for Arduino
As an example, we will use a sketch that turns on and off the LED, upon a command from the Serial-port.
WARNING
The LED in the Arduino SS Micro hangs on the SS port and therefore it turns off automatically. Despite this, the standard Blink example - the flashing LED is working.
char inChar; #define LED_PIN SS void setup() { pinMode(LED_PIN, OUTPUT); // Serial.begin(115200); // Serial - } void loop() { if (Serial.available() > 0) { inChar = Serial.read(); if (inChar=='e') // e - Enable - { digitalWrite(LED_PIN,HIGH); } } else if (inChar=='d') // d - Disable - { digitalWrite(LED_PIN,LOW); } else if (inChar=='b') // b - Blink - { while (true){ digitalWrite(LED_PIN,HIGH); delay(1000); digitalWrite(LED_PIN,LOW); delay(1000); } } } If you use another Arduino - do not forget to change the pin of the LED.
Code for computer
One of the advantages of Python, in addition to its cross-platform - the presence of a huge number of libraries. We will need:
- PySerial - library for working with Serial-port
- PyQT5 - a library for creating a graphical interface
Installation
For installation, we will use the built-in package manager - pip.
pip install pyserial pyqt5 For the convenience of creating a GUI, you can install the QTDesigner program.
Interface
Since this program is intended more likely to demonstrate the capabilities, the user can select the port from those offered, as well as the speed with which the communication will occur.
Source
All work with the device takes place thanks to the PySerial library. But there are a few nuances. For example, how to find out which port the device is connected to?
On the well-known stackoverflow site, a user with the nickname Thomas suggested a ready-made solution, which I used.
def serial_ports(): """ Lists serial port names :raises EnvironmentError: On unsupported or unknown platforms :returns: A list of the serial ports available on the system """ if sys.platform.startswith('win'): ports = ['COM%s' % (i + 1) for i in range(256)] elif sys.platform.startswith('linux') or sys.platform.startswith('cygwin'): # this excludes your current terminal "/dev/tty" ports = glob.glob('/dev/tty[A-Za-z]*') elif sys.platform.startswith('darwin'): ports = glob.glob('/dev/tty.*') else: raise EnvironmentError('Unsupported platform') result = [] for port in ports: try: s = serial.Serial(port) s.close() result.append(port) except (OSError, serial.SerialException): pass return result In addition, you must keep a list of available speeds:
speeds = ['1200','2400', '4800', '9600', '19200', '38400', '57600', '115200'] Now let's put together the design (created in QtDesigner and converted using pyuic5 utility to .py file), functions for scanning ports and the main program code .
The main class that contains all the logic of the program
class LedApp(QtWidgets.QMainWindow, design.Ui_Form): def __init__(self): super().__init__() self.setupUi(self) self.Port.addItems(serial_ports()) self.Speed.addItems(speeds) self.realport = None self.ConnectButton.clicked.connect(self.connect) self.EnableBtn.clicked.connect(self.send) def connect(self): try: self.realport = serial.Serial(self.Port.currentText(),int(self.Speed.currentText())) self.ConnectButton.setStyleSheet("background-color: green") self.ConnectButton.setText('') except Exception as e: print(e) def send(self): if self.realport: self.realport.write(b'b') The variables self.Port and self.Speed are drop-down lists containing the values of the available ports and speeds.
When you click on the self.ConnectButton button, the connect function is called, in which you attempt to connect to the specified port with the specified speed. If the connection is successful, the button turns green and the label changes.
The send function sends a byte string to our port - forcing the flashing mode to be enabled.
In this way, you can control various devices connected to USB.
This article is an introductory and overview, more complete information can be found for example here:
The full source code, both a sketch for Arduino, and the program is posted on GitHub .
Source: https://habr.com/ru/post/443326/
All Articles