Bad advice: how to write technical documentation? Part Three and Last
Tips on writing competent technical documentation for users.
Part 3 (final)
The conclusion of the manual of our technical writer Andrei Starovoytov , which will help to make your user documentation easier and more understandable.
')
This time we will examine in more detail:
Previous parts: our approach to documentation and localization; documenting tips part 1 and part 2 .
Conceptual topics (concept pages)
Such topics are needed to provide users with additional technical information and thus not to overload the task-topic.
Please note that they should be exactly additional information, but not the way to solve the problem.
Conceptual topics are good to use in order to:
For example, the topic “About Virtual Machines” may describe what it is and how it works. But in this topic there should not be instructions on how to create a virtual machine - this should be described in the task topic.
Thus, an experienced user, reading a task-topic, will not complain: "Why do you tell me what it is, I already know ...". And the one who does not know, will see the link to the conceptual topic and read.
Typically, conceptual topic headings begin with:
Here is an example of a conceptual topic from the English documentation:
Reference topics (reference pages) :
Such topics describe various background information that the user can refer to if necessary.
Good examples of such topics can be:
Here is an example of the topic, which describes the icons of the graphical interface:

Topics that describe how to solve any problem (troubleshooting pages)
Such topics help the user overcome an obstacle or solve a problem. A troubleshooting topic might have the following scenarios:
What is and is not a troubleshooting :
If the user wants to do something, but does not know how - it should be described not in troubleshooting, but in a task topic.
Troubleshooting means that the user tried to do something (according to the instructions of the task-topic), but some problem arose and the user does not know how to solve it.
For example, a topic that describes how to use an external disk in a guest operating system is a task topic.
And the topic that describes possible problems - “I cannot connect an external disk” (“I am connecting problems with a hard disk”) is a troubleshooting topic. Its content implies that the user followed the instructions, but for some reason he did not succeed.
If you are writing a task-topic, and a step in the instructions may cause slight difficulties, it is allowed to describe it in the same step or topic. For small difficulties, it is not necessary to write a separate troubleshooting topic.
For example, at the end of a topic that describes how to change shortcuts, you can add: “Some shortcuts cannot be edited or deleted” (“Some key combinations can't be edited or deleted”).
Troubleshooting Topics
Typically, troubleshooting topics have a structure similar to task topics.
They consist of:
Title (page title)
It is good when the troubleshooting header expresses the user's first-person problem. For example:
If you write documentation in English, you should use the title-style capitalization in the title (for capitalization, see the details at the end of the article):
Correct: My USB Device Isn't Working
Wrong: My USB device isn't working
Introduction
Immediately after the title, provide users with the information they need to know first and foremost.
For example:
Introductory phrase (step heading)
Before the sequence of steps to be taken to solve the problem, write the introductory phrase. Do not forget to put a colon at the end.
If the solution to the problem is a series of sequential actions:
In such cases, the introductory phrase should be done according to the same principles as for the task-topics (see the 2nd part of the tips), namely, use the same words as in the statement of the task.
For example, you write a troubleshooting topic that explains why the user cannot open the virtual machine configuration (the menu item is grayed out and inactive):
Title: “I can't open the Virtual Machine Settings”
Introduction: “If you cannot open the virtual machine settings (the menu item is grayed out), then the most likely reason is that the virtual machine is not turned off.”
Further, the introductory phrase: "To open the settings of the virtual machine:" (this phrase uses the same words as in the formulation of the task that must be performed)
And then the steps - 1) Make sure the machine is turned off. If it works, click there and there. 2) Then do this.
If the problem has several solutions:
In such cases, the introductory phrase should contain the words:
- “try these solutions”,
- “try the following” (“try the following”),
- “make sure” (“make sure that”), etc.
Here are some examples from English documentation:
Page Title: I Can't Activate Parallels Desktop
Task Covers: A list of things to check
Step Heading: If you're having trouble activating Parallels Desktop, make sure that ...
Page Title: Windows Seems Slow
Task Covers: A list of things to try
Step Heading: If Windows performance seems slow, try the following ...
Page Title: A Message Says “No Macs Connected”
Task Covers: Several things to check or try
Step Heading: In the list of Macs
Information needed to solve the problem (steps to solution)
This section includes everything that the user needs to know and / or undertake.
If there are several solutions:
In such cases, describe each method using bullets (this can be read in more detail in the second part of the tips). If any method is complicated, and you have already described it in detail in another topic, just give the link.
If what needs to be done is already described somewhere in another topic:
Just give a link to this topic.
If there is no specific instruction, what could be done to solve the problem:
Provide any additional information that can help the user to understand for himself what could be the cause of the problem.
Conclusion (outro)
In conclusion, you can provide additional information related to the task or possible solutions to the problem. More information about using outro can be found in the second part of the tips .
Using graphics (screenshots, diagrams, charts, etc.)
Screenshots and diagrams can help users understand much better what is written in the topic.
When to use graphics:
There is no need to insert a screenshot under each step - the user will simply not know where to look, constantly comparing the screen and the screenshot.
Screenshots should be inserted when they significantly help to understand what is written in the instructions.
For example:
Where and how to post graphics:
Below are a few recommendations on where and how to place graphics on the page.
1) If the screenshot reflects conceptual information or the result of the task, you can paste it in or after the intro.
Here is an example from the English documentation, which shows a topic describing the windowed mode of Windows. A screenshot that shows what will happen after such a switch is inserted after the introduction and just before the instruction how to switch to this mode:

2) If the screenshot refers to a specific step in the instructions, paste it after or inside this step:

If you need to insert a screenshot of a button, icon or another interface element, you need to insert it after the name of this element:

Do not use graphics to illustrate obvious things.
If specifically, do not use screenshots to illustrate:
Additional tips for writing documentation in English:
1) How to capitalize titles:
capital style Three styles of capitalization are available: sentence style, title style, and all caps.
Don't use all caps for emphasis.
capitalization (sentence style): capitalization (capitalization)
capitalization (title style):
Follow these rules when you use title-style capitalization. Capitalize every word except:
Capitalize:
• The first and last word, regardless of the part of speech:
For Linux Users
What Parallels Tools Are For
• The second word in a hyphenated compound:
Correct: High-Level Events, 32-Bit Addressing
Incorrect: High-level Events, 32-bit Addressing
Exceptions: Built-in, Plug-in
• The words Are, If, It, It, Than, That, and This
2) How to use the word “click”:
click on the button on the screen. Don't use click on. For most users, such as tutorials.
Correct: Click Mac If you want to use USB device with Mac OS X.
Incorrect: Point to Mac and Mac OS X.
click on Don't use; use click.
3) Email or e-mail?
Use email. Don't use e-mail.
4) If or whether?
Use if to express a condition. Use whether to express alternatives.
Correct: Check whether the Parallels Tools have been installed.
Incorrect: Check if Parallels Tools have been installed.
Correct: Click Mac If you want to use USB device with Mac OS X.
5) How to use product names:
Follow the capitalization style on the product packaging. For example, a chapter of text (for example, a chapter). Thereafter, when applicable, use a shortened version of the product name.
For example: Parallels Desktop 14 for Mac: Use Parallels Desktop 14 for Mac.
Subsequent occurrences, use Parallels Desktop.
Conclusion
In these 3 parts of the manual, we have tried to put together, summarize and structure the tips that will help make your documentation easier and more understandable.
We do not insist that it is necessary to write this way - there are many approaches to documentation and techniques. Look at the situation and use those that suit you.
Thank you very much for your attention and interest!
Part 3 (final)
The conclusion of the manual of our technical writer Andrei Starovoytov , which will help to make your user documentation easier and more understandable.
')
This time we will examine in more detail:
- conceptual topics (concept pages);
- reference topics (reference pages);
- topics that tell you how to solve any problem (troubleshooting pages);
- where and how to use screenshots;
- and also give a couple of tips to those who write documentation in English.
Previous parts: our approach to documentation and localization; documenting tips part 1 and part 2 .
Conceptual topics (concept pages)
Such topics are needed to provide users with additional technical information and thus not to overload the task-topic.
Please note that they should be exactly additional information, but not the way to solve the problem.
Conceptual topics are good to use in order to:
- tell how this or that process works;
- describe which new features were added in this version of the product;
- provide the user with additional information that will help him make a decision;
- tell what the user can do in your application.
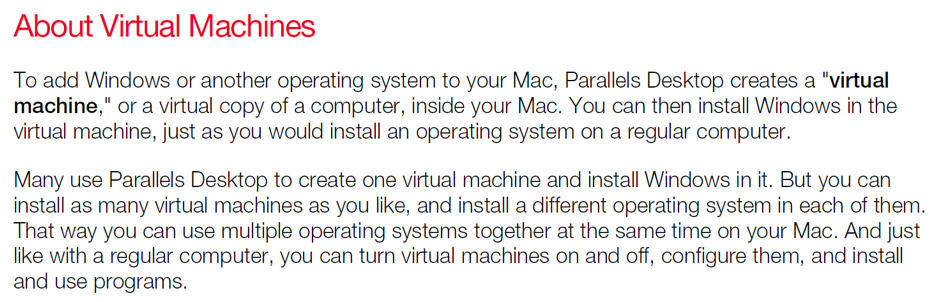
For example, the topic “About Virtual Machines” may describe what it is and how it works. But in this topic there should not be instructions on how to create a virtual machine - this should be described in the task topic.
Thus, an experienced user, reading a task-topic, will not complain: "Why do you tell me what it is, I already know ...". And the one who does not know, will see the link to the conceptual topic and read.
Typically, conceptual topic headings begin with:
- “About (something)” (“About Virtual Machines”);
- “What is ...?” (“What is a Virtual Machine?”);
- “How does (something) work?” (“How a Virtual Machine Works?”);
- “More about something” (“Understanding Virtual Machine Basics”), etc.
Here is an example of a conceptual topic from the English documentation:
Reference topics (reference pages) :
Such topics describe various background information that the user can refer to if necessary.
Good examples of such topics can be:
- “Glossary” at the end of the guide;
- a topic in which you describe which items are available in the menu and what they do, which shortcut keys you can use when working with the program, which icons are available on the taskbar, etc.
Here is an example of the topic, which describes the icons of the graphical interface:
Topics that describe how to solve any problem (troubleshooting pages)
Such topics help the user overcome an obstacle or solve a problem. A troubleshooting topic might have the following scenarios:
- The user has a problem, and he wants to solve it. For example, “My USB device does not work in a virtual machine” (“My USB Device doesn’t work in a Virtual Machine”).
- The user tried to do something and did not succeed. For example, “I cannot activate Parallels Desktop” (“I Can't Activate Parallels Desktop”).
- There is some condition or condition that the user wants to change. For example, “Windows is slow” (“Windows Seems Slow”).
What is and is not a troubleshooting :
If the user wants to do something, but does not know how - it should be described not in troubleshooting, but in a task topic.
Troubleshooting means that the user tried to do something (according to the instructions of the task-topic), but some problem arose and the user does not know how to solve it.
For example, a topic that describes how to use an external disk in a guest operating system is a task topic.
And the topic that describes possible problems - “I cannot connect an external disk” (“I am connecting problems with a hard disk”) is a troubleshooting topic. Its content implies that the user followed the instructions, but for some reason he did not succeed.
If you are writing a task-topic, and a step in the instructions may cause slight difficulties, it is allowed to describe it in the same step or topic. For small difficulties, it is not necessary to write a separate troubleshooting topic.
For example, at the end of a topic that describes how to change shortcuts, you can add: “Some shortcuts cannot be edited or deleted” (“Some key combinations can't be edited or deleted”).
Troubleshooting Topics
Typically, troubleshooting topics have a structure similar to task topics.
They consist of:
- Title (“title”)
- Prologue (“intro”)
- An introductory phrase followed by numbered steps or necessary information (“step heading”)
- Information that is needed to solve a problem (“steps to solution”)
- The final part (“outro”)
Title (page title)
It is good when the troubleshooting header expresses the user's first-person problem. For example:
- “I can't activate Parallels Desktop” (“I Can't Activate Parallels Desktop”)
- “Windows is slow” (“Windows Seems Slow”)
- “The message“ You have no virtual machines ”” appears (““ A Message Says' No Virtual Machines Detected ””)
If you write documentation in English, you should use the title-style capitalization in the title (for capitalization, see the details at the end of the article):
Correct: My USB Device Isn't Working
Wrong: My USB device isn't working
Introduction
Immediately after the title, provide users with the information they need to know first and foremost.
For example:
- Explain the most likely cause of the problem. If the reasons can be many, describe all possible.
- Sometimes it is possible to describe in general terms what needs to be done to solve a problem. It is in general - detailed instructions should be given in steps to solution.
Introductory phrase (step heading)
Before the sequence of steps to be taken to solve the problem, write the introductory phrase. Do not forget to put a colon at the end.
If the solution to the problem is a series of sequential actions:
In such cases, the introductory phrase should be done according to the same principles as for the task-topics (see the 2nd part of the tips), namely, use the same words as in the statement of the task.
For example, you write a troubleshooting topic that explains why the user cannot open the virtual machine configuration (the menu item is grayed out and inactive):
Title: “I can't open the Virtual Machine Settings”
Introduction: “If you cannot open the virtual machine settings (the menu item is grayed out), then the most likely reason is that the virtual machine is not turned off.”
Further, the introductory phrase: "To open the settings of the virtual machine:" (this phrase uses the same words as in the formulation of the task that must be performed)
And then the steps - 1) Make sure the machine is turned off. If it works, click there and there. 2) Then do this.
If the problem has several solutions:
In such cases, the introductory phrase should contain the words:
- “try these solutions”,
- “try the following” (“try the following”),
- “make sure” (“make sure that”), etc.
Here are some examples from English documentation:
Page Title: I Can't Activate Parallels Desktop
Task Covers: A list of things to check
Step Heading: If you're having trouble activating Parallels Desktop, make sure that ...
Page Title: Windows Seems Slow
Task Covers: A list of things to try
Step Heading: If Windows performance seems slow, try the following ...
Page Title: A Message Says “No Macs Connected”
Task Covers: Several things to check or try
Step Heading: In the list of Macs
Information needed to solve the problem (steps to solution)
This section includes everything that the user needs to know and / or undertake.
If there are several solutions:
In such cases, describe each method using bullets (this can be read in more detail in the second part of the tips). If any method is complicated, and you have already described it in detail in another topic, just give the link.
If what needs to be done is already described somewhere in another topic:
Just give a link to this topic.
If there is no specific instruction, what could be done to solve the problem:
Provide any additional information that can help the user to understand for himself what could be the cause of the problem.
Conclusion (outro)
In conclusion, you can provide additional information related to the task or possible solutions to the problem. More information about using outro can be found in the second part of the tips .
Using graphics (screenshots, diagrams, charts, etc.)
Screenshots and diagrams can help users understand much better what is written in the topic.
When to use graphics:
There is no need to insert a screenshot under each step - the user will simply not know where to look, constantly comparing the screen and the screenshot.
Screenshots should be inserted when they significantly help to understand what is written in the instructions.
For example:
- When you have to show a button or an icon that has no name in a goo, or doesn’t immediately catch your eye, or there are several similar ones on the screen;
- When you need to provide context for the task or a clear visual explanation of how it will look in the end;
- If the screenshot allows you to quickly understand or explain something that will require too long and complex explanation of words.
Where and how to post graphics:
Below are a few recommendations on where and how to place graphics on the page.
1) If the screenshot reflects conceptual information or the result of the task, you can paste it in or after the intro.
Here is an example from the English documentation, which shows a topic describing the windowed mode of Windows. A screenshot that shows what will happen after such a switch is inserted after the introduction and just before the instruction how to switch to this mode:
2) If the screenshot refers to a specific step in the instructions, paste it after or inside this step:
If you need to insert a screenshot of a button, icon or another interface element, you need to insert it after the name of this element:
Do not use graphics to illustrate obvious things.
If specifically, do not use screenshots to illustrate:
- Menu
- Icons, buttons and tabs that have a name
- Everything else that can be easily and easily described in words.
Additional tips for writing documentation in English:
1) How to capitalize titles:
capital style Three styles of capitalization are available: sentence style, title style, and all caps.
- Sentence-style capitalization: This line provides an example of sentence-style capitalization.
- Title-Style Capitalization.
- All caps: THIS LINE PROVIDES AN EXAMPLE OF ALL CAPS.
Don't use all caps for emphasis.
capitalization (sentence style): capitalization (capitalization)
capitalization (title style):
Follow these rules when you use title-style capitalization. Capitalize every word except:
- Article (a, an, the),
- Coordinating conjunctions (and, but, or, nor, for, yet, and so)
- How to Connect Your Printer
- Regardless of the part of speech
- Words that always begin with a lowercase letter, such as an iPhone and iPad.
- (For, by, for, from, in, into, of, off, on, onto, out, over, to, up, and with), except for For example:
Start Up the ComputerLog
In to the ServerGet
Started with Parallels Desktop
Capitalize:
• The first and last word, regardless of the part of speech:
For Linux Users
What Parallels Tools Are For
• The second word in a hyphenated compound:
Correct: High-Level Events, 32-Bit Addressing
Incorrect: High-level Events, 32-bit Addressing
Exceptions: Built-in, Plug-in
• The words Are, If, It, It, Than, That, and This
2) How to use the word “click”:
click on the button on the screen. Don't use click on. For most users, such as tutorials.
Correct: Click Mac If you want to use USB device with Mac OS X.
Incorrect: Point to Mac and Mac OS X.
click on Don't use; use click.
3) Email or e-mail?
Use email. Don't use e-mail.
4) If or whether?
Use if to express a condition. Use whether to express alternatives.
Correct: Check whether the Parallels Tools have been installed.
Incorrect: Check if Parallels Tools have been installed.
Correct: Click Mac If you want to use USB device with Mac OS X.
5) How to use product names:
Follow the capitalization style on the product packaging. For example, a chapter of text (for example, a chapter). Thereafter, when applicable, use a shortened version of the product name.
For example: Parallels Desktop 14 for Mac: Use Parallels Desktop 14 for Mac.
Subsequent occurrences, use Parallels Desktop.
Conclusion
In these 3 parts of the manual, we have tried to put together, summarize and structure the tips that will help make your documentation easier and more understandable.
We do not insist that it is necessary to write this way - there are many approaches to documentation and techniques. Look at the situation and use those that suit you.
Thank you very much for your attention and interest!
Source: https://habr.com/ru/post/443262/
All Articles