Set up a Kubernetes HA cluster on bare metal with GlusterFS & MetalLB. Part 2/3

Part 1/3 here
Hello and welcome back! This is the second part of an article about setting up a Kubernetes cluster on bare metal. Previously, we set up the Kubernetes ON-cluster using external etcd, master-lead schemes and load balancing. Well, now it's time to set up an additional environment and utilities to make the cluster more useful and as close as possible to its working state.
In this part of the article, we will focus on configuring the internal load balancer of cluster services — this will be MetalLB. We will also install and configure distributed file storage between our working nodes. We will use GlusterFS for persistent volumes that are available in Kubernetes.
After performing all the actions, the scheme of our cluster will look like this:
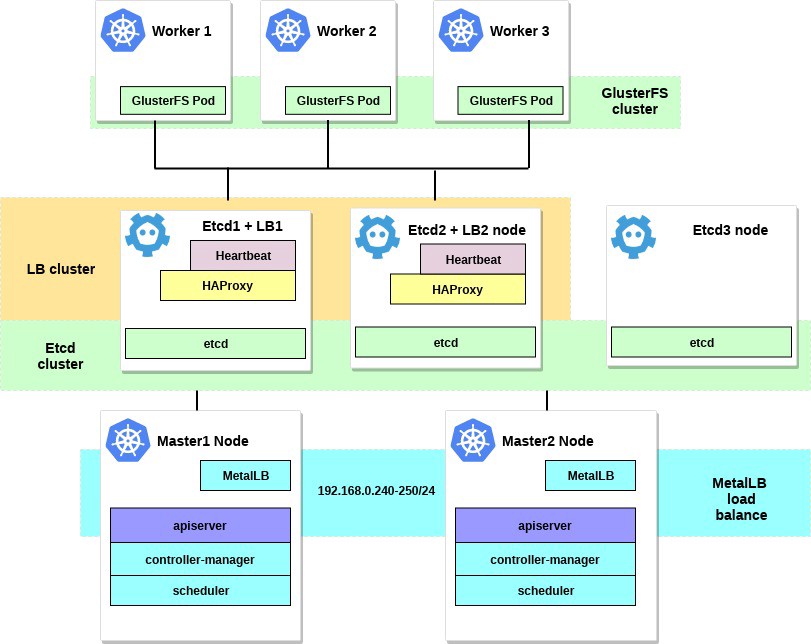
1. Set up MetalLB as an internal load balancer.
A few words about MetalLB, directly from the document page:
MetalLB is a load balancer implementation for Kubernetes clusters on bare metal with standard routing protocols.
Kubernetes does not offer an implementation of network load balancers ( services like LoadBalancer ) for bare metal. All the options for implementing Network LB that Kubernetes ships with are the linking code, it refers to various IaaS platforms (GCP, AWS, Azure, etc.). If you are not working on a platform supported by IaaS (GCP, AWS, Azure, etc.), the LoadBalancer will remain in the “waiting” state for an indefinite period when created.
The operators of the BM servers have two less efficient tools for entering user traffic into their clusters, the NodePort and externalIPs services. Both of these options have significant production flaws, which makes BM clusters second-class citizens in the Kubernetes ecosystem.
')
MetalLB seeks to correct this imbalance by offering a Network LB implementation that integrates with standard network equipment, so external services on BM clusters also “just work” at maximum speeds.
Thus, using this tool, we start services in the Kubernetes cluster using a load balancer, for which many thanks to the MetalLB team. The setup process is really simple and straightforward.
Earlier in the example, we chose the subnet 192.168.0.0/24 for the needs of our cluster. Now take some of this subnet for the future load balancer.
We log into the machine system with the kubectl utility configured and run:
control# kubectl apply -f https://raw.githubusercontent.com/google/metallb/v0.7.3/manifests/metallb.yaml This will deploy MetalLB in a cluster, in the metallb-system . Ensure that all MetalLB components are functioning normally:
control# kubectl get pod --namespace=metallb-system NAME READY STATUS RESTARTS AGE controller-7cc9c87cfb-ctg7p 1/1 Running 0 5d3h speaker-82qb5 1/1 Running 0 5d3h speaker-h5jw7 1/1 Running 0 5d3h speaker-r2fcg 1/1 Running 0 5d3h Now configure MetalLB using configmap. In this example, we use the Layer 2 setting. For information about other setting options, refer to the MetalLB documentation.
Create a file metallb-config.yaml in any directory within the selected IP range of the subnet of our cluster:
control# vi metallb-config.yaml apiVersion: v1 kind: ConfigMap metadata: namespace: metallb-system name: config data: config: | address-pools: - name: default protocol: layer2 addresses: - 92.168.0.240-192.168.0.250 And apply this setting:
control# kubectl apply -f metallb-config.yaml If necessary, check and change the configmap later:
control# kubectl describe configmaps -n metallb-system control# kubectl edit configmap config -n metallb-system We now have our own customized local load balancer. Let's check how it works, on the example of the Nginx service.
control# vi nginx-deployment.yaml apiVersion: apps/v1 kind: Deployment metadata: name: nginx-deployment spec: selector: matchLabels: app: nginx replicas: 3 template: metadata: labels: app: nginx spec: containers: - name: nginx image: nginx:latest ports: - containerPort: 80 control# vi nginx-service.yaml apiVersion: v1 kind: Service metadata: name: nginx spec: type: LoadBalancer selector: app: nginx ports: - port: 80 name: http Then create a test deployment and Nginx service:
control# kubectl apply -f nginx-deployment.yaml control# kubectl apply -f nginx-service.yaml And now - check the result:
control# kubectl get po NAME READY STATUS RESTARTS AGE nginx-deployment-6574bd76c-fxgxr 1/1 Running 0 19s nginx-deployment-6574bd76c-rp857 1/1 Running 0 19s nginx-deployment-6574bd76c-wgt9n 1/1 Running 0 19s control# kubectl get svc NAME TYPE CLUSTER-IP EXTERNAL-IP PORT(S) AGE nginx LoadBalancer 10.100.226.110 192.168.0.240 80:31604/TCP 107s Created 3 pod Nginx, as we indicated in the Deploy earlier. The Nginx service will send traffic to all these hearths using a circular balancing scheme. And you can also see the external IP received from our load balancer MetalLB.
Now try to minimize to the IP address 192.168.0.240, and you will see the Nginx page index.html. Do not forget to remove the test deployment and the Nginx service.
control# kubectl delete svc nginx service "nginx" deleted control# kubectl delete deployment nginx-deployment deployment.extensions "nginx-deployment" deleted Well, on this with MetalLB everything, we go ahead - let's configure GlusterFS for the Kubernetes volumes.
2. Configure GlusterFS with Heketi on the working nodes.
In fact, the Kubernetes cluster cannot be used without volumes inside it. As you know, pods are ephemeral, i.e. They can be created and deleted at any time. All data inside them will be lost. Thus, in a real cluster, you will need distributed storage to ensure the exchange of settings and data between the nodes and applications within it.
In Kubernetes volumes are available in various versions, choose the appropriate ones. In this example, I will demonstrate how GlusterFS storage is created for any internal applications, it is like permanent volumes. Earlier, I used the “system” installation of GlusterFS on all Kubernetes work nodes for this, and then I just created volumes of the hostPath type in the GlusterFS directories.
Now we have a new handy tool Heketi .
A few words from the Heketi documentation:
RESTful-based volume management infrastructure for GlusterFS.
Heketi offers a RESTful management interface that you can use to manage the life cycle of GlusterFS volumes. Thanks to Heketi, cloud services, such as OpenStack Manila, Kubernetes, and OpenShift, can dynamically provide GlusterFS volumes with any type of reliability supported. Heketi automatically determines the location of the blocks in the cluster, providing the location of the blocks and their replicas in different areas of failure. Heketi also supports any number of GlusterFS clusters, allowing cloud services to offer network storage files, not limited to a single GlusterFS cluster.
It sounds good, and, in addition, this tool will bring our VM cluster closer to the large cloud clusters Kubernetes. In the end, you can create PersistentVolumeClaims , which will be formed automatically, and much more.
You can take additional system hard drives to configure GlusterFS or just create several dummy block devices. In this example, I will use the second method.
Create dummy block devices on all three working nodes:
worker1-3# dd if=/dev/zero of=/home/gluster/image bs=1M count=10000 You will receive a file of about 10 GB. Then use losttup - to add it to these nodes as a loopback device:
worker1-3# losetup /dev/loop0 /home/gluster/image Please note: if you already have some loopback device 0, then you will need to select any other number.
I took the time and found out why Heketi does not want to work properly. Therefore, to prevent any problems in future configurations, first make sure that we load the dm_thin_pool kernel module and install the glusterfs-client package on all working nodes.
worker1-3# modprobe dm_thin_pool worker1-3# apt-get update && apt-get -y install glusterfs-client Ok, now you need to have the file / home / gluster / image and the device / dev / loop0 on all the working nodes. Remember to create a systemd service that will automatically launch losetup and modprobe each time these servers are loaded.
worker1-3# vi /etc/systemd/system/loop_gluster.service [Unit] Description=Create the loopback device for GlusterFS DefaultDependencies=false Before=local-fs.target After=systemd-udev-settle.service Requires=systemd-udev-settle.service [Service] Type=oneshot ExecStart=/bin/bash -c "modprobe dm_thin_pool && [ -b /dev/loop0 ] || losetup /dev/loop0 /home/gluster/image" [Install] WantedBy=local-fs.target And turn it on:
worker1-3# systemctl enable /etc/systemd/system/loop_gluster.service Created symlink /etc/systemd/system/local-fs.target.wants/loop_gluster.service → /etc/systemd/system/loop_gluster.service. The preparatory work is completed, and we are ready to deploy GlusterFS and Heketi to our cluster. For this, I will use this cool guide . Most of the commands run from an external control computer, and very small commands run from any master node inside the cluster.
First, copy the repository and create DaemonSet GlusterFS:
control# git clone https://github.com/heketi/heketi control# cd heketi/extras/kubernetes control# kubectl create -f glusterfs-daemonset.json Now let's mark our three working nodes for GlusterFS; after marking them, GlusterFS will be created:
control# kubectl label node worker1 storagenode=glusterfs control# kubectl label node worker2 storagenode=glusterfs control# kubectl label node worker3 storagenode=glusterfs control# kubectl get pod NAME READY STATUS RESTARTS AGE glusterfs-5dtdj 1/1 Running 0 1m6s glusterfs-hzdll 1/1 Running 0 1m9s glusterfs-p8r59 1/1 Running 0 2m1s Now create a Heketi service account:
control# kubectl create -f heketi-service-account.json We will ensure that this service account has the ability to manage gluster bogs. To do this, create a cluster function that is required for our newly created service account:
control# kubectl create clusterrolebinding heketi-gluster-admin --clusterrole=edit --serviceaccount=default:heketi-service-account Now let's create a secret key, Kubernetes, which blocks the configuration of our Heketi instance:
control# kubectl create secret generic heketi-config-secret --from-file=./heketi.json Create the first source for Heketi, which we use for the first configuration operations and subsequently delete:
control# kubectl create -f heketi-bootstrap.json service "deploy-heketi" created deployment "deploy-heketi" created control# kubectl get pod NAME READY STATUS RESTARTS AGE deploy-heketi-1211581626-2jotm 1/1 Running 0 2m glusterfs-5dtdj 1/1 Running 0 6m6s glusterfs-hzdll 1/1 Running 0 6m9s glusterfs-p8r59 1/1 Running 0 7m1s After creating and running the Bootstrap Heketi service, we will need to go to one of our master nodes, we will run several commands there, because our external managing node is not inside our cluster, so we cannot access the working sub-networks and the internal network of the cluster.
First let's load the heketi-client utility and copy it to the system bin folder:
master1# wget https://github.com/heketi/heketi/releases/download/v8.0.0/heketi-client-v8.0.0.linux.amd64.tar.gz master1# tar -xzvf ./heketi-client-v8.0.0.linux.amd64.tar.gz master1# cp ./heketi-client/bin/heketi-cli /usr/local/bin/ master1# heketi-cli heketi-cli v8.0.0 Now we’ll find the IP address of the heketi and export it as a system variable:
master1# kubectl --kubeconfig /etc/kubernetes/admin.conf describe pod deploy-heketi-1211581626-2jotm For me this pod have a 10.42.0.1 ip master1# curl http://10.42.0.1:57598/hello Handling connection for 57598 Hello from Heketi master1# export HEKETI_CLI_SERVER=http://10.42.0.1:57598 Now let's give Heketi information about the GlusterFS cluster that he should manage. We provide it through a topology file. Topology is a JSON manifest with a list of all nodes, disks, and clusters used by GlusterFS.
NOTE. Make sure thathostnames/managepoints to the exact name, as in thekubectl get nodesection, and thathostnames/storageis the IP address of the storage nodes.
master1:~/heketi-client# vi topology.json { "clusters": [ { "nodes": [ { "node": { "hostnames": { "manage": [ "worker1" ], "storage": [ "192.168.0.7" ] }, "zone": 1 }, "devices": [ "/dev/loop0" ] }, { "node": { "hostnames": { "manage": [ "worker2" ], "storage": [ "192.168.0.8" ] }, "zone": 1 }, "devices": [ "/dev/loop0" ] }, { "node": { "hostnames": { "manage": [ "worker3" ], "storage": [ "192.168.0.9" ] }, "zone": 1 }, "devices": [ "/dev/loop0" ] } ] } ] } Then download this file:
master1:~/heketi-client# heketi-cli topology load --json=topology.json Creating cluster ... ID: e83467d0074414e3f59d3350a93901ef Allowing file volumes on cluster. Allowing block volumes on cluster. Creating node worker1 ... ID: eea131d392b579a688a1c7e5a85e139c Adding device /dev/loop0 ... OK Creating node worker2 ... ID: 300ad5ff2e9476c3ba4ff69260afb234 Adding device /dev/loop0 ... OK Creating node worker3 ... ID: 94ca798385c1099c531c8ba3fcc9f061 Adding device /dev/loop0 ... OK Next we use Heketi to provide volumes for storing the database. The team name is a bit strange, but everything is in order. Also create a heketi repository:
master1:~/heketi-client# heketi-cli setup-openshift-heketi-storage master1:~/heketi-client# kubectl --kubeconfig /etc/kubernetes/admin.conf create -f heketi-storage.json secret/heketi-storage-secret created endpoints/heketi-storage-endpoints created service/heketi-storage-endpoints created job.batch/heketi-storage-copy-job created These are all commands that need to be run from the master node. Let's go back to the managing node and continue from there; First of all, make sure that the last running command was successfully completed:
control# kubectl get pod NAME READY STATUS RESTARTS AGE glusterfs-5dtdj 1/1 Running 0 39h glusterfs-hzdll 1/1 Running 0 39h glusterfs-p8r59 1/1 Running 0 39h heketi-storage-copy-job-txkql 0/1 Completed 0 69s And the heketi-storage-copy-job task is completed.
If there is currently no glusterfs-client package installed on your work nodes, then there is an error.
It's time to remove the Hetsti Bootstrap installation file and do a little cleanup:
control# kubectl delete all,service,jobs,deployment,secret --selector="deploy-heketi" In the last step, we need to create a long-term instance of Heketi:
control# cd ./heketi/extras/kubernetes control:~/heketi/extras/kubernetes# kubectl create -f heketi-deployment.json secret/heketi-db-backup created service/heketi created deployment.extensions/heketi created control# kubectl get pod NAME READY STATUS RESTARTS AGE glusterfs-5dtdj 1/1 Running 0 39h glusterfs-hzdll 1/1 Running 0 39h glusterfs-p8r59 1/1 Running 0 39h heketi-b8c5f6554-knp7t 1/1 Running 0 22m If there is currently no glusterfs-client package installed on your work nodes, then there is an error. And we are almost done, now the Heketi database is stored in the GlusterFS volume and is not reset every time the Heketi pod restarts.
To start using a GlusterFS cluster with dynamic resource allocation, we need to create a StorageClass.
First, let's find the endpoint of the Gluster storage, which will be passed to the StorageClass as a parameter (heketi-storage-endpoints):
control# kubectl get endpoints NAME ENDPOINTS AGE heketi 10.42.0.2:8080 2d16h ....... ... .. Now create several files:
control# vi storage-class.yml apiVersion: storage.k8s.io/v1beta1 kind: StorageClass metadata: name: slow provisioner: kubernetes.io/glusterfs parameters: resturl: "http://10.42.0.2:8080" control# vi test-pvc.yml kind: PersistentVolumeClaim apiVersion: v1 metadata: name: gluster1 annotations: volume.beta.kubernetes.io/storage-class: "slow" spec: accessModes: - ReadWriteOnce resources: requests: storage: 1Gi Use these files to create a class and pvc:
control# kubectl create -f storage-class.yaml storageclass "slow" created control# kubectl get storageclass NAME PROVISIONER AGE slow kubernetes.io/glusterfs 2d8h control# kubectl create -f test-pvc.yaml persistentvolumeclaim "gluster1" created control# kubectl get pvc NAME STATUS VOLUME CAPACITY ACCESS MODES STORAGECLASS AGE gluster1 Bound pvc-27f733cd-1c77-11e9-bb07-7efe6b0e6fa5 1Gi RWO slow 2d8h We can also view the PV volume:
control# kubectl get pv NAME CAPACITY ACCESS MODES RECLAIM POLICY STATUS CLAIM STORAGECLASS REASON AGE pvc-27f733cd-1c77-11e9-bb07-7efe6b0e6fa5 1Gi RWO Delete Bound default/gluster1 slow 2d8h Now we have a dynamically created GlusterFS volume associated with PersistentVolumeClaim , and we can use this statement in any subject.
Create a simple one under Nginx and test it:
control# vi nginx-test.yml apiVersion: v1 kind: Pod metadata: name: nginx-pod1 labels: name: nginx-pod1 spec: containers: - name: nginx-pod1 image: gcr.io/google_containers/nginx-slim:0.8 ports: - name: web containerPort: 80 volumeMounts: - name: gluster-vol1 mountPath: /usr/share/nginx/html volumes: - name: gluster-vol1 persistentVolumeClaim: claimName: gluster1 control# kubectl create -f nginx-test.yaml pod "nginx-pod1" created Browse under (wait a few minutes, you may need to upload an image if it does not already exist):
control# kubectl get pods NAME READY STATUS RESTARTS AGE glusterfs-5dtdj 1/1 Running 0 4d10h glusterfs-hzdll 1/1 Running 0 4d10h glusterfs-p8r59 1/1 Running 0 4d10h heketi-b8c5f6554-knp7t 1/1 Running 0 2d18h nginx-pod1 1/1 Running 0 47h Now go into the container and create the file index.html:
control# kubectl exec -ti nginx-pod1 /bin/sh # cd /usr/share/nginx/html # echo 'Hello there from GlusterFS pod !!!' > index.html # ls index.html # exit It will be necessary to find the internal IP address of the hearth and curl into it from any master node:
master1# curl 10.40.0.1 Hello there from GlusterFS pod !!! In doing so, we are just testing our new permanent volume.
Some useful commands for checking the new GlusterFS cluster are:heketi-cli cluster listandheketi-cli volume list. They can be run on your computer if heketi-cli is installed . In this example, this is the master1 node.
master1# heketi-cli cluster list Clusters: Id:e83467d0074414e3f59d3350a93901ef [file][block] master1# heketi-cli volume list Id:6fdb7fef361c82154a94736c8f9aa53e Cluster:e83467d0074414e3f59d3350a93901ef Name:vol_6fdb7fef361c82154a94736c8f9aa53e Id:c6b69bd991b960f314f679afa4ad9644 Cluster:e83467d0074414e3f59d3350a93901ef Name:heketidbstorage At this stage, we have successfully configured an internal load balancer with file storage, and our cluster is now closer to its operational state.
In the next part of the article we will focus on creating a cluster monitoring system, and also launch a test project in it to use all the resources we have configured.
Stay in touch, and all the best!
Source: https://habr.com/ru/post/443110/
All Articles