A guide to deploying machine learning models in a production environment as an API using Flask
Friends, at the end of March we are launching a new stream in the course "Data Scientist" . And right now we are starting to share with you useful material on the course.
Introduction
Recalling the early experience of my hobby for machine learning (ML), I can say that a lot of effort was spent on building a really good model. I consulted with experts in this field to understand how to improve my model, thought about the necessary functions, tried to make sure that all the advice they offered was taken into account. But still I ran into a problem.
')
How to implement a model in a real project? I had no ideas about this. All the literature I have studied up to this point has focused only on improving the models. I have not seen the next step in their development.

That is why I am writing this guide. I want you to face the problem that I faced at one time, but were able to solve it quickly enough. By the end of this article, I will show you how to implement a machine learning model using the Flask Python framework.
Content
Options for the implementation of machine learning models.
In most cases, the actual use of machine learning models is a central part of development, even if it is just a small component of an email automation system or chatbot. Sometimes there are moments when implementation barriers seem insurmountable.
For example, most ML specialists use R or Python for their scientific research. However, consumers of these models will be software engineers who use a completely different technology stack. There are two options that can solve this problem:
Option 1: Rewrite all code in the language that development engineers work with. It sounds logical to some extent, however, a large amount of time and effort is needed to replicate the developed models. As a result, it turns out just a waste of time. Most languages, such as JavaScript, do not have convenient libraries for working with ML. Therefore, it will be quite a rational decision not to use this option.
Option 2: Use API. Network APIs have solved the problem of working with applications in different languages. If the front-end developer needs to use your machine learning model to build a web application based on it, they just need to get the URL of the destination server that discusses the API.
What is an API?
In simple words, the API (Application Programming Interface) is a kind of contract between two programs, saying that if a user program provides input data in a specific format, then a developer program (API) passes it through itself and provides the output data necessary for the user.
You will be able to independently read a couple of articles that describe well why API is a fairly popular choice among developers.
Most providers of large cloud services and smaller companies that focus on machine learning provide ready-to-use APIs. They satisfy the needs of developers who do not understand machine learning, but want to incorporate this technology into their solutions.
For example, one of these API providers is Google with its own Google Vision API .
All the developer needs to do is simply invoke the REST (Representational State Transfer) API using the SDK provided by Google. See what you can do using the Google Vision API .
Sounds great, right? In this article, we will figure out how to create your own API using Flask, a Python framework.
Note : Flask is not the only network framework for this purpose. There are Django, Falcon, Hug and many others that are not mentioned in this article. For example, for R there is a package called plumber
Install the Python environment and basic Flask information.
1) Create a virtual environment using Anaconda. If you need to create your own virtual environment for Python and save the necessary state of dependencies, then Anaconda offers good solutions for this. Next will be working with the command line.
2) We will try to create our simple “Hello world” application on Flask using gunicorn .


Hooray! You wrote your first program on Flask! Since you already have some experience with these simple steps, we can create network endpoints that can be accessed locally.
Using Flask, we can wrap our models and use them as a Web API. If we want to create more complex network applications (for example, in JavaScript), then we need to add some changes.
Creating a machine learning model.
Find null / Nan values in columns:
To understand how we created it, read the following .
We will create a pipeline to make sure that all the preprocessing steps that we do are the work of the scikit-learn appraiser.
To search for suitable hyper-parameters (degree for polynomial objects and alpha for an edge), do a grid search (Grid Search):
Our pipeline looks good enough to go to the next important step: Serializing the machine learning model.
Saving machine learning models: Serialization and Deserialization.
In Python, pickling is the standard way to store objects and later retrieve them in their original state. To make it sound clearer, I will give a simple example:
Then we will unload the canned object again:
We can save canned objects to a file and use them. This method is similar to creating
Note: Some may not like this method of conservation for serialization. An alternative could be
We have a custom class (Class), which we need to import while we are training (training), so we will use the
It is advisable to create a separate
The model will be saved in the directory selected above. Once the model is conserved, it can be wrapped in a Flask wrapper. However, before that you need to make sure that the canned file is working. Let's load it back and make a forecast:
Since we have completed the preprocessing steps so that the newly received data is part of the pipeline, we just need to run predict (). Using the scikit-learn library is quite simple to work with pipelines. Appraisers and pipelines protect your time and nerves, even if the initial implementation seems wild.
Creating an API using Flask
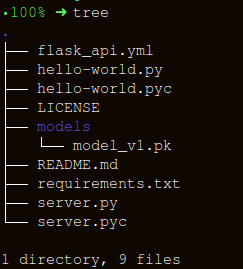
Let's keep the folder structure as simple as possible:
There are three important parts to creating the
HTTP messages are created from the header and body. In general, the main body content is transmitted in JSON format. We will send (
Note: You can send plain text, XML, cvs or image directly for interchangeability of the format, however, it is preferable to use JSON in our case.
After running, enter:
Let's generate data for forecasting and a queue for running the API locally at
Conclusion
In this article, we walked only half the way, creating a working API that provides predictions, and took a step closer to integrating ML solutions directly into the developed applications. We have created a fairly simple API that will help in prototyping the product and make it truly functional, but in order to send it to production, you need to make a few corrections that are no longer in the scope of learning machine learning.
There are a few things that should not be forgotten in the process of creating an API:
The next logical step is to create mechanics for deploying such an API on a small virtual machine. There are different ways to do this, but we will look at them in the next article.
Code and explanation for this article
Useful sources:
[1] Don't Pickle your data.
[2] Building Scikit Learn compatible transformers .
[3] Using jsonify in Flask .
[4] Flask-QuickStart.
Here is such a material. Subscribe to us if you like the publication, and also sign up for a free open webinar on the topic: “Metric classification algorithms”, which the developer and data scientist with 5 years of experience, Alexander Nikitin , will conduct on March 12th.
Introduction
Recalling the early experience of my hobby for machine learning (ML), I can say that a lot of effort was spent on building a really good model. I consulted with experts in this field to understand how to improve my model, thought about the necessary functions, tried to make sure that all the advice they offered was taken into account. But still I ran into a problem.
')
How to implement a model in a real project? I had no ideas about this. All the literature I have studied up to this point has focused only on improving the models. I have not seen the next step in their development.
That is why I am writing this guide. I want you to face the problem that I faced at one time, but were able to solve it quickly enough. By the end of this article, I will show you how to implement a machine learning model using the Flask Python framework.
Content
- Options for the implementation of machine learning models.
- What is an API?
- Install the Python environment and basic Flask information.
- Creating a machine learning model.
- Conservation machine learning models: Serialization and Deserialization.
- Creating an API using Flask.
Options for the implementation of machine learning models.
In most cases, the actual use of machine learning models is a central part of development, even if it is just a small component of an email automation system or chatbot. Sometimes there are moments when implementation barriers seem insurmountable.
For example, most ML specialists use R or Python for their scientific research. However, consumers of these models will be software engineers who use a completely different technology stack. There are two options that can solve this problem:
Option 1: Rewrite all code in the language that development engineers work with. It sounds logical to some extent, however, a large amount of time and effort is needed to replicate the developed models. As a result, it turns out just a waste of time. Most languages, such as JavaScript, do not have convenient libraries for working with ML. Therefore, it will be quite a rational decision not to use this option.
Option 2: Use API. Network APIs have solved the problem of working with applications in different languages. If the front-end developer needs to use your machine learning model to build a web application based on it, they just need to get the URL of the destination server that discusses the API.
What is an API?
In simple words, the API (Application Programming Interface) is a kind of contract between two programs, saying that if a user program provides input data in a specific format, then a developer program (API) passes it through itself and provides the output data necessary for the user.
You will be able to independently read a couple of articles that describe well why API is a fairly popular choice among developers.
Most providers of large cloud services and smaller companies that focus on machine learning provide ready-to-use APIs. They satisfy the needs of developers who do not understand machine learning, but want to incorporate this technology into their solutions.
For example, one of these API providers is Google with its own Google Vision API .
All the developer needs to do is simply invoke the REST (Representational State Transfer) API using the SDK provided by Google. See what you can do using the Google Vision API .
Sounds great, right? In this article, we will figure out how to create your own API using Flask, a Python framework.
Note : Flask is not the only network framework for this purpose. There are Django, Falcon, Hug and many others that are not mentioned in this article. For example, for R there is a package called plumber
Install the Python environment and basic Flask information.
1) Create a virtual environment using Anaconda. If you need to create your own virtual environment for Python and save the necessary state of dependencies, then Anaconda offers good solutions for this. Next will be working with the command line.
- Here you will find the miniconda installer for Python;
wget https://repo.continuum.io/miniconda/Miniconda3-latest-Linux-x86_64.shbash Miniconda3-latest-Linux-x86_64.sh- Follow the sequence of questions.
source .bashrc- If you type:
conda, you can see the list of available commands and help. - To create a new environment, enter:
conda create --name <environment-name> python=3.6 - Follow the steps you will be prompted to do and at the end enter:
source activate <environment-name> - Install the necessary Python packages. The most important are flask and gunicorn.
2) We will try to create our simple “Hello world” application on Flask using gunicorn .
- Open your favorite text editor and create a
hello-world.pyfile in the folderhello-world.py - Write the following code:
"""Filename: hello-world.py """ from flask import Flask app = Flask(__name__) @app.route('/users/<string:username>') def hello_world(username=None): return("Hello {}!".format(username)) - Save the file and return to the terminal.
- To start the API, run in the terminal:
gunicorn --bind 0.0.0.0:8000 hello-world:app - If you get the following, then you are on the right track:
- In the browser, enter the following:
https://localhost:8000/users/any-name
Hooray! You wrote your first program on Flask! Since you already have some experience with these simple steps, we can create network endpoints that can be accessed locally.
Using Flask, we can wrap our models and use them as a Web API. If we want to create more complex network applications (for example, in JavaScript), then we need to add some changes.
Creating a machine learning model.
- To begin with, let's take on the machine learning competition Loan Prediction Competition . The main goal is to customize the pre-processing pipeline and create ML models to facilitate the prediction task during deployment.
import os import json import numpy as np import pandas as pd from sklearn.externals import joblib from sklearn.model_selection import train_test_split, GridSearchCV from sklearn.base import BaseEstimator, TransformerMixin from sklearn.ensemble import RandomForestClassifier from sklearn.pipeline import make_pipeline import warnings warnings.filterwarnings("ignore") - We save in a folder:
!ls /home/pratos/Side-Project/av_articles/flask_api/data/ test.csv training.csv data = pd.read_csv('../data/training.csv') list(data.columns) ['Loan_ID', 'Gender', 'Married', 'Dependents', 'Education', 'Self_Employed', 'ApplicantIncome', 'CoapplicantIncome', 'LoanAmount', 'Loan_Amount_Term', 'Credit_History', 'Property_Area', 'Loan_Status'] data.shape (614, 13) ul>Find null / Nan values in columns:
for _ in data.columns: print("The number of null values in:{} == {}".format(_, data[_].isnull().sum())) The number of null values in:Loan_ID == 0 The number of null values in:Gender == 13 The number of null values in:Married == 3 The number of null values in:Dependents == 15 The number of null values in:Education == 0 The number of null values in:Self_Employed == 32 The number of null values in:ApplicantIncome == 0 The number of null values in:CoapplicantIncome == 0 The number of null values in:LoanAmount == 22 The number of null values in:Loan_Amount_Term == 14 The number of null values in:Credit_History == 50 The number of null values in:Property_Area == 0 The number of null values in:Loan_Status == 0 - The next step is to create datasets for training and testing:
red_var = ['Gender','Married','Dependents','Education','Self_Employed','ApplicantIncome','CoapplicantIncome',\ 'LoanAmount','Loan_Amount_Term','Credit_History','Property_Area'] X_train, X_test, y_train, y_test = train_test_split(data[pred_var], data['Loan_Status'], \ test_size=0.25, random_state=42) - To ensure that all the pre-processing steps are executed correctly even after we conducted the experiments and we did not miss anything during the forecasting process, we will create our own evaluator on Scikit-learn estimator .
To understand how we created it, read the following .
from sklearn.base import BaseEstimator, TransformerMixin class PreProcessing(BaseEstimator, TransformerMixin): """Custom Pre-Processing estimator for our use-case """ def __init__(self): pass def transform(self, df): """Regular transform() that is a help for training, validation & testing datasets (NOTE: The operations performed here are the ones that we did prior to this cell) """ pred_var = ['Gender','Married','Dependents','Education','Self_Employed','ApplicantIncome',\ 'CoapplicantIncome','LoanAmount','Loan_Amount_Term','Credit_History','Property_Area'] df = df[pred_var] df['Dependents'] = df['Dependents'].fillna(0) df['Self_Employed'] = df['Self_Employed'].fillna('No') df['Loan_Amount_Term'] = df['Loan_Amount_Term'].fillna(self.term_mean_) df['Credit_History'] = df['Credit_History'].fillna(1) df['Married'] = df['Married'].fillna('No') df['Gender'] = df['Gender'].fillna('Male') df['LoanAmount'] = df['LoanAmount'].fillna(self.amt_mean_) gender_values = {'Female' : 0, 'Male' : 1} married_values = {'No' : 0, 'Yes' : 1} education_values = {'Graduate' : 0, 'Not Graduate' : 1} employed_values = {'No' : 0, 'Yes' : 1} property_values = {'Rural' : 0, 'Urban' : 1, 'Semiurban' : 2} dependent_values = {'3+': 3, '0': 0, '2': 2, '1': 1} df.replace({'Gender': gender_values, 'Married': married_values, 'Education': education_values, \ 'Self_Employed': employed_values, 'Property_Area': property_values, \ 'Dependents': dependent_values}, inplace=True) return df.as_matrix() def fit(self, df, y=None, **fit_params): """Fitting the Training dataset & calculating the required values from train eg: We will need the mean of X_train['Loan_Amount_Term'] that will be used in transformation of X_test """ self.term_mean_ = df['Loan_Amount_Term'].mean() self.amt_mean_ = df['LoanAmount'].mean() return self - Convert
y_trainandy_testtonp.array:
y_train = y_train.replace({'Y':1, 'N':0}).as_matrix() y_test = y_test.replace({'Y':1, 'N':0}).as_matrix() We will create a pipeline to make sure that all the preprocessing steps that we do are the work of the scikit-learn appraiser.
pipe = make_pipeline(PreProcessing(), RandomForestClassifier()) pipe Pipeline(memory=None, steps=[('preprocessing', PreProcessing()), ('randomforestclassifier', RandomForestClassifier(bootstrap=True, class_weight=None, criterion='gini', max_depth=None, max_features='auto', max_leaf_nodes=None, min_impurity_decrease=0.0, min_impurity_split=None, min_samples_leaf=1, min_samples_split=2, min_weight_fraction_leaf=0.0, n_estimators=10, n_jobs=1, oob_score=False, random_state=None, verbose=0, warm_start=False))]) To search for suitable hyper-parameters (degree for polynomial objects and alpha for an edge), do a grid search (Grid Search):
- Define param_grid:
param_grid = {"randomforestclassifier__n_estimators" : [10, 20, 30], "randomforestclassifier__max_depth" : [None, 6, 8, 10], "randomforestclassifier__max_leaf_nodes": [None, 5, 10, 20], "randomforestclassifier__min_impurity_split": [0.1, 0.2, 0.3]} - Run a search on the grid:
grid = GridSearchCV(pipe, param_grid=param_grid, cv=3) - Customize training data for the estimator (pipeline estimator):
grid.fit(X_train, y_train) GridSearchCV(cv=3, error_score='raise', estimator=Pipeline(memory=None, steps=[('preprocessing', PreProcessing()), ('randomforestclassifier', RandomForestClassifier(bootstrap=True, class_weight=None, criterion='gini', max_depth=None, max_features='auto', max_leaf_nodes=None, min_impurity_decrease=0.0, min_impu..._jobs=1, oob_score=False, random_state=None, verbose=0, warm_start=False))]), fit_params=None, iid=True, n_jobs=1, param_grid={'randomforestclassifier__n_estimators': [10, 20, 30], 'randomforestclassifier__max_leaf_nodes': [None, 5, 10, 20], 'randomforestclassifier__min_impurity_split': [0.1, 0.2, 0.3], 'randomforestclassifier__max_depth': [None, 6, 8, 10]}, pre_dispatch='2*n_jobs', refit=True, return_train_score=True, scoring=None, verbose=0) - Let's see which parameter selected the grid search:
print("Best parameters: {}".format(grid.best_params_)) Best parameters: {'randomforestclassifier__n_estimators': 30, 'randomforestclassifier__max_leaf_nodes': 20, 'randomforestclassifier__min_impurity_split': 0.2, 'randomforestclassifier__max_depth': 8} - Calculate:
print("Validation set score: {:.2f}".format(grid.score(X_test, y_test))) Validation set score: 0.79 - Download the test suite:
test_df = pd.read_csv('../data/test.csv', encoding="utf-8-sig") test_df = test_df.head() grid.predict(test_df) array([1, 1, 1, 1, 1]) Our pipeline looks good enough to go to the next important step: Serializing the machine learning model.
Saving machine learning models: Serialization and Deserialization.
“In computer science, in the context of data storage, serialization is the process of translating data structures or object states into a stored format (for example, a file or memory buffer) and recreating it later in the same or a different computer environment.”
In Python, pickling is the standard way to store objects and later retrieve them in their original state. To make it sound clearer, I will give a simple example:
list_to_pickle = [1, 'here', 123, 'walker'] #Pickling the list import pickle list_pickle = pickle.dumps(list_to_pickle) list_pickle b'\x80\x03]q\x00(K\x01X\x04\x00\x00\x00hereq\x01K{X\x06\x00\x00\x00walkerq\x02e.' Then we will unload the canned object again:
loaded_pickle = pickle.loads(list_pickle) loaded_pickle [1, 'here', 123, 'walker'] We can save canned objects to a file and use them. This method is similar to creating
.rda files, as in R programming, for example.Note: Some may not like this method of conservation for serialization. An alternative could be
h5py .We have a custom class (Class), which we need to import while we are training (training), so we will use the
dill module to pack a class evaluator (Class) with a grid object.It is advisable to create a separate
training.py file containing all the code for training the model. (An example can be found here ).- Set the
dill
!pip install dill Requirement already satisfied: dill in /home/pratos/miniconda3/envs/ordermanagement/lib/python3.5/site-packages import dill as pickle filename = 'model_v1.pk' with open('../flask_api/models/'+filename, 'wb') as file: pickle.dump(grid, file) The model will be saved in the directory selected above. Once the model is conserved, it can be wrapped in a Flask wrapper. However, before that you need to make sure that the canned file is working. Let's load it back and make a forecast:
with open('../flask_api/models/'+filename ,'rb') as f: loaded_model = pickle.load(f) loaded_model.predict(test_df) array([1, 1, 1, 1, 1]) Since we have completed the preprocessing steps so that the newly received data is part of the pipeline, we just need to run predict (). Using the scikit-learn library is quite simple to work with pipelines. Appraisers and pipelines protect your time and nerves, even if the initial implementation seems wild.
Creating an API using Flask
Let's keep the folder structure as simple as possible:
There are three important parts to creating the
apicall() wrapper function:- Receive
requestdata (for which the forecast will be made); - Loading a canned appraiser;
- Translation of our forecasts into JSON format and receiving a response
status code: 200;
HTTP messages are created from the header and body. In general, the main body content is transmitted in JSON format. We will send (
POST url-endpoint/ ) incoming data as a packet for receiving forecasts.Note: You can send plain text, XML, cvs or image directly for interchangeability of the format, however, it is preferable to use JSON in our case.
"""Filename: server.py """ import os import pandas as pd from sklearn.externals import joblib from flask import Flask, jsonify, request app = Flask(__name__) @app.route('/predict', methods=['POST']) def apicall(): """API Call Pandas dataframe (sent as a payload) from API Call """ try: test_json = request.get_json() test = pd.read_json(test_json, orient='records') #To resolve the issue of TypeError: Cannot compare types 'ndarray(dtype=int64)' and 'str' test['Dependents'] = [str(x) for x in list(test['Dependents'])] #Getting the Loan_IDs separated out loan_ids = test['Loan_ID'] except Exception as e: raise e clf = 'model_v1.pk' if test.empty: return(bad_request()) else: #Load the saved model print("Loading the model...") loaded_model = None with open('./models/'+clf,'rb') as f: loaded_model = pickle.load(f) print("The model has been loaded...doing predictions now...") predictions = loaded_model.predict(test) """Add the predictions as Series to a new pandas dataframe OR Depending on the use-case, the entire test data appended with the new files """ prediction_series = list(pd.Series(predictions)) final_predictions = pd.DataFrame(list(zip(loan_ids, prediction_series))) """We can be as creative in sending the responses. But we need to send the response codes as well. """ responses = jsonify(predictions=final_predictions.to_json(orient="records")) responses.status_code = 200 return (responses) After running, enter:
gunicorn --bind 0.0.0.0:8000 server:appLet's generate data for forecasting and a queue for running the API locally at
https:0.0.0.0:8000/predict import json import requests """Setting the headers to send and accept json responses """ header = {'Content-Type': 'application/json', \ 'Accept': 'application/json'} """Reading test batch """ df = pd.read_csv('../data/test.csv', encoding="utf-8-sig") df = df.head() """Converting Pandas Dataframe to json """ data = df.to_json(orient='records') data '[{"Loan_ID":"LP001015","Gender":"Male","Married":"Yes","Dependents":"0","Education":"Graduate","Self_Employed":"No","ApplicantIncome":5720,"CoapplicantIncome":0,"LoanAmount":110.0,"Loan_Amount_Term":360.0,"Credit_History":1.0,"Property_Area":"Urban"},{"Loan_ID":"LP001022","Gender":"Male","Married":"Yes","Dependents":"1","Education":"Graduate","Self_Employed":"No","ApplicantIncome":3076,"CoapplicantIncome":1500,"LoanAmount":126.0,"Loan_Amount_Term":360.0,"Credit_History":1.0,"Property_Area":"Urban"},{"Loan_ID":"LP001031","Gender":"Male","Married":"Yes","Dependents":"2","Education":"Graduate","Self_Employed":"No","ApplicantIncome":5000,"CoapplicantIncome":1800,"LoanAmount":208.0,"Loan_Amount_Term":360.0,"Credit_History":1.0,"Property_Area":"Urban"},{"Loan_ID":"LP001035","Gender":"Male","Married":"Yes","Dependents":"2","Education":"Graduate","Self_Employed":"No","ApplicantIncome":2340,"CoapplicantIncome":2546,"LoanAmount":100.0,"Loan_Amount_Term":360.0,"Credit_History":null,"Property_Area":"Urban"},{"Loan_ID":"LP001051","Gender":"Male","Married":"No","Dependents":"0","Education":"Not Graduate","Self_Employed":"No","ApplicantIncome":3276,"CoapplicantIncome":0,"LoanAmount":78.0,"Loan_Amount_Term":360.0,"Credit_History":1.0,"Property_Area":"Urban"}]' """POST <url>/predict """ resp = requests.post("http://0.0.0.0:8000/predict", \ data = json.dumps(data),\ headers= header) resp.status_code 200 """The final response we get is as follows: """ resp.json() {'predictions': '[{"0":"LP001015","1":1},{... Conclusion
In this article, we walked only half the way, creating a working API that provides predictions, and took a step closer to integrating ML solutions directly into the developed applications. We have created a fairly simple API that will help in prototyping the product and make it truly functional, but in order to send it to production, you need to make a few corrections that are no longer in the scope of learning machine learning.
There are a few things that should not be forgotten in the process of creating an API:
- Creating a high-quality API from spaghetti code is almost impossible, so use your knowledge of machine learning to create a useful and convenient API.
- Try using version control for models and API code. Remember that Flask does not provide support for version control. Saving and tracking ML models is a difficult task, find a convenient way for yourself. There is an article about how to do it.
- In connection with the specifics of the scikit-learn models, it is necessary to make sure that the appraiser and the code for training lie side by side (in the case of using a user appraiser for preprocessing or another similar task). Thus, a conserved model will have a class evaluator next to it.
The next logical step is to create mechanics for deploying such an API on a small virtual machine. There are different ways to do this, but we will look at them in the next article.
Code and explanation for this article
Useful sources:
[1] Don't Pickle your data.
[2] Building Scikit Learn compatible transformers .
[3] Using jsonify in Flask .
[4] Flask-QuickStart.
Here is such a material. Subscribe to us if you like the publication, and also sign up for a free open webinar on the topic: “Metric classification algorithms”, which the developer and data scientist with 5 years of experience, Alexander Nikitin , will conduct on March 12th.
Source: https://habr.com/ru/post/442918/
All Articles