Using Fastify and Preact for rapid prototyping of web applications
The author of the material, the translation of which we are publishing today, wants to share a story about what technologies he uses for the rapid development of prototypes of web applications. These technologies include the Fastify and Preact libraries. He also uses the htm library. It seamlessly integrates with Preact and is used to describe DOM elements using clear constructions that resemble JSX. At the same time to work with it you do not need a transpiler like Babel. Demonstrating the prototype development toolkit and how to work with it, the author of the material will show how to package such applications in Docker containers. This makes it easy to demonstrate applications to anyone who interests them.

I started using the above-mentioned set of technologies a few weeks ago when I needed to create a very simple prototype of a web application designed to test, together with my colleagues, some assumptions.
My experiment was extremely successful. I was able to create a prototype very quickly, my colleagues were able to conveniently experiment with it, they were able to quickly express their impressions of it. At the same time, they could test the project even if Node.js and NPM were not installed on their computers.
')
All this led me to the idea that I should write material about my approach to rapid prototyping of web applications. It is possible that this approach will be useful to someone else. For those who are already familiar with Fastify and Preact, I will immediately outline the most important thing that will allow them to immediately use my ideas in practice.
If you are already familiar with Fastify and Preact and want to learn how to organize the development of projects based on these technologies, then you are literally a couple of steps from the desired. Namely, we are talking about the execution of the following commands:
Of course, you can change the name of the project,
After installing everything you need, you can start working on the project. Namely, we are talking about the following:
By editing the corresponding files, you can run the project:
After that, you can try it by going to
And something else. If you like my development, I will be immensely grateful for the asterisk on GitHub .
Now let's look at the technologies used here and the features of working with them.
Fastify is a fast and economical web framework for Node.js. This project was originally created by two programmers. Now the team of those who work on it, has 10 people, more than 130 people help in the development of the project, he gathered almost 10,000 stars on GitHub.
Fastify was influenced by Node.js frameworks, like Express and Hapi, which have been around for quite some time. It was initially aimed at performance, at the convenience of programmers and at expanding its capabilities with the help of plug-ins. This, by the way, is one of my favorite features of Fastify.
If you are not familiar with the Fastify framework or want to know it better, I can recommend its official documentation .
It should be noted that I am related to Fastify. I am a member of the main development team and I am mainly engaged in supporting the project site and working on its documentation.
Preact is a library for developing user interfaces for web projects, which was created by one person as a compact and fast replacement for React. This project was quite successful, it is now engaged in a whole team of developers, on GitHub, he scored more than 20,000 stars.
One of the reasons I like Preact is that this library has an extensible layer describing the visual components of the application. Under normal conditions, this library can be used with JSX in combination with Babel to translate code, but if you do not want to install Babel and customize the application build process, you can use Preact, for example, in conjunction with the htm library, which uses template literals and does not require Transpilation when running projects in which it is used in modern browsers.
We will use the htm library in this material and will soon consider a few examples.
Here we look at the whole process of creating a project. Our goal will be to develop a simple web application that displays information about the time on the server at the time of its launch. Here, in order to make it clearer what we will strive for.
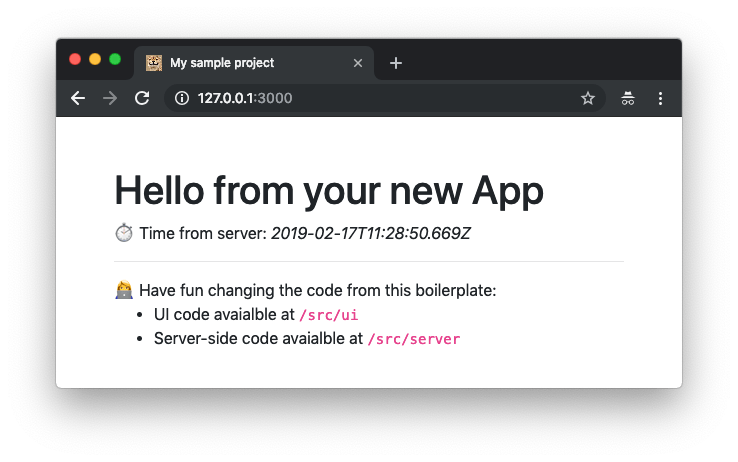
Application in browser
This is a single-page application (Single Page Application, SPA), in which Preact and htm are used to form its client part, and Fastify is used to create an API designed to get server time.
The attentive reader may have noticed that the page shown in the previous figure has a pretty favicon icon. True, he is very small there, so I'm going to make it easier for those who, trying to break his eyes, try to make out. Here is his larger version.

Favicon
Let's start with creating a new folder:
Now we initialize the NPM project and install Fastify:
Please note that when describing some dependency packages, I used the
Please note that you can also create a new project based on Fastify using the command tool
While writing this material, this team creates a project designed to use Fastify 1.x, but very soon, after the release of Fastify 2, this tool will be updated.
Let's analyze the installed packages:
At the moment we are ready to create an API based on Fastify. So let's put the server code in the
I believe that the above code explains itself well, but there are some interesting details that are worth telling. This will be especially useful for those who have no experience with Fastify.
The first thing you can notice in this code is that the
Another interesting detail is that we define the server as an exported module here. This module (called “plugin” in the Fastify jargon) is a function that takes as an argument an instance of Fastify (
The modular approach used here, although it looks a bit unusual, has its advantages. First we need to note that it allows you to combine multiple servers. Imagine that you created a server designed to serve your blog, and another one for the forum. They can be easily embedded in an existing application by attaching them to paths like
Moreover, this approach allows abstraction of applications and sub-applications from server bindings (we are talking about, for example, binding of sockets), passing the solution to this problem either to the root application or
Start the server using the
In order to simplify your life, we can add this command to the
Before actually starting the server, we need to make sure that there is a folder in which static resources will be located. Otherwise,
Now we can start the application using the
If everything works correctly, in the browser you will see something like the following:
At this point, you can appreciate another nice opportunity Fastify. It lies in the fact that JSON serialization, in the event that a route returns an object, is applied automatically.
Now work on the server API is complete. Let's do the frontend.
All the code of our project related to the frontend will be in the
To begin with, we place in the folder the files, which are styles, libraries and the favicon icon:
Now create the file
Before us is a completely normal HTML page, with which we load all resources (CSS and JS) and create an empty
Now let's take a look at the application code, which should be in the
In this application, there is only one state component, called the
If you are familiar with React, then you can easily understand the above code.
Using Preact and htm, we can create components by declaring classes that extend the built-in class
In this class, we can describe the behavior of a component using life-cycle methods, like
In our case, as soon as the component is attached to the page (the
After the request is completed, we set the value of the
The
The htm library allows you to describe DOM nodes using tagged template literals with a special tag -
Another thing to note is that we need to create an instance of the application and display it on an HTML page. This is done using the
Now the work on the front-end application is complete. You can restart the server, go to
I think the best way to show off your new small projects to others is to use Docker features for this purpose.
Thanks to Docker, anyone who tries to run your application in their own hands will be relieved of thinking about whether he has the right version of Node.js and NPM installed, he will not need to download the application’s source code to ensure that by entering the correct sequence of commands , install its dependencies and start the server.
In order to package the application into the Docker container, we need to create a very simple
Here we describe the following actions:
In order to build an image for a container, execute the following command:
After a few seconds, the image should be ready and you should be able to run the container:
The
Now you are ready to share your application with other people. In order to run it in the Docker environment, it is enough, provided that Docker is installed on the computer, to execute the above two commands in its folder.
In this article, we talked about how to create an environment for the rapid development of web applications using Fastify and Preact. In addition, we talked about how to share the application with other people using Docker.
As mentioned above, the proposed tools are designed for rapid prototyping, so now you may be wondering what is missing here for developing real-world applications. Most likely, you, speaking of "real applications", mean the following possibilities:
All these possibilities for developing real-world applications have not yet been added to the set of technologies considered here, so for the time being I perceive it as a means for developing prototypes. I am sure that if you liked what you saw, and you consider all this as the basis for future applications that solve real problems, you can easily find what you need and create, based on Fastify and Preact, applications that are ready for release in production.
Dear readers! How do you create web application prototypes?

Start
I started using the above-mentioned set of technologies a few weeks ago when I needed to create a very simple prototype of a web application designed to test, together with my colleagues, some assumptions.
My experiment was extremely successful. I was able to create a prototype very quickly, my colleagues were able to conveniently experiment with it, they were able to quickly express their impressions of it. At the same time, they could test the project even if Node.js and NPM were not installed on their computers.
')
All this led me to the idea that I should write material about my approach to rapid prototyping of web applications. It is possible that this approach will be useful to someone else. For those who are already familiar with Fastify and Preact, I will immediately outline the most important thing that will allow them to immediately use my ideas in practice.
Main ideas
If you are already familiar with Fastify and Preact and want to learn how to organize the development of projects based on these technologies, then you are literally a couple of steps from the desired. Namely, we are talking about the execution of the following commands:
git clone https://github.com/lmammino/fastify-preact-htm-boilerplate.git my-new-project cd my-new-project rm -rf .git npm install Of course, you can change the name of the project,
my-new-project , to the name of your project.After installing everything you need, you can start working on the project. Namely, we are talking about the following:
- The
src/uifolder contains the client-side files of the application (Preact and htm are used here). - The
src/serverfolder contains files related to the server part of the application (Fastify is used here).
By editing the corresponding files, you can run the project:
npm start After that, you can try it by going to
localhost:3000 in your browser.And something else. If you like my development, I will be immensely grateful for the asterisk on GitHub .
Now let's look at the technologies used here and the features of working with them.
Fastify
Fastify is a fast and economical web framework for Node.js. This project was originally created by two programmers. Now the team of those who work on it, has 10 people, more than 130 people help in the development of the project, he gathered almost 10,000 stars on GitHub.
Fastify was influenced by Node.js frameworks, like Express and Hapi, which have been around for quite some time. It was initially aimed at performance, at the convenience of programmers and at expanding its capabilities with the help of plug-ins. This, by the way, is one of my favorite features of Fastify.
If you are not familiar with the Fastify framework or want to know it better, I can recommend its official documentation .
It should be noted that I am related to Fastify. I am a member of the main development team and I am mainly engaged in supporting the project site and working on its documentation.
Preact
Preact is a library for developing user interfaces for web projects, which was created by one person as a compact and fast replacement for React. This project was quite successful, it is now engaged in a whole team of developers, on GitHub, he scored more than 20,000 stars.
One of the reasons I like Preact is that this library has an extensible layer describing the visual components of the application. Under normal conditions, this library can be used with JSX in combination with Babel to translate code, but if you do not want to install Babel and customize the application build process, you can use Preact, for example, in conjunction with the htm library, which uses template literals and does not require Transpilation when running projects in which it is used in modern browsers.
We will use the htm library in this material and will soon consider a few examples.
Project Overview
Here we look at the whole process of creating a project. Our goal will be to develop a simple web application that displays information about the time on the server at the time of its launch. Here, in order to make it clearer what we will strive for.
Application in browser
This is a single-page application (Single Page Application, SPA), in which Preact and htm are used to form its client part, and Fastify is used to create an API designed to get server time.
The attentive reader may have noticed that the page shown in the previous figure has a pretty favicon icon. True, he is very small there, so I'm going to make it easier for those who, trying to break his eyes, try to make out. Here is his larger version.
Favicon
Setting up the server side of the application
Let's start with creating a new folder:
mkdir server-time cd server-time Now we initialize the NPM project and install Fastify:
npm init -y npm i --save fastify@next fastify-static@next fastify-cli Please note that when describing some dependency packages, I used the
@next construction. This is done to ensure that the project uses the Fastify 2 library, which is currently in the release candidate state, but will very soon become the main stable version.Please note that you can also create a new project based on Fastify using the command tool
fastify-cli : npx fastify-cli generate server-time While writing this material, this team creates a project designed to use Fastify 1.x, but very soon, after the release of Fastify 2, this tool will be updated.
Let's analyze the installed packages:
fastifyis the main component of the framework.fastify-staticis an additional plugin that allows you to conveniently serve static files with the Fastify server.fastify-cliis a command-line tool that allows you to create projects based on Fastify.
At the moment we are ready to create an API based on Fastify. So let's put the server code in the
src/server/server.js : const path = require('path') module.exports = async function(fastify, opts) { // `src/ui` fastify.register(require('fastify-static'), { root: path.join(__dirname, '..', 'ui'), }) // API fastify.get('/api/time', async (request, reply) => { return { time: new Date().toISOString() } }) } I believe that the above code explains itself well, but there are some interesting details that are worth telling. This will be especially useful for those who have no experience with Fastify.
The first thing you can notice in this code is that the
async keyword is used here. Fastify supports both async / await style development, and a more traditional callback based approach. What exactly to choose depends on the preferences of a particular developer.Another interesting detail is that we define the server as an exported module here. This module (called “plugin” in the Fastify jargon) is a function that takes as an argument an instance of Fastify (
fastify ) and a set of options ( opts ). Inside the module declaration, we can use a fastify instance for registering plugins. This is what happens with the fastify-static plugin. We can also describe HTTP endpoints using special methods like fastify.get and fastify.post .The modular approach used here, although it looks a bit unusual, has its advantages. First we need to note that it allows you to combine multiple servers. Imagine that you created a server designed to serve your blog, and another one for the forum. They can be easily embedded in an existing application by attaching them to paths like
/blog and /forum .Moreover, this approach allows abstraction of applications and sub-applications from server bindings (we are talking about, for example, binding of sockets), passing the solution to this problem either to the root application or
fastify-cli .Start the server using the
fastify command line fastify : node_modules/.bin/fastify start --log-level info src/server/server.js In order to simplify your life, we can add this command to the
scripts section of our package.json file: { "scripts": { "start": "fastify start --log-level info src/server/server.js" } } Before actually starting the server, we need to make sure that there is a folder in which static resources will be located. Otherwise,
fastify-static will fastify-static error. Create this folder: mkdir src/ui Now we can start the application using the
npm start command and navigate using the browser to the address localhost:3000/api/time .If everything works correctly, in the browser you will see something like the following:
{ "time": "2019-02-17T19:32:03.354Z" } At this point, you can appreciate another nice opportunity Fastify. It lies in the fact that JSON serialization, in the event that a route returns an object, is applied automatically.
Now work on the server API is complete. Let's do the frontend.
Setting frontend
All the code of our project related to the frontend will be in the
src/ui folder. It will consist of 5 files:app.js- Preact application code.bootstrap.min.css- CSS code for styling the application (it is taken directly from the Bootstrap framework).favicon.ico- favicon file. If you are developing a serious application, you cannot do without a good favicon file.index.htmlis the main HTML file of our one-page application.preacthtm.js- code for Preact and htm libraries.
To begin with, we place in the folder the files, which are styles, libraries and the favicon icon:
curl "https://unpkg.com/htm@2.0.0/preact/standalone.js" > src/ui/preacthtm.js curl "https://stackpath.bootstrapcdn.com/bootstrap/4.3.1/css/bootstrap.min.css" > src/ui/bootstrap.min.css curl "https://github.com/lmammino/fastify-preact-htm-boilerplate/blob/master/src/ui/favicon.ico?raw=true" > src/ui/favicon.ico Now create the file
src/ui/index.html : <!DOCTYPE html> <html lang="en"> <head> <meta charset="utf-8" /> <meta name="viewport" content="width=device-width, initial-scale=1, shrink-to-fit=no" /> <!-- Bootstrap CSS --> <link rel="stylesheet" href="/bootstrap.min.css" /> <title>My awesome server time</title> </head> <body> <div id="app"></div> <!-- JavaScript --> <script src="/preacthtm.js"></script> <script src="/app.js"></script> </body> </html> Before us is a completely normal HTML page, with which we load all resources (CSS and JS) and create an empty
<div> element with the app identifier, into which we will output our application during the execution of the project.Now let's take a look at the application code, which should be in the
src/ui/app.js : /* htmPreact */ const { html, Component, render } = htmPreact class App extends Component { componentDidMount() { this.setState({ loading: true, time: null }) fetch('/api/time') .then(response => response.json()) .then(data => this.setState({ loading: false, time: data.time })) } render(props, state) { return html` <div class="container mt-5"> <div class="row justify-content-center"> <div class="col"> <h1>Hello from your new App</h1> <div> ${state.loading && html` <p>Loading time from server...</p> `} ${state.time && html` <p>Time from server: <i><font color="#999999">${state.time}</font></i> </p> `} </div> <hr /> <div> Have fun changing the code from this boilerplate: <ul> <li>UI code available at <code>/src/ui</code></li> <li>Server-side code available at <code>/src/server</code></li> </ul> </div> </div> </div> </div> ` } } render( html` <${App} /> `, document.getElementById('app') ) In this application, there is only one state component, called the
App . The state of this component includes 2 variables:loadingis a boolean variable used to indicate whether a request is made to a server API at some point in time to get information about server time.time- the string that contains the latest time information received from the server.
If you are familiar with React, then you can easily understand the above code.
Using Preact and htm, we can create components by declaring classes that extend the built-in class
Component .In this class, we can describe the behavior of a component using life-cycle methods, like
componentDidMount() , and also use a method that behaves like a normal render() method from React.In our case, as soon as the component is attached to the page (the
componentDidMount() method), we set the state loading property and execute an API request using fetch .After the request is completed, we set the value of the
time state property and reset the loading property to false .The
render() method is called automatically every time a component changes state or when new properties are passed to it. In this method, we describe the DOM component using htm.The htm library allows you to describe DOM nodes using tagged template literals with a special tag -
html . Within our template literal, there may be dynamic expressions, like the ones we use to check the state and to decide what to display on the screen if the application loads data from the server, and if the data already uploaded.Another thing to note is that we need to create an instance of the application and display it on an HTML page. This is done using the
render() function of the global htmPreact object.Now the work on the front-end application is complete. You can restart the server, go to
localhost:3000 and experiment with what we just created. For example, you can develop something based on this application. And when what you build seems interesting enough to show it to someone else, you will probably find it useful to pack your application in a Docker container.Containerization application
I think the best way to show off your new small projects to others is to use Docker features for this purpose.
Thanks to Docker, anyone who tries to run your application in their own hands will be relieved of thinking about whether he has the right version of Node.js and NPM installed, he will not need to download the application’s source code to ensure that by entering the correct sequence of commands , install its dependencies and start the server.
In order to package the application into the Docker container, we need to create a very simple
Dockerfile file in the root folder of our project: FROM node:11-alpine WORKDIR /app COPY . /app RUN npm install --production EXPOSE 3000 CMD ["npm", "start"] Here we describe the following actions:
- The image is created based on the image of Node.js 11, built on the basis of Alpine Linux.
- Everything from the current folder is copied to the container
/appfolder. - After that we run the
npm installcommand to download and install dependencies. The use of the--productionflag results in the fact that only the dependencies necessary for the deployment of the project in production will be installed. This speeds up image creation if the project uses many development dependencies. - We point out that the container must have 3000 open, on which, by default, the server will work.
- As a result, we describe the command,
npm start, which will be executed during container startup. She runs the application.
In order to build an image for a container, execute the following command:
docker build -t server-time . After a few seconds, the image should be ready and you should be able to run the container:
docker run -it -p 3000:3000 server-time The
-p allows you to configure the connection port of container 3000 to the local port 3000. This will allow you to access the containerized application at localhost:3000 .Now you are ready to share your application with other people. In order to run it in the Docker environment, it is enough, provided that Docker is installed on the computer, to execute the above two commands in its folder.
Results
In this article, we talked about how to create an environment for the rapid development of web applications using Fastify and Preact. In addition, we talked about how to share the application with other people using Docker.
As mentioned above, the proposed tools are designed for rapid prototyping, so now you may be wondering what is missing here for developing real-world applications. Most likely, you, speaking of "real applications", mean the following possibilities:
- Compilation of the resources of the interface of the application: the creation of optimized files (bundles), possibly using Webpack, Babel, or other means.
- Routing in the interface part of the application.
- Server rendering.
- Means of permanent data storage.
All these possibilities for developing real-world applications have not yet been added to the set of technologies considered here, so for the time being I perceive it as a means for developing prototypes. I am sure that if you liked what you saw, and you consider all this as the basis for future applications that solve real problems, you can easily find what you need and create, based on Fastify and Preact, applications that are ready for release in production.
Dear readers! How do you create web application prototypes?
Source: https://habr.com/ru/post/442652/
All Articles