Simplest command line on NASM and QEMU

So, immediately to the point. We will write under Linux, on NASM and using QEMU. Installing this is easy, so skip this step.
It is understood that the reader is familiar with the syntax of NASM at least at a basic level (however, there will be nothing particularly complicated here) and understands what registers are.
Basic theory
The first thing that starts the processor when the computer is turned on is the BIOS code (or UEFI, but here I will only talk about the BIOS), which is "sewn up" in the motherboard's memory (specifically - at 0xFFFFFFF0).
Immediately after powering on, the BIOS launches Power-On Self-Test (POST) - a self-test after powering on. The BIOS checks the memory, detects and initializes the connected devices, checks the registers, determines the size of the memory, and so on and so on.
The next step is to define a boot disk from which you can boot the OS. A boot disk is a disk (or any other drive) whose last 2 bytes of the first sector (the first sector means the first 512 bytes of the drive, since 1 sector = 512 bytes) is 55 and AA (in hexadecimal). Once the boot disk is found, the BIOS will load its first 512 bytes into RAM at 0x7c00 and transfer control to the processor at that address.
Of course, in these 512 bytes will not work to fit a full-fledged operating system. Therefore, it is usually in this sector that the primary loader is put, which loads the main OS code into RAM and transfers control to it.
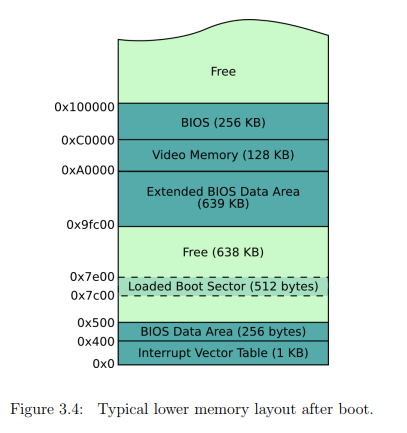
From the very beginning, the processor operates in Real Mode (= 16-bit mode). This means that it can work only with 16-bit data and uses segment addressing of memory, and can also address only 1 MB of memory. But we will not use the second one here. The picture below shows the state of the RAM when control is transferred to our code (the picture is taken from here ).
The last thing to say before the practical part is the interruption. An interrupt is a special signal (for example, from an input device, such as a keyboard or mouse) to a processor that says you need to immediately interrupt the execution of the current code and execute the code for the interrupt handler. All addresses of interrupt handlers are in the Interrupt Descriptor Table (IDT) in RAM. Each interrupt has its own interrupt handler. For example, when you press a keyboard key, an interrupt is triggered, the processor stops, remembers the address of the interrupted instruction, saves all values of its registers (on the stack), and proceeds to execute the interrupt handler. As soon as its execution ends, the processor restores the values of the registers and goes back to the interrupted instruction and continues execution.
For example, the BIOS uses the 0x10 interrupt (hexadecimal format), and the 0x16 interrupt is used to wait for a key to be pressed. In fact, these are all interruptions that we need here.
Also, each interrupt has its own subfunction, which determines the peculiarity of its behavior. To display something on the screen in text format (!), You need to enter the value 0x0e in the AH register. In addition, interrupts have their own parameters. 0x10 takes values from ah (defines a specific subfunction) and al (the character to be output). In this way,
mov ah, 0x0e mov al, 'x' int 0x10 will display the character 'x'. 0x16 takes a value from ah (a specific sub-function) and loads into the register al the value of the entered key. We will use the function 0x0.
Practical part
Let's start with the auxiliary code. We will need two-line comparison functions and a line output function on the screen. I tried to describe as clearly as possible the operation of these functions in the comments.
str_compare.asm:
compare_strs_si_bx: push si ; push bx push ax comp: mov ah, [bx] ; , cmp [si], ah ; ah jne not_equal ; , cmp byte [si], 0 ; , je first_zero ; inc si ; bx si inc bx jmp comp ; first_zero: cmp byte [bx], 0 ; bx != 0, , jne not_equal ; , not_equal mov cx, 1 ; , cx = 1 pop si ; pop bx pop ax ret ; not_equal: mov cx, 0 ; , cx = 0 pop si ; pop bx pop ax ret ; The function takes the SI and BX registers as parameters. If the lines are equal, then CX is set to 1, otherwise - 0.
It is also worth noting that the registers AX, BX, CX and DX are divided into two single-byte parts: AH, BH, CH, and DH for the high byte, and AL, BL, CL and DL for the low byte.
Initially, it is implied that bx and si are pointers (!) (That is, stores the address in memory) to some address in the memory where the beginning of the line is located. Operation [bx] takes a pointer from bx, passes to that address, and takes some value from there. inc bx means that the pointer will now refer to the address immediately following the original address.
print_string.asm:
print_string_si: push ax ; ax mov ah, 0x0e ; ah 0x0e, call print_next_char ; pop ax ; ax ret ; print_next_char: mov al, [si] ; cmp al, 0 ; si jz if_zero ; int 0x10 ; al inc si ; jmp print_next_char ; ... if_zero: ret As a parameter, the function accepts the SI register and prints a string, byte by byte.
We now turn to the main code. To begin with, let's define all variables (this code will be located at the very end of the file):
; 0x0d - , 0xa - wrong_command: db "Wrong command!", 0x0d, 0xa, 0 greetings: db "The OS is on. Type 'help' for commands", 0x0d, 0xa, 0xa, 0 help_desc: db "Here's nothing to show yet. But soon...", 0x0d, 0xa, 0 goodbye: db 0x0d, 0xa, "Goodbye!", 0x0d, 0xa, 0 prompt: db ">", 0 new_line: db 0x0d, 0xa, 0 help_command: db "help", 0 input: times 64 db 0 ; - 64 times 510 - ($-$$) db 0 dw 0xaa55 The carriage return character moves the carriage to the left edge of the screen, that is, at the beginning of the line.
input: times 64 db 0 means that we allocate 64 bytes for the input buffer and fill them with zeros.
The remaining variables are needed to display some information, then you will understand by the code why they are all needed.
times 510 - ($-$$) db 0 dw 0xaa55 means that we explicitly set the size of the output file (with the .bin extension) as 512 bytes, fill the first 510 bytes with zeros (of course, they are filled before the execution of the entire code), and the last two bytes - with the same "magic" bytes 55 and AA . $ means the address of the current instruction, and $$ - the address of the very first instruction of our code.
Let's go to the actual code:
org 0x7c00 ; (1) bits 16 ; (2) jmp start ; start %include "print_string.asm" ; %include "str_compare.asm" ; ==================================================== start: mov ah, 0x00 ; (3) mov al, 0x03 int 0x10 mov sp, 0x7c00 ; (4) mov si, greetings ; call print_string_si ; mainloop (one). This command makes it clear to NASM that we are executing code, starting at address 0x7c00. This allows it to automatically offset all addresses relative to this address, so that we do not explicitly do this.
(2). This command instructs NASM to operate in 16-bit mode.
(3). When launching, QEMU prints on the screen a lot of unnecessary information to us. To do this, set to ah 0x00, to al 0x03 and call 0x10 to clear the screen of everything.
(four). To save registers on the stack, you need to specify at what address its vertex will be located using the stack pointer SP. SP will indicate the area in memory in which the next value will be written. Add a value to the stack - SP goes down through memory by 2 bytes (since we are in Real Mode, where all the register operands are 16-bit, that is, two-byte values). We specified 0x7c00, so the values in the stack will be stored right next to our code in memory. Once again - the stack grows down (!). This means that the more values there are in the stack, the smaller the memory pointer will be indicated by the stack pointer SP.
mainloop: mov si, prompt ; call print_string_si call get_input ; jmp mainloop ; mainloop... The main loop. Here, with each iteration, we print the character ">", after which we call the get_input function, which implements work with keyboard interruption.
get_input: mov bx, 0 ; bx input_processing: mov ah, 0x0 ; 0x16 int 0x16 ; ASCII cmp al, 0x0d ; enter je check_the_input ; , , ; cmp al, 0x8 ; backspace je backspace_pressed cmp al, 0x3 ; ctrl+c je stop_cpu mov ah, 0x0e ; - ; int 0x10 mov [input+bx], al ; inc bx ; cmp bx, 64 ; input je check_the_input ; , enter jmp input_processing ; (1) [input + bx] means that we take the address of the beginning of the input input buffer and add bx to it, that is, we get to bx + the 1st element of the buffer.
stop_cpu: mov si, goodbye ; call print_string_si jmp $ ; ; $ Everything is simple here - if you press Ctrl + C, the computer just infinitely performs the jmp $ function.
backspace_pressed: cmp bx, 0 ; backspace , input , je input_processing ; mov ah, 0x0e ; backspace. , int 0x10 ; , mov al, ' ' ; , int 0x10 ; mov al, 0x8 ; int 0x10 ; backspace dec bx mov byte [input+bx], 0 ; input jmp input_processing ; In order not to erase the '>' character when pressing the backspace, we check if the input is empty. If not, we do nothing.
check_the_input: inc bx mov byte [input+bx], 0 ; , ; ( '\0' ) mov si, new_line ; call print_string_si mov si, help_command ; si help mov bx, input ; bx - call compare_strs_si_bx ; si bx ( help) cmp cx, 1 ; compare_strs_si_bx cx 1, ; je equal_help ; => ; help jmp equal_to_nothing ; , "Wrong command!" Here, I think everything is clear from the comments.
equal_help: mov si, help_desc call print_string_si jmp done equal_to_nothing: mov si, wrong_command call print_string_si jmp done Depending on what was entered, we output either the text of the variable help_desc, or the text of the variable wrong_command.
; done input done: cmp bx, 0 ; input je exit ; , mainloop dec bx ; , mov byte [input+bx], 0 jmp done ; exit: ret Actually, the whole code is:
prompt.asm:
org 0x7c00 bits 16 jmp start ; start %include "print_string.asm" %include "str_compare.asm" ; ==================================================== start: cli ; , ; mov ah, 0x00 ; mov al, 0x03 int 0x10 mov sp, 0x7c00 ; mov si, greetings ; call print_string_si ; mainloop mainloop: mov si, prompt ; call print_string_si call get_input ; jmp mainloop ; mainloop... get_input: mov bx, 0 ; bx input_processing: mov ah, 0x0 ; 0x16 int 0x16 ; ASCII cmp al, 0x0d ; enter je check_the_input ; , , ; cmp al, 0x8 ; backspace je backspace_pressed cmp al, 0x3 ; ctrl+c je stop_cpu mov ah, 0x0e ; - ; int 0x10 mov [input+bx], al ; inc bx ; cmp bx, 64 ; input je check_the_input ; , enter jmp input_processing ; stop_cpu: mov si, goodbye ; call print_string_si jmp $ ; ; $ backspace_pressed: cmp bx, 0 ; backspace , input , je input_processing ; mov ah, 0x0e ; backspace. , int 0x10 ; , mov al, ' ' ; , int 0x10 ; mov al, 0x8 ; int 0x10 ; backspace dec bx mov byte [input+bx], 0 ; input jmp input_processing ; check_the_input: inc bx mov byte [input+bx], 0 ; , ; ( '\0' ) mov si, new_line ; call print_string_si mov si, help_command ; si help mov bx, input ; bx - call compare_strs_si_bx ; si bx ( help) cmp cx, 1 ; compare_strs_si_bx cx 1, ; je equal_help ; => ; help jmp equal_to_nothing ; , "Wrong command!" equal_help: mov si, help_desc call print_string_si jmp done equal_to_nothing: mov si, wrong_command call print_string_si jmp done ; done input done: cmp bx, 0 ; input je exit ; , mainloop dec bx ; , mov byte [input+bx], 0 jmp done ; exit: ret ; 0x0d - , 0xa - wrong_command: db "Wrong command!", 0x0d, 0xa, 0 greetings: db "The OS is on. Type 'help' for commands", 0x0d, 0xa, 0xa, 0 help_desc: db "Here's nothing to show yet. But soon...", 0x0d, 0xa, 0 goodbye: db 0x0d, 0xa, "Goodbye!", 0x0d, 0xa, 0 prompt: db ">", 0 new_line: db 0x0d, 0xa, 0 help_command: db "help", 0 input: times 64 db 0 ; - 64 times 510 - ($-$$) db 0 dw 0xaa55 To compile all of this, enter the command:
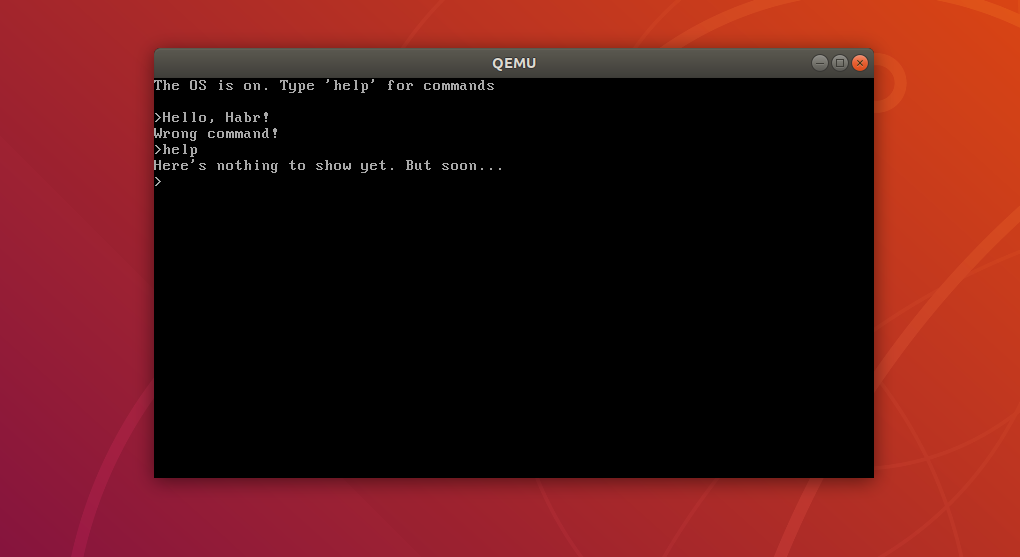
nasm -f bin prompt.asm -o bootloader.bin And we get a binary with our code at the output. Now run the QEMU emulator with this file (-monitor stdio allows you to print the register value at any time using the print $ reg command):
qemu-system-i386 bootloader.bin -monitor stdio And we get the output:
')
Source: https://habr.com/ru/post/442428/
All Articles