Improving Development Productivity with Vue - Part 2
If you have not read Part 1, you can correct this misunderstanding here .
Reuse configurations
The new library vue-cli-3 eliminated the need to maintain complex build patterns and configurations. Instead, it allows the developer to focus on creating his application. It also has little-known functionality that can significantly increase your efficiency. If you do not have vue-cli-3 installed, you can install it by running:
install @ vue / cli
yarn global add @vue/cli // npm i @vue/cli -g One of the unnoticed benefits is the deleted presets . They allow you to define an explicit set of plug-ins and their options when creating a new project on Vue. You can even explicitly install versions of these plugins to further define the functionality. If you used vue-cli-3, you probably came across this when creating a new application:
vue-cli-3 create

In the option "Manual selection" you are provided with a list of packages that can be pre-installed with your new application. In this article, I will select some standard configuration options, such as vue-router and vuex, and then proceed to the following queries.
Manual configuration options

After completing the queries, vue-cli will ask you if you want to save this preset for future projects. This is very useful when you create multiple applications and know which parameters you want for each installation.
Local Presets

When you save the configuration as a preset, it will be available the next time vue create is started.
From this point on, our application installs dependencies, and we’ll have the Vue application ready. But what about presets? Let's look at the .rc file that cli has created. It will be in your home directory and is called .vuerc .
~ / .vuerc file
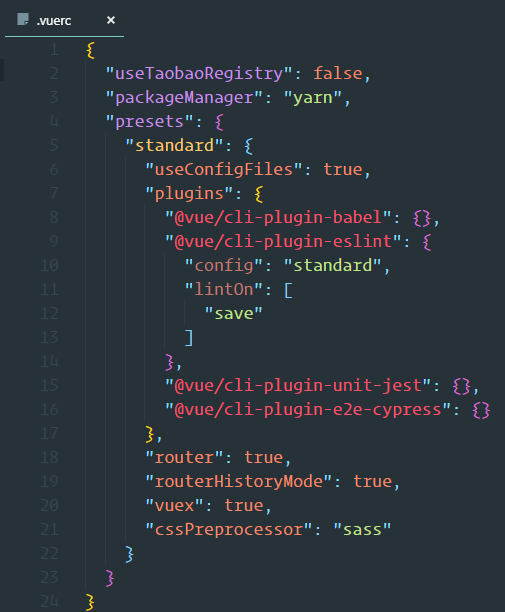
Today we are going to use this configuration to create our own preset, which can remotely customize any new project we are working on.
Creating a preset
Let's create a new my-preset folder and copy the default configuration into the preset.json file. You may have noticed above that configuration parameters were passed to cli-plugin-eslint. Since all vue-cli-3 plugins use inquire for user responses, we can give them options and skip them.
If you go to the vue-cli-3 repository and go to the available packages, you will find all the above-mentioned plugins in the @vue directory.
Vue-cl monorepo

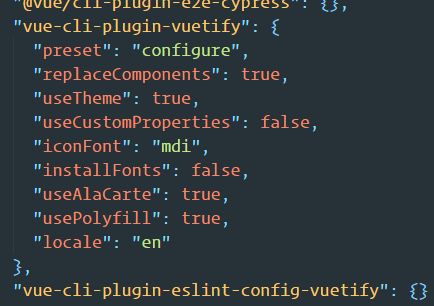
Each package has a list of options for which we can enable the default settings. First, let's connect the vuetify-cli-plugin plugin . Opening the file prompts.js will reveal all available options that we can pre-configure under the plugins. Let's add these options to the preset:
Vuetify plugin options
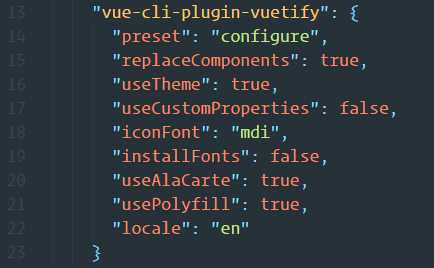
At this stage, any cli-plugin that you want to add can be done by adding a new property to the plugin and examining the available parameters that need to be configured.
Creating a plugin
This will be a very simple implementation of the vue-cli-3 plugin. For a more advanced walk, please visit the official documentation .
Depending on the settings, you may have existing functions in the application that you would like to automate with vue-cli. This can be done without creating an explicit package, but let's imagine that you want it to be available for detection by the @ vue / cli-service and be accessible to other developers.
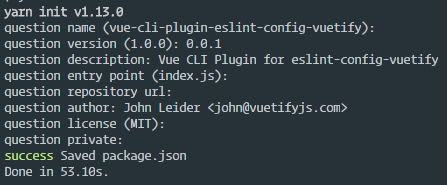
Create a new project with the name vue-cli-plugin- <your plugin name> .
Creating a new package
For this plugin, we want to change the eslint configuration of our application by adding
eslint-config-vuetify .
To do this, we will create a generator file that tells vue-cli to add a new package and update the eslint configuration.
For all my projects, I use eslint-config-vuetify , and I would like to upload it to my projects.
Vue-cli generator file
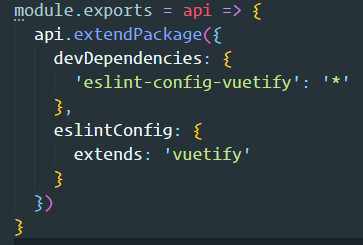
Here I am setting up a basic package extension. It is expected that the generator files will export the function and provide access to modify the project files. This feature tells the client to add the eslint configuration as a dependency, and then update the project configuration.
After posting to npm, vue-cli can now pick up a package for use by others!
Let's go back and update our preset with a new plugin.
Adding a new plug-in preset
Now it's time to accept our application for a spin. We can create a new project by telling vue to use the preset.
And voila! One line, and we have a reusable starting point for new projects, pre-configured as we like. If you want to discuss this article, do not hesitate to contact me in the Discord community .
Repositories
')
Source: https://habr.com/ru/post/442344/
All Articles