SketchUp extension (plug-in) for furniture designing by a programmer
When calculating the cost of a new kitchen, the price was so high that I decided to make it myself since it would cost twice as cheap. For training I decided to make a desktop for myself. A quick understanding came: to make a good thing you need to make a 3D model. This will allow the design phase to see how the furniture will look like and think about how the assembly will take place in the future. Since I do not do 3D modeling, I began to look for a simpler program. And the easiest thing I found is SketchUp . When creating a model, it was constantly necessary to edit the model due to constantly changing dimensions. And after the third change, an idea emerged - to make a parameterized model so that it itself was generated with the required dimensions. SketchUp supports scripts in the Ruby language and this article is about what I did.
The solution is quite simple - I create some API that allows you to create 3D objects of laminated particle board with the necessary parameters. The finished model is assembled from these objects and sheet sizes are uploaded to a separate file for transfer to the center of the cut. As a result of operation, I added the ability to specify edges for sheets. This plugin was used to design more than a dozen different products from chipboard. With each new project, the plugin was being finalized and modified, the convenience was improved and the API was improved. As an example, the last project is a table-table. In the picture is a model + finished product (bird and dog to attract attention :))
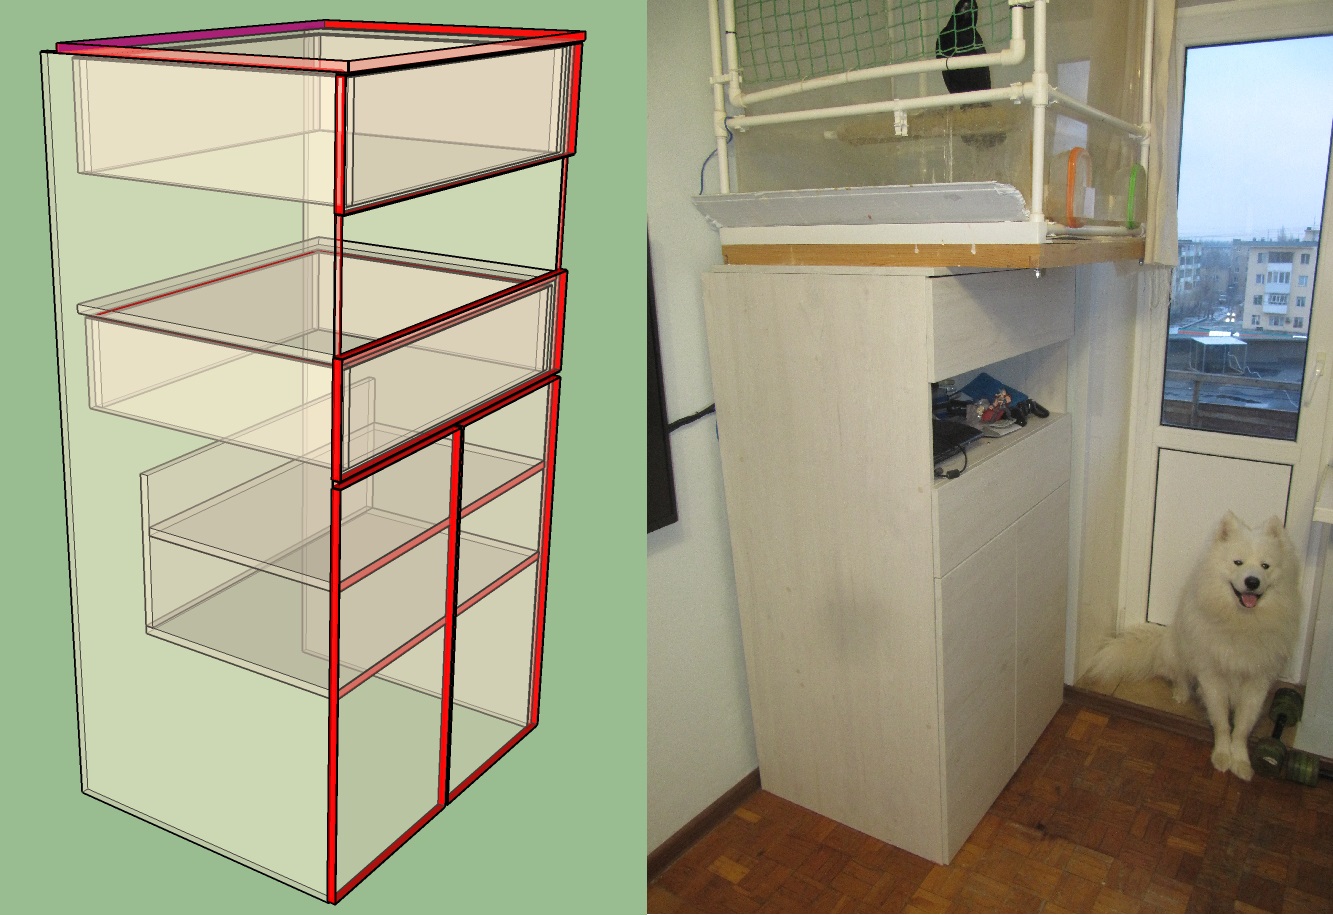
Red - is 2 mm edge, purple - edge 0.4 mm. The bottom shelves are not up to the end, as there is a radiator near the wall. The tabletop is 4 cm behind the wall so that the heat from the radiator rises up and heats the wall ( in general, it is very convenient to make the furniture yourself - you can make it to fit your size ).
# $weght = 16.0 # $zazor = 5.0 # $dWidth = 26.0 # $width = 770 $offsetStena = 40 $dStoledhnica = 20 $height = 2500 - 150 - 900 $depthLeft = 600 $depthRight = $depthLeft - 175 $jshikHeight = 200 $heightPlanka = 300 $heightJshik = 190 $heightJshikOffset = 10 # def object3D_main() # Shasoft::Object3D::loadLibrary() # Shasoft::Object3D::LDSP::setWeght($weght) # stenaLeft = Shasoft::Object3D::LDSP::create($height-$weght,$depthLeft,"2 0 0 1").name(" ").rotateY(-90) stenaRight = Shasoft::Object3D::LDSP::create($height-$weght,$depthLeft,"2 0 0 1").name(" ").rotateY(-90).moveX($width-$weght) stoleshnica = Shasoft::Object3D::LDSP::create($width,$depthLeft+$dStoledhnica-$offsetStena,"2 2 1 2").name("").move(-$weght,-$dStoledhnica,$height-$weght) polka1 = Shasoft::Object3D::LDSP::create($width-$weght*2,$depthRight,"2 0 0 0").name(" 1").moveZ(400) polka2 = Shasoft::Object3D::LDSP::create($width-$weght*2,$depthRight-$weght,"2 0 0 0").name(" 2").moveZ(600) polka3 = Shasoft::Object3D::LDSP::create($width-$weght*2,$depthLeft-$offsetStena,"2 0 0 0").name(" 3").moveZ(800+$heightJshik+$heightJshikOffset+10-$weght-5) pereborka1 = Shasoft::Object3D::LDSP::create($width-$weght*2,$heightPlanka).name("").rotateX(90).moveY($depthRight).moveZ(400+$weght) # jshik1box = Shasoft::Object3D::LDSP::create_box($width-$weght*2-$dWidth,$depthLeft-$zazor-$offsetStena,$heightJshik," ",1).moveX($dWidth/2).moveZ($height-$heightJshik-$heightJshikOffset-$weght) jshik1Fasad = Shasoft::Object3D::LDSP::create($width,200,"2 2 2 2").rotateX(90).moveX(-$weght).moveZ($height-$heightJshik-$heightJshikOffset-$weght-5).name(" 1") jshik1 = Shasoft::Object3D::create(jshik1box,jshik1Fasad) # jshik2box = Shasoft::Object3D::LDSP::create_box($width-$weght*2-$dWidth,$depthLeft-$zazor-$offsetStena,$heightJshik-$weght-5," ",1).moveX($dWidth/2).moveZ($height-$heightJshik-$heightJshikOffset-$weght) jshik2Fasad = Shasoft::Object3D::LDSP::create($width,200,"2 2 2 2").rotateX(90).moveX(-$weght).moveZ($height-$heightJshik-$heightJshikOffset-$weght-5).name(" 2") jshik2 = Shasoft::Object3D::create(jshik2box,jshik2Fasad).moveZ(-$height+800+$heightJshik+$heightJshikOffset+$weght+10) # widthDver = $width/2-5 dver1 = Shasoft::Object3D::LDSP::create(widthDver,800-5-10,"2 2 2 2").rotateX(90).moveZ(5).moveX(-$weght).name(" 1") dver2 = dver1.copy.moveX($width-widthDver).name(" 2") # for i in 0..5 Shasoft::Object3D::LDSP::create(467,247,"0 2 0 0").name(" ").moveX(-600).moveZ(i*50) end for i in 0..2 Shasoft::Object3D::LDSP::create(467,640,"0 2 0 0").name(" 2").moveX(-600-600).moveZ(i*50) end # Shasoft::Object3D::LDSP::write_csv( File.dirname(__FILE__)+"/main.csv" ) #Shasoft::Object3D::LDSP::write_csv_cut( File.dirname(__FILE__)+"/cut.csv" ) #Shasoft::Object3D::show() end Installation
Download the file Object3D.rbz
Run SketchUp
Opening the Extension Manager (Window / Extension Manager)
Click the button "Install extension" and select the downloaded file Object3D.rbz
After this, the plugin asks for the directory where the projects will be stored. Those. The window "Specify the project directory" is displayed and you need to specify the folder where you will store your projects.
As a result, we have our extension.

Using
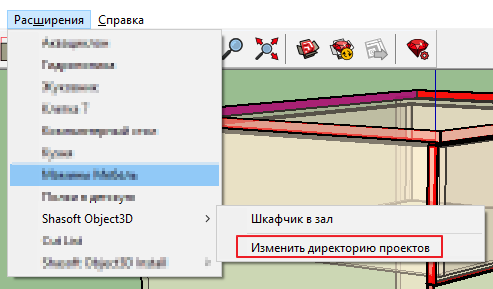
Go to the folder that we specified to store projects. This folder can be changed in the plugin menu.
Create a folder in the folder with the name of our project. In my case, this is the "Locker in the hall". Then go to the created directory and create the file main.rb in which we create the function of the entry point
# def object3D_main() ... # end Restart SketchUp and in the plug-in menu you will have an item with the name of the folder you created. Now you selecting this item will happen the following:
- clearing the ruby console
- delete all items in the current project
- loading the main.rb file from the specified directory
- function call object3D_main
In the object3D_main function, you need to generate your model. You can copy the code that I gave above into the main.rb file and then you will generate my locker.
API
File "core.rb"
Each function returns a Shasoft :: Object3D :: Object3D object that contains methods for moving an object and rotating it.
The name () function sets the name of the object. Do not neglect them. When building can help a lot :)
The functions of the object moveX , moveY , moveZ allow you to move the object along the corresponding axes.
The function move (x, y, z) allows you to move an object along three axes at once.
Object functions rotateX , rotateY , rotateZ allow you to rotate the object around the respective axes.
There are functions aliases moveRed , moveGreen , moveBlue , rotateRed , rotateGreen , rotateBlue where the X (red), Y (green), Z (blue) axes are named after their color in SketchUp. Maybe someone will be more comfortable.
Each function returns a pointer to the object itself. This allows you to make a call chain# 90 X Y 100 obj.rotateX(90).moveY(100)The set object function (dict, key, value) allows you to set the value of an attribute. dict - dictionary name, key - attribute name, value - value
The get object function (dict, key, value = nil) allows you to get the value of an attribute. dict - dictionary name, key - attribute name, value - value
The copy method allows you to get a copy of the object (although it is not very stable :))
The group method allows you to get a standard SketchUp :: Group object.
The method for creating an object is defined. As parameters, you can pass a list of Shasoft :: Object3D :: Object3D or SketchUp :: Group objects. If the parameter list is empty, a new group will be created.
# Shasoft::Object3D::create(*args) There is also a function that allows you to get a list of objects (Skechup :: Group). You can specify the name of the dictionary and only objects with such a dictionary will be returned. In particular, this is how I separate the objects of the chipboard sheet from others. When creating, I set an LDSP dictionary on which I then filter all the objects in the scene.
# # dict - Shasoft::Object3D::get(dict=nil) File "2D_weght"
# 3D # pts - x,y # weght - () Shasoft::Object3D::create_pushpull(pts,weght) # # lX - X # lY - Y # weght - Shasoft::Object3D::create_plane(lX,lY,weght) File "ldsp.rb"
# Shasoft::Object3D::LDSP::weght # Shasoft::Object3D::LDSP::setWeght(weght) # Shasoft::Object3D::LDSP::material # Shasoft::Object3D::LDSP::setMaterial(material) # # width - ( X) # depth - ( Y) # kromka - [X , Y , X , Y ], 0 - , 1 - 0.4 , 2 - 2 Shasoft::Object3D::LDSP::create(width,depth,kromka="0 0 0 0") Auxiliary function for creating drawers
# # width - # depth - # height - # name - # is_kromka - 1/0 2 Shasoft::Object3D::LDSP::create_box(width,depth,height,name,is_kromka) work result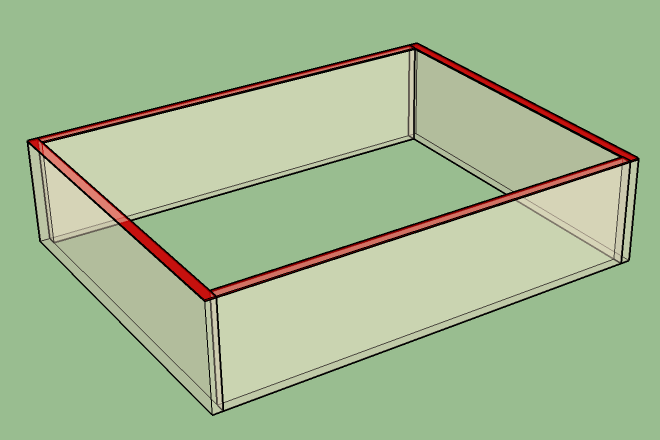
# CSV Shasoft::Object3D::LDSP::write_csv(filepath) as a result, the following csv file will be generated with the following columns
- A - Width
- B - Depth
- C Number of parts
- D - edges in the D-long side format, K-short side. It is in this that they are recorded in the office in which I order the cutting of parts. Perhaps this is the standard.
- E - edges in the format in which you crushed them when generating
- F - Name of all parts. This is useful when building.

In custody
Designing and assembling furniture yourself is about 2 times the money saving. As well as the opportunity to squeeze your individual furniture product into any nonstandard hole in the apartment. I usually collect furniture on confirmatics 7x50 from laminated chipboard 16 mm
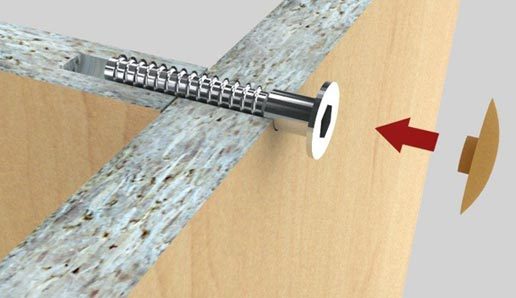
In the presence of a drill for confirmats
(and a little skill) assembly takes not much time.
The only negative - you can get into it . After the desktop, I have already assembled: the kitchen, several cells (for the same bird, it is in the photo), shelves (wall and floor), cabinets and tables. In general, "littered" in the apartment all the unused space.
Link to the plugin page
')
Source: https://habr.com/ru/post/442190/
All Articles