Installing IPS-display in Thinkpad T430S
If you have a ThinkPad T420 / T420S / T430 / T430S laptop, I have great news: you can replace the screen with something worthy! The laptop will require a small surgical operation, but this is doable!
If you have another ThinkPad series, you're lucky ... the T430S has one of the worst screens in recent history, really like a cheap netbook.
Replacing is quite simple, but requires a rather deep immersion in a laptop and a little mess with the adapter. So what to do? Read on!
')
The T430S has an Ivy Bridge processor, up to 16 GB of RAM, an easily removable hard disk and an optical drive (still sometimes useful, although I more often connect an external USB3 drive). Like most ThinkPads, this is a durable laptop, easy to use, and has a large, active user community.
Unlike other laptops, its display is a real, top-class trash . This is a TN matrix (which changes color if you look at it from different angles), and this is one of the worst TN displays you have ever seen in your life. This is really absolute shit. The community has long been looking for a way to replace it: and now, in 2019, finally, there is an acceptable way to install a very good IPS-panel in your ThinkPad T420 / T430 series!
Like many other laptops, the T4 {2,3} 0 {, S} models use the Low Voltage Differential Alarm (LVDS) to communicate with the display. This is an old technology common in laptops for high-speed communications over short distances, such as between a GPU and an LCD. This low voltage system with a fairly low signal voltage (350 mV), although it requires quite a lot of pairs for high bandwidth, but the power consumption is very low, and it is “good enough” for most low resolution displays. The differential line provides for the transmission of two antiphase signals. This is convenient for countering interference when the same signal is subtracted from both phases.
Embedded DisplayPort (eDP) is a much more modern protocol; this is DisplayPort for laptops. Packet communication protocol, much like PCI Express. Now it is used by many external monitors and modern IPS-panels in most laptops.
Notebook IPS panels of suitable size only support eDP, and ThinkPad displays LVDS. These two protocols are completely incompatible ...
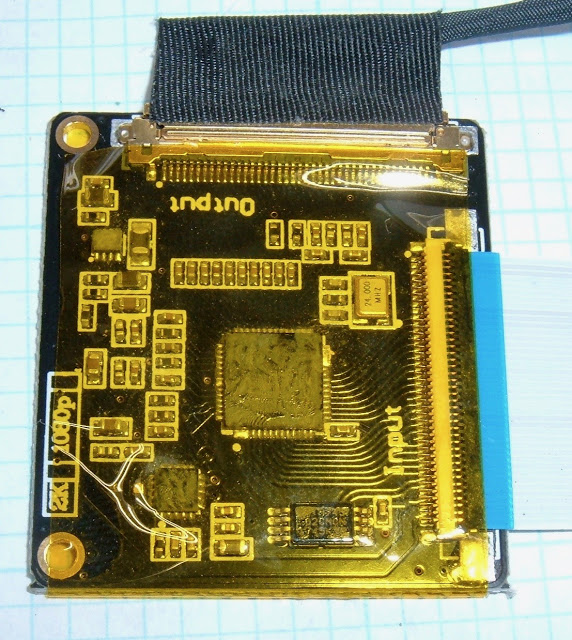
That was until about 2015, when the Chinese comrades created the adapter! This little thing accepts an LVDS signal at the input and outputs the eDP signal to use a modern LCD display! This device costs about $ 70 on eBay and includes either a small microcontroller or an FPGA (I didn’t understand the numbers and don’t intend to disassemble this device) to process the signal. If you can find an LCD with such an adapter, take it - it will probably be cheaper. Otherwise, select one of the recommended LCD models (eBay has a list of supported LCD displays).
Is it dangerous to install this adapter in a laptop? Well, see for yourself. Inspection of the device showed no particularly obvious antennas on the PCB and nothing resembling a wireless transmitter, although I cannot completely rule out that there is some interesting function. However, it works without drivers on the host - so if there’s some kind of hardware backdoor, it doesn’t have an easy way to transfer information to the Internet, and if someone is close enough to pick up the RF radiation, it can just look at the screen. If host drivers were required, I might have refused to use such an adapter, but the built-in LVDS to eDP converter seems like a reasonable gadget. On a normal home laptop, it works quite normally, although it is hardly worth recommending it for a business laptop. Lenovo is a Chinese company at the moment, so another Chinese thing on the tire does not increase the risk.
If you look at the tracks of the microcircuit, they are well rounded - I always like this. Hard turns can lead to signal reflection (a problem at high frequencies) - the angle is wider than the rest of the path, which affects the impedance that causes reflections, and high-frequency alternating current strangely refers to such things. Rounds prevent this. I'm a little surprised that there are no serpentine traces of "equal length", but here it either does not matter, or the chip itself handles distortion.
I hope you are competent enough to parse a laptop. If you need detailed instructions, this article may be difficult for you (or you can find tutorials on YouTube). Lenovo laptops are really easy to disassemble, but they are still complex electronic devices with a huge number of screws.
I used to repair many, many laptops and talk about it . Modern Lenovo is a real pleasure. It is very pleasant to work with him: nothing is hidden too much, a reasonable number of screws basically correspond to each other (say, instead of almost 100 screws of 17 or 25 different types, as happened in some Powerbooks).
Turn off the power before removing it completely, remove the battery and then hold the power switch for a few seconds. This completely drains the charge from the board, and this is important: if there is a residual charge, then you fry the fuse of the inverter, which is difficult to replace. Do not do this.
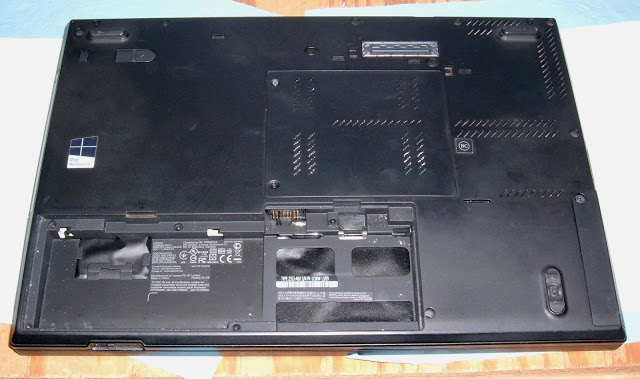
We remove the set of screws from the bottom, remove the drives, etc. If you are not familiar with this model of laptop, it’s easy to find a good guide on the Internet. Just unscrew everything and remember where it is. Every time I work on a laptop, there is a piece of paper with diagrams of different layers nearby: the screws are put in the appropriate places of the sheet, so I can return each screw to where it came from. For a Thinkpad, this is not so critical, but with old Apple hardware, if you don’t follow, then a 4.5 mm screw will go into a 4 mm hole and a 4 mm screw will not go completely into a 4.5 mm hole and ... well if you had to work with it, then you understand me. If not, consider yourself lucky.
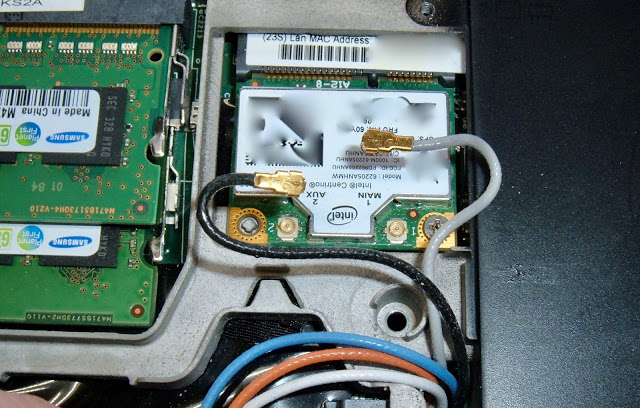
If you need help on how the WiFi antenna cables are connected, see the photo. Even before I started a computer repair blog, I often photographed the complex parts of laptops for reference. I have photos of all kinds of strange things in the archives ... The main antenna is a gray wire, the auxiliary antenna is a black wire. It is not necessary to remove the RAM or wireless card, but you need to pull out the cables. No, you will not know my MAC address ...
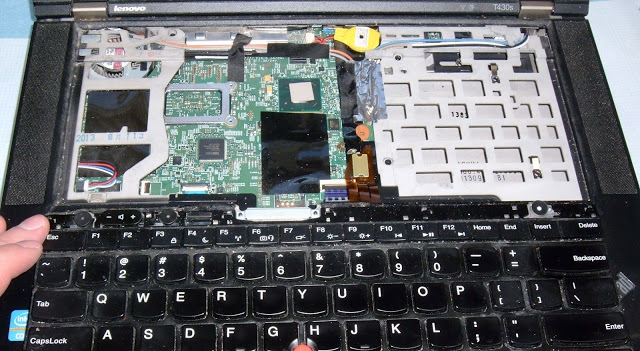
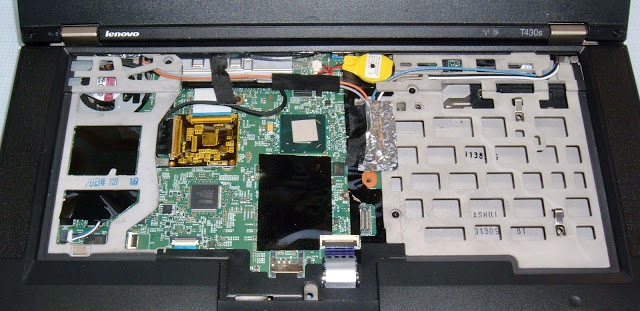
The keyboard gets a shift. Turn off everything around the power / volume switches, etc. (start on the right), then somehow move the keyboard: I think you will move it up, but you can be down - this becomes obvious if you move it back and forth. On the left you will see the motherboard, on the right is the optical drive bay and a bunch of cables. I love the fact that Lenovo leaves long enough cables: the keyboard cable is long enough to push the keyboard completely down before it runs out: some other laptops don't.
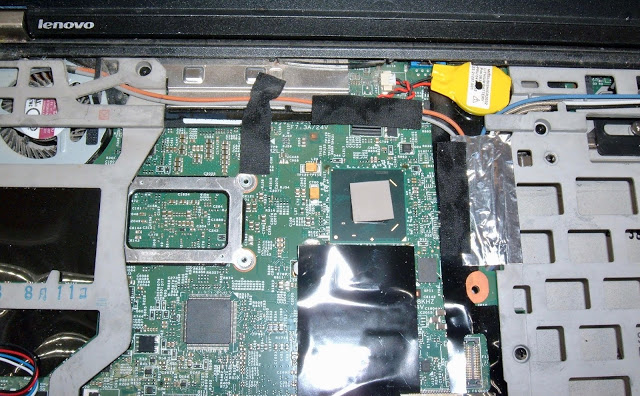
Another reference photo will help you: here we will add a cable and an adapter, but initially everything is aligned from the factory like this. I have long since disassembled a laptop to replace the fan, so the tape is not perfectly flat here.
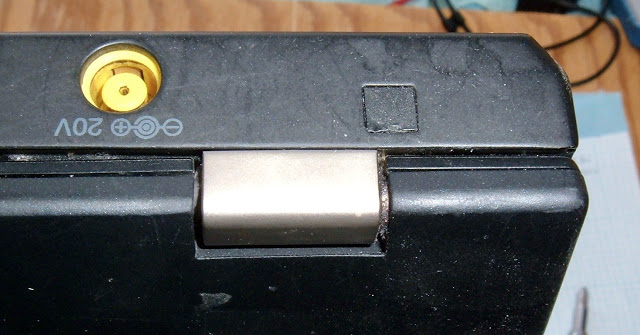
Behind small pieces of glue on the back cover are hiding a few extra screws for the hinges. To repair, you need to detach the screen, so unscrew these screws. A small flat screwdriver is great. Just be careful and put them sticky side up. They are very sticky and will stick to paper with joy if put in the wrong way.
You may be able to find replacement stickers on eBay , but they are not needed and cost a lot of money, so if the stickers get messed up, just enjoy the cool industrial look of a laptop.
On top of the case, you need to remove a few screws (mostly around the drive compartment), but otherwise everything rests on the clips at the edges. The body can be released with a long fingernail. In fact, in the process of this upgrade, I want not only to put the adapter, but also to replace the disabled buttons under the touch panel (water or tea, I do not remember). This is quite a bit of extra work compared to replacing the screen (you need to move the fingerprint reader to a new case), but the laptop becomes more pleasant to use.
If you're already inside the laptop, do the maintenance. Clean the fan (a little anti-dust spray and external spin-up will blow a lot of dust), tighten the screws that are not going to be unscrewed, etc. Just do the cleaning, this is important.
Do you know what else I like? Modular power boards. The ThinkPad power connector is usually on a small daughter board that can be replaced without replacing the entire motherboard. This is one of the main differences between a cheap “consumer class” laptop and a “business class” laptop — more connectors, so you can change small details rather than the entire board. Power connectors often fail. The ability to replace a cheap motherboard instead of an entire laptop motherboard saves money in the long run — at least if you have someone who can do this.
If not, well, someone like me will buy a laptop with a burnt power connector for cheap, repair it and earn good profits.
If you change the upper case, put the fingerprint reader on the new case. If not, do not worry about it.
It looks like this fingerprint scanner is really often found on the ThinkPad.
After removing all the wires from the top of the case, it's time to replace the LCD display. Actually, this is the meaning of the whole event.
In the lower right and lower left corners of the screen on the outside of the hinges, two stickers hide the screws. Remove them quietly, like stickers on screen hinges, and unscrew the screws. There are only two screws on the frame, the rest are latches and clips.
After a little work with your fingernail, a pick or other suitable tool, you will unfold a frame around the screen. Just pick a point and pick it. It seems that the lower part (between the loops) is better to disengage the latter, and the assembly is better to start with it. Just a tip.
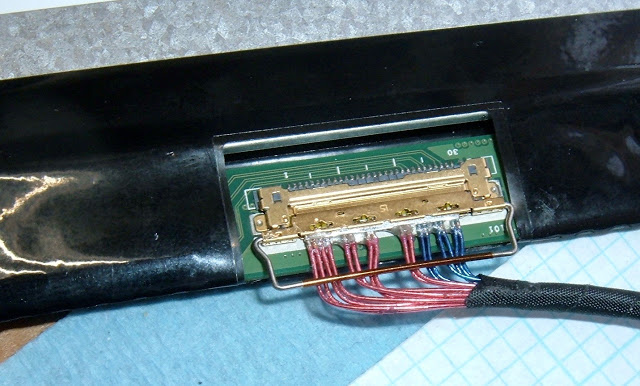
The old screen is quite easily removed if you unscrew the four screws. Before replacing the panel, you need to fix the eDP connector at the top - on the back side. The cable comes from the adapter board with a metal pull ring. Make sure the connector fits snugly: it takes some effort to fully fit it. If he does not sit tight, then nothing will work. Turn the ring around the top, it helps to keep the connector from swinging. Beautiful design!
The new display is a direct replacement for the old one, screwed with the same screws in the same places: that’s what these replacement kits are good for. No changes required! Again, while you are here, quickly tighten the remaining screws in the display frame. Some of them have loosened up a bit over the past few years - you can tighten them while you have the case open!
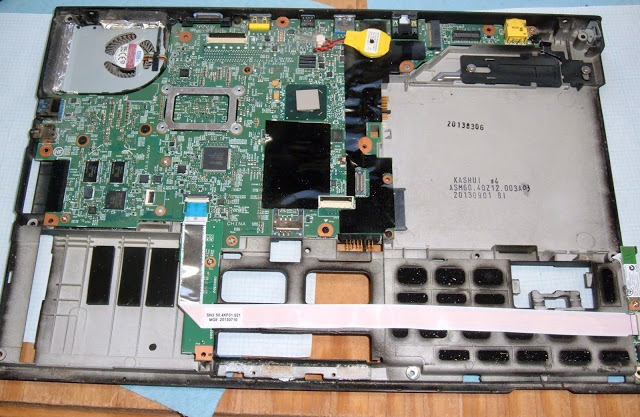
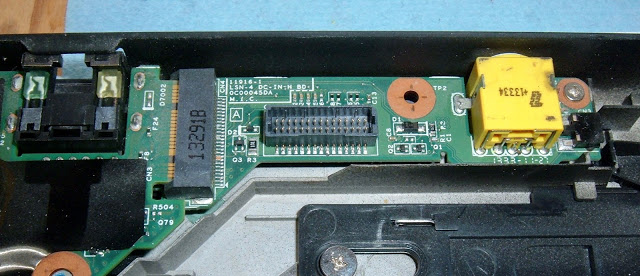
Start to collect everything. The adapter board sits on a metal frame that holds the processor radiator. The short cable goes to the LVDS port on the motherboard, and the flexible cable is guided by a snake to the display.
Before collecting everything back, it would be nice to check. I always do a functional test at the earliest stage of assembly, until the screen, frame, etc. are screwed in. And it works!
In the photo you may notice a protective film on the screen. It is better to remove it before final assembly. If you forget to do this, you will have to open the frame again, and its latches are not eternal.
Assemble the remaining parts of the laptop - and you're done!
At first I had to go through a slight panic: the windows displayed a boot screen, and then a blank screen. It took some time (and one or two restarts) for the OS to understand that the resolution changed from an incomprehensible 1600 × 900 to a much more reasonable 1920x1080. I have not finished with the safe mode of Windows 10 when the machine has sorted out the hardware, and then set the scale to 150%, so that everything on the screen has become gigantic. Fix this and everything will work fine.
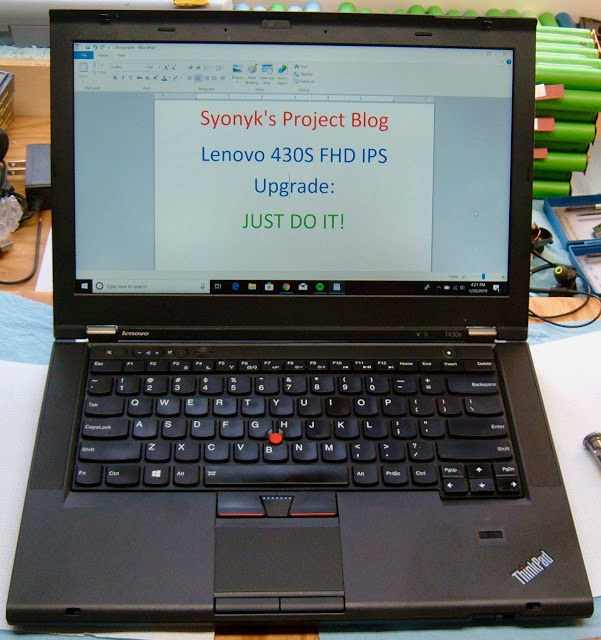
I can not describe in words (or photos) how much better the new display. Maybe you saw somewhere in advertising, how a clear, bright display looks at an angle compared to a blurred image, so it is. They even play down the difference. Modern IPS-panel is much better than TN. It amazes me that the colors do not change when I pass by the laptop: everything remains clear instead of the usual game “Oh, but now what color has it spoiled?”
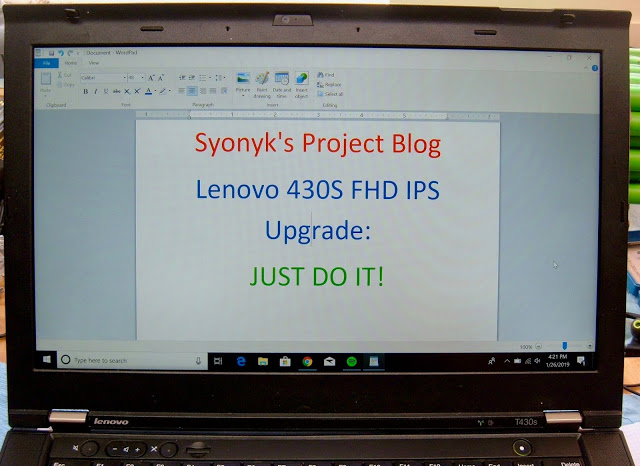
Seriously. It costs money. Do it .
Now you can somehow say to other owners of the same laptop: “Oh, yes, this screen is terrible ... I replaced it, now it is much better!” I like how easy it is.
Successful upgrade!
If you have another ThinkPad series, you're lucky ... the T430S has one of the worst screens in recent history, really like a cheap netbook.
Replacing is quite simple, but requires a rather deep immersion in a laptop and a little mess with the adapter. So what to do? Read on!
')
Lenovo ThinkPad T430S
The T430S has an Ivy Bridge processor, up to 16 GB of RAM, an easily removable hard disk and an optical drive (still sometimes useful, although I more often connect an external USB3 drive). Like most ThinkPads, this is a durable laptop, easy to use, and has a large, active user community.
Unlike other laptops, its display is a real, top-class trash . This is a TN matrix (which changes color if you look at it from different angles), and this is one of the worst TN displays you have ever seen in your life. This is really absolute shit. The community has long been looking for a way to replace it: and now, in 2019, finally, there is an acceptable way to install a very good IPS-panel in your ThinkPad T420 / T430 series!
Problem: LVDS vs. eDP
Like many other laptops, the T4 {2,3} 0 {, S} models use the Low Voltage Differential Alarm (LVDS) to communicate with the display. This is an old technology common in laptops for high-speed communications over short distances, such as between a GPU and an LCD. This low voltage system with a fairly low signal voltage (350 mV), although it requires quite a lot of pairs for high bandwidth, but the power consumption is very low, and it is “good enough” for most low resolution displays. The differential line provides for the transmission of two antiphase signals. This is convenient for countering interference when the same signal is subtracted from both phases.
Embedded DisplayPort (eDP) is a much more modern protocol; this is DisplayPort for laptops. Packet communication protocol, much like PCI Express. Now it is used by many external monitors and modern IPS-panels in most laptops.
Notebook IPS panels of suitable size only support eDP, and ThinkPad displays LVDS. These two protocols are completely incompatible ...
Adapter
That was until about 2015, when the Chinese comrades created the adapter! This little thing accepts an LVDS signal at the input and outputs the eDP signal to use a modern LCD display! This device costs about $ 70 on eBay and includes either a small microcontroller or an FPGA (I didn’t understand the numbers and don’t intend to disassemble this device) to process the signal. If you can find an LCD with such an adapter, take it - it will probably be cheaper. Otherwise, select one of the recommended LCD models (eBay has a list of supported LCD displays).
Is it dangerous to install this adapter in a laptop? Well, see for yourself. Inspection of the device showed no particularly obvious antennas on the PCB and nothing resembling a wireless transmitter, although I cannot completely rule out that there is some interesting function. However, it works without drivers on the host - so if there’s some kind of hardware backdoor, it doesn’t have an easy way to transfer information to the Internet, and if someone is close enough to pick up the RF radiation, it can just look at the screen. If host drivers were required, I might have refused to use such an adapter, but the built-in LVDS to eDP converter seems like a reasonable gadget. On a normal home laptop, it works quite normally, although it is hardly worth recommending it for a business laptop. Lenovo is a Chinese company at the moment, so another Chinese thing on the tire does not increase the risk.
If you look at the tracks of the microcircuit, they are well rounded - I always like this. Hard turns can lead to signal reflection (a problem at high frequencies) - the angle is wider than the rest of the path, which affects the impedance that causes reflections, and high-frequency alternating current strangely refers to such things. Rounds prevent this. I'm a little surprised that there are no serpentine traces of "equal length", but here it either does not matter, or the chip itself handles distortion.
Panel and adapter installation
I hope you are competent enough to parse a laptop. If you need detailed instructions, this article may be difficult for you (or you can find tutorials on YouTube). Lenovo laptops are really easy to disassemble, but they are still complex electronic devices with a huge number of screws.
I used to repair many, many laptops and talk about it . Modern Lenovo is a real pleasure. It is very pleasant to work with him: nothing is hidden too much, a reasonable number of screws basically correspond to each other (say, instead of almost 100 screws of 17 or 25 different types, as happened in some Powerbooks).
Turn off the power before removing it completely, remove the battery and then hold the power switch for a few seconds. This completely drains the charge from the board, and this is important: if there is a residual charge, then you fry the fuse of the inverter, which is difficult to replace. Do not do this.
We remove the set of screws from the bottom, remove the drives, etc. If you are not familiar with this model of laptop, it’s easy to find a good guide on the Internet. Just unscrew everything and remember where it is. Every time I work on a laptop, there is a piece of paper with diagrams of different layers nearby: the screws are put in the appropriate places of the sheet, so I can return each screw to where it came from. For a Thinkpad, this is not so critical, but with old Apple hardware, if you don’t follow, then a 4.5 mm screw will go into a 4 mm hole and a 4 mm screw will not go completely into a 4.5 mm hole and ... well if you had to work with it, then you understand me. If not, consider yourself lucky.
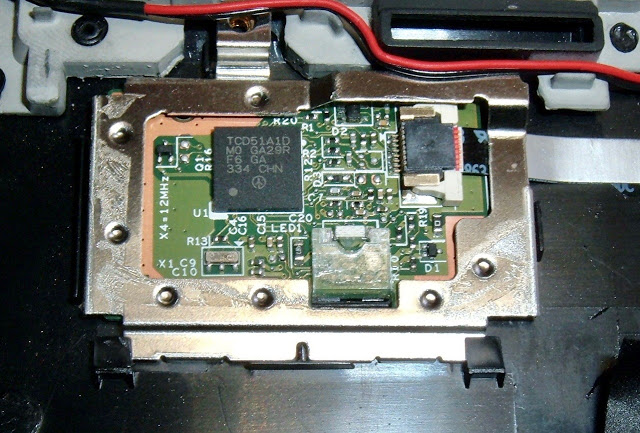
If you need help on how the WiFi antenna cables are connected, see the photo. Even before I started a computer repair blog, I often photographed the complex parts of laptops for reference. I have photos of all kinds of strange things in the archives ... The main antenna is a gray wire, the auxiliary antenna is a black wire. It is not necessary to remove the RAM or wireless card, but you need to pull out the cables. No, you will not know my MAC address ...
The keyboard gets a shift. Turn off everything around the power / volume switches, etc. (start on the right), then somehow move the keyboard: I think you will move it up, but you can be down - this becomes obvious if you move it back and forth. On the left you will see the motherboard, on the right is the optical drive bay and a bunch of cables. I love the fact that Lenovo leaves long enough cables: the keyboard cable is long enough to push the keyboard completely down before it runs out: some other laptops don't.
Another reference photo will help you: here we will add a cable and an adapter, but initially everything is aligned from the factory like this. I have long since disassembled a laptop to replace the fan, so the tape is not perfectly flat here.
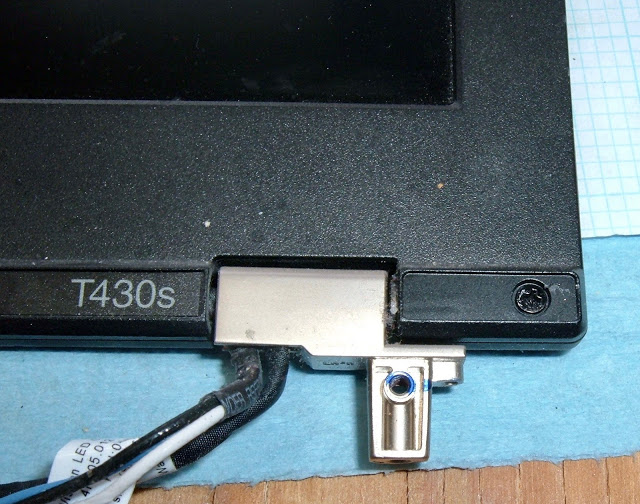
Behind small pieces of glue on the back cover are hiding a few extra screws for the hinges. To repair, you need to detach the screen, so unscrew these screws. A small flat screwdriver is great. Just be careful and put them sticky side up. They are very sticky and will stick to paper with joy if put in the wrong way.
You may be able to find replacement stickers on eBay , but they are not needed and cost a lot of money, so if the stickers get messed up, just enjoy the cool industrial look of a laptop.
On top of the case, you need to remove a few screws (mostly around the drive compartment), but otherwise everything rests on the clips at the edges. The body can be released with a long fingernail. In fact, in the process of this upgrade, I want not only to put the adapter, but also to replace the disabled buttons under the touch panel (water or tea, I do not remember). This is quite a bit of extra work compared to replacing the screen (you need to move the fingerprint reader to a new case), but the laptop becomes more pleasant to use.
If you're already inside the laptop, do the maintenance. Clean the fan (a little anti-dust spray and external spin-up will blow a lot of dust), tighten the screws that are not going to be unscrewed, etc. Just do the cleaning, this is important.
Do you know what else I like? Modular power boards. The ThinkPad power connector is usually on a small daughter board that can be replaced without replacing the entire motherboard. This is one of the main differences between a cheap “consumer class” laptop and a “business class” laptop — more connectors, so you can change small details rather than the entire board. Power connectors often fail. The ability to replace a cheap motherboard instead of an entire laptop motherboard saves money in the long run — at least if you have someone who can do this.
If not, well, someone like me will buy a laptop with a burnt power connector for cheap, repair it and earn good profits.
If you change the upper case, put the fingerprint reader on the new case. If not, do not worry about it.
It looks like this fingerprint scanner is really often found on the ThinkPad.
LCD Replacement
After removing all the wires from the top of the case, it's time to replace the LCD display. Actually, this is the meaning of the whole event.
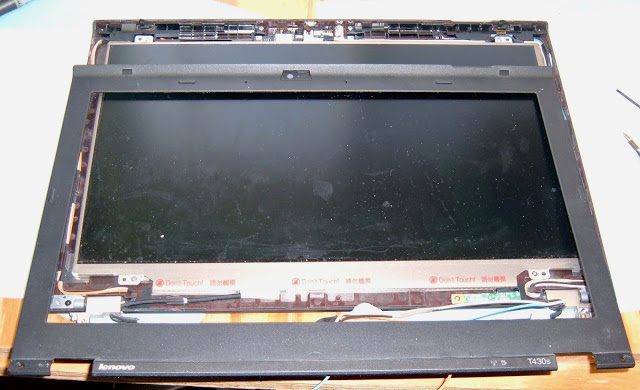
In the lower right and lower left corners of the screen on the outside of the hinges, two stickers hide the screws. Remove them quietly, like stickers on screen hinges, and unscrew the screws. There are only two screws on the frame, the rest are latches and clips.
After a little work with your fingernail, a pick or other suitable tool, you will unfold a frame around the screen. Just pick a point and pick it. It seems that the lower part (between the loops) is better to disengage the latter, and the assembly is better to start with it. Just a tip.
The old screen is quite easily removed if you unscrew the four screws. Before replacing the panel, you need to fix the eDP connector at the top - on the back side. The cable comes from the adapter board with a metal pull ring. Make sure the connector fits snugly: it takes some effort to fully fit it. If he does not sit tight, then nothing will work. Turn the ring around the top, it helps to keep the connector from swinging. Beautiful design!
The new display is a direct replacement for the old one, screwed with the same screws in the same places: that’s what these replacement kits are good for. No changes required! Again, while you are here, quickly tighten the remaining screws in the display frame. Some of them have loosened up a bit over the past few years - you can tighten them while you have the case open!
Start to collect everything. The adapter board sits on a metal frame that holds the processor radiator. The short cable goes to the LVDS port on the motherboard, and the flexible cable is guided by a snake to the display.
Before collecting everything back, it would be nice to check. I always do a functional test at the earliest stage of assembly, until the screen, frame, etc. are screwed in. And it works!
In the photo you may notice a protective film on the screen. It is better to remove it before final assembly. If you forget to do this, you will have to open the frame again, and its latches are not eternal.
Assemble the remaining parts of the laptop - and you're done!
Result
At first I had to go through a slight panic: the windows displayed a boot screen, and then a blank screen. It took some time (and one or two restarts) for the OS to understand that the resolution changed from an incomprehensible 1600 × 900 to a much more reasonable 1920x1080. I have not finished with the safe mode of Windows 10 when the machine has sorted out the hardware, and then set the scale to 150%, so that everything on the screen has become gigantic. Fix this and everything will work fine.
I can not describe in words (or photos) how much better the new display. Maybe you saw somewhere in advertising, how a clear, bright display looks at an angle compared to a blurred image, so it is. They even play down the difference. Modern IPS-panel is much better than TN. It amazes me that the colors do not change when I pass by the laptop: everything remains clear instead of the usual game “Oh, but now what color has it spoiled?”
Seriously. It costs money. Do it .
Now you can somehow say to other owners of the same laptop: “Oh, yes, this screen is terrible ... I replaced it, now it is much better!” I like how easy it is.
Successful upgrade!
Source: https://habr.com/ru/post/441904/
All Articles