VPN without VPN or a story about the unconventional use of SSH
According to ssh.com and Wikipedia, the first version and implementation of the SSH protocol was released in 1995. The task of the author was to develop a secure alternative used then for remote administration of rlogin, telnet and rsh. It is curious that the emergence of the SSH protocol contributed to the information security incident, as a result of which the attacker gathered an impressive database of logins / passwords from the servers, simply listening to the university network and highlighting authentication packets (login / password pairs were transmitted in unencrypted form).
The protocol quickly gained popularity and, after a long period of refinement and improvement, was standardized by the IETF in 2006. Since then, he has become the de facto standard for remote control of systems with a text console. In addition to the actual text console, the protocol provides many other useful features, such as file transfer and port forwarding. It is about port forwarding and its not too obvious application that will be discussed in this article.
The SSH protocol provides two port forwarding modes — forward and reverse. Direct mode allows you to open a listening TCP port on the SSH client side and redirect all connections to this port to the server side.
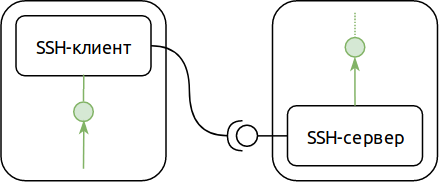
')
For example, if our Remote Desktop (RDS) server is running on our SSH server, we can use the SSH protocol to connect to this server, even if a direct network connection is not possible (for example, it is blocked by a firewall). Like this:
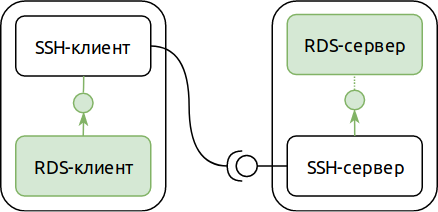
The second mode of port forwarding - reverse - allows you to swap the roles of the SSH server and the client (as applied to the redirected port). In reverse mode, the listening TCP port opens on the SSH server side, and the application servicing this port is on the SSH client side. This is rarely useful, but, as a rule, very aptly.
By combining these two modes and our example with a remote desktop server, you can get this configuration:
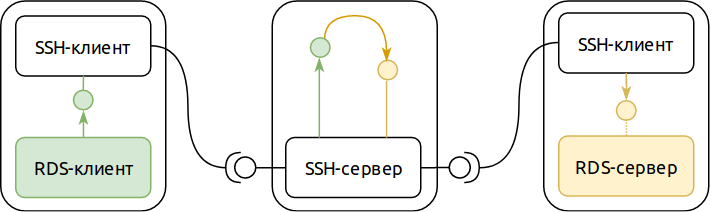
At first glance, it looks redundant. But along with the apparent redundancy, we obtained two important properties:
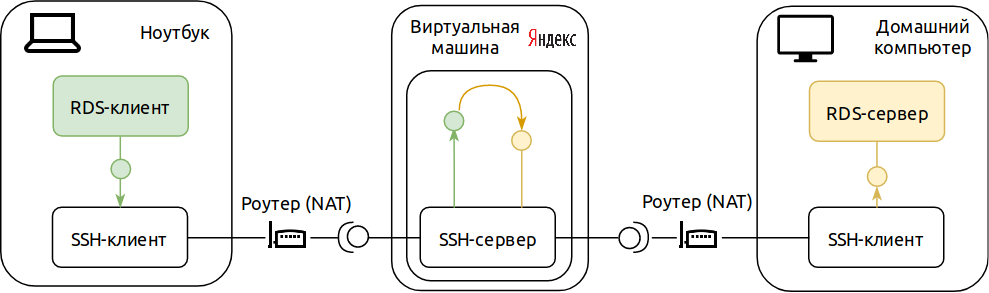
If you look closer, you can see two independent computer networks on this diagram. One - transport - allows you to establish SSH-connection. The other - internal - is used for application purposes. From this observation in subsequent articles we will try to draw some interesting conclusions, but for now let us return to our experiments.
It’s XXI century in the courtyard, the delivery of a network packet from Siberia to California takes 0.1 seconds, the whole world is enmeshed in computer networks, and TCP / IP is even in toothbrushes. It would seem that with such a connectivity of everything with everything, we should have the opportunity to control a computer not only through physical presence near input devices, but also remotely, over a network long ago. Moreover, there are plenty of technologies and protocols for this. Microsoft's Remote Desktop, variations on VNC in * nix systems, solutions from Citrix, thousands of them ... Nevertheless, few of us can boast the ability to connect to your home computer from anywhere in the world using any of these technologies.
There are two reasons why few people can boast of having a connection with their own home computer. The first is the lack of a typical home computer's address on the global network. The roots of this state of affairs go back to 1981, in which the IPv4 standard was first described, which to this day is used (by itself, with changes and additions) to address most of the nodes on the Internet. The authors of the standard decided that the address space with a capacity of 3.7 billion addresses would be enough for all devices in the world, but the reality turned out to be harsh. It is expected that there will be no free addresses on the IPv4 Internet by September 2019.
In addition, a typical Internet user who does not host web sites may well enjoy all the benefits of civilization without having an address in the global network, instead being limited to only a private network address and provider NAT. In other words, for most Internet users there is no difference between the presence and absence of a global IP address for their equipment. In such conditions, the number of those to whom the provider issues a global IP address in the global network is rapidly decreasing. As a result, a typical home computer is located on a private network and has no global address. Even in the case when the provider still assigns the user’s address in the global network, this equipment is a home router that performs NAT from the home private network. The user, of course, can “forward the port” on the router, but even in this best case, the global address of the router can change from day to day. Yes, there are providers who provide the “Static IP” service for a modest fee, but in practice, somewhere by this time, the user realizes that the game is not worth the trouble, and if you need to do something with your home computer, you can call to call
The most stubborn ones can go through this quest to the end and face the second reason why opening access to your computer through the Internet is entertainment only for those who are strong in spirit. This reason is simple - information security. The global network is global, that sooner or later someone from the other end of the world and with bad intentions will knock on your gates. Hitting an open port on which the remote desktop server responds is not too difficult, and, you can be sure, sooner or later the TCP SYN will come from a Chinese village to the super-secret port 32167.
Going back to our exotic port forwarding using SSH, you can see that its features eliminate both of these reasons.
Immediately you need to make a reservation that TeamViewer is a great product with a huge number of very different possibilities. We, in the framework of this article, will collect for ourselves only a way to safely connect via the Internet via the Remote Desktop protocol to a computer that is behind NAT. Nevertheless, I would venture to suggest that connecting to any computer with Internet access is the main distinguishing feature of TeamViewer, thanks to which this product is so popular. And it is this kind of connection that we can implement with our own hands, using our SSH configuration from the first part of the article.
So, the conditions of the problem: there is a home computer and laptop, both running Windows 10. You need to do so that you can access the home computer using the Remote Desktop protocol from a laptop from anywhere in the world. Our system will include our home computer server Remote Desktop, a laptop with a Remote Desktop client, and an SSH server. The SSH server is the only component that needs a global IP address and constant availability. The easiest option that meets these requirements is to place an SSH server in the cloud. Yandex.Oblako is great (primarily due to its pricing policy), so we will use it. The result is this:
Let's start with the preparation of our home computer. First, make sure that remote access to it is generally allowed. This can be done through the Remote Access tab in the advanced system parameters:

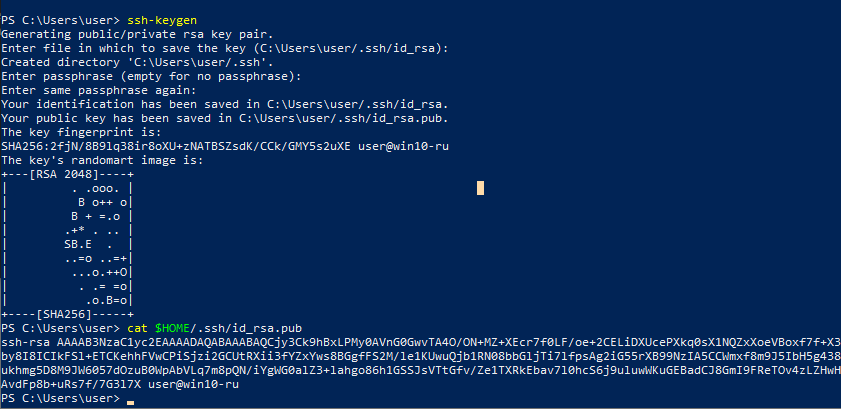
Beginning in April 2018, an ssh client is already present among the command line utilities in Windows 10. This will help us to be less distracted by the installation of different software and get down to business right away. First, generate a key for SSH. Open the PowerShell command interpreter and execute 'ssh-keygen'. When asked about the password for the key, we’ll leave it blank. After generating the key, we will output its open part to the console with the command 'cat $ HOME / .ssh / id_rsa.pub'. The result of the command is useful to us to run the SSH server in the cloud. It should get something like this:
We need to copy the closed part of the SSH key to the laptop. This part of the key lies in the '$ HOME / .ssh / id_rsa' file (without the suffix ".pub"), and we can copy it as a regular file. For example, using a USB flash drive (we assume that it is mounted as drive F :)
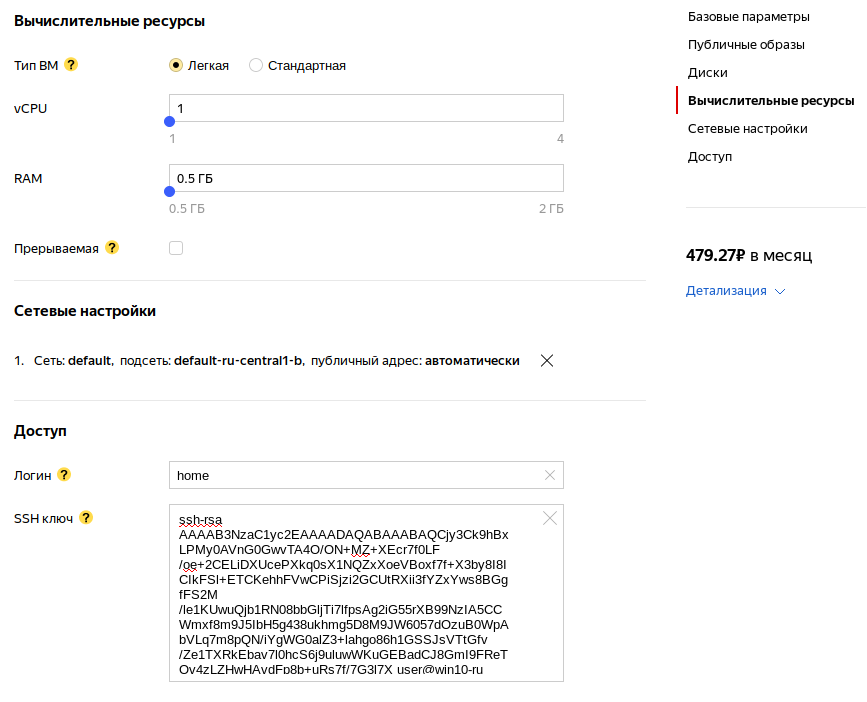
Now we will start our SSH server. Let's create a virtual machine (VM) in Yandex. Cloud. For our purposes, you can choose a "light" VM with 1 vCPU and 0.5 gigabytes of RAM. In the network settings section, select the default network with an automatic IP address. In the “access” section, as a login, enter “home”, in the input field of the SSH-key we copy what we output to the console in the previous step:
Click "Create VM" and wait for the completion. After the creation of the virtual machine is completed, we need to know its IP address:
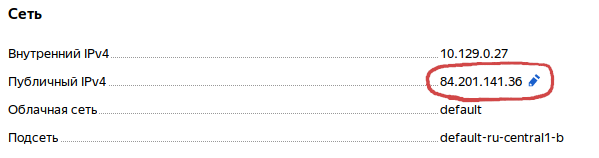
We will need the IP address of our virtual machine in order to run an SSH client on a home PC and laptop. Run it on the computer in this way (in this and the following commands, you need to replace 84.201.141.36 with the IP address of your VM):
On the question of connecting to an unknown server, we answer “yes”. If then we do not see any text on the console, then everything went fine. Now we set up the laptop. Copy the private key from our flash drive:
And run the SSH client:
Now you can run a remote desktop client (mstsc.exe) on a laptop, specifying localhost: 1025 as the connection address. Hurray, it works!
Or almost work. If you stop the SSH process on your home computer, you will not be able to connect. We need to make sure that this process automatically starts at the start of the system, and also restarts when the connection is broken. This can be achieved, for example, by creating a PowerShell script and registering it as mandatory to run in Group Policy when the computer starts. Only you need to take into account that it will be launched on behalf of the system account, which means you need to make sure that our SSH key is available to the system account.
At first we will be engaged in a key. Run PowerShell as administrator and execute these commands:
At the same time, in the same PowerShell window, let's allow the execution of scripts:
Now create the actual script. Let's open our favorite text editor (Notepad will also work), and write this script here (remember to replace the IP address of the SSH server with the one given to you by Yandex):
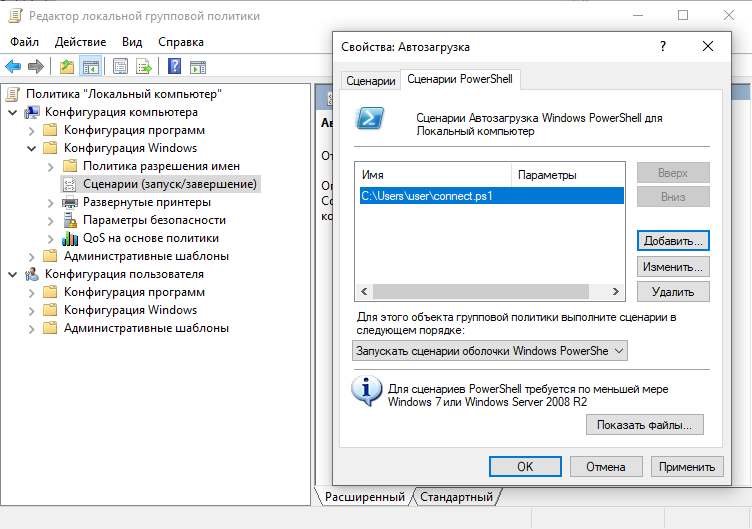
Save the script to your favorite directory. Finally, register it for autorun. To do this, launch the group policy editor (Win + R → gpedit.msc), and open the items “Computer configuration” → “Windows configuration” → “Scripts (start / stop)” → “Startup”. On the PowerShell Scripts tab, use the Add button, and specify the path to our saved script.
Similar actions will be done on a laptop. First PowerShell as administrator:
Then in a text editor we will prepare a script (it is slightly different from the previous one, but as before, we replace the IP address with the one that was given to you by Yandex):
Someone will register it for launch at startup using gpedit.msc. Restart the computer and laptop (to make sure everything starts up correctly) and voila! Now our home computer and our laptop are forever connected to each other (as long as our virtual machine in Yandex. Cloud is enabled and accessible).
Isn't it great? In any cafe, at any airport, you can connect to your home and see your favorite pictures with cats. Or to please the family by turning on Beethoven’s 5th symphony at full volume. Or ask about the success of your mining farm. Or see what's going on at home with a webcam. Is there any use of this opportunity to "teleport"? But our solution has its drawbacks.
First, setting up a connection is not the easiest and most enjoyable process. And in case something goes wrong, debugging is a bit more complicated than the initial setup. Of course, this problem is solved by assiduity and patience, but even the small amount of labor that needs to be spent may raise doubts about the expediency of the effort.
Secondly, a virtual machine in the cloud costs money. In the case of Yandex, the minimum you can count on is 480 rubles per month. This, of course, is not outrageous money, but still its own, earned by sweat. Whether viewing pictures with cats is worth this money is for everyone to decide for themselves, but it may very well be that all the advantages of our solution will be crossed out by its price.
The price issue can be significantly smoothed by sharing the costs with friends and like-minded people. Since the virtual machine is used for tasks that do not require any noticeable computing power, a performance drop is extremely unlikely. And the economic effect is noticeable: if you rent a virtual machine with ten people, then everyone will have to pay only 48 rubles a month. True, in this case, the harmony can be violated by the issue of trust: any like-minded person has the opportunity to connect to a fellow computer using an SSH server. In the case when everyone has strong passwords on their accounts, this is not a problem. But, let's face it, a strong password to log on to your home computer is the exception rather than the rule.
So, suppose that we have gathered 10 like-minded people, set up everything as written above, and everything works for everyone. Our club of fans of pictures with cats safely takes the opportunity to go to his home via the Internet for only 48 rubles a month without registration and SMS, everyone is happy and happy. The question is - are the capabilities of our “technology” limited only to cats and is it possible to use it for something more serious?
Of course you can. If we replace the “home computer” in our reasoning with a “build server in the cloud” and the “laptop” with “working computer in the office”, we get something worthy of the title “system of access to the development infrastructure”. And if instead of the build server we have an IP camera, and instead of a working computer, there is a security post, we get a “video surveillance system”.
In both cases, however, will have to pay more attention to access control issues. In particular, when sharing an SSH server with several users, I would like to isolate these users from each other. And even with this sharing, we are forced to assign each resource to each user its own TCP port and remember its number. Addressing numbers can soon become quite tedious, so I would like to be able to assign meaningful names to resources. But we will talk about how to improve the situation in the next article.
In the meantime, thank you for your attention and please share your thoughts in the comments.
The protocol quickly gained popularity and, after a long period of refinement and improvement, was standardized by the IETF in 2006. Since then, he has become the de facto standard for remote control of systems with a text console. In addition to the actual text console, the protocol provides many other useful features, such as file transfer and port forwarding. It is about port forwarding and its not too obvious application that will be discussed in this article.
The SSH protocol provides two port forwarding modes — forward and reverse. Direct mode allows you to open a listening TCP port on the SSH client side and redirect all connections to this port to the server side.
')
For example, if our Remote Desktop (RDS) server is running on our SSH server, we can use the SSH protocol to connect to this server, even if a direct network connection is not possible (for example, it is blocked by a firewall). Like this:
The second mode of port forwarding - reverse - allows you to swap the roles of the SSH server and the client (as applied to the redirected port). In reverse mode, the listening TCP port opens on the SSH server side, and the application servicing this port is on the SSH client side. This is rarely useful, but, as a rule, very aptly.
By combining these two modes and our example with a remote desktop server, you can get this configuration:
At first glance, it looks redundant. But along with the apparent redundancy, we obtained two important properties:
- The only thing that is required from the network for such a scheme to work correctly is to ensure the constancy of the network address of the node where the SSH server is located. The nodes that run the server and the RDS client can change their network addresses at least every minute (or they can even have addresses on the private network, we only need outgoing NAT, which is often meant by the phrase “Internet connection”).
- Despite the fact that for us the RDS server is accessible from anywhere in the Internet, other users cannot connect to it (provided there are no vulnerabilities in the SSH server). And since the RDS protocol has its own access control, even in the event of a successful attack on the SSH server, the attacker will also need to carry out an attack on the RDS. The likelihood of a simultaneous SSH server and an RDS server vulnerability is much less than that for each component separately.
If you look closer, you can see two independent computer networks on this diagram. One - transport - allows you to establish SSH-connection. The other - internal - is used for application purposes. From this observation in subsequent articles we will try to draw some interesting conclusions, but for now let us return to our experiments.
Connect to your home computer
It’s XXI century in the courtyard, the delivery of a network packet from Siberia to California takes 0.1 seconds, the whole world is enmeshed in computer networks, and TCP / IP is even in toothbrushes. It would seem that with such a connectivity of everything with everything, we should have the opportunity to control a computer not only through physical presence near input devices, but also remotely, over a network long ago. Moreover, there are plenty of technologies and protocols for this. Microsoft's Remote Desktop, variations on VNC in * nix systems, solutions from Citrix, thousands of them ... Nevertheless, few of us can boast the ability to connect to your home computer from anywhere in the world using any of these technologies.
There are two reasons why few people can boast of having a connection with their own home computer. The first is the lack of a typical home computer's address on the global network. The roots of this state of affairs go back to 1981, in which the IPv4 standard was first described, which to this day is used (by itself, with changes and additions) to address most of the nodes on the Internet. The authors of the standard decided that the address space with a capacity of 3.7 billion addresses would be enough for all devices in the world, but the reality turned out to be harsh. It is expected that there will be no free addresses on the IPv4 Internet by September 2019.
In addition, a typical Internet user who does not host web sites may well enjoy all the benefits of civilization without having an address in the global network, instead being limited to only a private network address and provider NAT. In other words, for most Internet users there is no difference between the presence and absence of a global IP address for their equipment. In such conditions, the number of those to whom the provider issues a global IP address in the global network is rapidly decreasing. As a result, a typical home computer is located on a private network and has no global address. Even in the case when the provider still assigns the user’s address in the global network, this equipment is a home router that performs NAT from the home private network. The user, of course, can “forward the port” on the router, but even in this best case, the global address of the router can change from day to day. Yes, there are providers who provide the “Static IP” service for a modest fee, but in practice, somewhere by this time, the user realizes that the game is not worth the trouble, and if you need to do something with your home computer, you can call to call
The most stubborn ones can go through this quest to the end and face the second reason why opening access to your computer through the Internet is entertainment only for those who are strong in spirit. This reason is simple - information security. The global network is global, that sooner or later someone from the other end of the world and with bad intentions will knock on your gates. Hitting an open port on which the remote desktop server responds is not too difficult, and, you can be sure, sooner or later the TCP SYN will come from a Chinese village to the super-secret port 32167.
Going back to our exotic port forwarding using SSH, you can see that its features eliminate both of these reasons.
Collect yourself TeamViewer
Immediately you need to make a reservation that TeamViewer is a great product with a huge number of very different possibilities. We, in the framework of this article, will collect for ourselves only a way to safely connect via the Internet via the Remote Desktop protocol to a computer that is behind NAT. Nevertheless, I would venture to suggest that connecting to any computer with Internet access is the main distinguishing feature of TeamViewer, thanks to which this product is so popular. And it is this kind of connection that we can implement with our own hands, using our SSH configuration from the first part of the article.
So, the conditions of the problem: there is a home computer and laptop, both running Windows 10. You need to do so that you can access the home computer using the Remote Desktop protocol from a laptop from anywhere in the world. Our system will include our home computer server Remote Desktop, a laptop with a Remote Desktop client, and an SSH server. The SSH server is the only component that needs a global IP address and constant availability. The easiest option that meets these requirements is to place an SSH server in the cloud. Yandex.Oblako is great (primarily due to its pricing policy), so we will use it. The result is this:
Let's start with the preparation of our home computer. First, make sure that remote access to it is generally allowed. This can be done through the Remote Access tab in the advanced system parameters:
Beginning in April 2018, an ssh client is already present among the command line utilities in Windows 10. This will help us to be less distracted by the installation of different software and get down to business right away. First, generate a key for SSH. Open the PowerShell command interpreter and execute 'ssh-keygen'. When asked about the password for the key, we’ll leave it blank. After generating the key, we will output its open part to the console with the command 'cat $ HOME / .ssh / id_rsa.pub'. The result of the command is useful to us to run the SSH server in the cloud. It should get something like this:
We need to copy the closed part of the SSH key to the laptop. This part of the key lies in the '$ HOME / .ssh / id_rsa' file (without the suffix ".pub"), and we can copy it as a regular file. For example, using a USB flash drive (we assume that it is mounted as drive F :)
copy $HOME/.ssh/id_rsa f:\ Now we will start our SSH server. Let's create a virtual machine (VM) in Yandex. Cloud. For our purposes, you can choose a "light" VM with 1 vCPU and 0.5 gigabytes of RAM. In the network settings section, select the default network with an automatic IP address. In the “access” section, as a login, enter “home”, in the input field of the SSH-key we copy what we output to the console in the previous step:
Click "Create VM" and wait for the completion. After the creation of the virtual machine is completed, we need to know its IP address:
We will need the IP address of our virtual machine in order to run an SSH client on a home PC and laptop. Run it on the computer in this way (in this and the following commands, you need to replace 84.201.141.36 with the IP address of your VM):
ssh -NR 3389:localhost:3389 home@84.201.141.36 On the question of connecting to an unknown server, we answer “yes”. If then we do not see any text on the console, then everything went fine. Now we set up the laptop. Copy the private key from our flash drive:
mkdir -Force $HOME/.ssh copy f:\id_rsa $HOME/.ssh/id_rsa And run the SSH client:
ssh -NL 1025:localhost:3389 home@84.201.141.36 Now you can run a remote desktop client (mstsc.exe) on a laptop, specifying localhost: 1025 as the connection address. Hurray, it works!
Or almost work. If you stop the SSH process on your home computer, you will not be able to connect. We need to make sure that this process automatically starts at the start of the system, and also restarts when the connection is broken. This can be achieved, for example, by creating a PowerShell script and registering it as mandatory to run in Group Policy when the computer starts. Only you need to take into account that it will be launched on behalf of the system account, which means you need to make sure that our SSH key is available to the system account.
At first we will be engaged in a key. Run PowerShell as administrator and execute these commands:
copy $HOME/.ssh/id_rsa "$(gwmi win32_userprofile | where {$_.SID -eq "S-1-5-18"} | select -ExpandProperty LocalPath)/rds_id_rsa" icacls "$(gwmi win32_userprofile | where {$_.SID -eq "S-1-5-18"} | select -ExpandProperty LocalPath)/rds_id_rsa" /reset At the same time, in the same PowerShell window, let's allow the execution of scripts:
Set-ExecutionPolicy RemoteSigned Now create the actual script. Let's open our favorite text editor (Notepad will also work), and write this script here (remember to replace the IP address of the SSH server with the one given to you by Yandex):
while (1) { & $(get-command ssh |select -expandproperty Path) ` -i "$(gwmi win32_userprofile | where {$_.SID -eq "S-1-5-18"} | select -ExpandProperty LocalPath)/rds_id_rsa" ` -o StrictHostKeyChecking=accept-new -o ExitOnForwardFailure=yes ` -NR 3389:localhost:3389 home@84.201.141.36 Start-Sleep -Seconds 15 } Save the script to your favorite directory. Finally, register it for autorun. To do this, launch the group policy editor (Win + R → gpedit.msc), and open the items “Computer configuration” → “Windows configuration” → “Scripts (start / stop)” → “Startup”. On the PowerShell Scripts tab, use the Add button, and specify the path to our saved script.
Similar actions will be done on a laptop. First PowerShell as administrator:
copy $HOME/.ssh/id_rsa "$(gwmi win32_userprofile | where {$_.SID -eq "S-1-5-18"} | select -ExpandProperty LocalPath)/rds_id_rsa" icacls "$(gwmi win32_userprofile | where {$_.SID -eq "S-1-5-18"} | select -ExpandProperty LocalPath)/rds_id_rsa" /reset Set-ExecutionPolicy RemoteSigned Then in a text editor we will prepare a script (it is slightly different from the previous one, but as before, we replace the IP address with the one that was given to you by Yandex):
while (1) { & $(get-command ssh |select -expandproperty Path) ` -i "$(gwmi win32_userprofile | where {$_.SID -eq "S-1-5-18"} | select -ExpandProperty LocalPath)/rds_id_rsa" ` -o StrictHostKeyChecking=accept-new -o ExitOnForwardFailure=yes ` -NL 1025:localhost:3389 home@84.201.141.36 Start-Sleep -Seconds 15 } Someone will register it for launch at startup using gpedit.msc. Restart the computer and laptop (to make sure everything starts up correctly) and voila! Now our home computer and our laptop are forever connected to each other (as long as our virtual machine in Yandex. Cloud is enabled and accessible).
Well?
Isn't it great? In any cafe, at any airport, you can connect to your home and see your favorite pictures with cats. Or to please the family by turning on Beethoven’s 5th symphony at full volume. Or ask about the success of your mining farm. Or see what's going on at home with a webcam. Is there any use of this opportunity to "teleport"? But our solution has its drawbacks.
First, setting up a connection is not the easiest and most enjoyable process. And in case something goes wrong, debugging is a bit more complicated than the initial setup. Of course, this problem is solved by assiduity and patience, but even the small amount of labor that needs to be spent may raise doubts about the expediency of the effort.
Secondly, a virtual machine in the cloud costs money. In the case of Yandex, the minimum you can count on is 480 rubles per month. This, of course, is not outrageous money, but still its own, earned by sweat. Whether viewing pictures with cats is worth this money is for everyone to decide for themselves, but it may very well be that all the advantages of our solution will be crossed out by its price.
The price issue can be significantly smoothed by sharing the costs with friends and like-minded people. Since the virtual machine is used for tasks that do not require any noticeable computing power, a performance drop is extremely unlikely. And the economic effect is noticeable: if you rent a virtual machine with ten people, then everyone will have to pay only 48 rubles a month. True, in this case, the harmony can be violated by the issue of trust: any like-minded person has the opportunity to connect to a fellow computer using an SSH server. In the case when everyone has strong passwords on their accounts, this is not a problem. But, let's face it, a strong password to log on to your home computer is the exception rather than the rule.
To be continued
So, suppose that we have gathered 10 like-minded people, set up everything as written above, and everything works for everyone. Our club of fans of pictures with cats safely takes the opportunity to go to his home via the Internet for only 48 rubles a month without registration and SMS, everyone is happy and happy. The question is - are the capabilities of our “technology” limited only to cats and is it possible to use it for something more serious?
Of course you can. If we replace the “home computer” in our reasoning with a “build server in the cloud” and the “laptop” with “working computer in the office”, we get something worthy of the title “system of access to the development infrastructure”. And if instead of the build server we have an IP camera, and instead of a working computer, there is a security post, we get a “video surveillance system”.
In both cases, however, will have to pay more attention to access control issues. In particular, when sharing an SSH server with several users, I would like to isolate these users from each other. And even with this sharing, we are forced to assign each resource to each user its own TCP port and remember its number. Addressing numbers can soon become quite tedious, so I would like to be able to assign meaningful names to resources. But we will talk about how to improve the situation in the next article.
In the meantime, thank you for your attention and please share your thoughts in the comments.
Source: https://habr.com/ru/post/441806/
All Articles