Test layout? Easy

The article was prepared by Anna anna-che and Xenia KseMish .
One of the reasons why we actively began testing the layout was, as usual, a rake. We have stepped on a bug that began to manifest itself after the next update of Chrome. It turned out that within 3 hours, users could not transfer funds from an account through the personal account of our Internet bank. And all because of the fact that in the new version of the browser the form of transferring funds from one account to another has gone beyond the window.
Such bugs are also harmless. For example, the well-known brand of clothing also came across this rake. Due to insufficient testing of the layout, the users of the site of this brand instead of the “Learn more” button have seen “Find out the pain ...” for a long time.

The inscription on the button, of course, is close to the truth, the prices there are really pain, but this is clearly not what the creators of the site intended. In general, such moments should be monitored and corrected, regardless of what they cause - an inconvenience or a smile.
')
Aware of these problems, we applied the practice of mandatory design review by our product designers, but it was not the case. It turned out that not all teams have a dedicated designer, or they do not have enough time, or, even worse, the front and the designer cannot come to a common approach to the layout of a particular page, form or element.
Without thinking twice, we set off to look for options, how we can minimize both the number of layout defects and the confrontations of Front VS Designer. After examining possible practices and tools for automating layout testing and gathering cones, we implemented the following approach.
Briefly about us:To begin with, we wanted to solve the problem with the agreements between the front and the designer. At the initial stage of the formation of the layout of the functionality, the front and the designer jointly describe the “Contract”. In this contract, they describe all the arrangements for the location of elements, their styles, distance, etc. Thanks to this, when detecting mismatches of the layout with the imposed page, the guys will not have to find out for a long time who is right and who is to blame.
Now we are developing a single product, on which more than 20 scram teams work, each of which is responsible for a specific functionality, while we try to maintain a single style and design of the product itself - visual presentation, the location of the main elements, etc.
Regarding the distribution of users across browsers, today our users use (values are rounded):
- 60% - Chrome,
- 30% - Firefox,
- 10% are other browsers.
We test the functionality with the help of our BDD framework Akita (Java + Cucumber + Selenide), we wrote about it here .
They describe their arrangements in the galen-spec file.
What is galen-spec?
In order to automate layout testing and thereby minimize the number of defects, we decided to implement the Galen Framework tool. It is based on the .spec file (specification or, as we called, "Contract"). And it integrates easily with Selenium tests.
After the designer and the front made up the “Contract”, the tester forms a .spec file based on it, according to the requirements of Galen. The framework uses its own language to write test specifications.
What does a .spec file consist of?
Logically, it can be divided into two parts:
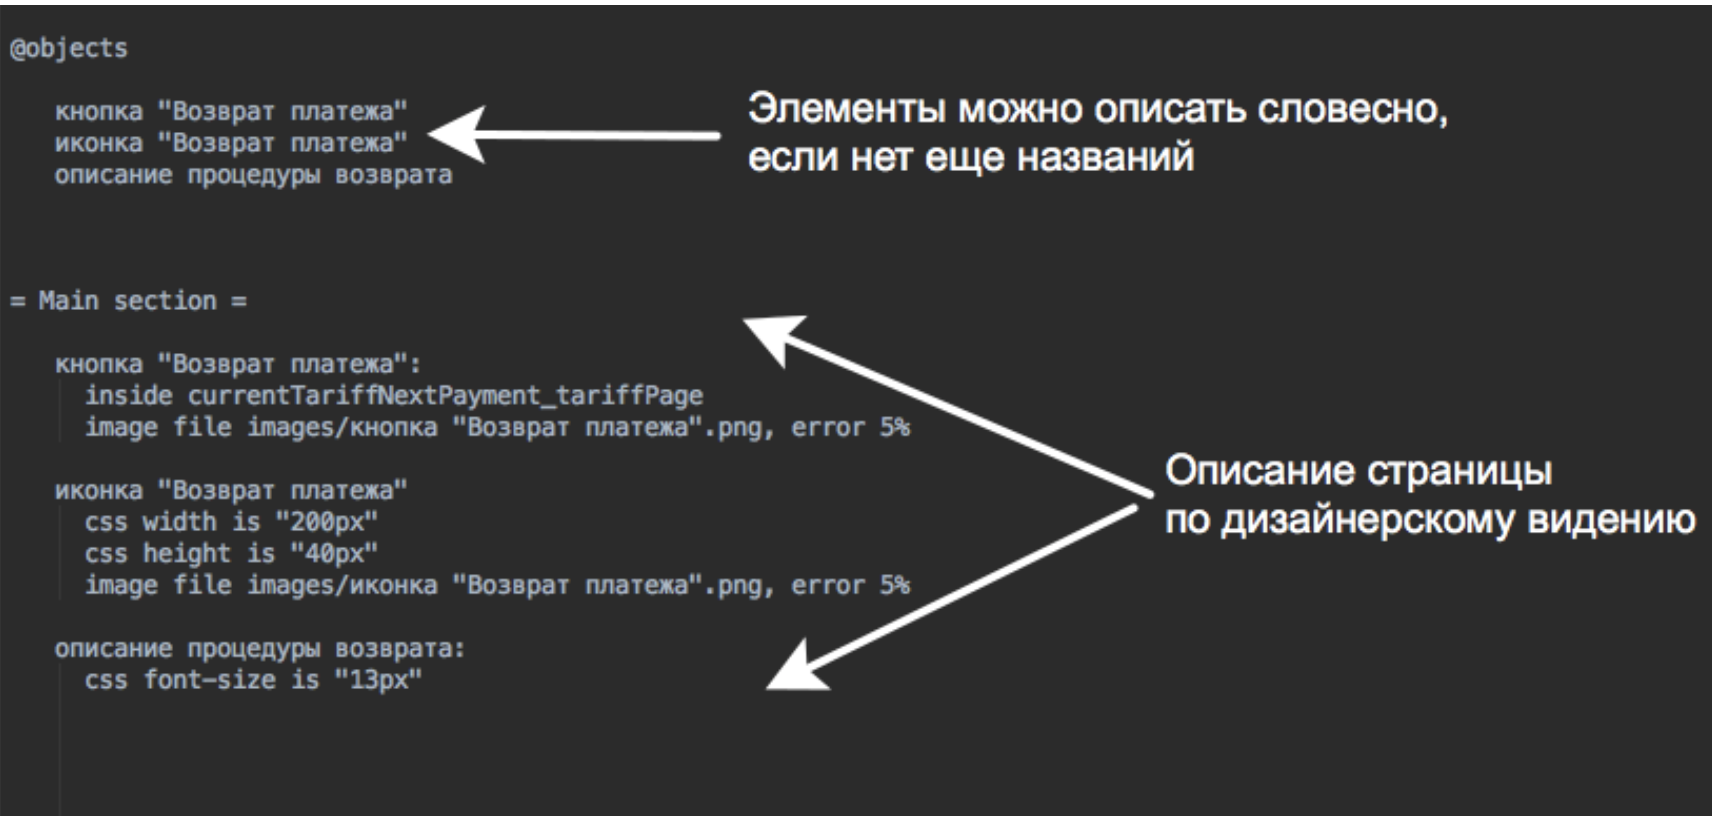
1. object definitions
Here we need to be sure to indicate which objects are on our page - header, footer, menu, content, etc. In general, we list the main elements that we will check, give them names and define locators.
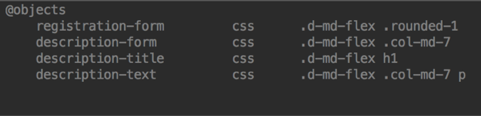
@objects - elements on the page (you can use CSS, XPATH, ID)
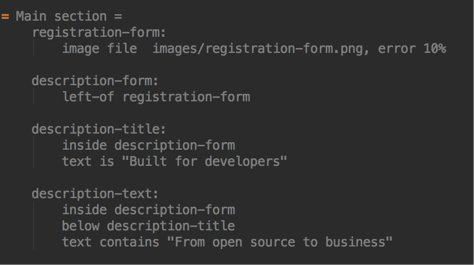
2. When locators are defined, it is necessary to determine the styles and specifications of specific objects. For this, part of the object specs specification is used, where we describe in detail, for example, that our text-block (description-text) is inside the description form, below the header, and contains certain text.
Main section - for each element described in @objects describes the verification options.
* the galen spec language is sensitive to indents in the main section, so pay special attention to this and follow the tabulation :)
Thus, the “Contract”, concluded between the front and the designer and transferred to the Galen language, allows us to automatically verify the arrangement and internal content of the elements, as well as adaptability and cross-browser compatibility.
Quick start example
- We describe the elements of a particular page and checks in the .spec files using the Galen Spec language, and put them in the specs package.
- We add sample screenshots into a package of specs / images
- We are working on BDD, so the script in the .feature file might look something like this:

- We launch the test script through normal Cucumber Runner.
In this scenario, we check the main GitHub page. In the last step, we added a layout check. Such checks can complement existing functional tests, or run them separately. If any kind of discrepancies are found in the layout, then we will have an image with the expected result and the resulting one, plus a difference in them. All this business will attach to the kukmber-report.
The difference in the reports is as follows:

error = Error {[Element doesn’t look like "./akita-testing-template/src/test/resources/specs/images/registration-form.png". There are 10.47% mismatching pixels but max allowed is 10%]
Here we see that the check failed, the images differ by more than 10% and all these color differences, except for filling with black, this is the difference between the elements.
If the items are completely identical, the difference will be displayed in black.
The most common question is where to get a reference screenshot at all?
Answer: We take the standard either from the designer, or by driving tests on the Prodovsk environment, which we consider to be the reference. From there we get pictures of our blocks, which we will compare, and put them in the images folder, from where the specifications will pull links to them.
What we came to using this approach
- managed to reduce the number of smoke tests and their passage time by about 20% due to the fact that checking of some forms and similar elements slammed into one test, which checks their visual component and immediately reveals discrepancies
- Now we can be sure that our applications are displayed correctly in the selected browsers
- know that adaptability is fine and not parted
- came to an automatic design review.
You can read the documentation for compiling galen-spec files here - galen-spec-language-guide .
We talked about the technical aspects of working with the Galen Framework, its capabilities and basic checks at the last Selenium Camp, and will write it in a blog.
The ability to use galen-spec and new steps to check the layout we brought to our Akita library , where there is a template for a quick start , and we also have a telegram chat , where you can ask your questions.
And we will answer.
Source: https://habr.com/ru/post/441674/
All Articles