Openshift - red-hat crafts
Openshift
- Openshift sweep.
- Configuration after installation.
- Create and connect PV.
- Creating and deploying a Red Hat Decision Manager project (enterprise kie-workbench).
- Creating and deploying AMQ (red hat active mq) and postgressql projects using persistent storage.
- Creating separate projects for services, templates for them, pipeline, integration with gitlab, gitlab regestry.
1. Openshift sweep
Server requirements, preparing dns servers, list of server names, server requirements.
Minimum requirements are brief - all servers must have at least 16Gb Ram 2 cores and at least 100 gigabytes for docker needs.
Bind-based dns should have the following configuration.
dkm - master, dk0 - performing, ifr - infrastructure, bln - balancer, shd - nfs, dkr - control node with which the cluster configuration occurred, was also planned as a separate node under docker regestry.
')
db.osh $TTL 1h @ IN SOA test.osh. root.test.osh. ( 2008122601 ; Serial 28800 ; Refresh 14400 ; Retry 604800 ; Expire - 1 week 86400 ) ; Minimum @ IN NS test.osh. @ IN A 127.0.0.1 rnd-osh-dk0-t01 IN A 10.19.86.18 rnd-osh-dk0-t02 IN A 10.19.86.19 rnd-osh-dk0-t03 IN A 10.19.86.20 rnd-osh-dkm-t01 IN A 10.19.86.21 rnd-osh-dkm-t02 IN A 10.19.86.22 rnd-osh-dkm-t03 IN A 10.19.86.23 rnd-osh-ifr-t01 IN A 10.19.86.24 rnd-osh-ifr-t02 IN A 10.19.86.25 rnd-osh-ifr-t03 IN A 10.19.86.26 rnd-osh-bln-t01 IN A 10.19.86.27 rnd-osh-shd-t01 IN A 10.19.86.28 rnd-osh-dkr-t01 IN A 10.19.86.29 lb IN A 10.19.86.27 openshift IN A 10.19.86.27 api-openshift IN A 10.19.86.27 *.apps.openshift IN A 10.19.86.21 *.apps.openshift IN A 10.19.86.22 *.apps.openshift IN A 10.19.86.23 db.rv.osh $TTL 1h @ IN SOA test.osh. root.test.osh. ( 1 ; Serial 604800 ; Refresh 86400 ; Retry 2419200 ; Expire 604800 ) ; Negative Cache TTL ; @ IN NS test.osh. @ IN A 127.0.0.1 18 IN PTR rnd-osh-dk0-t01.test.osh. 19 IN PTR rnd-osh-dk0-t02.test.osh. 20 IN PTR rnd-osh-dk0-t03.test.osh. 21 IN PTR rnd-osh-dkm-t01.test.osh. 22 IN PTR rnd-osh-dkm-t02.test.osh. 23 IN PTR rnd-osh-dkm-t03.test.osh. 24 IN PTR rnd-osh-ifr-t01.test.osh. 25 IN PTR rnd-osh-ifr-t02.test.osh. 26 IN PTR rnd-osh-ifr-t03.test.osh. 27 IN PTR rnd-osh-bln-t01.test.osh. 28 IN PTR rnd-osh-shd-t01.test.osh. 29 IN PTR rnd-osh-dkr-t01.test.osh. 27 IN PTR lb.test.osh. 27 IN PTR api-openshift.test.osh. named.conf.default-zones zone "test.osh" IN { type master; file "/etc/bind/db.osh"; allow-update { none; }; notify no; }; zone "86.19.10.in-addr.arpa" { type master; file "/etc/bind/db.rv.osh"; }; Server Preparation
After connecting the subscription. Enabling repositories and installing the necessary initial packages.
rm -rf /etc/yum.repos.d/cdrom.repo subscription-manager repos --disable="*" subscription-manager repos --enable="rhel-7-server-rpms" --enable="rhel-7-server-extras-rpms" --enable="rhel-7-server-ose-3.10-rpms" --enable="rhel-7-server-ansible-2.4-rpms" yum -y install wget git net-tools bind-utils yum-utils iptables-services bridge-utils bash-completion kexec-tools sos psacct yum -y update yum -y install docker Docker storage configuration (separate drive).
systemctl stop docker rm -rf /var/lib/docker/* echo "STORAGE_DRIVER=overlay2" > /etc/sysconfig/docker-storage-setup echo "DEVS=/dev/sdc" >> /etc/sysconfig/docker-storage-setup echo "CONTAINER_ROOT_LV_NAME=dockerlv" >> /etc/sysconfig/docker-storage-setup echo "CONTAINER_ROOT_LV_SIZE=100%FREE" >> /etc/sysconfig/docker-storage-setup echo "CONTAINER_ROOT_LV_MOUNT_PATH=/var/lib/docker" >> /etc/sysconfig/docker-storage-setup echo "VG=docker-vg" >> /etc/sysconfig/docker-storage-setup systemctl enable docker docker-storage-setup systemctl is-active docker systemctl restart docker docker info | grep Filesystem Installing the rest of the required packages.
yum -y install atomic atomic trust show yum -y install docker-novolume-plugin systemctl enable docker-novolume-plugin systemctl start docker-novolume-plugin yum -y install openshift-ansible Create, add user, and also keys.
useradd --create-home --groups users,wheel ocp sed -i 's/# %wheel/%wheel/' /etc/sudoers mkdir -p /home/ocp/.ssh echo "ssh-rsa AAAAB3NzaC........8Ogb3Bv ocp SSH Key" >> /home/ocp/.ssh/authorized_keys In case of conflict with already used subnets, change the default addressing inside containers.
echo '{ "bip": "172.26.0.1/16" }' > /etc/docker/daemon.json systemctl restart docker Network manager configuration. (dns should be able to froward to the outside world)
nmcli connection modify ens192 ipv4.dns 172.17.70.140 nmcli connection modify ens192 ipv4.dns-search cluster.local +ipv4.dns-search test.osh +ipv4.dns-search cpgu systemctl stop firewalld systemctl disable firewalld systemctl restart network Edit, if necessary, the name of the machine to the full name.
hhh=$(cat /etc/hostname) echo "$hhh".test.osh > /etc/hostname After the actions taken restart the server.
Preparation of the control node dkr
The difference between the controlling node and the rest is that there is no need to connect the docker to a separate disk.
There is also a need to configure ntp.
yum install ntp -y systemctl enable ntpd service ntpd start service ntpd status ntpq -p chmod 777 -R /usr/share/ansible/openshift-ansible/ You also need to add the private key to the user ocp.
Log in via ssh as an ocp user on all nodes.
Inventory file preparation and cluster scan.
host-poc.yaml [OSEv3:children] masters nodes etcd lb nfs [OSEv3:vars] ansible_ssh_user=ocp ansible_become=yes openshift_override_hostname_check=True openshift_master_cluster_method=native openshift_disable_check=memory_availability,disk_availability,package_availability openshift_deployment_type=openshift-enterprise openshift_release=v3.10 oreg_url=registry.access.redhat.com/openshift3/ose-${component}:${version} debug_level=2 os_firewall_use_firewalld=True openshift_install_examples=true openshift_clock_enabled=True openshift_router_selector='node-role.kubernetes.io/infra=true' openshift_registry_selector='node-role.kubernetes.io/infra=true' openshift_examples_modify_imagestreams=true os_sdn_network_plugin_name='redhat/openshift-ovs-multitenant' openshift_master_identity_providers=[{'name': 'htpasswd_auth', 'login': 'true', 'challenge': 'true', 'kind': 'HTPasswdPasswordIdentityProvider'}] openshift_master_htpasswd_users={'admin': '$apr1$pQ3QPByH$5BDkrp0m5iclRske.M0m.0'} openshift_master_default_subdomain=apps.openshift.test.osh openshift_master_cluster_hostname=api-openshift.test.osh openshift_master_cluster_public_hostname=openshift.test.osh openshift_enable_unsupported_configurations=true openshift_use_crio=true openshift_crio_enable_docker_gc=true # registry openshift_hosted_registry_storage_kind=nfs openshift_hosted_registry_storage_access_modes=['ReadWriteMany'] openshift_hosted_registry_storage_nfs_directory=/exports openshift_hosted_registry_storage_nfs_options='*(rw,root_squash)' openshift_hosted_registry_storage_volume_name=registry openshift_hosted_registry_storage_volume_size=30Gi # cluster monitoring openshift_cluster_monitoring_operator_install=true openshift_cluster_monitoring_operator_node_selector={'node-role.kubernetes.io/master': 'true'} #metrics openshift_metrics_install_metrics=true openshift_metrics_hawkular_nodeselector={"node-role.kubernetes.io/infra": "true"} openshift_metrics_cassandra_nodeselector={"node-role.kubernetes.io/infra": "true"} openshift_metrics_heapster_nodeselector={"node-role.kubernetes.io/infra": "true"} openshift_metrics_storage_kind=nfs openshift_metrics_storage_access_modes=['ReadWriteOnce'] openshift_metrics_storage_nfs_directory=/exports openshift_metrics_storage_nfs_options='*(rw,root_squash)' openshift_metrics_storage_volume_name=metrics openshift_metrics_storage_volume_size=20Gi #logging openshift_logging_kibana_nodeselector={"node-role.kubernetes.io/infra": "true"} openshift_logging_curator_nodeselector={"node-role.kubernetes.io/infra": "true"} openshift_logging_es_nodeselector={"node-role.kubernetes.io/infra": "true"} openshift_logging_install_logging=true openshift_logging_es_cluster_size=1 openshift_logging_storage_kind=nfs openshift_logging_storage_access_modes=['ReadWriteOnce'] openshift_logging_storage_nfs_directory=/exports openshift_logging_storage_nfs_options='*(rw,root_squash)' openshift_logging_storage_volume_name=logging openshift_logging_storage_volume_size=20Gi #ASB ansible_service_broker_install=true openshift_hosted_etcd_storage_kind=nfs openshift_hosted_etcd_storage_nfs_options="*(rw,root_squash,sync,no_wdelay)" openshift_hosted_etcd_storage_nfs_directory=/opt/osev3-etcd openshift_hosted_etcd_storage_volume_name=etcd-vol2 openshift_hosted_etcd_storage_access_modes=["ReadWriteOnce"] openshift_hosted_etcd_storage_volume_size=30G openshift_hosted_etcd_storage_labels={'storage': 'etcd'} ansible_service_broker_local_registry_whitelist=['.*-apb$'] #cloudforms #openshift_management_install_management=true #openshift_management_app_template=cfme-template # host group for masters [masters] rnd-osh-dkm-t0[1:3].test.osh # host group for etcd [etcd] rnd-osh-dkm-t0[1:3].test.osh [lb] rnd-osh-bln-t01.test.osh containerized=False [nfs] rnd-osh-shd-t01.test.osh [nodes] rnd-osh-dkm-t0[1:3].test.osh openshift_node_group_name='node-config-master' rnd-osh-ifr-t0[1:3].test.osh openshift_node_group_name='node-config-infra' rnd-osh-dk0-t0[1:3].test.osh openshift_node_group_name='node-config-compute' Run alternately playbooks.
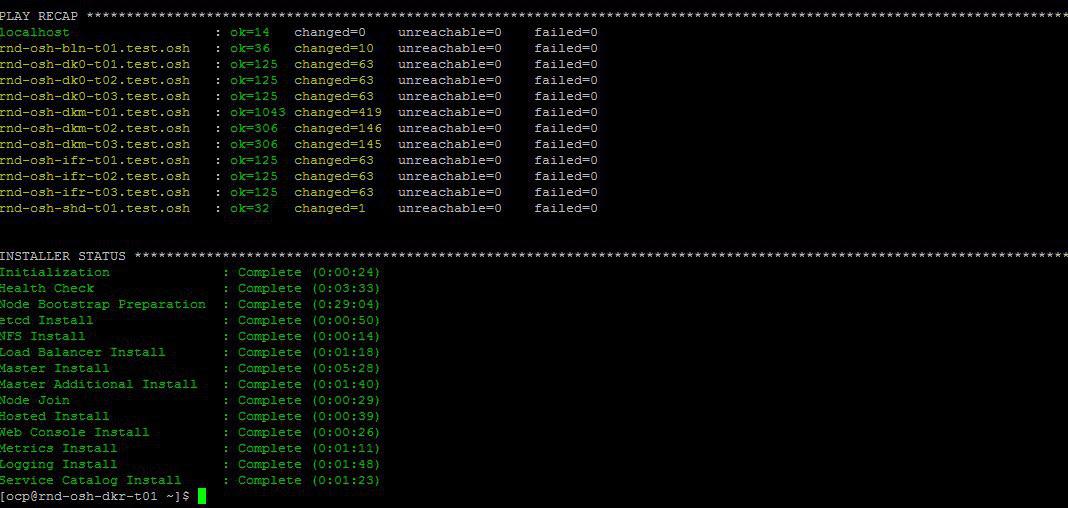
ansible-playbook -i host-poc.yaml /usr/share/ansible/openshift-ansible/playbooks/prerequisites.yml ansible-playbook -i host-poc.yaml /usr/share/ansible/openshift-ansible/playbooks/openshift-checks/pre-install.yml ansible-playbook -i host-poc.yaml /usr/share/ansible/openshift-ansible/playbooks/deploy_cluster.yml If all is well in the end will be about the following.
Edit the local host file to verify after installation that oprenshift works via the web interface.
10.19.86.18 rnd-osh-dk0-t01.test.osh 10.19.86.19 rnd-osh-dk0-t02.test.osh 10.19.86.20 rnd-osh-dk0-t03.test.osh 10.19.86.21 rnd-osh-dkm-t01.test.osh 10.19.86.22 rnd-osh-dkm-t02.test.osh 10.19.86.23 rnd-osh-dkm-t03.test.osh 10.19.86.24 rnd-osh-ifr-t01.test.osh 10.19.86.25 rnd-osh-ifr-t02.test.osh 10.19.86.26 rnd-osh-ifr-t03.test.osh 10.19.86.27 rnd-osh-bln-t01.test.osh openshift.test.osh 10.19.86.28 rnd-osh-shd-t01.test.osh 10.19.86.29 rnd-osh-dkr-t01.test.osh Check by url openshift.test.osh : 8443
2. Configuration after installation
Go to dkm.
oc login oc adm policy add-cluster-role-to-user cluster-admin admin --rolebinding-name=cluster-admin Check that it is possible to see a previously hidden project (openshift, for example) in the web interface.
3. Creating and connecting PV
Creating a persistent volume on the nfs server.
mkdir -p /exports/examplpv chmod -R 777 /exports/examplpv chown nfsnobody:nfsnobody -R /exports/examplpv echo '"/exports/examplpv" *(rw,root_squash)' >> /etc/exports.d/openshift-ansible.exports exportfs -ar restorecon -RvF Adding pv to openshift.
You need to create a project oc new-project examplpv-project.
If the project has already been created go to it oc project examplpv-project. Create a yaml of the following content.
apiVersion: v1 kind: PersistentVolume metadata: name: examplpv-ts1 spec: capacity: storage: 20Gi accessModes: - ReadWriteOnce nfs: path: /exports/examplpv server: rnd-osh-shd-t01 persistentVolumeReclaimPolicy: Recycle And apply. oc apply -f filename.yaml
After performance
oc get pv the created pv will be visible in the list.
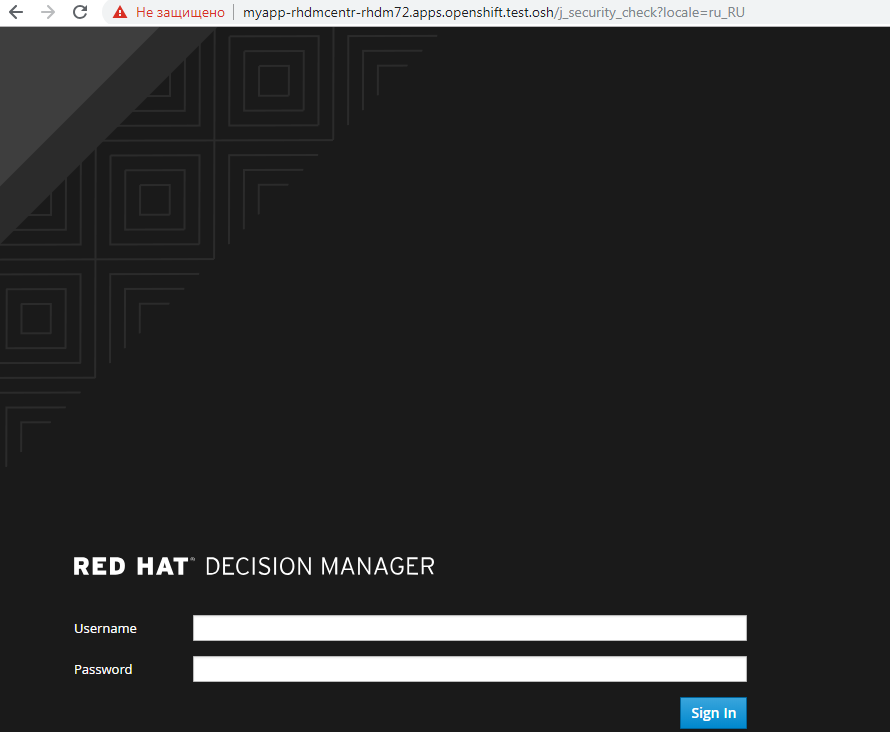
4. Creation and deployment of the Red Hat Decision Manager project (enterprise analog kie-workbench)
Check for patterns.
oc get imagestreamtag -n openshift | grep rhdm 
Adding templates - a link and a more complete description can be found.
unzip rhdm-7.2.1-openshift-templates.zip -d ./rhdm-7.2.1-openshift-templates Create a new project:
oc new-project rhdm72 Add authorization to docker registry.redhat.io server:
docker login registry.redhat.io cat ~/.docker/config.json oc create secret generic pull-secret-name --from-file=.dockerconfigjson=/root/.docker/config.json --type=kubernetes.io/dockerconfigjson oc secrets link default pull-secret-name --for=pull oc secrets link builder pull-secret-name Import imagetream, create keys Decision Server, Decision Central.
keytool -genkeypair -alias jboss -keyalg RSA -keystore keystore.jks -storepass mykeystorepass --dname "CN=STP,OU=Engineering,O=POC.mos,L=Raleigh,S=NC,C=RU" oc create -f rhdm72-image-streams.yaml oc create secret generic kieserver-app-secret --from-file=keystore.jks oc create secret generic decisioncentral-app-secret --from-file=keystore.jks Creating a persistent volume on the nfs server.
mkdir -p /exports/rhdm72 chmod -R 777 /exports/rhdm72 chown nfsnobody:nfsnobody -R /exports/rhdm72 echo '"/exports/rhamq72" *(rw,root_squash)' >> /etc/exports.d/openshift-ansible.exports exportfs -ar restorecon -RvF Add pv to project:
apiVersion: v1 kind: PersistentVolume metadata: name: rhdm72-pv1 spec: capacity: storage: 20Gi accessModes: - ReadWriteMany nfs: path: /exports/rhdm72 server: rnd-osh-shd-t01 persistentVolumeReclaimPolicy: Recycle Rhdm70 required PV parameters
accessModes:
- ReadWriteOnce
but in 7.2 it is already required
accessModes:
- ReadWriteMany
Apply - oc apply -f filename.yaml
+ check that the created pv is available.

create an application from templates according to official documentation.
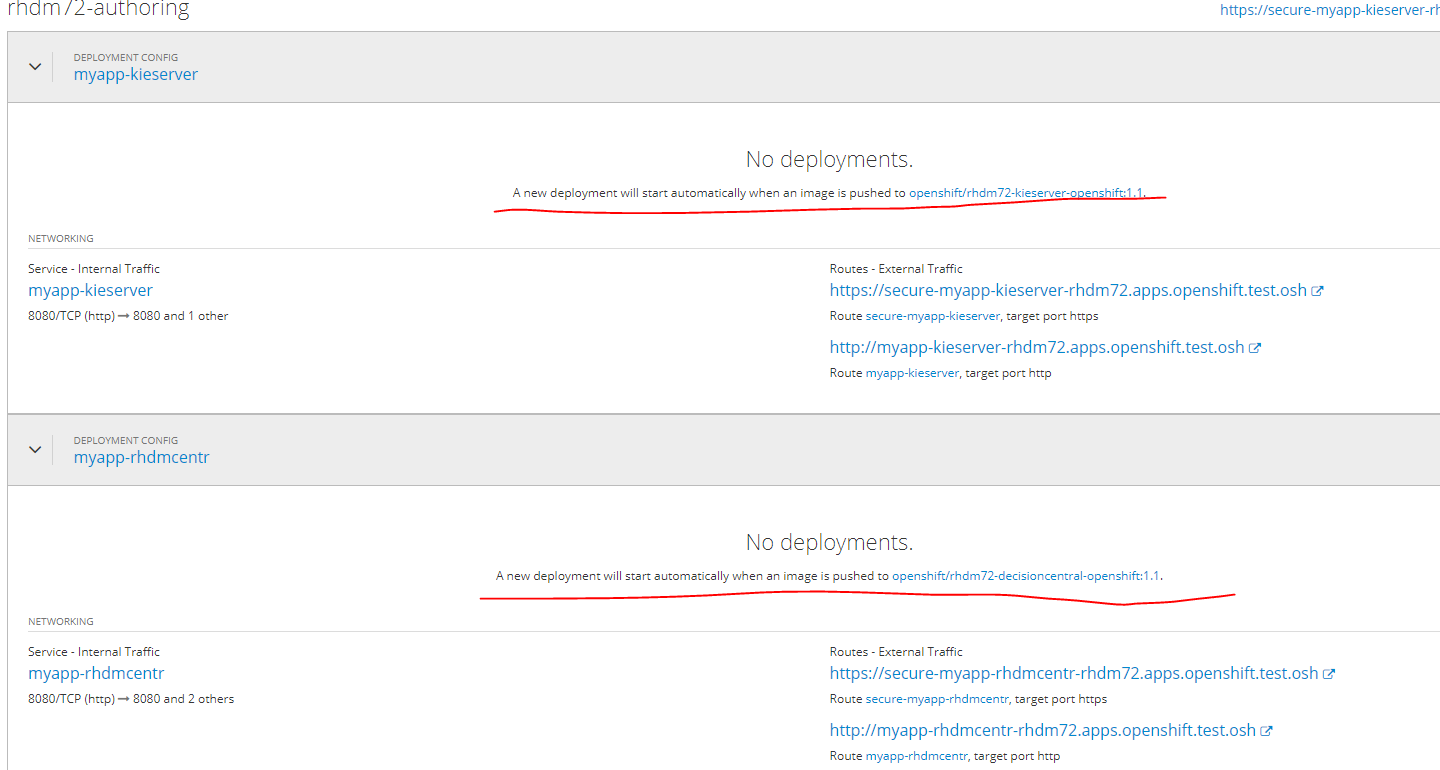
oc new-app -f rhdm-7.2.1-openshift-templates/templates/rhdm72-authoring.yaml -p DECISION_CENTRAL_HTTPS_SECRET=decisioncentral-app-secret -p KIE_SERVER_HTTPS_SECRET=kieserver-app-secret The application will automatically deploy upon completion of the Pull images in the docker-registry.
Up to this point the status will be as follows.
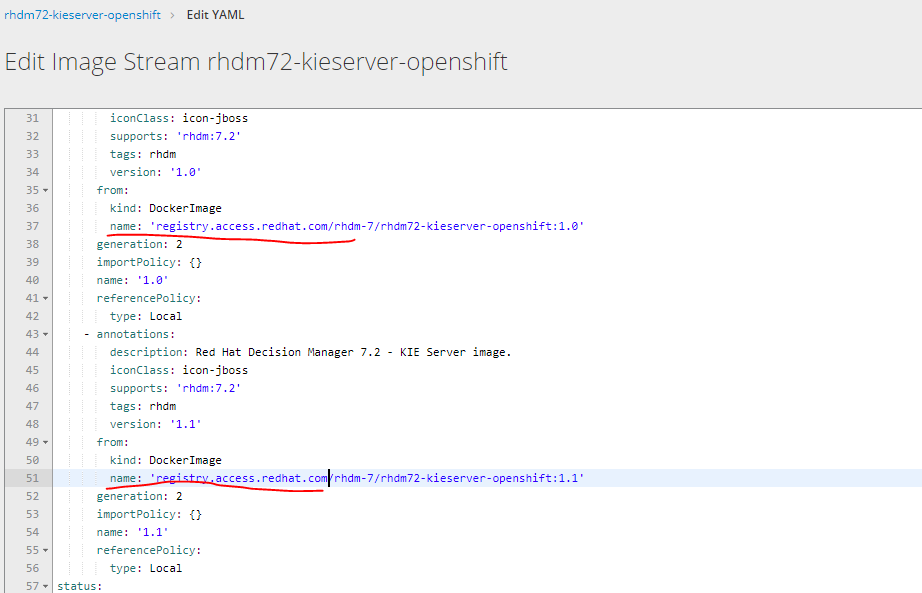
In the case of a link to the image will be the following error

It is necessary to change the url of loading images by selecting edit yaml from registry.redhat.io to registry.access.redhat.com
To go to the deployed service in its web interface, you must add the following url to the hosts file
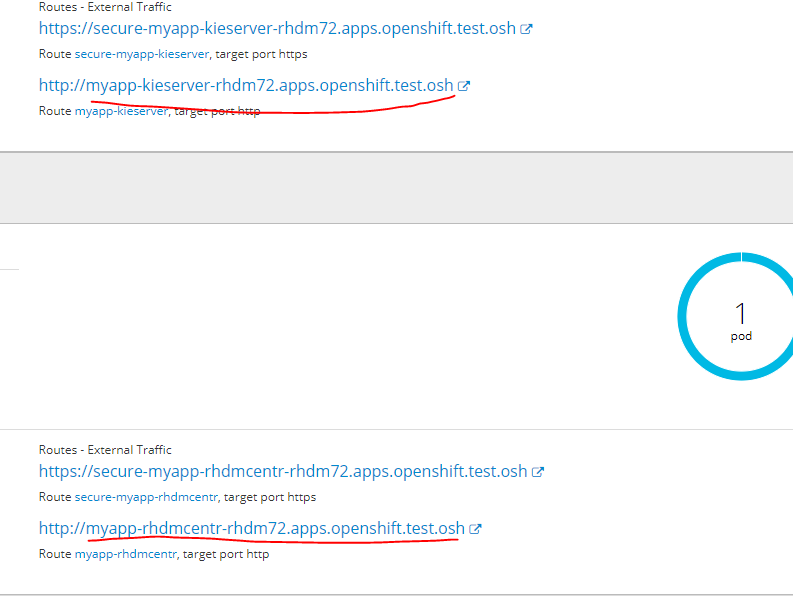
on any of the infra nodes
10.19.86.25 rnd-osh-ifr-t02.test.osh myapp-rhdmcentr-rhdm72.apps.openshift.test.osh
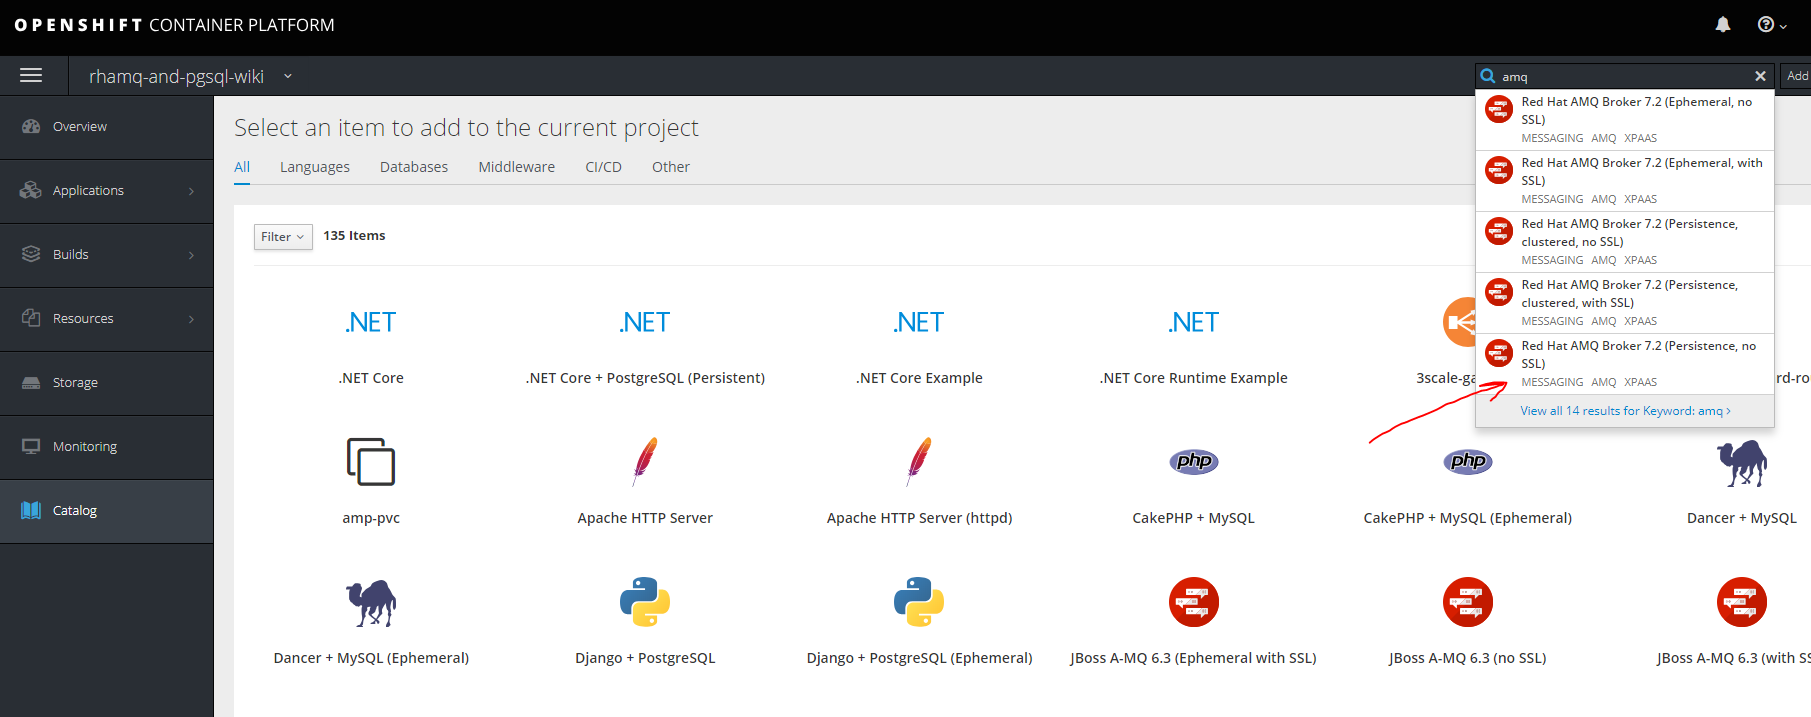
5. Creating and deploying AMQ projects (red hat active mq) and postgressql using persistent storage
Rhamq
Create a new project
oc new-project rhamq-and-pgsql We import images in case of their absence.
oc replace --force -f https://raw.githubusercontent.com/jboss-container-images/jboss-amq-7-broker-openshift-image/72-1.1.GA/amq-broker-7-image-streams.yaml oc replace --force -f https://raw.githubusercontent.com/jboss-container-images/jboss-amq-7-broker-openshift-image/72-1.1.GA/amq-broker-7-scaledown-controller-image-streams.yaml oc import-image amq-broker-72-openshift:1.1 oc import-image amq-broker-72-scaledown-controller-openshift:1.0 Installation templates
for template in amq-broker-72-basic.yaml \ amq-broker-72-ssl.yaml \ amq-broker-72-custom.yaml \ amq-broker-72-persistence.yaml \ amq-broker-72-persistence-ssl.yaml \ amq-broker-72-persistence-clustered.yaml \ amq-broker-72-persistence-clustered-ssl.yaml; do oc replace --force -f \ https://raw.githubusercontent.com/jboss-container-images/jboss-amq-7-broker-openshift-image/72-1.1.GA/templates/${template} done Add role to service account.
oc policy add-role-to-user view -z default Creating pv on nfs server
mkdir -p /exports/pgmq chmod -R 777 /exports/pgmq chown nfsnobody:nfsnobody -R /exports/pgmq echo '"/exports/pgmq" *(rw,root_squash)' >> /etc/exports.d/openshift-ansible.exports exportfs -ar restorecon -RvF Create yaml
pgmq_storage.yaml
apiVersion: v1 kind: PersistentVolume metadata: name: pgmq-ts1 spec: capacity: storage: 20Gi accessModes: - ReadWriteOnce nfs: path: /exports/pgmq server: rnd-osh-shd-t01 persistentVolumeReclaimPolicy: Recycle Apply pv
oc apply -f pgmq_storage.yaml Create from template
is ready
For other options with ssl clustering, etc. You can refer to the documentation access.redhat.com/documentation/en-us/red_hat_amq/7.2/html/deploying_amq_broker_on_openshift_container_platform
Postgresql
Create another PV in the same way as you did for MQ.
mkdir -p /exports/pgmq2 chmod -R 777 /exports/pgmq2 chown nfsnobody:nfsnobody -R /exports/pgmq2 echo '"/exports/pgmq2" *(rw,root_squash)' >> /etc/exports.d/openshift-ansible.exports exportfs -ar restorecon -RvF pgmq_storage.yaml
apiVersion: v1 kind: PersistentVolume metadata: name: pgmq-ts2 spec: capacity: storage: 20Gi accessModes: - ReadWriteOnce nfs: path: /exports/pgmq2 server: rnd-osh-shd-t01 persistentVolumeReclaimPolicy: Recycle 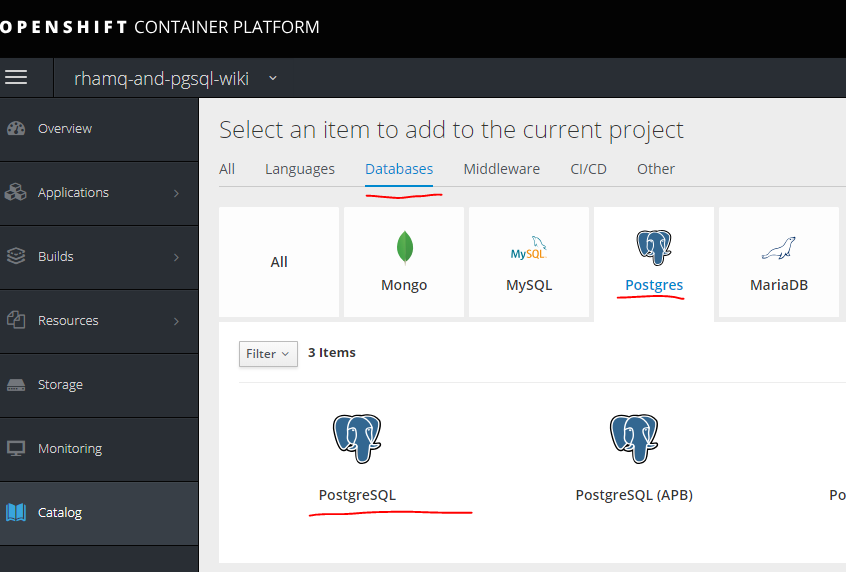
Fill in the required parameters

is ready.
6. Creating separate projects for services, templates for them, pipeline, integration with gitlab, gitlab regestry
The first thing you need to create a project.
oc new-project ttttt 
Initially, without having a template, you can create a manual application.
There are two ways.
The first one is simply using a ready-made image, but then version version of images, etc. will not be available, but in some cases it will be relevant.
First of all, you need to get the data for authentication to the registry. Using the example of the assembled image in Gitlab, this is done like this.

First you need to create secrets to access the docker registry - see the options and syntax.
oc create secret docker-registry Then create a secret
oc create secret docker-registry gitlabreg --docker-server='gitlab.xxx.com:4567' --docker-username='gitlab+deploy-token-1' --docker-password='syqTBSMjHtT_t-X5fiSY' --docker-email='email' Then create our application.
oc new-app --docker-image='gitlab.xxx.com:4567/oko/oko-service:latest' If something went wrong, and the image does not stretch in the application's state, specify the secret to our regestry.
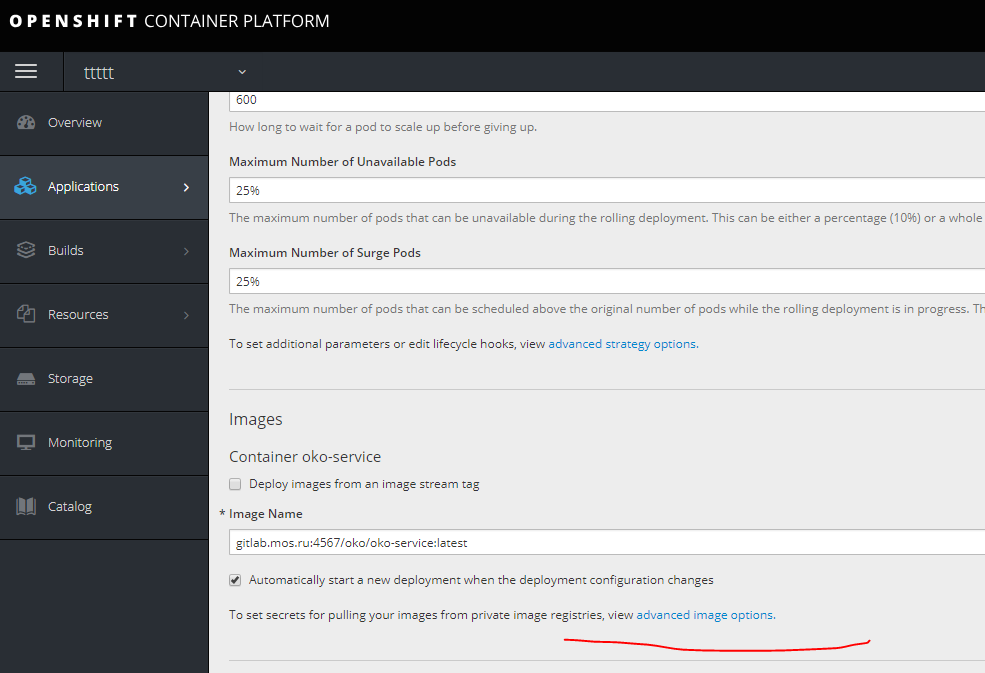
Then we add the necessary environment variables.
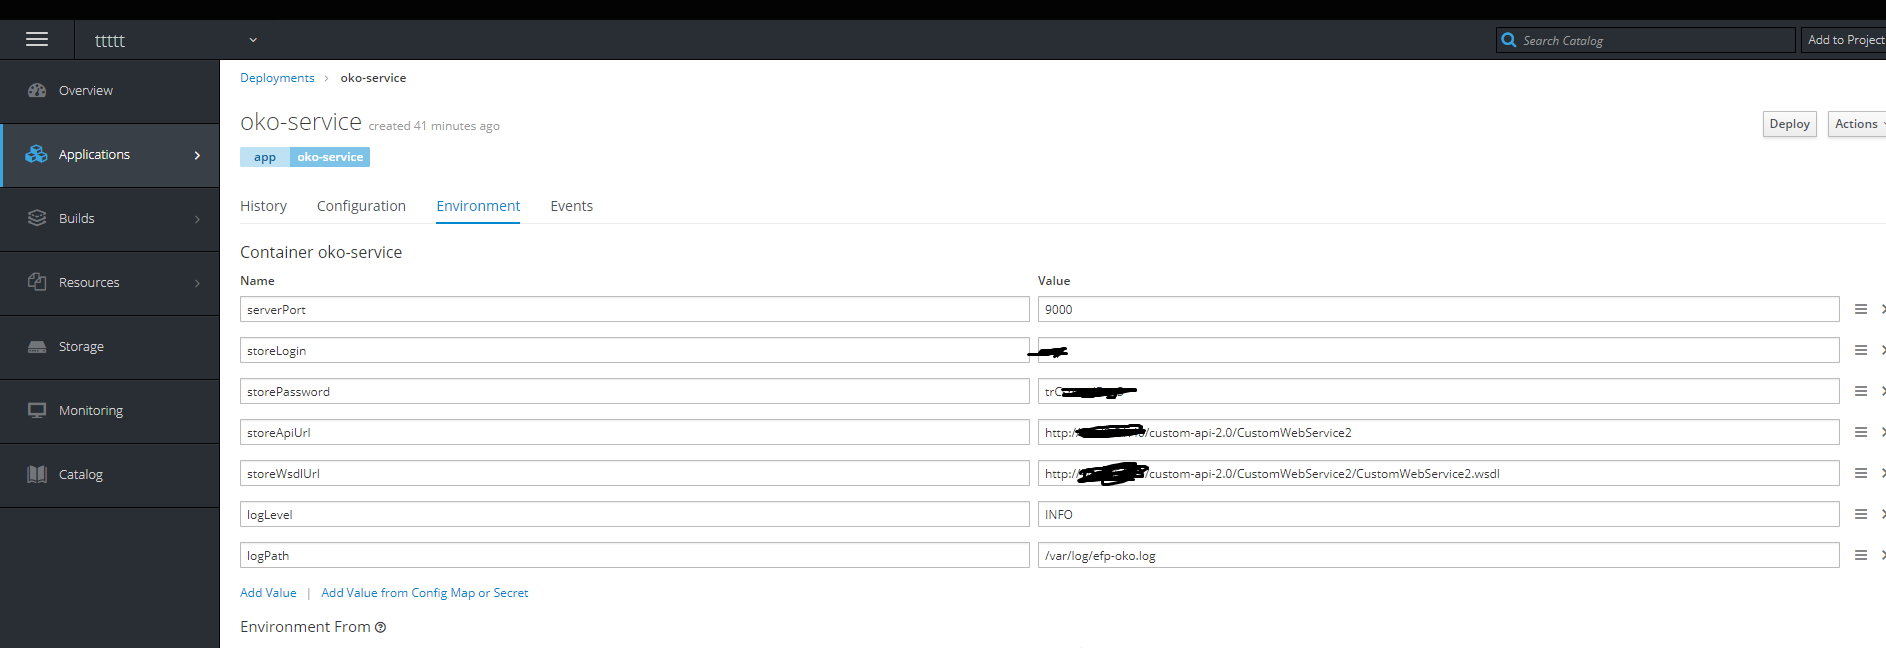
Done - the container is alive.
Then click on the right to edit yaml and select the ports.
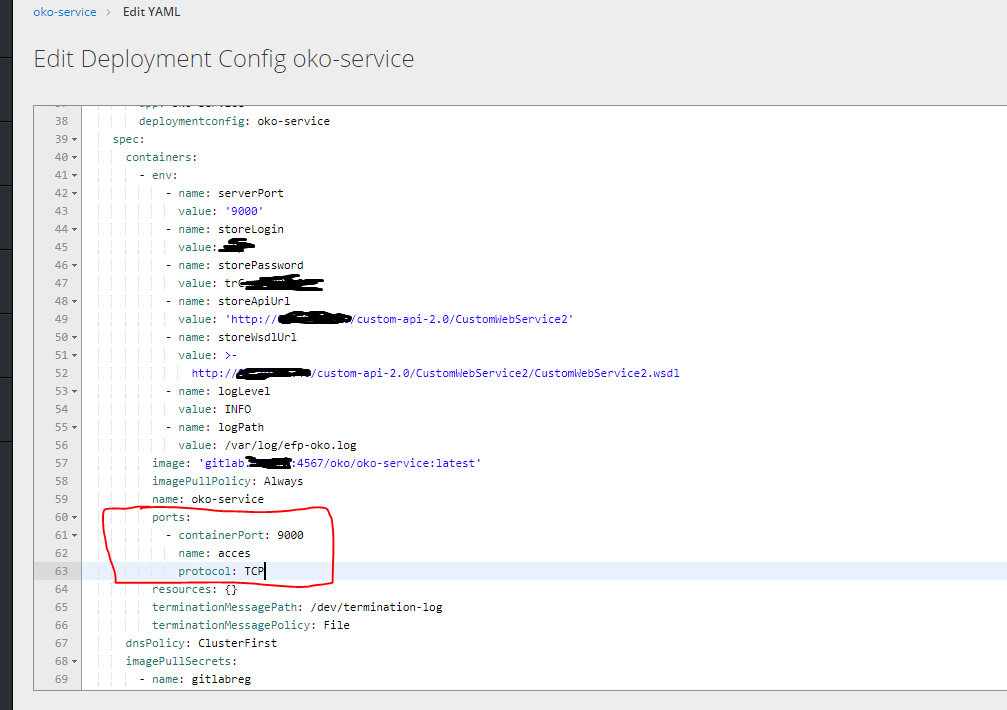
Then, to get access to our container, you need to create a route, but you cannot create it without a service, because the first step is to create a service.
service.yaml
kind: Service apiVersion: v1 metadata: name: oko-service spec: type: ClusterIP ports: - port: 9000 protocol: TCP targetPort: 9000 selector: app: oko-service sessionAffinity: None status: loadBalancer: {} oc apply -f service.yaml Create a Route.
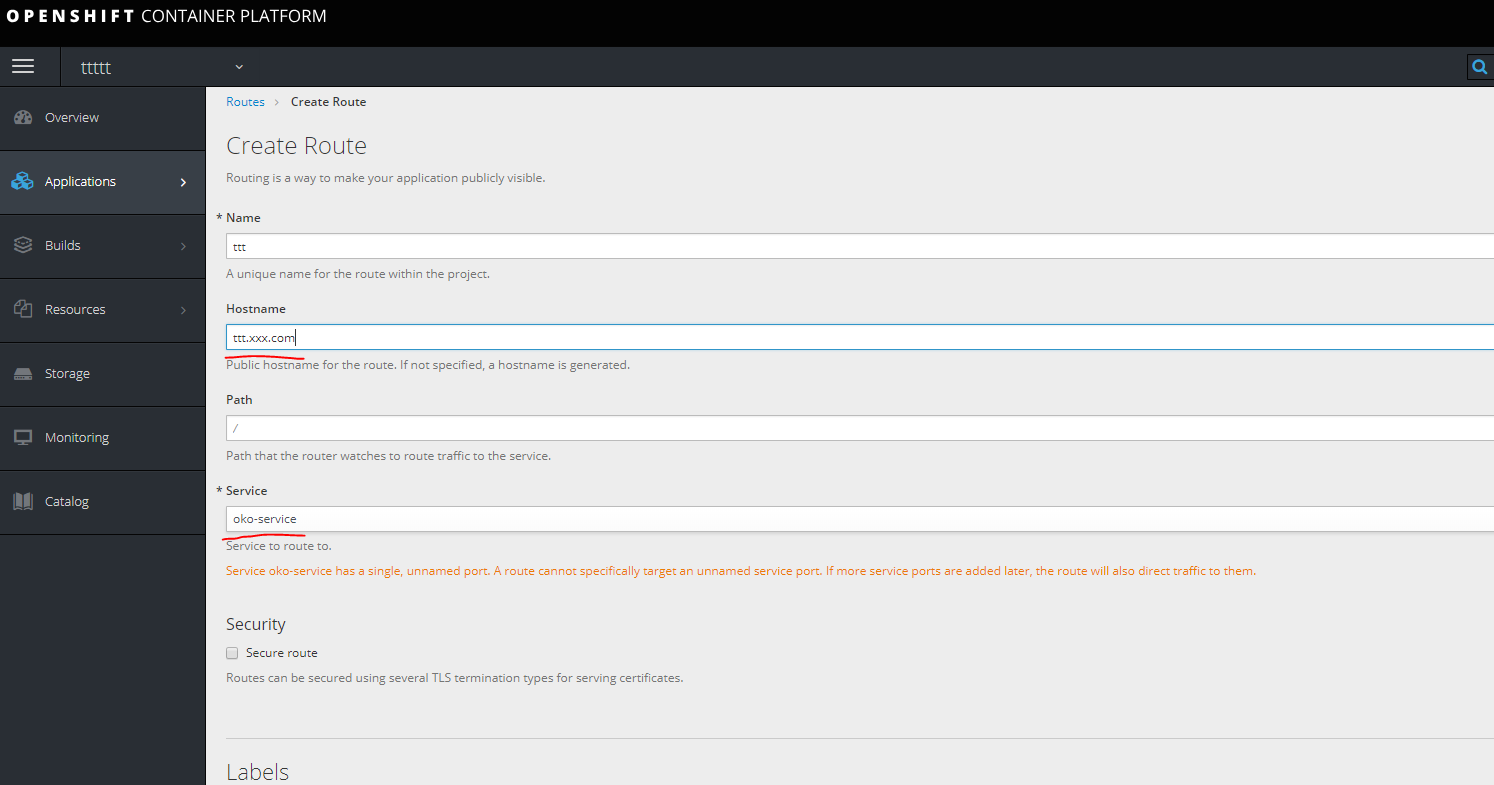
we register url in hosts on the machine looking at one of infra nodes.

we register url in hosts on the machine looking at one of infra nodes.
Is done.
Template.
The template is created by uploading to yaml separately all the components that relate to the service.
Namely, in this case it is secrets dc Service Route.
You can see all that is done in a specific project.
oc get all unload interest
oc get deploymentconfig.apps.openshift.io oko-service -o yaml or
oc get d oko-service -o yaml Then you can take as a basis any template for opensihft and integrate what was obtained to obtain the template.
In this case, the result will look like this:
template.yaml
kind: "Template" apiVersion: "v1" metadata: name: oko-service-template objects: - kind: DeploymentConfig apiVersion: v1 metadata: name: oko-service annotations: description: "ImageStream Defines how to build the application oko-service" labels: app: oko-service spec: replicas: 1 revisionHistoryLimit: 10 selector: matchLabels: app: oko-service deploymentconfig: oko-service template: metadata: labels: app: oko-service spec: selector: app: oko-service deploymentconfig: oko-service containers: - env: - name: serverPort value: "9000" - name: storeLogin value: "iii" - name: storePassword value: "trCsm5" - name: storeApiUrl value: "http://14.75.41.20/custom-api-2.0/CustomWebService2" - name: storeWsdlUrl value: "http://14.75.41.20/custom-api-2.0/CustomWebService2/CustomWebService2.wsdl" - name: logLevel value: "INFO" - name: logPath value: "/var/log/efp-oko.log" ports: - containerPort: 9000 name: acces protocol: TCP readinessProbe: failureThreshold: 3 httpGet: path: / port: 9000 scheme: HTTP initialDelaySeconds: 5 periodSeconds: 10 successThreshold: 1 timeoutSeconds: 1 image: gitlab.xxx.com:4567/oko/oko-service imagePullPolicy: Always name: oko-service imagePullSecrets: - name: gitlab.xxx.com type: ImageChange strategy: activeDeadlineSeconds: 21600 resources: {} rollingParams: intervalSeconds: 1 maxSurge: 25% maxUnavailable: 25% timeoutSeconds: 600 updatePeriodSeconds: 5 type: Rolling triggers: - type: "ImageChange" imageChangeParams: automatic: true containerNames: - "oko-service" from: kind: ImageStream name: 'oko-service:latest' - kind: ImageStream apiVersion: v1 metadata: name: oko-service annotations: openshift.io/generated-by: OpenShiftNewApp labels: app: oko-service deploymentconfig: oko-service spec: dockerImageRepository: gitlab.xxx.com:4567/oko/oko-service tags: - annotations: openshift.io/imported-from: gitlab.xxx.com:4567/oko/oko-service from: kind: DockerImage name: gitlab.xxx.com:4567/oko/oko-service importPolicy: insecure: "true" name: latest referencePolicy: type: Source forcePull: true - kind: Service apiVersion: v1 metadata: name: oko-service spec: type: ClusterIP ports: - port: 9000 protocol: TCP targetPort: 9000 selector: app: oko-service sessionAffinity: None status: loadBalancer: {} - kind: Route apiVersion: route.openshift.io/v1 metadata: name: oko-service spec: host: oko-service.moxs.ru to: kind: Service name: oko-service weight: 100 wildcardPolicy: None status: ingress: - conditions: host: oko-service.xxx.com routerName: router wildcardPolicy: None You can also add secrets here, in the following example we will consider a version of the service with an assembly on the openshift side where the secret will be in the template.
Second way
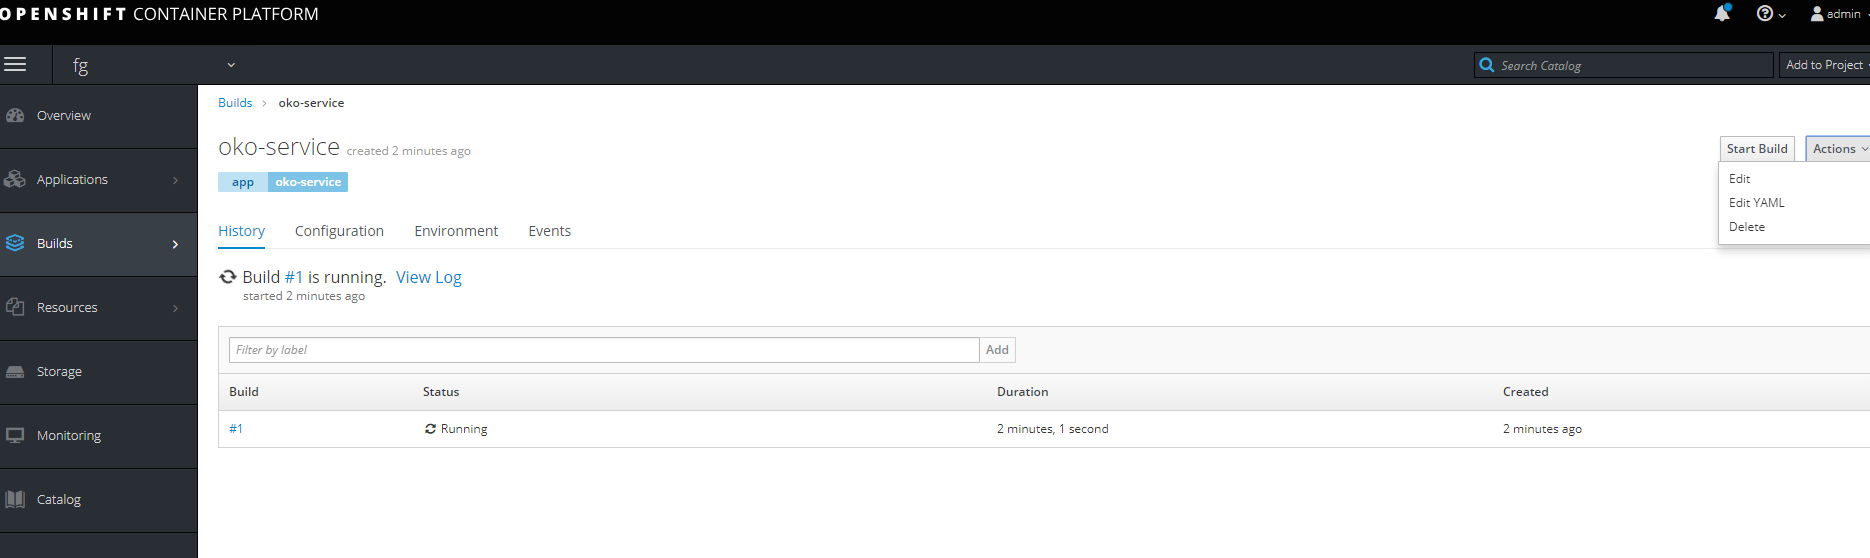
Creating a project with complete stages of the assembly of images, a simple pipeline and assembly by Push.
First of all create a new project.
First you need to create a Buildconfig from the gita (in this case there are three docker files in the project, a regular docker file which is designed for docker version 1.17 above using two FROMs, and two separate dockerfiles to build the base image and the target one.)
For access to git if it is private, authorization is required. Create a secret with the following content.
oc create secret generic sinc-git --from-literal=username=gitsinc --from-literal=password=Paaasssword123 We give service account builder access to our secret
oc secrets link builder sinc-git We tie the secret to the url of git
oc annotate secret sinc-git 'build.openshift.io/source-secret-match-uri-1=https://gitlab.xxx.com/*' Finally, we will try to create an application from the gita with the key - allow-missing-images, since we do not have the base image that we have collected yet.
oc new-app gitlab.xxx.com/OKO/oko-service.git --strategy = docker --allow-missing-images
Then you need to fix the build for the required dockerfile in the created buildconfig.
Rule
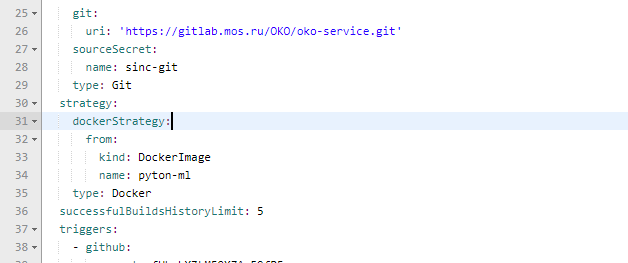
Also we change the parameters in order to make the base container.
Let's try to make this one Buildcconfig two. Under the base image, unload it into yaml and pick up what is needed.
At the exit, you can get two of these patterns.
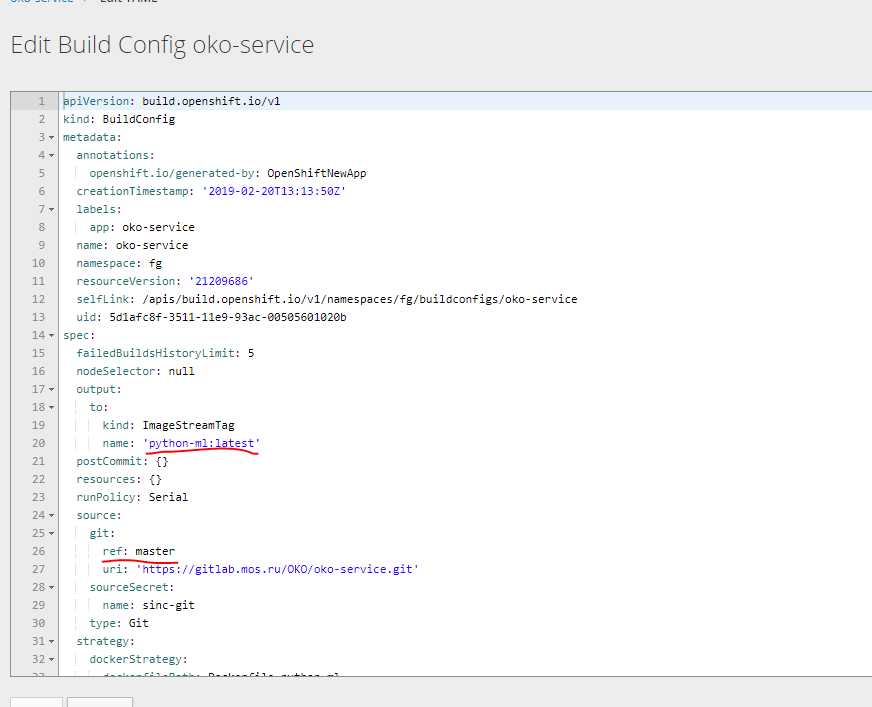
bc-py
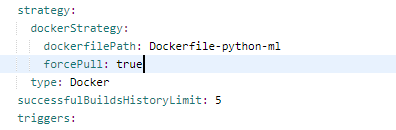
kind: "BuildConfig" apiVersion: "v1" metadata: name: "oko-service-build-pyton-ml" labels: app: oko-service spec: completionDeadlineSeconds: 2400 triggers: - type: "ImageChange" source: type: git git: uri: "https://gitlab.xxx.com/OKO/oko-service.git" ref: "master" sourceSecret: name: git-oko strategy: type: Docker dockerStrategy: dockerfilePath: Dockerfile-python-ml forcePull: true output: to: kind: "ImageStreamTag" name: "python-ml:latest" bc-oko
kind: "BuildConfig" apiVersion: "v1" metadata: name: "oko-service-build" labels: app: oko-service spec: completionDeadlineSeconds: 2400 triggers: - type: "ImageChange" source: type: git git: uri: "https://gitlab.xxx.xom/OKO/oko-service.git" ref: "master" sourceSecret: name: git-oko strategy: type: Docker dockerStrategy: dockerfilePath: Dockerfile-oko-service from: kind: ImageStreamTag name: "python-ml:latest" forcePull: true env: - name: serverPort value: "9000" - name: storeLogin value: "iii" - name: storePassword value: "trCsn5" - name: storeApiUrl value: "http://14.75.41.20/custom-api-2.0/CustomWebService2" - name: storeWsdlUrl value: "http://14.75.41.20/custom-api-2.0/CustomWebService2/CustomWebService2.wsdl" - name: logLevel value: "INFO" - name: logPath value: "/var/log/efp-oko.log" output: to: kind: "ImageStreamTag" name: "oko-service:latest" We also need to create deploymentconfig two imagestream and to complete the service and route scan.
I preferred not to separate all configs separately, but to immediately create a template that includes all the components for the service. based on the previous template for the version without assembly.
template kind: "Template" apiVersion: "v1" metadata: name: oko-service-template objects: - kind: Secret apiVersion: v1 type: kubernetes.io/basic-auth metadata: name: git-oko annotations: build.openshift.io/source-secret-match-uri-1: https://gitlab.xxx.com/* data: password: R21ZFSw== username: Z2l0cec== - kind: "BuildConfig" apiVersion: "v1" metadata: name: "oko-service-build-pyton-ml" labels: app: oko-service spec: completionDeadlineSeconds: 2400 triggers: - type: "ImageChange" source: type: git git: uri: "https://gitlab.xxx.com/OKO/oko-service.git" ref: "master" sourceSecret: name: git-oko strategy: type: Docker dockerStrategy: dockerfilePath: Dockerfile-python-ml forcePull: true output: to: kind: "ImageStreamTag" name: "python-ml:latest" - kind: "BuildConfig" apiVersion: "v1" metadata: name: "oko-service-build" labels: app: oko-service spec: completionDeadlineSeconds: 2400 triggers: - type: "ImageChange" source: type: git git: uri: "https://gitlab.xxx.com/OKO/oko-service.git" ref: "master" sourceSecret: name: git-oko strategy: type: Docker dockerStrategy: dockerfilePath: Dockerfile-oko-service from: kind: ImageStreamTag name: "python-ml:latest" forcePull: true env: - name: serverPort value: "9000" - name: storeLogin value: "iii" - name: storePassword value: "trC" - name: storeApiUrl value: "http://14.75.41.20/custom-api-2.0/CustomWebService2" - name: storeWsdlUrl value: "http://14.75.41.20/custom-api-2.0/CustomWebService2/CustomWebService2.wsdl" - name: logLevel value: "INFO" - name: logPath value: "/var/log/efp-oko.log" output: to: kind: "ImageStreamTag" name: "oko-service:latest" - kind: DeploymentConfig apiVersion: v1 metadata: name: oko-service annotations: description: "ImageStream Defines how to build the application oko-service" labels: app: oko-service spec: replicas: 1 revisionHistoryLimit: 10 selector: matchLabels: app: oko-service deploymentconfig: oko-service template: metadata: labels: app: oko-service spec: selector: app: oko-service deploymentconfig: oko-service containers: - env: - name: serverPort value: "9000" - name: storeLogin value: "iii" - name: storePassword value: "trCsn5" - name: storeApiUrl value: "http://14.75.41.20/custom-api-2.0/CustomWebService2" - name: storeWsdlUrl value: "http://14.75.41.20/custom-api-2.0/CustomWebService2/CustomWebService2.wsdl" - name: logLevel value: "INFO" - name: logPath value: "/var/log/efp-oko.log" ports: - containerPort: 9000 name: acces protocol: TCP readinessProbe: failureThreshold: 3 httpGet: path: / port: 9000 scheme: HTTP initialDelaySeconds: 5 periodSeconds: 10 successThreshold: 1 timeoutSeconds: 1 image: docker-registry.default.svc:5000/oko-service-p/oko-service imagePullPolicy: Always name: oko-service type: ImageChange strategy: activeDeadlineSeconds: 21600 resources: {} rollingParams: intervalSeconds: 1 maxSurge: 25% maxUnavailable: 25% timeoutSeconds: 600 updatePeriodSeconds: 5 type: Rolling triggers: - type: "ImageChange" imageChangeParams: automatic: true containerNames: - "oko-service" from: kind: ImageStreamTag name: 'oko-service:latest' - kind: ImageStream apiVersion: v1 metadata: name: oko-service annotations: openshift.io/generated-by: OpenShiftNewApp labels: app: oko-service deploymentconfig: oko-service spec: dockerImageRepository: "" tags: - annotations: openshift.io/imported-from: oko-service from: kind: DockerImage name: oko-service importPolicy: insecure: "true" name: latest referencePolicy: type: Source - kind: ImageStream apiVersion: v1 metadata: name: python-ml spec: dockerImageRepository: "" tags: - annotations: openshift.io/imported-from: oko-service-build from: kind: DockerImage name: python-ml importPolicy: insecure: "true" name: latest referencePolicy: type: Source - kind: Service apiVersion: v1 metadata: name: oko-service spec: type: ClusterIP ports: - port: 9000 protocol: TCP targetPort: 9000 selector: app: oko-service sessionAffinity: None status: loadBalancer: {} - kind: Route apiVersion: route.openshift.io/v1 metadata: name: oko-service spec: host: oko-service.xxx.com to: kind: Service name: oko-service weight: 100 wildcardPolicy: None status: ingress: - conditions: host: oko-service.xxx.com routerName: router wildcardPolicy: None This template is made for the oko-service-p project, so you need to take this into account.
You can use variables to automatically substitute the desired values.
Once again, the basic Yaml can be obtained by unloading data using oc get ... -o yaml
You can use this pattern for scanning as follows.
oc process -f oko-service-templatebuild.yaml | oc create -f - Then create Pipeline
oko-service-pipeline.yaml
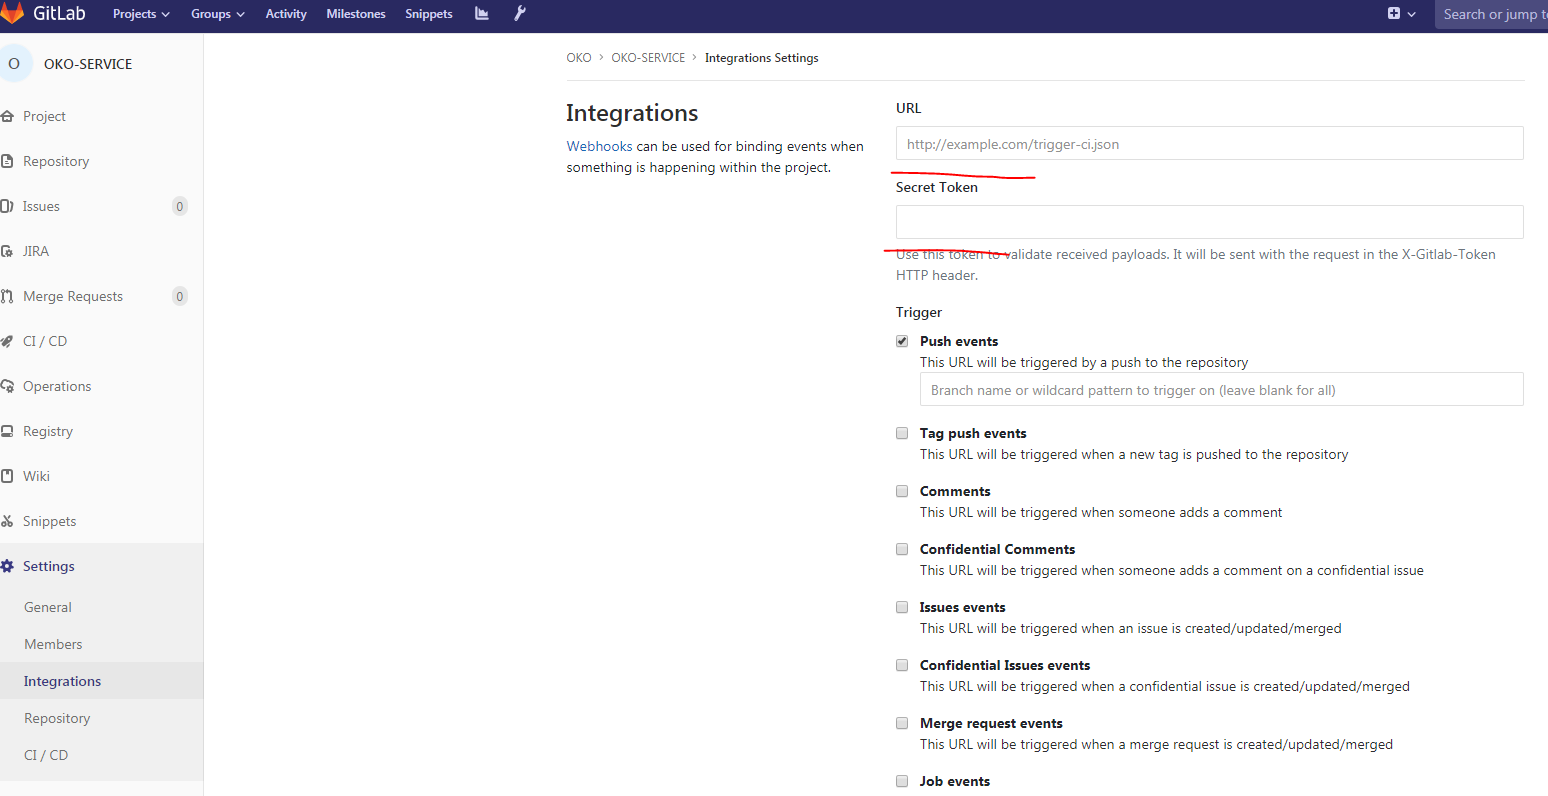
kind: "BuildConfig" apiVersion: "v1" type: "GitLab" gitlab: secret: "secret101" metadata: name: "oko-service-sample-pipeline" spec: strategy: jenkinsPipelineStrategy: jenkinsfile: |- // path of the template to use // def templatePath = 'https://raw.githubusercontent.com/openshift/nodejs-ex/master/openshift/templates/nodejs-mongodb.json' // name of the template that will be created def templateName = 'oko-service-template' // NOTE, the "pipeline" directive/closure from the declarative pipeline syntax needs to include, or be nested outside, pipeline { agent any environment { DEV_PROJECT = "oko-service"; } stages { stage('deploy') { steps { script { openshift.withCluster() { openshift.withProject() { echo "Hello from project ${openshift.project()} in cluster ${openshift.cluster()}" def dc = openshift.selector('dc', "${DEV_PROJECT}") openshiftBuild(buildConfig: 'oko-service-build', waitTime: '3000000') openshiftDeploy(deploymentConfig: 'oko-service', waitTime: '3000000') } } } } } } // stages } // pipeline type: JenkinsPipeline triggers: - type: GitLab gitlab: secret: ffffffffk After applying the Pipeline configuration by running
oc describe buildconfig oko-service-sample-pipeline You can get the url for the webhook in gitlab.

The secret to replace the specified secret in the config.
Also, after applying the Pipeline, openshift itself will begin installing jenkins in the project to launch Pipeline. The initial launch is long, so you need to wait some time.
Then in Gitlab in our project:
Fill in the Url, secret, remove the Enable SSL verification and our webhook is ready.
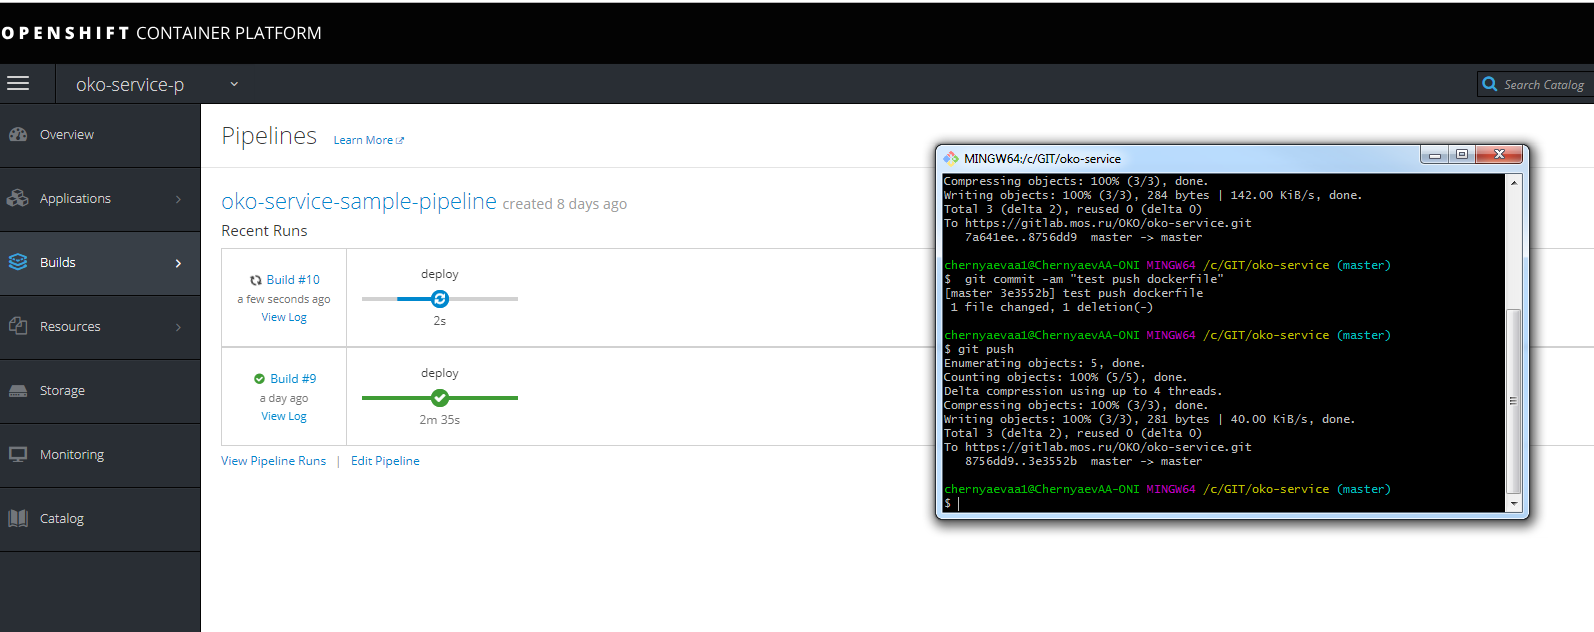
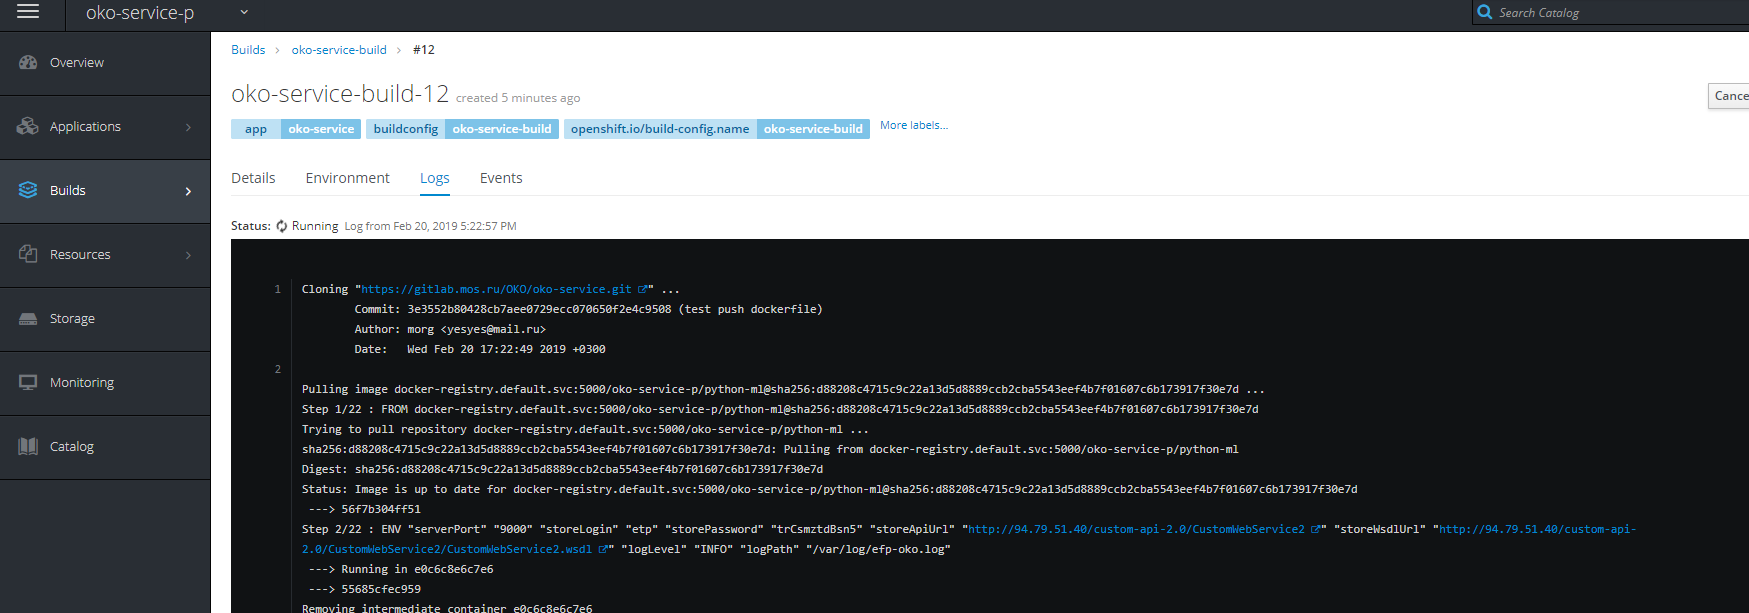
You can make a test push and look at the progress of assembly
Do not forget to register in the host url to get into the same jenkins on infranode.

You can also see the progress of the assembly.
PS I hope this article will help many understand how and with what openshift is eaten, clarifies many moments that are not obvious at first glance.
PSS some solutions to solve some problems
Problems running build builds, etc.
- create a service account for the project
oc create serviceaccount oko-serviceaccount oc adm policy add-scc-to-user privileged system:serviceaccount:__:oko-serviceaccount oc adm policy add-scc-to-group anyuid system:authenticated oc adm policy add-scc-to-user anyuid system:serviceaccount:__:oko-serviceaccount Problems with the suspension of the project and not deleting it
- forced termination script (congenital disease)
for i in $(oc get projects | grep Terminating| awk '{print $1}'); do echo $i; oc get serviceinstance -n $i -o yaml | sed "/kubernetes-incubator/d"| oc apply -f - ; done Problems downloading images.
oc adm policy add-role-to-group system:image-puller system:serviceaccounts:__ oc adm policy add-role-to-user system:image-puller system:serviceaccount:__::default oc adm policy add-role-to-group system:image-puller system:serviceaccounts:__ oc policy add-role-to-user system:image-puller system:serviceaccount:__::default oc policy add-role-to-group system:image-puller system:serviceaccounts:__ 
Also override permissions on the folder for the registry on nfs. (in the registry log errors for writing, the build is hanging on the push).
chmod 777 -r /exports/registry/docker/registry/ chmod -R 777 /exports/registry/docker/registry/ chown nfsnobody:nfsnobody -R /exports/registry/ hown -R 1001 /exports/registry/ restorecon -RvF exportfs -ar Source: https://habr.com/ru/post/441360/
All Articles