OpenAI Gym + ROS + Gazebo: learning autonomous robot at home. Part 1
Over the past few years, we have witnessed the introduction of artificial intelligence technologies in our everyday life - from vacuum cleaners to unmanned drones. All of them, driven by artificial intelligence, are already common to us. But despite this, the development process, from design to implementation, takes years and is not cheap. In addition, machine learning algorithms require large data and there are no guarantees that in the end everything will work.
Sooner or later, each developer comes to the conclusion that before creating a real robot, it is necessary to test the concept in a simulation, debug all systems and, finally, understand whether that development path was chosen.
Dr. Andrew Howard had similar thoughts when he and his student Neyton Koenig began developing the Gazebo 3D simulator at the University of Southern California in 2002. The concept of a high-precision simulator arose from the need to test robots in various difficult outdoor conditions. At the first stages of development, this approach saves time and money on the acquisition of the necessary equipment.
')
In this series of articles, I would like to share my experience in simulating and training an unmanned vehicle with only one ordinary camera as a sensor.
Hello. I am studying for a master's degree (Computer Science, MS) in Applied Informatics at Berlin University of Applied Sciences (HTW-Berlin).
As part of my coursework, I work on learning autonomous robots in simulated environments using ROS [1], Gazebo [2] and OpenAI Gym [3]. This course work is divided into two parts.
The first part is devoted to the development of a framework that would simplify the testing of Reinforcement Learning (reinforcement learning) algorithms on various autonomous robots inside the Gazebo simulation.
In the second part, I will focus on the implementation of the autonomous driving algorithm. I will work on this for the entire next semester, so this and the next article will deal mainly with the implementation of the OpenAI Gym environment for Gazebo. Directly Reinforcement Learning (RL) will be affected superficially.
The complete project code can be found here .
We will use the ROS version of Melodic. This version has several limitations and the most significant of them is Ubuntu 18 (it is also possible to install ROS on Windows WSL and on Ubuntu Headless, but more on that later). In addition, ROS still does not support Python 3.
In this pilot part, I will briefly talk about the technologies that will be used to create the environment. I will also describe the installation process and at the end we will launch a full-fledged simulation, which can be controlled via the Gym API.
Robot Operating System (ROS) is a robots programming framework. ROS is a “software glue” that allows developers to focus on their specific task. Although ROS is not an operating system, it provides services such as hardware abstraction, low-level device management, implementation of frequently used functions, transfer of messages between processes and package management (plug-ins).
ROS is designed as a loosely coupled system in which a process, called a node, must be responsible for one task. Nodes communicate with each other using messages that pass through logical channels called topics. Each node can send or receive data from another node using a publisher-subscriber design pattern (publish – subscribe pattern)
For ROS, drivers have already been implemented that allow working in a unified manner with many devices, such as controllers, GPS, cameras, laser range finders, etc.
And so, install ROS Melodic ( full instruction )
For some reason, the complete installation package does not include some of the necessary packages. Install them separately:
We will not dwell on them in detail. They are needed to control our robot, which will be discussed further.
Gazebo is an open source dynamic 3D simulator that develops the Open Source Robotic Foundation and interacts quite closely with ROS. Gazebo allows you to accurately and efficiently simulate robots both in difficult indoor conditions and outside.
The simulator consists of a server gzserver , which is engaged in the calculation of physics, collisions and simulation of sensors. Clients can be connected to the server, for example gzclient (for desktop) and gzweb (for browser). They are the ones who render models.
All this makes it possible to test complex robotic systems in the virtual space much faster and without the risk of damaging the expensive real robots.
Gazebo is included in the full ROS installation package, so there is no need to install anything extra. Headless configuration requires gzweb . I will tell about it in the following parts.
OpenAI is a non-profit research company engaged in artificial intelligence, one of the founders of which is Ilon Max.
OpenAI Gym is a Python library that provides an API for developing and comparing RL algorithms with a huge number of virtual environments and a common API. Gym already has many ready-made environments, including games Atari.
My project is based on the openai_ros package. This package implements the architecture that was proposed by The Construct team. The guys at The Construct have developed a general structure that implements the necessary API for managing simulations and describes the API for integrating Gazebo into the Gym, which requires minimal implementation. The proposed structure consists of three logical layers (in fact, any number can be used), the lowest of them is another “glue” that connects the Gym API with Gazebo. More on this in the next section, when we will parse the code.
First we need to create a working directory for catkin. catkin is a build automation system like CMake, which is included by default in the ROS installation package:
and clone the required ROS packages.
We will need a robot model developed at MIT with all sensors.
Well, actually, the project itself
Next you need to compile all these packages.
You also need to install all the necessary python libraries.
To run any ROS package, we first need to load all the ROS packages that we have compiled into the current terminal session:
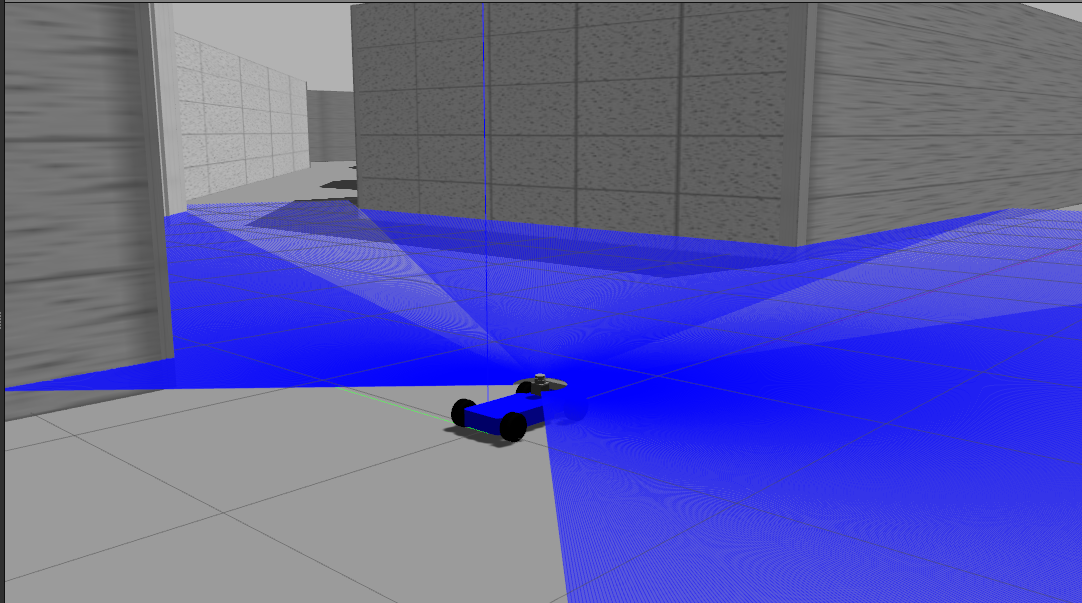
Now we can run the simulation of the Racecar robot:
This command will launch the ROS master server, Gazebo server along with its UI (on the desktop), load the robot and the world for it.
Screenshot:
And the same thing in the second terminal for our RL algorithm:
This command will launch our neuroracer_gym_rl package, which implements a simple Q-Learning algorithm in our Gym environment. We will analyze it in the next section.
Those who can not wait, can find the source code here . Looking ahead, I will say that after several days of training on a server with a GeForce GTX 1080 Ti 11GB RAM card, this simple algorithm has not really learned anything. In the next part, I will list the possible reasons, but you can already experiment with your own implementation.
And so, we have a fully working simulation of an autonomous car and a ready-made template for the RL algorithm. In the next part, we will analyze openai_ros in more detail and discuss the sensors installed on the robot. After this, I will show you how to implement your algorithms and what problems may arise during training.
PS: This is my first experience writing an article. For this, do not hesitate to write if you find mistakes or have ideas, or constructive criticism. I will try to take this into account in the following sections.
[1] (M. Quigley, K. Conley, B. Gerkey, J. Faust, T. Foote, J. Leibs, R. Wheeler, and AY Ng. Ros: an open source robot operating system. In ICRA workshop on open source software, volume 3, page 5. Kobe, Japan, 2009.
[2] NP Koenig and A. Howard. Design and use paradigms for gazebo, an open-source multi-robot simulator. In IROS, volume 4, pages 2149–2154 . Citeseer, 2004.
[3] LPJSJSJTWZ Greg Brockman, Vicki Cheung. Openai gym, 2016, arXiv: 1606.01540
Sooner or later, each developer comes to the conclusion that before creating a real robot, it is necessary to test the concept in a simulation, debug all systems and, finally, understand whether that development path was chosen.
Dr. Andrew Howard had similar thoughts when he and his student Neyton Koenig began developing the Gazebo 3D simulator at the University of Southern California in 2002. The concept of a high-precision simulator arose from the need to test robots in various difficult outdoor conditions. At the first stages of development, this approach saves time and money on the acquisition of the necessary equipment.
')
In this series of articles, I would like to share my experience in simulating and training an unmanned vehicle with only one ordinary camera as a sensor.
Hello. I am studying for a master's degree (Computer Science, MS) in Applied Informatics at Berlin University of Applied Sciences (HTW-Berlin).
As part of my coursework, I work on learning autonomous robots in simulated environments using ROS [1], Gazebo [2] and OpenAI Gym [3]. This course work is divided into two parts.
The first part is devoted to the development of a framework that would simplify the testing of Reinforcement Learning (reinforcement learning) algorithms on various autonomous robots inside the Gazebo simulation.
In the second part, I will focus on the implementation of the autonomous driving algorithm. I will work on this for the entire next semester, so this and the next article will deal mainly with the implementation of the OpenAI Gym environment for Gazebo. Directly Reinforcement Learning (RL) will be affected superficially.
The complete project code can be found here .
System requirements
- Ubuntu 18.04 or Windows WSL Ubuntu 18.04
- Python 2.7
- pip
- Tenserflow CPU or GPU
We will use the ROS version of Melodic. This version has several limitations and the most significant of them is Ubuntu 18 (it is also possible to install ROS on Windows WSL and on Ubuntu Headless, but more on that later). In addition, ROS still does not support Python 3.
Part One: Introduction
In this pilot part, I will briefly talk about the technologies that will be used to create the environment. I will also describe the installation process and at the end we will launch a full-fledged simulation, which can be controlled via the Gym API.
ROS: “don't reinvent the wheel”
Robot Operating System (ROS) is a robots programming framework. ROS is a “software glue” that allows developers to focus on their specific task. Although ROS is not an operating system, it provides services such as hardware abstraction, low-level device management, implementation of frequently used functions, transfer of messages between processes and package management (plug-ins).
ROS is designed as a loosely coupled system in which a process, called a node, must be responsible for one task. Nodes communicate with each other using messages that pass through logical channels called topics. Each node can send or receive data from another node using a publisher-subscriber design pattern (publish – subscribe pattern)
For ROS, drivers have already been implemented that allow working in a unified manner with many devices, such as controllers, GPS, cameras, laser range finders, etc.
And so, install ROS Melodic ( full instruction )
sudo sh -c 'echo "deb http://packages.ros.org/ros/ubuntu $(lsb_release -sc) main" > /etc/apt/sources.list.d/ros-latest.list' sudo apt-key adv --keyserver hkp://ha.pool.sks-keyservers.net:80 --recv-key 421C365BD9FF1F717815A3895523BAEEB01FA116 sudo apt update sudo apt install ros-melodic-desktop-full sudo rosdep init rosdep update echo "source /opt/ros/melodic/setup.bash" >> ~/.bashrc source /opt/ros/melodic/setup.bash For some reason, the complete installation package does not include some of the necessary packages. Install them separately:
sudo apt install ros-melodic-ackermann-msgs sudo apt install ros-melodic-effort-controllers sudo apt install ros-melodic-joy sudo apt install ros-melodic-tf2-sensor-msgs We will not dwell on them in detail. They are needed to control our robot, which will be discussed further.
Gazebo
Gazebo is an open source dynamic 3D simulator that develops the Open Source Robotic Foundation and interacts quite closely with ROS. Gazebo allows you to accurately and efficiently simulate robots both in difficult indoor conditions and outside.
The simulator consists of a server gzserver , which is engaged in the calculation of physics, collisions and simulation of sensors. Clients can be connected to the server, for example gzclient (for desktop) and gzweb (for browser). They are the ones who render models.
All this makes it possible to test complex robotic systems in the virtual space much faster and without the risk of damaging the expensive real robots.
Gazebo is included in the full ROS installation package, so there is no need to install anything extra. Headless configuration requires gzweb . I will tell about it in the following parts.
OpenAI Gym
OpenAI is a non-profit research company engaged in artificial intelligence, one of the founders of which is Ilon Max.
OpenAI Gym is a Python library that provides an API for developing and comparing RL algorithms with a huge number of virtual environments and a common API. Gym already has many ready-made environments, including games Atari.
openai_ros
My project is based on the openai_ros package. This package implements the architecture that was proposed by The Construct team. The guys at The Construct have developed a general structure that implements the necessary API for managing simulations and describes the API for integrating Gazebo into the Gym, which requires minimal implementation. The proposed structure consists of three logical layers (in fact, any number can be used), the lowest of them is another “glue” that connects the Gym API with Gazebo. More on this in the next section, when we will parse the code.
Putting it all together
First we need to create a working directory for catkin. catkin is a build automation system like CMake, which is included by default in the ROS installation package:
cd ~ mkdir catkin_ws cd catkin_ws/ mkdir src cd src/ and clone the required ROS packages.
Mit racecar
We will need a robot model developed at MIT with all sensors.
git clone https://github.com/mit-racecar/racecar.git git clone https://github.com/mit-racecar/racecar-simulator.git openai_ros
git clone https://bitbucket.org/theconstructcore/openai_ros.git neuroracer
Well, actually, the project itself
git clone https://github.com/karray/neuroracer.git Next you need to compile all these packages.
cd ~/catkin_ws catkin_make You also need to install all the necessary python libraries.
pip install -U numpy tensorflow gym keras Run simulation
To run any ROS package, we first need to load all the ROS packages that we have compiled into the current terminal session:
source ~/catkin_ws/devel/setup.bash Now we can run the simulation of the Racecar robot:
roslaunch racecar_gazebo racecar_tunnel.launch This command will launch the ROS master server, Gazebo server along with its UI (on the desktop), load the robot and the world for it.
Screenshot:
Spoiler header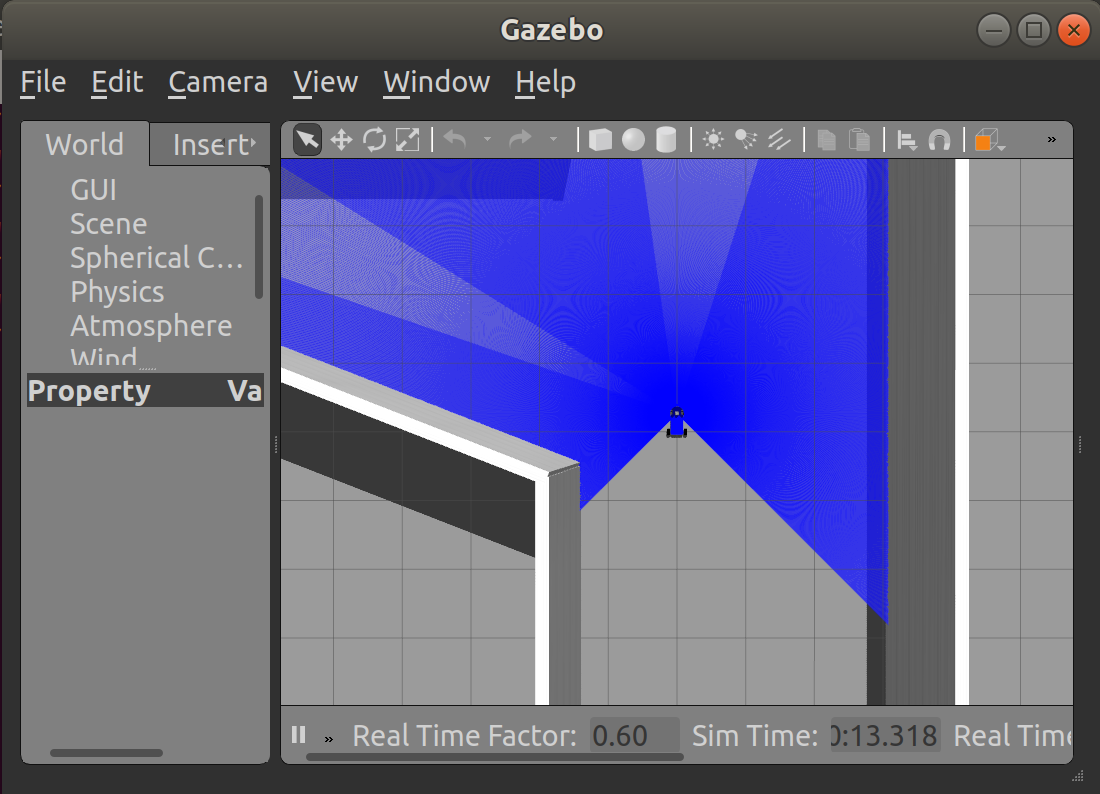
And the same thing in the second terminal for our RL algorithm:
source ~/catkin_ws/devel/setup.bash roslaunch neuroracer_gym_rl qlearning.launch This command will launch our neuroracer_gym_rl package, which implements a simple Q-Learning algorithm in our Gym environment. We will analyze it in the next section.
Those who can not wait, can find the source code here . Looking ahead, I will say that after several days of training on a server with a GeForce GTX 1080 Ti 11GB RAM card, this simple algorithm has not really learned anything. In the next part, I will list the possible reasons, but you can already experiment with your own implementation.
Conclusion
And so, we have a fully working simulation of an autonomous car and a ready-made template for the RL algorithm. In the next part, we will analyze openai_ros in more detail and discuss the sensors installed on the robot. After this, I will show you how to implement your algorithms and what problems may arise during training.
PS: This is my first experience writing an article. For this, do not hesitate to write if you find mistakes or have ideas, or constructive criticism. I will try to take this into account in the following sections.
Links
[1] (M. Quigley, K. Conley, B. Gerkey, J. Faust, T. Foote, J. Leibs, R. Wheeler, and AY Ng. Ros: an open source robot operating system. In ICRA workshop on open source software, volume 3, page 5. Kobe, Japan, 2009.
[2] NP Koenig and A. Howard. Design and use paradigms for gazebo, an open-source multi-robot simulator. In IROS, volume 4, pages 2149–2154 . Citeseer, 2004.
[3] LPJSJSJTWZ Greg Brockman, Vicki Cheung. Openai gym, 2016, arXiv: 1606.01540
Source: https://habr.com/ru/post/441218/
All Articles