Use Adobe Illustrator to create a page layout.
This guide was created for those who already know how to use Adobe Illustrator, but do not yet know all the subtleties of working with it and want to get to know it better.
Comrade CurlyBrace has already laid out the layout presented here, thanks to him!
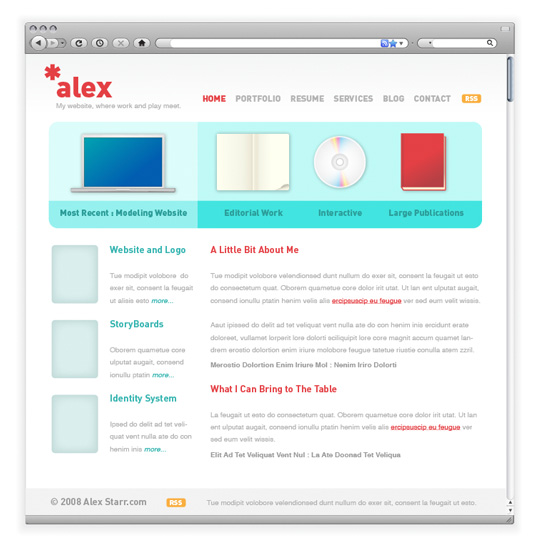
First, look at what we will try to do:
')

Create a new document with a width of 960px and an arbitrary height. I chose this width, because, judging by the visitors to our site , most of them have rather big monitors.
Do not forget to set the Color Mode in RGB .

The black borders in the picture below indicate the size of the document we are creating (the area between them is also called artboard ). I like to put a screenshot with a clean browser window as a background: it’s much easier to perceive the page as it should be.

The next step is very important. Of course, you can choose an arbitrary scale ( Zoom ) and even change it in the process, but keep in mind that the text on the page should be readable at a scale of 100% (1: 1). To zoom in, you can use the box below.

You can hide and display the borders of the workspace when you need it. To hide it, you need to select the command View> Hide Artboard . There is only one problem: this operation takes too much time. Therefore, I advise you to use a special keyboard shortcut for this: Command + Semicolon (;) .

To easily lay out the hierarchy of the document and balance it, you can, for starters, mark the page with gray rectangles, as I did. Thin long rectangles are future text.

When you are confident in the layout of the page, you can remove the rectangles by replacing them with guides ( Guide lines ).

Using guides as starting points, add various elements to the page: navigation, text, logo, images and icons to your liking. When you play around with the elements of the interface, try to remove the guides and look at the fruits of their work. There may be such a situation that the guides will work against you. Adjust them so they know their place.

Bring the page header to perfection by adding images and icons to it.

I decided to add a blue color in the cap.

Now you can proceed to the design of the text. Determine how headlines and links will look. I think it is better to do it right away so that later you can concentrate on developing the site (when the time comes).

There are several ways to prepare a design for WYSIWYG editors (for example, Adobe Dreamweaver). The first involves the use of slices ( Slice ). They can be created using the same guides or selection. We will do it with the help of guides: drag them and place them around each link element on the page. In our example, all four icons are links: lead to separate pages on our site.

When you mark out the right blocks on the page, you can turn them into real slices. To do this, use the command Object> Slice> Create from Guides . I noticed that Illustrator may not make the appropriate slices on demand, so I repeat this operation three or four times. When everything is ready, black numbered blocks will appear.

To save the slice made, use File> Save for Web & Devices .... Select the slices you need to save with the Slice Select Tool (k) . You can select several such blocks by holding Shift . In the panel on the right, select the options you want to save images. JPEG, for example, is more suitable for images with several colors, GIF - for images with a small number of colors and large monochromatic areas, and PNG - to preserve transparency in images (however, you will encounter an eccentric named Internet Explorer if you use the latest ). Choose the quality you need (you can play around with the settings) and click Save .

Choose a location to save files. I chose the desktop . Remember to set the Format field to Images Only .

A folder with the name Images will appear on your desktop. Inside are slices that have now become images.

Clear all guides with the View> Guides> Clear Guides command. Next, draw guides around those objects that you intend to cut now. When you hover over the menu, it should change its color. You need to cut it for all the shades you use.

Select the slices you want to save. Navigation in my example is just suitable for saving to GIF (does not contain images and a large number of colors). If you want to use ordinary fonts, then you should arrange nafigatsiyu using HTML.

Name the images as you like. If you do not want to do this, their names will be automatically selected.

When saving images to the same folder as last time, it will contain both new and old images. Remember to repeat steps 16-18 for the other states of the navigation buttons.

Keep in mind that this is not the only scenario. You can export slices together, including or disabling needed when editing the page.
Another method for creating slides is to select an object and execute the command Object> Slice> Create from Selection . You can use any way to create slices, which is more like.

In certain cases, you do not need text written directly in Illustrator, so you can safely delete it (before exporting slices).

Bottom image indicating that I deleted the text after the slice markup. Now it can be exported.

Look again at what we did.
I am sure that you feel easy when working with Adobe Illustrator. It is very easy to create layouts of any complexity: you can fully control the process of creating a page layout.
Comrade CurlyBrace has already laid out the layout presented here, thanks to him!
First, look at what we will try to do:
')
Step one
Create a new document with a width of 960px and an arbitrary height. I chose this width, because, judging by the visitors to our site , most of them have rather big monitors.
Do not forget to set the Color Mode in RGB .
Step Two
The black borders in the picture below indicate the size of the document we are creating (the area between them is also called artboard ). I like to put a screenshot with a clean browser window as a background: it’s much easier to perceive the page as it should be.
Step Three
The next step is very important. Of course, you can choose an arbitrary scale ( Zoom ) and even change it in the process, but keep in mind that the text on the page should be readable at a scale of 100% (1: 1). To zoom in, you can use the box below.
Step Four
You can hide and display the borders of the workspace when you need it. To hide it, you need to select the command View> Hide Artboard . There is only one problem: this operation takes too much time. Therefore, I advise you to use a special keyboard shortcut for this: Command + Semicolon (;) .
Step five
To easily lay out the hierarchy of the document and balance it, you can, for starters, mark the page with gray rectangles, as I did. Thin long rectangles are future text.
Step Six
When you are confident in the layout of the page, you can remove the rectangles by replacing them with guides ( Guide lines ).
Step Seven
Using guides as starting points, add various elements to the page: navigation, text, logo, images and icons to your liking. When you play around with the elements of the interface, try to remove the guides and look at the fruits of their work. There may be such a situation that the guides will work against you. Adjust them so they know their place.
Step Eight
Bring the page header to perfection by adding images and icons to it.
Step Nine
I decided to add a blue color in the cap.
Step Ten
Now you can proceed to the design of the text. Determine how headlines and links will look. I think it is better to do it right away so that later you can concentrate on developing the site (when the time comes).
Step Eleventh
There are several ways to prepare a design for WYSIWYG editors (for example, Adobe Dreamweaver). The first involves the use of slices ( Slice ). They can be created using the same guides or selection. We will do it with the help of guides: drag them and place them around each link element on the page. In our example, all four icons are links: lead to separate pages on our site.
Step Twelve
When you mark out the right blocks on the page, you can turn them into real slices. To do this, use the command Object> Slice> Create from Guides . I noticed that Illustrator may not make the appropriate slices on demand, so I repeat this operation three or four times. When everything is ready, black numbered blocks will appear.
Step Thirteen
To save the slice made, use File> Save for Web & Devices .... Select the slices you need to save with the Slice Select Tool (k) . You can select several such blocks by holding Shift . In the panel on the right, select the options you want to save images. JPEG, for example, is more suitable for images with several colors, GIF - for images with a small number of colors and large monochromatic areas, and PNG - to preserve transparency in images (however, you will encounter an eccentric named Internet Explorer if you use the latest ). Choose the quality you need (you can play around with the settings) and click Save .
Step Fourteen
Choose a location to save files. I chose the desktop . Remember to set the Format field to Images Only .
Step fifteenth
A folder with the name Images will appear on your desktop. Inside are slices that have now become images.
Step sixteenth
Clear all guides with the View> Guides> Clear Guides command. Next, draw guides around those objects that you intend to cut now. When you hover over the menu, it should change its color. You need to cut it for all the shades you use.
Step seventeenth
Select the slices you want to save. Navigation in my example is just suitable for saving to GIF (does not contain images and a large number of colors). If you want to use ordinary fonts, then you should arrange nafigatsiyu using HTML.
Step Eighteenth
Name the images as you like. If you do not want to do this, their names will be automatically selected.
Step nineteenth
When saving images to the same folder as last time, it will contain both new and old images. Remember to repeat steps 16-18 for the other states of the navigation buttons.
Step twentieth
Keep in mind that this is not the only scenario. You can export slices together, including or disabling needed when editing the page.
Another method for creating slides is to select an object and execute the command Object> Slice> Create from Selection . You can use any way to create slices, which is more like.
Step twenty first
In certain cases, you do not need text written directly in Illustrator, so you can safely delete it (before exporting slices).
Step twenty second
Bottom image indicating that I deleted the text after the slice markup. Now it can be exported.
Extreme step
Look again at what we did.
I am sure that you feel easy when working with Adobe Illustrator. It is very easy to create layouts of any complexity: you can fully control the process of creating a page layout.
Source: https://habr.com/ru/post/44026/
All Articles