Cybernetic orchestra. Orchestration of Docker containers with .NET Core applications in the cloud
Orchestrators can be used to provide load balancing, scalability and increase resiliency. Among them, the service Kubernetes is now very popular. The easiest way to try it in business is to deploy it in the cloud, which we will do today.

Note: we continue the series of publications of the full versions of articles from the magazine Hacker. Spelling and punctuation of the author saved.
Expand AKS
We go to the portal Azure , click "Create a resource" and find a service called Kubernetes Service.
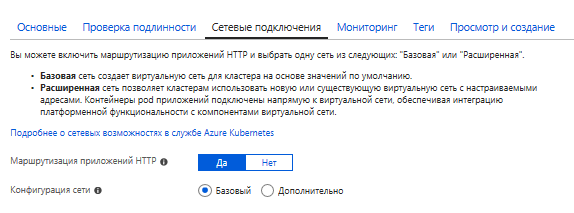
Choose a name and DNS prefix to your taste. The name affects how you contact your cluster, but the prefix affects its FQDN.

The cheapest virtual machine currently costs just over $ 30 per month.
The second step is to create a service principal. Service principal is a kind of service account under which certain specific tasks can be performed. The advantages are that the rights of such an account can be limited. In addition, you can create any number of such accounts (while the number of regular accounts is limited by subscription). You can find the created service principal accounts in Active Directory among the App Registrations

RBAC (role-based access control) is the ability to limit or grant access to specific resources (or groups of resources). That is, you can distinguish which users of your subscription have access rights and which ones do not have.
At the moment, the process takes about 20 minutes, but everything may depend on the configuration.
You can find official manuals by links.
Creating an AKS cluster using the portal
Creating AKS Cluster with CLI
To work we need the Azure command line - CLI (Command Line Interface). It can be installed both under Windows and under macOS or Linux. Personally, I prefer to use the Azure Cloud Shell. This is a command line that runs from an Azure portal page loaded into a browser. To work, it requires a blob storage created. Its cost will be a few cents per month and therefore I prefer not to be soared about installing the CLI on my car.
Kubernetes supports various container technologies, but let's look at the most popular - Docker. docker.hub allows you to store one private image of the docker for free. If you need more, you can place them for money. But for money, a private docker image can be placed in the Azure Container Registry. Now the prices start from 5 dollars per month (for the base SKU).
I created an ACR service called myservice. If you also decide to use ACR, then having created the service you will need to get its keys.

Then it will be possible to log in by executing the command:
docker login myservice.azurecr.io Enter username (myservice) and password from portal (PJSeyO9 = lCMRDI7dGkz68wjhFGRGxSY3)
Now, going into the project directory, you can build an image, simultaneously marking it with the desired tag. And then send it to the cloud service:
docker build -t myservice.azurecr.io/myservice . docker push myservice.azurecr.io/myservice Secrets, secrets ... We provide access to the image and save the settings.
When working with a deployed AKS you need to get his credits. Otherwise, kubectl commands will not be executed. To access the AKS, the following command is executed:
az aks get-credentials --resource-group KubernetesGroup --name verycoolcluster In order to access the docker image located in the docker's repository in a private container, you need to create a secret. If you have a public image, you can skip this step.
To create a secret file, you need to run the following command:
kubectl create secret docker-registry regcred --docker-server=<your-registry-server> --docker-username=<your-name> --docker-password=<your-pword> --docker-email=<your-email> If your image is in the docker's repository, the value of <your-registry-server> will be https://index.docker.io/v1/
For Azure Container Registry, the FQDN will be <registry-name> .azurecr.io
That is, to create a secret for the container in my case, I ran:
kubectl create secret docker-registry regcred --docker-server="myservice.azurecr.io" --docker-username="myservice" --docker-password="PJSeyO9=lCMRDI7dGkz68wjhFGRGxSY3" --docker-email="asommer@yandex.ru" You can now view the contents of the created secret file using the command:
kubectl get secret regcred --output=yaml INFO
If you use AKS, you can not create a secret file, but provide access to the AKS service to the ACR service in another way - by running a special script. You can take it from the next page:
Authenticate with Azure Container Registry from Azure Kubernetes Service
#!/bin/bash AKS_RESOURCE_GROUP=KubernetesGroup AKS_CLUSTER_NAME=verycoolcluster ACR_RESOURCE_GROUP=MyACRGroup ACR_NAME=myservice # Get the id of the service principal configured for AKS CLIENT_ID=$(az aks show --resource-group $AKS_RESOURCE_GROUP --name $AKS_CLUSTER_NAME --query "servicePrincipalProfile.clientId" --output tsv) # Get the ACR registry resource id ACR_ID=$(az acr show --name $ACR_NAME --resource-group $ACR_RESOURCE_GROUP --query "id" --output tsv) # Create role assignment az role assignment create --assignee $CLIENT_ID --role Reader --scope $ACR_ID You can simply modify the values of the variables AKS * and ACR *, then copy the script and paste it into the Azure CLI or Cloud Shell.
Kubernetes contains a secure credential storage. That is, you can create a file with settings and access to these settings will be difficult to obtain from the outside. This file usually contains database connection strings and some credits. If you don’t have such information in the application (is it true?), Then you can skip this step.
In order to create a configuration file from the command line, we first need to consider the vi commands.
vi < > will create a file if it is missing or open an existing one
To save the changes made, press ESC and then ZZ
To just exit without saving ESC and after: q!
Very abbreviated description, but it should be enough. I can add that the use of the Insert key can be very useful.
So, through the Azure Cloud Shell create a file with an arbitrary name (say, appsettings.json) and the necessary content for you. Suppose so:
{ "ConnectionString": "some secret string goes there" } And after you execute the command:
kubectl create secret generic secret-appsettings --from-file=/home/youraccount/appsettings.json This command will create a secret with settings named secret-appsettings
Find out which way to replace / home / youraccount with the pwd command
Create deployment
Deployments are designed for stateless services. They describe how Pods and ReplicaSets will be created and how they will be updated. A pod is a group of containers (or one container) that work in the same environment. The purpose of ReplicaSet is to control that the specified number of pod will be launched and will constantly work.
Based on the previously created, I create a file deploy.yaml which will create 3 pod. The file contains the following code (remember that spaces in yaml are very important):
apiVersion: apps/v1beta1 kind: Deployment metadata: name: mydeployment spec: replicas: 3 minReadySeconds: 10 strategy: type: RollingUpdate rollingUpdate: maxUnavailable: 1 maxSurge: 1 template: metadata: labels: app: myapp spec: containers: - name: app image: myservice.azurecr.io/myservice:latest ports: - containerPort: 80 name: http protocol: TCP imagePullPolicy: Always env: - name: "ASPNETCORE_ENVIRONMENT" value: "Production" volumeMounts: - name: secrets mountPath: /app/secrets readOnly: true imagePullSecrets: - name: regcred volumes: - name: secrets secret: secretName: secret-appsettings Consider the code. The beginning describes the number of replicas and the update strategy. Then the deployment is given a name (myapp) and a link to the container image is indicated. Ports are registered. 80 is the standard port for http. Next come the ASP.NET Core environment settings. Then the credits of the private image of the docker and the secret settings of the application, which we recently created, are mounted.
strategy: type: RollingUpdate rollingUpdate: maxUnavailable: 1 maxSurge: 1 This piece is responsible for the update process. maxSurge - the number of pods created over existing when upgrading (in pieces or percent). maxUnavailable - the maximum number of pods that may become unavailable during the update process.
deployment can be created using the command:
kubectl apply -f deploy.yaml Meet Ingress
In order to provide access to cluster services and load balancing, a service called ingress is used. A rather popular solution is ingress created on the basis of nginx. The easiest way to install it is using the Kubernetes package manager, called helm. The advantage of Azure Cloud Shell is that helm is already installed in it. What remains to be done to install nginx-ingress. Enter:
helm init Wait a bit and execute:
helm install stable/nginx-ingress --namespace kube-system --set rbac.create=false Creating SSL Certificates with LetsEncrypt
Since the SSL certificate is bound to a domain name, we will give our DNS resource a name.
Execute the following command and take external (external) IP
kubectl get service -l app=nginx-ingress --namespace kube-system Substitute the IP and the name we have invented for the subdomain into the following script
#!/bin/bash # Public IP address of your ingress controller IP="168.63.19.2" # Name to associate with public IP address DNSNAME="myservice-ingress" # Get the resource-id of the public ip PUBLICIPID=$(az network public-ip list --query "[?ipAddress!=null]|[?contains(ipAddress, '$IP')].[id]" --output tsv) # Update public ip address with DNS name az network public-ip update --ids $PUBLICIPID --dns-name $DNSNAME We simply copy this script, paste it into the command line and execute it this way. As a name for the subdomain, I set a very "original" name - myservice-ingress
Install the certificate manager in the same way by copying and pasting the following script into the command line. Here, even nothing really needs to be changed.
helm install \ --name cert-manager \ --namespace kube-system \ stable/cert-manager \ --set ingressShim.defaultIssuerName=letsencrypt-prod \ --set ingressShim.defaultIssuerKind=ClusterIssuer \ --set rbac.create=false \ --set serviceAccount.create=false INFO
If we had a cluster with RBAC, the script would be different.
helm install stable/cert-manager --set ingressShim.defaultIssuerName=letsencrypt-staging --set ingressShim.defaultIssuerKind=ClusterIssuer If the certificate file is available, you can add it as follows:
kubectl create secret tls tls-secret --cert CERT.crt --key KEY-FOR-CERT.key But since we do not have a certificate signed by CA, we will have to dance a little with a tambourine. We will create a CA using a free service called LetsEncrypt . LetsEncrypt is a Certificate Authority that issues certificates completely free of charge. Such is the altruistic organization whose goal is to secure the Internet.
So, create a cluster-issuer.yaml file. It describes the organization that issued the certificate.
apiVersion: certmanager.k8s.io/v1alpha1 kind: ClusterIssuer metadata: name: letsencrypt-prod spec: acme: server: https://acme-v02.api.letsencrypt.org/directory email: youeemail@yourdomain.ru privateKeySecretRef: name: letsencrypt-prod http01: {} You only need to replace the e-mail with your address and you can perform:
kubectl apply -f cluster-issuer.yaml Then we create a certificate file certificate.yaml specifying the name of the created ClusterIssuer and the domain for which the certificate is intended - myservice-ingress.westeurope.cloudapp.azure.com
apiVersion: certmanager.k8s.io/v1alpha1 kind: Certificate metadata: name: tls-prod-secret spec: secretName: tls-prod-secret dnsNames: - myservice-ingress.westeurope.cloudapp.azure.com acme: config: - http01: ingressClass: nginx domains: - myservice-ingress.westeurope.cloudapp.azure.com issuerRef: name: letsencrypt-prod kind: ClusterIssuer We carry out:
kubectl apply -f certificate.yaml Service Creation and Ingress
Four different types of services can be created in Kubernetes.
The default service is ClusterIP. Access to this service is possible only from a cluster by internal IP.
NodePort automatically creates the ClusterIP service. Access to NodePort is possible from the outside via the following route:
LoadBalancer load balancer provides access to the service from the outside, automatically creating the NodePort and ClusterIP services.
ExternalName associates a service with an external name.
We have enough basic service:
apiVersion: v1 kind: Service metadata: name: myservice spec: type: ClusterIP ports: - port: 80 name: http targetPort: http selector: app: myapp By the selector value we specify the name of our deployment.
It remains to create a service.
kubectl apply -f service.yaml And as a final step we create an ingress with which I already introduced you a little higher in this article. In yaml, we specify the name of the cluster-issuer and certificate. We created them earlier.
apiVersion: extensions/v1beta1 kind: Ingress metadata: name: myingress annotations: kubernetes.io/ingress.class: nginx certmanager.k8s.io/cluster-issuer: letsencrypt-prod nginx.ingress.kubernetes.io/rewrite-target: / spec: tls: - hosts: - myservice-ingress.westeurope.cloudapp.azure.com secretName: tls-prod-secret rules: - host: myservice-ingress.westeurope.cloudapp.azure.com http: paths: - path: / backend: serviceName: myservice servicePort: 80 After some time after the creation of ingress using the same kubectl apply command, our microservice should be available at https: // myservice-ingress.westeurope.cloudapp.azure.com . By clicking on the lock in the address bar of the browser next to https, you can make sure that the certificate is valid and issued by the CA.

We remind you that this is the full version of an article from Hacker magazine . Its author is Alexey Sommer .
')
Source: https://habr.com/ru/post/435870/
All Articles