An example client-server application on Flutter
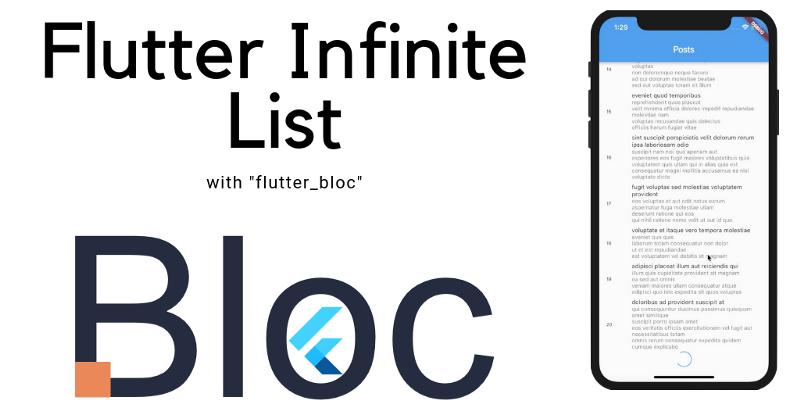
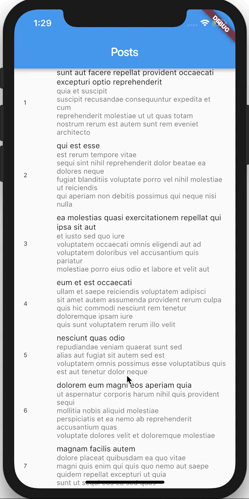
In this tutorial we are going to develop an application that receives data via the Internet and display it as a list. Like this
OK, let's start by creating a project. Let's write the following on the command line
')
flutter create flutter_infinite_list Next, go to our dependency file pubspec.yaml and add the ones we need.
name: flutter_infinite_list description: A new Flutter project. version: 1.0.0+1 environment: sdk: ">=2.0.0-dev.68.0 <3.0.0" dependencies: flutter: sdk: flutter flutter_bloc: 0.4.11 http: 0.12.0 equatable: 0.1.1 dev_dependencies: flutter_test: sdk: flutter flutter: uses-material-design: true After that, install these dependencies with the following command
flutter packages get For this application, we will use jsonplaceholder to get stream data. If you are not familiar with this service, this is an online REST API service that can give fake data. This is very useful for building prototype applications.
By opening the following link jsonplaceholder.typicode.com/posts?_start=0&_limit=2 you will see the JSON response with which we will work.
[ { "userId": 1, "id": 1, "title": "sunt aut facere repellat provident occaecati excepturi optio reprehenderit", "body": "quia et suscipit\nsuscipit recusandae consequuntur expedita et cum\nreprehenderit molestiae ut ut quas totam\nnostrum rerum est autem sunt rem eveniet architecto" }, { "userId": 1, "id": 2, "title": "qui est esse", "body": "est rerum tempore vitae\nsequi sint nihil reprehenderit dolor beatae ea dolores neque\nfugiat blanditiis voluptate porro vel nihil molestiae ut reiciendis\nqui aperiam non debitis possimus qui neque nisi nulla" } ] Note that in our GET request, we specified the initial and final constraint as a parameter.
Great, now we know how our data structure will look like! Let's create a model for them.
Create a post.dart file with the following content
import 'package:equatable/equatable.dart'; class Post extends Equatable { final int id; final String title; final String body; Post({this.id, this.title, this.body}) : super([id, title, body]); @override String toString() => 'Post { id: $id }'; } Post is only a class with id, title and body. We can also override the toString function to display a convenient string later. In addition, we extend the Equatable class so we can compare Posts objects.
Now we have a server response model, let's implement the Business Logic Component (bloc).
Before we dive into developing an application, you need to determine what our PostBloc will do.
At the top level, he will be responsible for processing the user's actions (scrolling) and getting new posts when the presentation layer requests them. Let's start implementing it.
Our PostBloc will only respond to one event. Receive data that will show on screen as needed. Create the post_event.dart class and implement our event.
import 'package:equatable/equatable.dart'; abstract class PostEvent extends Equatable {} class Fetch extends PostEvent { @override String toString() => 'Fetch'; } Again we will redefine toString for easier reading of the string displaying our event. We also need to extend the Equatable class to compare objects.
Summarizing, our PostBloc will receive PostEvents and convert them to PostStates. We have developed all the PostEvents (Fetch) events, we’ll go to PostState.
Our presentation layer must have several states for correct display.
isInitializing - informs the presentation layer that it is necessary to display the loading indicator while the data is loading.
posts - displays a list of Post objects.
isError - will inform the layer that errors occurred while loading data
hasReachedMax - indication of the latest available record
Create a class post_state.dart with the following content
import 'package:equatable/equatable.dart'; import 'package:flutter_infinite_list/models/models.dart'; abstract class PostState extends Equatable { PostState([Iterable props]) : super(props); } class PostUninitialized extends PostState { @override String toString() => 'PostUninitialized'; } class PostInitialized extends PostState { final List<Post> posts; final bool hasError; final bool hasReachedMax; PostInitialized({ this.hasError, this.posts, this.hasReachedMax, }) : super([posts, hasError, hasReachedMax]); factory PostInitialized.success(List<Post> posts) { return PostInitialized( posts: posts, hasError: false, hasReachedMax: false, ); } factory PostInitialized.failure() { return PostInitialized( posts: [], hasError: true, hasReachedMax: false, ); } PostInitialized copyWith({ List<Post> posts, bool hasError, bool hasReachedMax, }) { return PostInitialized( posts: posts ?? this.posts, hasError: hasError ?? this.hasError, hasReachedMax: hasReachedMax ?? this.hasReachedMax, ); } @override String toString() => 'PostInitialized { posts: ${posts.length}, hasError: $hasError, hasReachedMax: $hasReachedMax }'; } We used the Factory pattern for convenience and readability. Instead of manually creating PostState entities, we can use different factories, for example PostState.initial ()
Now we have events and states, it's time to create our PostBloc
To simplify our PostBloc will have a direct http client dependency, but in production you should wrap it in an external dependency in the api client and use the Repository pattern.
Create post_bloc.dart
import 'package:bloc/bloc.dart'; import 'package:meta/meta.dart'; import 'package:http/http.dart' as http; import 'package:flutter_infinite_list/bloc/bloc.dart'; import 'package:flutter_infinite_list/models/models.dart'; class PostBloc extends Bloc<PostEvent, PostState> { final http.Client httpClient; PostBloc({@required this.httpClient}); @override // TODO: implement initialState PostState get initialState => null; @override Stream<PostState> mapEventToState( PostState currentState, PostEvent event, ) async* { // TODO: implement mapEventToState yield null; } } Notice that only from the declarations of our class can we say that it will accept PostEvents as input and give it to PostStates
Let's proceed to the development of initialState
import 'package:bloc/bloc.dart'; import 'package:meta/meta.dart'; import 'package:http/http.dart' as http; import 'package:flutter_infinite_list/bloc/bloc.dart'; import 'package:flutter_infinite_list/models/models.dart'; class PostBloc extends Bloc<PostEvent, PostState> { final http.Client httpClient; PostBloc({@required this.httpClient}); @override PostState get initialState => PostState.initial(); @override Stream<PostState> mapEventToState( PostState currentState, PostEvent event, ) async* { // TODO: implement mapEventToState yield null; } } Next, you need to implement mapEventToState, which will be triggered every time you send an event.
import 'dart:convert'; import 'package:meta/meta.dart'; import 'package:http/http.dart' as http; import 'package:bloc/bloc.dart'; import 'package:flutter_infinite_list/bloc/bloc.dart'; import 'package:flutter_infinite_list/models/models.dart'; class PostBloc extends Bloc<PostEvent, PostState> { final http.Client httpClient; PostBloc({@required this.httpClient}); @override get initialState => PostState.initial(); @override Stream<PostState> mapEventToState(currentState, event) async* { if (event is Fetch && !currentState.hasReachedMax) { try { final posts = await _fetchPosts(currentState.posts.length, 20); if (posts.isEmpty) { yield currentState.copyWith(hasReachedMax: true); } else { yield PostState.success(currentState.posts + posts); } } catch (_) { yield PostState.failure(); } } } Future<List<Post>> _fetchPosts(int startIndex, int limit) async { final response = await httpClient.get( 'https://jsonplaceholder.typicode.com/posts?_start=$startIndex&_limit=$limit'); if (response.statusCode == 200) { final data = json.decode(response.body) as List; return data.map((rawPost) { return Post( id: rawPost['id'], title: rawPost['title'], body: rawPost['body'], ); }).toList(); } else { throw Exception('error fetching posts'); } } } Now every time PostEvent is sent, if this event is a sample and we have not reached the end of the list, the next 20 entries will be displayed.
We will modify our PostBloc a bit
import 'dart:convert'; import 'package:meta/meta.dart'; import 'package:rxdart/rxdart.dart'; import 'package:http/http.dart' as http; import 'package:bloc/bloc.dart'; import 'package:flutter_infinite_list/bloc/bloc.dart'; import 'package:flutter_infinite_list/models/models.dart'; class PostBloc extends Bloc<PostEvent, PostState> { final http.Client httpClient; PostBloc({@required this.httpClient}); @override Stream<PostEvent> transform(Stream<PostEvent> events) { return (events as Observable<PostEvent>) .debounce(Duration(milliseconds: 500)); } @override get initialState => PostState.initial(); @override Stream<PostState> mapEventToState(currentState, event) async* { if (event is Fetch && !currentState.hasReachedMax) { try { final posts = await _fetchPosts(currentState.posts.length, 20); if (posts.isEmpty) { yield currentState.copyWith(hasReachedMax: true); } else { yield PostState.success(currentState.posts + posts); } } catch (_) { yield PostState.failure(); } } } Future<List<Post>> _fetchPosts(int startIndex, int limit) async { final response = await httpClient.get( 'https://jsonplaceholder.typicode.com/posts?_start=$startIndex&_limit=$limit'); if (response.statusCode == 200) { final data = json.decode(response.body) as List; return data.map((rawPost) { return Post( id: rawPost['id'], title: rawPost['title'], body: rawPost['body'], ); }).toList(); } else { throw Exception('error fetching posts'); } } } Great, we have completed the implementation of business logic!
Create a class main.dart and implement runApp in it to render our UI
import 'package:flutter/material.dart'; void main() { runApp(MyApp()); } class MyApp extends StatelessWidget { @override Widget build(BuildContext context) { return MaterialApp( title: 'Flutter Infinite Scroll', home: Scaffold( appBar: AppBar( title: Text('Posts'), ), body: HomePage(), ), ); } } Next, create a HomePage that displays our posts and connects to PostBloc.
class HomePage extends StatefulWidget { @override _HomePageState createState() => _HomePageState(); } class _HomePageState extends State<HomePage> { final _scrollController = ScrollController(); final PostBloc _postBloc = PostBloc(httpClient: http.Client()); final _scrollThreshold = 200.0; _HomePageState() { _scrollController.addListener(_onScroll); _postBloc.dispatch(Fetch()); } @override Widget build(BuildContext context) { return BlocBuilder( bloc: _postBloc, builder: (BuildContext context, PostState state) { if (state.isInitializing) { return Center( child: CircularProgressIndicator(), ); } if (state.isError) { return Center( child: Text('failed to fetch posts'), ); } if (state.posts.isEmpty) { return Center( child: Text('no posts'), ); } return ListView.builder( itemBuilder: (BuildContext context, int index) { return index >= state.posts.length ? BottomLoader() : PostWidget(post: state.posts[index]); }, itemCount: state.hasReachedMax ? state.posts.length : state.posts.length + 1, controller: _scrollController, ); }, ); } @override void dispose() { _postBloc.dispose(); super.dispose(); } void _onScroll() { final maxScroll = _scrollController.position.maxScrollExtent; final currentScroll = _scrollController.position.pixels; if (maxScroll - currentScroll <= _scrollThreshold) { _postBloc.dispatch(Fetch()); } } } Next we will implement BottomLoader, which will show the user the loading of new posts.
class BottomLoader extends StatelessWidget { @override Widget build(BuildContext context) { return Container( alignment: Alignment.center, child: Center( child: SizedBox( width: 33, height: 33, child: CircularProgressIndicator( strokeWidth: 1.5, ), ), ), ); } } Finally, we implement PostWidget, which will draw a single object of type Post
class PostWidget extends StatelessWidget { final Post post; const PostWidget({Key key, @required this.post}) : super(key: key); @override Widget build(BuildContext context) { return ListTile( leading: Text( post.id.toString(), style: TextStyle(fontSize: 10.0), ), title: Text('${post.title}'), isThreeLine: true, subtitle: Text(post.body), dense: true, ); } } That's all, now you can run the application and see the result.
Project sources can be downloaded on Github
Source: https://habr.com/ru/post/435688/
All Articles