Kubernetes Cluster for $ 20 per month
Tl; DR
Raising a cluster for servicing web applications without stateless web applications along with ingress , letsencrypt , without using automation tools like kubespray, kubeadm, and any others.
Time for reading: ~ 45-60 minutes, for reproducing actions: from 3 hours.
Preamble
Writing an article led me to the need for my own cluster of kubernetes for experimentation. The automatic installation and configuration solutions that are publicly available did not work in my case, since I used non-mainstream Linux distributions. Dense work with kubernetes in IPONWEB stimulates to have such a platform, solving their problems in a comfortable way, including for home projects.
Components
The article will feature the following components:
- Your favorite Linux - I used Gentoo (node-1: systemd / node-2: openrc), Ubuntu 04/18/1.
- Kubernetes Server - kube-apiserver, kube-controller-manager, kube-scheduler, kubelet, kube-proxy.
- Containerd + CNI Plugins (0.7.4) - to organize containerization, we take containerd + CNI instead of docker (although initially the entire configuration was raised to the docker, so nothing prevents you from using it if necessary).
- CoreDNS - for organizing service discovery of components operating within the kubernetes cluster. The recommended version is not lower than 1.2.5, since from this version appears implicit support for the work of coredns as a process running outside the cluster.
- Flannel - for the organization of a network stack, communication podov and containers among themselves.
- Your favorite db.

Limitations and assumptions
- The article does not consider the cost of solutions vps / vds, presented on the market, as well as the possibility of deploying machines on these services. It is assumed that you already have something expanded, or you are able to do it yourself. Also not covered the process of installing / configuring your favorite database and private docker repository, if you need one.
- We can use both containerd + cni plugins and docker. The article does not consider the use of docker as a means of containerization. If you want to use docker, you will be able to configure the flannel accordingly , in addition, you will need to configure kubelet, namely, remove all options related to containerd. As shown by my experiments, docker and containerd on different nodes as means for containerization will work correctly.
- We cannot use
host-gwbackend for flannel, read more in the Flannel Configuration section. - We will not use anything for monitoring, backups, saving user files (state), storing configuration files and application code (git / hg / svn / etc)
Introduction
In the course of the work, I used a large number of sources, but I want to mention separately the rather detailed guide Kubernetes the hard way , which covers about 90% of the questions of the basic configuration of my own cluster. If you have already read this manual, feel free to skip straight to the Flannel Configuration section.
List of Terms / Glossary
- The api-server is a physical or virtual machine, on which a set of applications is located for running and correctly functioning kubernetes kube-apiserver. In this article, it is etcd, kube-apiserver, kube-controller-manager, kube-scheduler.
- master - dedicated workstation or VPS installation, synonymous with api-server.
- node-X is a dedicated workstation or VPS installation,
Xindicates the ordinal number of the station. In this article, all the numbers are unique and are key to understanding:- node-1 - car number 1
- node-2 - car number 2
- vCPU - virtual CPU, processor core. The number corresponds to the number of cores: 1vCPU - one core, 2vCPU - two, and so on.
- user - user or user space. When using
user$in command line instructions, the term refers to any client machine. - worker - a worker node on which direct calculations will be performed, synonymous with
node-X - A resource is an entity operated by a cluster of kubernetes. The resources of kubernetes include a large number of interconnected entities .
Network solution architecture
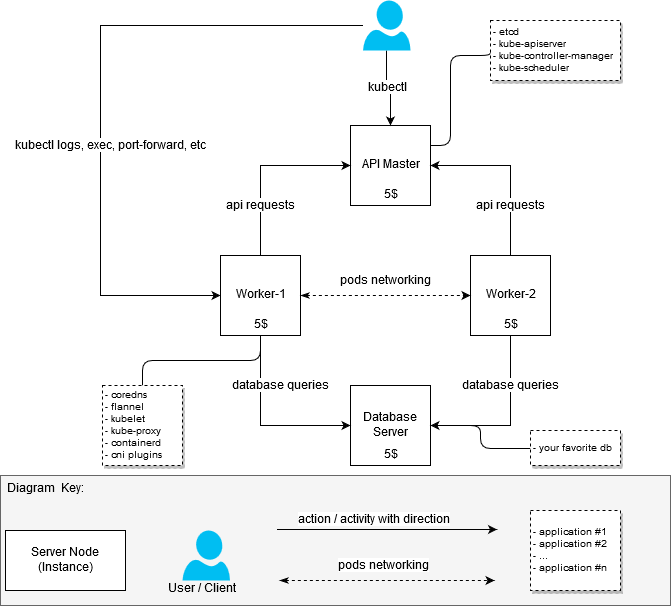
In the process of raising the cluster, I did not set the goal to optimize iron resources in such a way as to fit into the budget of $ 20 per month. It was necessary to simply assemble a working cluster with at least two working nodes (nodes). Therefore, initially the cluster looked like this:
- machine with 2 vCPU / 4G RAM: api-server + node-1 [$ 20]
- machine with 2 vCPU / 4G RAM: node-2 [$ 20]
After the first version of the cluster was working, I decided to rebuild it so as to distinguish between the nodes responsible for running applications within the cluster (the working nodes, they are also workers), and the master server API.
As a result, I received an answer to the question: "How to get a more or less inexpensive, but functioning cluster, if I want to host there are not the thickest applications."
(It is planned to be such)

(Stolen from the Internet, if someone suddenly does not know or have not seen)
Components and their performance
First of all, it was worth understanding how much resources I need to run software systems that relate directly to the cluster. The search for "hardware requirements" did not give specific results, so I had to approach the task from a practical point of view. As a measurement of MEM and CPU, I took statistics from systemd - we can assume that the measurements were made in a very amateur way, but I didn’t have the task of obtaining accurate values, since I still did not find any options cheaper than $ 5 for an instance.
It was possible to find VPS / VDS cheaper when hosting servers in Russia or the CIS, but the sad stories associated with the RKN and its actions create certain risks and give rise to a natural desire to avoid them.
So:
- Master server / servers configuration (Master Nodes):
- etcd (3.2.17): 80 - 100M, metrics were shot at randomly selected time. On average, memory consumption etcd did not exceed 300M;
- kube-apiserver (1.12.x - 1.13.0): 237.6M ~ 300M;
- kube-controller-manager (1.12.x - 1.13.0): approximately 90M, did not rise above 100M;
- kube-scheduler (1.12.x - 1.13.0): approximately 20M, consumption above 30-50M is not fixed.
- Worker Nodes configuration:
- kubelet (1.12.3 - 1.13.1): approximately 35 Mb, consumption above 50M is not fixed;
- kube-proxy (1.12.3 - 1.13.1): approximately 7.5 - 10M;
- flannel (0.10.0): approximately 15-20M;
- coredns (1.3.0): approximately 25M;
- containerd (1.2.1): consumption of containerd is low, but the statistics also show the container processes started by the daemon.
No, not needed . The master node does not require docker or containerd as such, although there are a large number of tutorials on the Internet that, for various needs, include using the containerization environment. In this configuration, turning off containerd from the list of dependencies was intentionally done; however, I don’t single out any obvious advantages of this approach.
The configuration provided above is minimal and sufficient to start the cluster. No additional actions / components are required, unless you want to add something on your own.
To build a test cluster or cluster for home projects, 1vCPU / 1G RAM will be quite enough for the master node to function. Of course, the load on the master node will vary depending on the number of workers involved (workers), as well as the presence and volume of third-party requests to the api-server.
I posted the master and worker configurations as follows:
- 1x Master with installed components: etcd, kube-apiserver, kube-controller-manager, kube-scheduler
- 2x Workers with installed components: containerd, coredns, flannel, kubelet, kube-proxy
Configuration
To configure the wizard, the following components must function:
etcd - for storing data for the api-server, as well as for the flannel;
kube-apiserver - actually, api-server;
kube-controller-manager - for generating and processing events;
kube-scheduler - for distributing resources registered via api-server - for example, pods .
The configuration of the "workhorse" requires the operation of the following components:kubelet - to start the sweats, to ensure the configuration of network settings;
kube-proxy - to organize the routing / balancing of kubernetes services ;
coredns - for service discovery inside running containers;
flannel - for organizing network access for containers running on different nodes, as well as for dynamic distribution of networks across nodes (kubernetes node) of the cluster.
There should be a small digression: coredns can be run on the master server as well. There are no restrictions that would force coredns to run on the worker nodes, except for the coredns.service configuration nuance, which simply won't run on the standard / unmodified Ubuntu server due to a conflict with the systemd-resolved service. I didn’t want to solve this problem, as I was completely satisfied with the 2 ns servers located on the worker nodes.
In order not to waste time on getting acquainted with all the details of the process of configuring components, I suggest that you familiarize yourself with them in the Kubernetes manual the hard way . I will focus on the distinctive features of my configuration option.
Files
All files for the functioning of cluster components for the wizard and work nodes are placed in / var / lib / kubernetes / for convenience. If necessary, you can place them in another way.
Certificates
The basis for generating certificates is the same Kubernetes the hard way , there are practically no significant differences. For the regeneration of subordinate certificates, simple bash scripts were written around cfssl applications - this was very useful in the debugging process.
You can generate certificates for your needs using the following scripts, recipes from Kubernetes the hard way, or other suitable tools.
You can get the scripts here: kubernetes bootstrap . Before launching, edit the certs / env.sh file , specifying your settings. Example:
$ cd certs #: certs$ ./generate-keys.sh # ... certificate generate output #: kubeconfig certs$ ./generate-configkube.sh If you have used env.sh and correctly specified all the parameters, then there is no need to touch the generated certificates. If you make a mistake at some stage, then the certificates can be regenerated in parts. These bash scripts are trivial, to understand them is not difficult.
Important note - you should not often re-create ca.pem and ca-key.pem certificates, since they are the root for all subsequent ones, in other words, you will have to recreate all accompanying certificates and deliver them to all machines and to all necessary directories.
Master
The necessary certificates to start the services on the master node should be placed in /var/lib/kubernetes/ :
- ca.pem - this certificate is used everywhere, you can generate it only once and then use it unchanged - so be careful. When re-generating, you will need to copy it to all nodes, as well as update the kubeconfig files using it (also on all machines).
- ca-key.pem is the same, except for copying by nodes.
- kube-controller-manager.pem - needed only for kube-controller-manager.
- kube-controller-manager-key.pem - only needed for kube-controller-manager.
kubernetes.pem - required for flannel, coredns when connected to etcd, kube-apiserver.
Theoretical retreatThis feature is made according to the Kubernetes the hard way configuration logic.
Based on this, this file will be needed everywhere - both on the wizard and on the work nodes. I did not begin to change the approach provided by the original manual, since with its help it is possible to organize the work of the cluster more quickly and more clearly and understand the whole bunch of dependencies.My personal opinion is that for etcd we need separate certificates that do not overlap with the certificates used for the work of kubernetes.
- kubernetes-key.pem - remains on the master servers.
- service-account.pem - needed only for kube-controller-manager daemons.
- service-account-key.pem is the same.
Work nodes
- ca.pem - needed for all services involved in working nodes (kubelet, kube-proxy), as well as for flannel, coredns. Among other things, its contents are included in kubeconfig files when they are generated using kubectl.
- kubernetes-key.pem - only needed for flannel and coredns to connect to etcd, which is located on the api master node.
- kubernetes.pem - similar to the previous one, needed only for flannel and coredns.
- kubelet / node-1.pem is the key for authorizing node-1.
- kubelet / node-1-key.pem is the key for authorizing node-1.
Important! If you have more than one node, then each node will include node-X-key.pem , node-X.pem and node-X.kubeconfig files inside the kubelet.
Debugging Certificates
Sometimes it may be necessary to look at how the certificate is configured to find out which IP / DNS nodes were used during its generation. The cfssl-certinfo -cert <cert> command will help us with this. For example, learn this information for node-1.pem :
$ cfssl-certinfo -cert node-1.pem { "subject": { "common_name": "system:node:node-1", "country": "RU", "organization": "system:nodes", "organizational_unit": "Infrastructure Unit", "locality": "Moscow", "province": "Moscow", "names": [ "RU", "Moscow", "Moscow", "system:nodes", "Infrastructure Unit", "system:node:node-1" ] }, "issuer": { "common_name": "Kubernetes", "country": "RU", "organization": "Kubernetes", "organizational_unit": "Infrastructure", "locality": "Moscow", "province": "Moscow", "names": [ "RU", "Moscow", "Moscow", "Kubernetes", "Infrastructure", "Kubernetes" ] }, "serial_number": "161113741562559533299282037709313751074033027073", "sans": [ "w40k.net", "node-1", "178.79.168.130", "192.168.164.230" ], "not_before": "2019-01-04T14:24:00Z", "not_after": "2029-01-01T14:24:00Z", "sigalg": "SHA256WithRSA", "authority_key_id": "6:C8:94:67:59:55:19:82:AD:ED:6D:50:F1:89:B:8D:46:78:FD:9A", "subject_key_id": "A1:5E:B3:3C:45:14:3D:C6:C:A:97:82:1:D5:2B:75:1A:A6:9D:B0", "pem": "<pem content>" } All other certificates for kubelet and kube-proxy are sewn directly into the corresponding kubeconfig.
kubeconfig
All the necessary kubeconfig'i can be done with the help of Kubernetes the hard way , however, here are some differences. The manual uses the kubedns and cni bridge configuration, but also coredns and flannel . These two services, in turn, use kubeconfig for authorization in the cluster.
$ cd certs #: kubeconfig certs$ ./generate-configkube.sh Master
The wizard requires the following kubeconfig files (as mentioned above, after generating them, you can take them to certs/kubeconfig ):
master /var/lib/kubernetes/$ tree -L 2 . +-- kube-controller-manager.kubeconfig L-- kube-scheduler L-- kube-scheduler.kubeconfig These files are required to run each of the service components.
Work nodes
For work nodes the following kubeconfig files are needed:
node-1 /var/lib/kubernetes/$ tree -L 2 . +-- coredns ¦ L-- coredns.kubeconfig +-- flanneld ¦ L-- flanneld.kubeconfig +-- kubelet ¦ L-- node-1.kubeconfig L-- kube-proxy L-- kube-proxy.kubeconfig Starting services
Despite the fact that on my work nodes different initialization systems are used, examples and the repository give options using systemd. With their help, the easiest way to understand what process and with what parameters you need to run, in addition, they should not cause major problems when learning services with destination flags.
To start the services, you need to copy the service-name.service to /lib/systemd/system/ or any other directory where systemd services are located, and then turn on and start the service. Example for kube-apiserver:
$ systemctl enable kube-apiserver.service $ systemctl start kube-apiserver.service Of course, all services must be green (that is, running and functioning). If suddenly you encounter any error, the journalct -xe or journal -f -t kube-apiserver will help you understand what went wrong.
Do not rush to start all the servers at once, for a start it will be enough to enable etcd and kube-apiserver. If everything went well, and you immediately earned all four services on the wizard, the launch of the wizard can be considered successful.
Master
You can use the systemd settings or generate init scripts for the configuration you are using. As already mentioned, for the master you need:
- systemd / etcd
- systemd / kube-apiserver
- systemd / kube-controller-manager
- systemd / kube-scheduler
Work nodes
- systemd / containerd
- systemd / kubelet
- systemd / kube-proxy
- systemd / coredns
- systemd / flannel
Customer
For the client to work, just copy the certs/kubeconfig/admin.kubeconfig (after you generate it or write it yourself) in ${HOME}/.kube/config
Download kubectl and test kube-apiserver. Let me remind you once again that at this stage only etcd should work for the kube-apiserver to work. The remaining components will be needed for the full operation of the cluster a little later.
Check that kube-apiserver and kubectl work:
$ kubectl version Client Version: version.Info{Major:"1", Minor:"13", GitVersion:"v1.13.0", "extra info": "..."} Server Version: version.Info{Major:"1", Minor:"13", GitVersion:"v1.13.0", "extra info": "..."} Flannel configuration
As a flannel configuration, I settled on a vxlan backend. Read more about backends here .
At once I will say that launching the kubernetes cluster on a VPS will most likely limit you in using the host-gw backend. Not being an experienced network engineer, I spent about two days debugging to understand what the problem was with using it on popular VDS / VPS providers.
Linode.com and digitalocean have been tested. The essence of the problem lies in the fact that providers do not provide honest L2 for private network (private networking). This, in turn, makes it impossible to walk network traffic between nodes in this configuration:
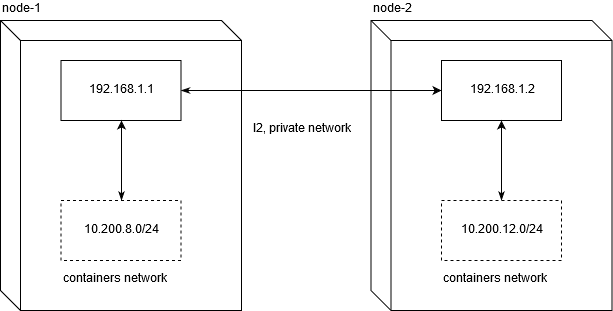
In order for the network traffic to work between the nodes, normal routing is enough. Do not forget that net.ipv4.ip_forward should be set to 1, and the FORWARD chain in the filter table should not contain any prohibiting rules for nodes.
node1$ ip route add 10.200.12.0/24 via 192.168.1.2 node2$ ip route add 10.200.8.0/24 via 192.168.1.1 [10.200.80.23 container-1]->[192.168.1.1 node-1]->[192.168.1.2 node-2]->[10.200.12.5 container-2] This is what does not work on the specified (and, most likely, and in general at all) VPS / VDS.
Therefore, if the configuration of a solution with high network performance between nodes is important to you, you still have to spend more than $ 20 to organize the cluster.
To set the desired flannel configuration, you can use set-flannel-config.sh from etc / flannel . It is important to remember : if you decide to change the backend, you will need to delete the configuration in etcd and restart all flannel daemons on all nodes - so choose it wisely. The default is vxlan.
master$ export ETCDCTL_CA_FILE='/var/lib/kubernetes/ca.pem' master$ export ETCDCTL_CERT_FILE='/var/lib/kubernetes/kubernetes.pem' master$ export ETCDCTL_KEY_FILE='/var/lib/kubernetes/kubernetes-key.pem' master$ export ETCDCTL_ENDPOINTS='https://127.0.0.1:2379' master$ etcdctl ls /coreos.com/network/subnets/ /coreos.com/network/subnets/10.200.8.0-24 /coreos.com/network/subnets/10.200.12.0-24 master$ etcdctl get /coreos.com/network/subnets/10.200.8.0-24 {"PublicIP":"178.79.168.130","BackendType":"vxlan","BackendData":{"VtepMAC":"22:ca:ac:15:71:59"}} After you have registered the necessary configuration in etcd, you need to configure the service to start it on each of the work nodes.
flannel.service
An example for the service can be taken here: systemd / flannel
[Unit] Description=Flanneld overlay address etcd agent After=network.target [Service] Type=notify #: current host ip. don't change if ip have not changed Environment=PUBLIC_IP=178.79.168.130 Environment=FLANNEL_ETCD=https://192.168.153.60:2379 ExecStart=/usr/bin/flanneld \ -etcd-endpoints=${FLANNEL_ETCD} -etcd-prefix=${FLANNEL_ETCD_KEY} \ -etcd-cafile=/var/lib/kubernetes/ca.pem \ -etcd-certfile=/var/lib/kubernetes/kubernetes.pem \ -etcd-keyfile=/var/lib/kubernetes/kubernetes-key.pem \ -etcd-prefix=/coreos.com/network \ -healthz-ip=127.0.0.1 \ -subnet-file=/run/flannel/subnet.env \ -public-ip=${PUBLIC_IP} \ -kubeconfig-file=/var/lib/kubernetes/config/kubeconfig/flanneld.kubeconfig \ $FLANNEL_OPTIONS ExecStartPost=/usr/libexec/flannel/mk-docker-opts.sh -k DOCKER_NETWORK_OPTIONS -d /run/flannel/docker Restart=on-failure RestartSec=5 [Install] RequiredBy=docker.service Customization
As described earlier, we need ca.pem, kubernetes.pem, and kubernetes-key.pem files for authorization in etcd. All other parameters do not carry any sacred meaning. The only thing that is really important is to configure the global ip address through which the network packets will go between networks:
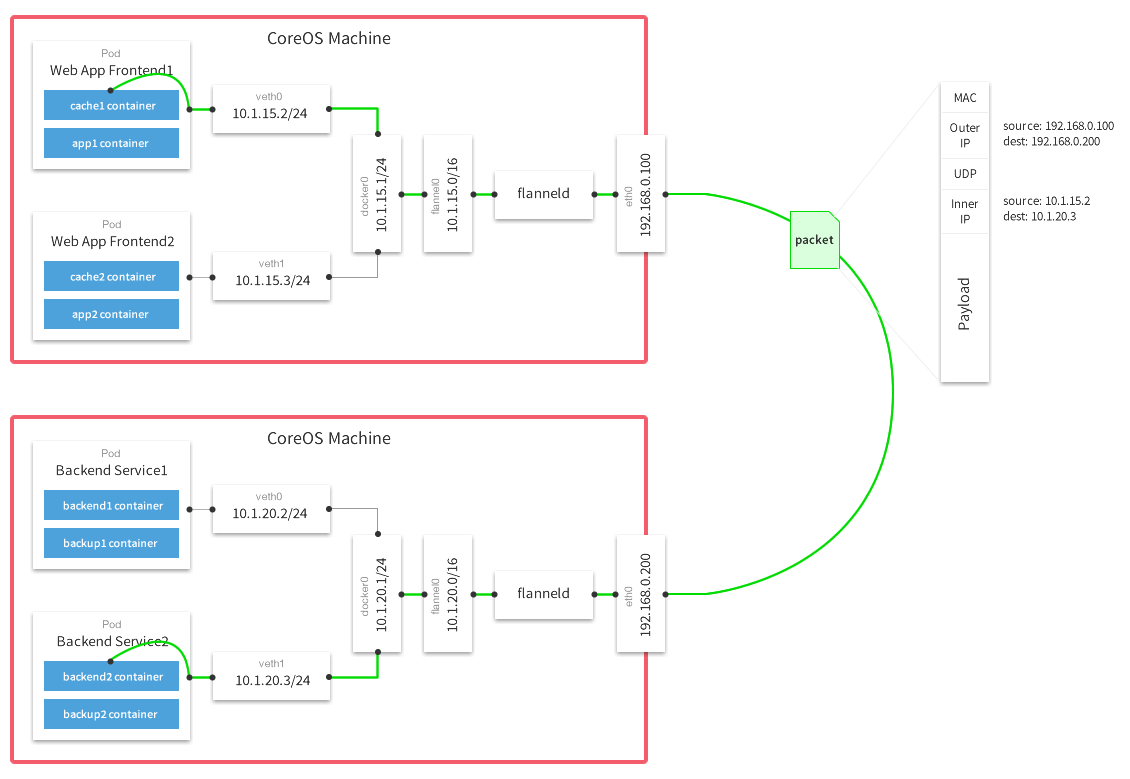
( Multi-Host Networking Overlay with Flannel )
#: node-1$ systemctl enable flanneld.service #: node-1$ systemctl start flanneld After successfully launching the flannel, you should discover the flannel.N network interface in your system:
node-1$ ifconfig flannel.100: flags=4163<UP,BROADCAST,RUNNING,MULTICAST> mtu 1450 inet 10.200.8.0 netmask 255.255.255.255 broadcast 0.0.0.0 inet6 fe80::20ca:acff:fe15:7159 prefixlen 64 scopeid 0x20<link> ether 22:ca:ac:15:71:59 txqueuelen 0 (Ethernet) RX packets 18853 bytes 1077085 (1.0 MiB) RX errors 0 dropped 0 overruns 0 frame 0 TX packets 11856 bytes 264331154 (252.0 MiB) TX errors 0 dropped 47 overruns 0 carrier 0 collisions 0 Verifying that your interfaces are working correctly on all nodes is quite simple. In my case, node-1 and node-2 have 10.200.8.0/24 and 10.200.12.0/24 networks, respectively, so we check availability with the usual icmp request:
#: node-2 node-1 node-1 $ ping -c 1 10.200.12.0 PING 10.200.12.0 (10.200.12.0) 56(84) bytes of data. 64 bytes from 10.200.12.0: icmp_seq=1 ttl=64 time=4.58 ms #: node-1 node-2 node-2 $ ping -c 1 10.200.8.0 PING 10.200.8.0 (10.200.8.0) 56(84) bytes of data. 64 bytes from 10.200.8.0: icmp_seq=1 ttl=64 time=1.44 ms In case of any problems, it is recommended to check if there are any cutting rules in iptables over UDP between the hosts.
Containerd Configuration
Place etc / containerd / config.toml in /etc/containerd/config.toml or where it is convenient for you, the main thing is to remember to change the path to the configuration file in the service (containerd.service, described below).
Configuration with some modifications of the standard. It is important not to set enable_tls_streaming = true if you do not understand why you are doing this. Otherwise, kubectl exec will stop working and will kubectl exec error stating that the certificate was signed by an unknown party.
containerd.service
[Unit] Description=containerd container runtime Documentation=https://containerd.io After=network.target [Service] ; uncomment this if your overlay module are built as module ; ExecStartPre=/sbin/modprobe overlay ExecStart=/usr/bin/containerd \ -c /etc/containerd/config.toml Restart=always RestartSec=5 Delegate=yes KillMode=process OOMScoreAdjust=-999 LimitNOFILE=1048576 LimitNPROC=infinity LimitCORE=infinity [Install] WantedBy=multi-user.target Customization
, , cri-tools .
etc/crictl.yaml /etc/crictl.yaml . :
node-1$ CONTAINERD_NAMESPACE=k8s.io crictl ps CONTAINER ID IMAGE CREATED STATE NAME ATTEMPT POD ID , - kubernetes , crictl , , .
CNI Plugins
Customization
cni plugins /opt/cni/bin/
{ "cniVersion": "0.3.0", "name": "cbr0", "plugins": [ { "type": "flannel", "name": "kubenet", "delegate": { "hairpinMode": true, "isDefaultGateway": true } }, { "type": "portmap", "capabilities": { "portMappings": true }, "externalSetMarkChain": "KUBE-MARK-MASQ" } ] } { "cniVersion": "0.3.0", "type": "loopback" } , . , , Red Hat Docker Podman , Intro to Podman
Kubelet
kubelet ( cni) — . kubelet hostname. , "" kubectl logs , kubectl exec , kubectl port-forward .
, etc/kubelet-config.yaml , , . :
systemReserved: cpu: 200m memory: 600Mi , GO kubernetes, , . . 0.2 vCPU 600 MB .
, , kubelet, kube-proxy, coredns, flannel . , — 2 vCPU / 4G ram, , kubernetes + postgresql .
- (micro nodes) .
kubelet.service
service : systemd/kubelet
[Unit] Description=Kubernetes Kubelet Documentation=https://github.com/kubernetes/kubernetes Requires=containerd.service [Service] #Environment=NODE_IP=192.168.164.230 Environment=NODE_IP=178.79.168.130 #: node name given by env Environment=NODE_NAME=w40k.net ExecStart=kubelet \ --allow-privileged \ --root-dir=/var/lib/kubernetes/kubelet \ --config=/var/lib/kubernetes/kubelet/kubelet-config.yaml \ --kubeconfig=/var/lib/kubernetes/kubelet/node-1.kubeconfig \ --cni-bin-dir=/opt/cni/bin \ --cni-conf-dir=/etc/cni/net.d/ \ --network-plugin=cni \ --container-runtime=remote \ --container-runtime-endpoint=unix:///var/run/containerd/containerd.sock \ --image-pull-progress-deadline=10m \ --node-ip=${NODE_IP} \ --hostname-override=${NODE_NAME} \ --v=1 Restart=on-failure RestartSec=5 [Install] WantedBy=multi-user.target Customization
, RBAC , kubelet.
etc/kubelet-default-rbac.yaml , kubelet :
user$ kubectl apply -f etc/kubelet-default-rbac.yaml , , .
#: node-1$ systemctl enable kubelet.service #: node-1$ systemctl start kubelet , api :
$ kubectl get nodes -o wide NAME STATUS ROLES AGE VERSION INTERNAL-IP EXTERNAL-IP OS-IMAGE KERNEL-VERSION CONTAINER-RUNTIME w40k.net Ready <none> 5m v1.13.1 178.79.168.130 <none> Gentoo/Linux 4.18.16-x86_64-linode118 containerd://1.2.1 Kube Proxy
: systemd/kubelet . , , kube-proxy-config.yaml : etc/kube-proxy
kube-proxy.service
[Unit] Description=Kubernetes Proxy Documentation=https://github.com/kubernetes/kubernetes After=network.target [Service] ExecStart=kube-proxy \ --config=/var/lib/kubernetes/kube-proxy/kube-proxy-config.yaml Restart=on-failure RestartSec=5 [Install] WantedBy=multi-user.target Customization
#: node-1$ systemctl enable kube-proxy.service #: node-1$ systemctl start kube-proxy kube-proxy "" iptables, , - kubernetes (- ). .
CoreDNS
Corefile : etc/coredns/Corefile , :
.:53 { errors log stdout health :8081 kubernetes cluster.local 10.200.0.0/16 { endpoint https://178.79.148.185:6443 tls /var/lib/kubernetes/kubernetes.pem /var/lib/kubernetes/kubernetes-key.pem /var/lib/kubernetes/ca.pem pods verified upstream /etc/resolv.conf kubeconfig /var/lib/kubernetes/config/kubeconfig/coredns.kubeconfig default } proxy . /etc/resolv.conf cache 30 } coredns.kubeconfig pem- ( ) worker . , coredns systemd-resolved. , Ubuntu , , , , . .
coredns.service
[Unit] Description=CoreDNS Documentation=https://coredns.io/ After=network.target [Service] ExecStart=/usr/bin/coredns -conf /etc/coredns/Corefile Restart=on-failure RestartSec=5 [Install] WantedBy=multi-user.target Customization
#: node-1$ systemctl enable coredns.service #: node-1$ systemctl start coredns , , :
node-1$ dig kubernetes.default.svc.cluster.local @127.0.0.1 #: ;kubernetes.default.svc.cluster.local. IN A ;; ANSWER SECTION: kubernetes.default.svc.cluster.local. 5 IN A 10.32.0.1 , coredns ip kubernetes .
, kubernetes.default kube-controller-manager, :
$ kubectl get svc -n default NAME TYPE CLUSTER-IP EXTERNAL-IP PORT(S) AGE kubernetes ClusterIP 10.32.0.1 <none> 443/TCP 26h nginx-ingress & cert-manager
, . nginx-ingress cert-manager.
— nginx kubernetes ingress (master), :
user$ git clone https://github.com/nginxinc/kubernetes-ingress.git user$ cd kubernetes-ingress/deployments user$ kubectl apply -f common/ns-and-sa.yaml user$ kubectl apply -f common/nginx-config.yaml user$ kubectl apply -f common/default-server-secret.yaml user$ kubectl apply -f daemon-set/nginx-ingress.yaml user$ kubectl apply -f rbac/rbac.yaml — cert manager (v0.5.2)
user$ git clone https://github.com/jetstack/cert-manager.git user$ cd cert-manager && git co v0.5.2 user$ cd contrib/manifests/cert-manager user$ kubectl apply -f with-rbac.yaml , , , :
NAMESPACE NAME READY STATUS RESTARTS AGE cert-manager cert-manager-554c76fbb7-t9762 1/1 Running 0 3h38m nginx-ingress nginx-ingress-sdztf 1/1 Running 0 10h nginx-ingress nginx-ingress-vrf85 1/1 Running 0 10h cert-manager nginx-ingress running state, , . , Running . .
, . , kubernetes resource : app/k8s
user$ kube apply -f ns-and-sa.yaml user$ kube apply -f configmap.yaml #: secret-example.yaml #: secret.yaml user$ kube apply -f secret.yaml user$ kube apply -f tls-production.yaml user$ kube apply -f deployment.yaml user$ kube apply -f service.yaml user$ kube apply -f ingress-production.yaml , - . , ( kubernetes-example.w40k.net), , , cert-manager nginx-ingress . , ingress tls/ssl.
:
- http://no-https.kubernetes-example.w40k.net/ — ssl; , - , .
- https://kubernetes-example.w40k.net/ — (, , ), , , kubernetes .
Links
, , :
— Kubernetes the hard way
— Multi-Host Networking Overlay with Flannel
— Intro to Podman
— Stateless Applications
— What is ingress
:
— Kubernetes Networking: Behind the scenes ( )
— A Guide to the Kubernetes Networking Model
— Understanding kubernetes networking: services ( )
Q&A
<tbd>, .
, , . , , - , , .
Api Server
kube-apiserver.service , api-server' curl http . - .
admin.kubeconfig ${HOME}/.kube/config, kubectl api-server (kube-apiserver).
( ) HTTP 200 OK + , api-server :
curl -H "Authorization: Bearer e5qXNAtwwCHUUwyLilZmAoFPozrQwUpw" -k -L https://<api-server-address>:6443/api/v1/ Kube Controller Manager
, controller manager api , . , service account' :
$ kubectl get sa NAME SECRETS AGE default 1 19h , , kube-controller-manager .
Kube Scheduler
. , , debug/job.yaml kubectl describe <type/resource> .
, kube controller manager .
#: job user$ kubectl apply -f debug/job.yaml job.batch/app created #: , job user$ kubectl get pods -l job-name=app NAME READY STATUS RESTARTS AGE app-9kr9z 0/1 Completed 0 54s #: , #: user$ kubectl describe pods app-9kr9z # ... ... Events: Type Reason Age From Message ---- ------ ---- ---- ------- Normal Scheduled 12s default-scheduler Successfully assigned example/app-9kr9z to w40k.net , default-scheduler pod w40k.net. - , — .
. , , , — "". systemd .
Kubelet
Kubelet kubernetes . kubelet . kubernetes event ( kubectl get events -o wide ) .
Kube Proxy
kube-proxy :
- ( Flannel , );
- iptables, filter nat .
, 10.32.0.0/24 "". , . iptables, , , - +. icmp , ping' . , .
, kube-proxy, :
#: user$ kubectl get svc NAME TYPE CLUSTER-IP EXTERNAL-IP PORT(S) AGE backend ClusterIP 10.32.0.195 <none> 80/TCP 5m #: user$ kubectl get pods -o wide #: ' NAME READY STATUS RESTARTS AGE IP NODE backend-896584448-4r94s 1/1 Running 0 11h 10.200.8.105 w40k.net backend-896584448-np992 1/1 Running 0 11h 10.200.12.68 docker.grart.net #: 10 /status/ endpoint , #: node-1$ for i in `seq 10`; do curl -L http://10.32.0.195/status/; done okokokokokokokokokok node-1$ conntrack -L -d 10.32.0.195 tcp 6 62 TIME_WAIT src=178.79.168.130 dst=10.32.0.195 sport=62158 dport=80 src=10.200.12.68 dst=10.200.8.0 sport=8000 dport=62158 [ASSURED] mark=0 use=1 tcp 6 60 TIME_WAIT src=178.79.168.130 dst=10.32.0.195 sport=62144 dport=80 src=10.200.12.68 dst=10.200.8.0 sport=8000 dport=62144 [ASSURED] mark=0 use=1 tcp 6 58 TIME_WAIT src=178.79.168.130 dst=10.32.0.195 sport=62122 dport=80 src=10.200.12.68 dst=10.200.8.0 sport=8000 dport=62122 [ASSURED] mark=0 use=1 tcp 6 59 TIME_WAIT src=178.79.168.130 dst=10.32.0.195 sport=62142 dport=80 src=10.200.8.105 dst=10.200.8.1 sport=8000 dport=62142 [ASSURED] mark=0 use=1 tcp 6 58 TIME_WAIT src=178.79.168.130 dst=10.32.0.195 sport=62130 dport=80 src=10.200.8.105 dst=10.200.8.1 sport=8000 dport=62130 [ASSURED] mark=0 use=1 tcp 6 61 TIME_WAIT src=178.79.168.130 dst=10.32.0.195 sport=62150 dport=80 src=10.200.12.68 dst=10.200.8.0 sport=8000 dport=62150 [ASSURED] mark=0 use=1 tcp 6 56 TIME_WAIT src=178.79.168.130 dst=10.32.0.195 sport=62116 dport=80 src=10.200.8.105 dst=10.200.8.1 sport=8000 dport=62116 [ASSURED] mark=0 use=1 tcp 6 57 TIME_WAIT src=178.79.168.130 dst=10.32.0.195 sport=62118 dport=80 src=10.200.12.68 dst=10.200.8.0 sport=8000 dport=62118 [ASSURED] mark=0 use=1 tcp 6 59 TIME_WAIT src=178.79.168.130 dst=10.32.0.195 sport=62132 dport=80 src=10.200.12.68 dst=10.200.8.0 sport=8000 dport=62132 [ASSURED] mark=0 use=1 tcp 6 56 TIME_WAIT src=178.79.168.130 dst=10.32.0.195 sport=62114 dport=80 src=10.200.8.105 dst=10.200.8.1 sport=8000 dport=62114 [ASSURED] mark=0 use=1 src/dst (9 10 ). , src :
- 10.200.8.105
- 10.200.12.68
, . , - ( , ) . .
#: node-1 10.200.8.105, node-2 10.200.12.68, #: 8000 #: node-1 node-1$ curl -L http://10.200.8.105:8000/status/ ok node-1$ curl -L http://10.200.12.68:8000/status/ ok #: node-2 node-2$ curl -L http://10.200.8.105:8000/status/ ok node-2$ curl -L http://10.200.12.68:8000/status/ ok , , conntrack , , kube-proxy. , nat :
node-1$ iptables -t nat -vnL
.
. , , . , . - , , .
')
Source: https://habr.com/ru/post/435228/
All Articles