Serverless REST API "on the knee in 5 minutes"
Hi, Habr! Today, we’ll continue to talk about the opportunities that Amazon Web Services provides us and how to use these capabilities in solving application problems.
On a simple example, let's consider creating in just a few minutes our own serverless, autoscaled REST API with parsing a case - getting a list for a resource.
Interesting? Then go under the cat!
')

(A source)
We will not use any databases to analyze the example; instead, our source of information will be a plain text file on AWS S3.

Used Amazon Web Services components:
A text file with tabulation as field separators will be used as a source of information for generating responses on a GEST REST request. The information is not important now for this example, but for further use of the API, I unloaded the current trading table for bonds denominated in Russian rubles from the Quik trading terminal and saved it in the bonds.txt file and placed this file in a specially created AWS S3 batch.
An example of the information received is as shown in the figure below:
Next, you need to write a function that will read information from the bonds.txt file, parse it and issue it on request. AWS Lambda will do just fine. But first, you will need to create a new role that will allow the Lambda function created to read information from a batch located in AWS S3.
Everything, the role is created and we can use it in further work.
After all the other cases have been tested and there is an understanding that the Lambda function works as we expect, we proceed to the creation of the API. Create an access point to the Lambda function created above and additionally install protection against unwanted launches using the API Key.
In this article, we looked at creating a serverless, autoscaled, REST API using Amazon's cloud services. The article was not the smallest in terms of volume, but I tried to explain the whole process of creating an API in as much detail as possible and put together the entire sequence of actions.
I am sure that after one or two repetitions of the actions described in the article, you will be able to raise your cloud API in 5 minutes and even faster.
Due to its relative simplicity, low cost and power, AWS API Gateway service provides developers with ample opportunities for use in work and in commercial projects. To consolidate the theoretical material of this article, try to get a free annual subscription to Amazon Web Services and take the above steps to create a REST API yourself.
For any questions and suggestions, I am ready to talk with pleasure. I look forward to your comments on the article and wish you success!
On a simple example, let's consider creating in just a few minutes our own serverless, autoscaled REST API with parsing a case - getting a list for a resource.
Interesting? Then go under the cat!
')
(A source)
Instead of intro
We will not use any databases to analyze the example; instead, our source of information will be a plain text file on AWS S3.
- So, suppose that on AWS S3 we have a text file with headers and a process writes information to it.
- We will create a cloud-based API, which, by a GET request with the passed parameter, will return a JSON collection as a response.
- At the same time, depending on the complexity of the tasks and, as a result, increased requirements for the computing power of resources, you will not have to take care of this, because service is fully autoscalable. And this means that you do not need any administration, server allocation and management, simply load your code and run it.
The architecture of the developed system
Used Amazon Web Services components:
- Amazon S3 - object storage, which allows you to store almost unlimited amounts of information;
- AWS Identity and Access Management (IAM) is a service that provides the ability to securely control access to AWS services and resources. Using IAM, you can create and manage AWS users and groups, and use permissions to grant or deny access to AWS resources;
- AWS Lambda is a service that allows you to run code without backing up and configuring servers. All computing powers are automatically scaled for each call. The fee is charged based on the number of requests for the functions and their duration, i.e. time during which the code is executed.
The level of free access (Free tier) implies 1 million requests per month free of charge and 400K GB-s. Supported languages: Node.js, Java, C #, Go, Python, Ruby, PowerShell
. We will use Python:- The boto3 library is an AWS SDK for Python that allows you to interact with various Amazon services;
- Amazon API Gateway is a fully managed developer service designed to create, publish, maintain, monitor, and secure APIs at any scale. In addition to the possibility of using several versions of the same API (stages) for the purpose of debugging, refinement and testing, the service allows you to create serverless REST API using AWS Lambda. Lambda runs code in a highly available computing infrastructure, eliminating the need for server distribution, scaling, and management.
The free tier level for the HTTP / REST API includes one million API calls per month for 12 months.
Data preparation
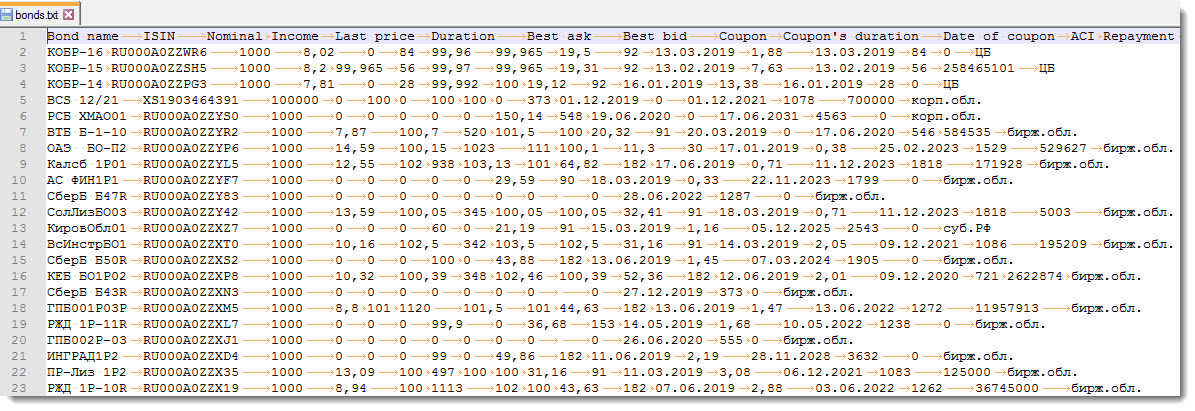
A text file with tabulation as field separators will be used as a source of information for generating responses on a GEST REST request. The information is not important now for this example, but for further use of the API, I unloaded the current trading table for bonds denominated in Russian rubles from the Quik trading terminal and saved it in the bonds.txt file and placed this file in a specially created AWS S3 batch.
An example of the information received is as shown in the figure below:
Next, you need to write a function that will read information from the bonds.txt file, parse it and issue it on request. AWS Lambda will do just fine. But first, you will need to create a new role that will allow the Lambda function created to read information from a batch located in AWS S3.
Creating a role for AWS Lambda
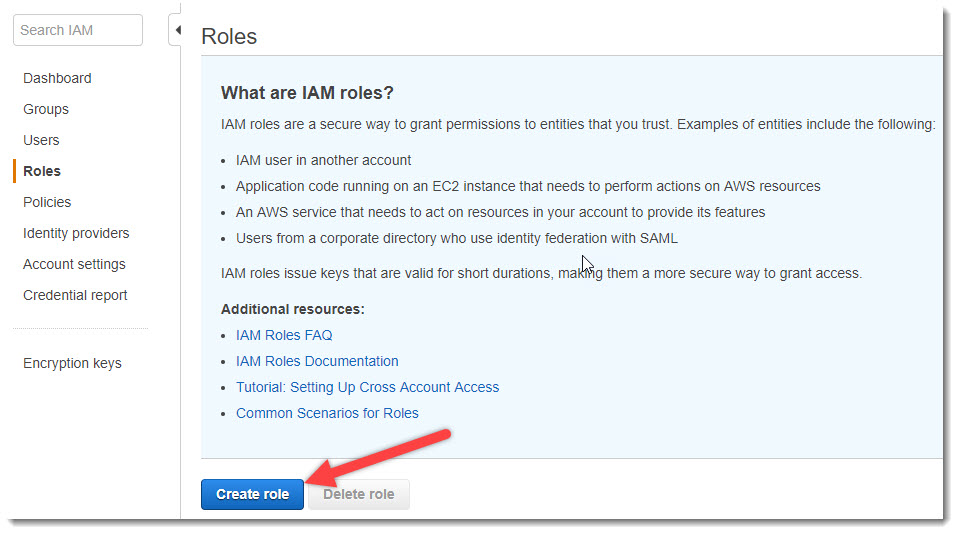
- In the AWS Management Console, go to the AWS IAM service and then to the “Roles” tab, click on the “Create role” button;Adding a new role
- The role we are creating will be used by AWS Lambda to read information from AWS S3. Therefore, in the next step, select “Select type of trusted” -> “Aws Service” and “Choose this service” -> “Lambda” and click on the button “Next: Permissions”Role for the Lambda service

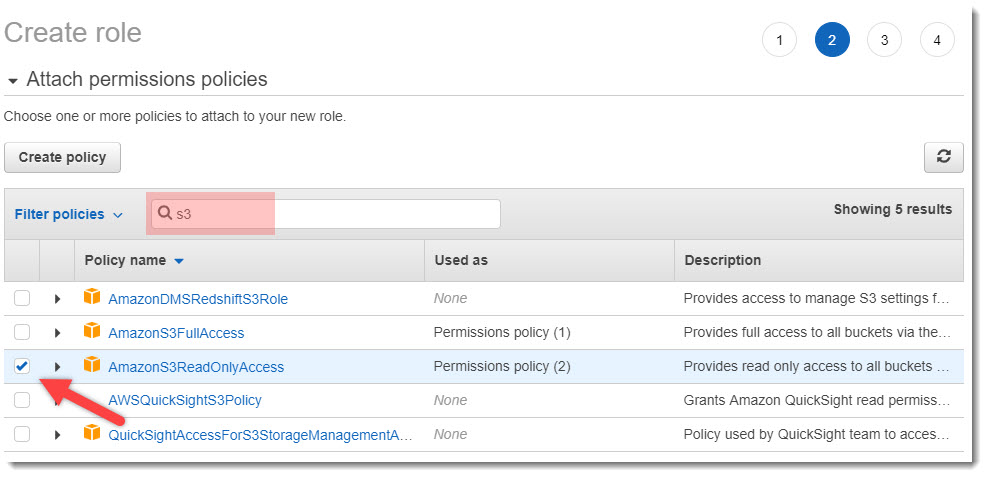
- Now you need to set the policies for accessing AWS resources to be used in the newly created role. Since The list of policies is quite impressive, using the filter for policies we specify “S3” for it. As a result, we get a filtered list applied to the S3 service. Check the checkbox in front of the “AmazonS3ReadOnlyAccess” policy and click on the “Next: Tags” button.Policies for Roles
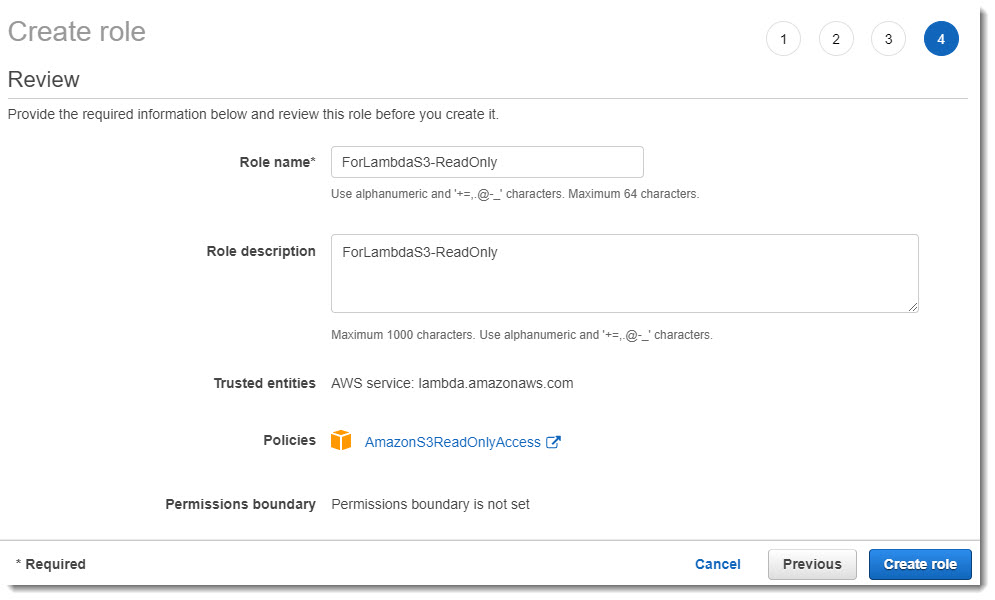
- The step (Add tags (optional)) is optional, but if you wish, you can specify tags for Roles. We will not do this and proceed to the next step - Preview. Here you need to set the name of the role - “ForLambdaS3-ReadOnly”, add a description and click on the “Create role” button.Title Roles
Everything, the role is created and we can use it in further work.
Creating a new feature in AWS Lambda
- Go to the AWS Lambda service and click on the “Create function” button:Function creation

Fill in all fields as shown in the screenshot below:- Name - "getAllBondsList";
- Runtime - "Python 3.6"
- Role - “Choose an existing role”
- Existing role - here we choose the role that we created above - ForLambdaS3-ReadOnly
Name and role selection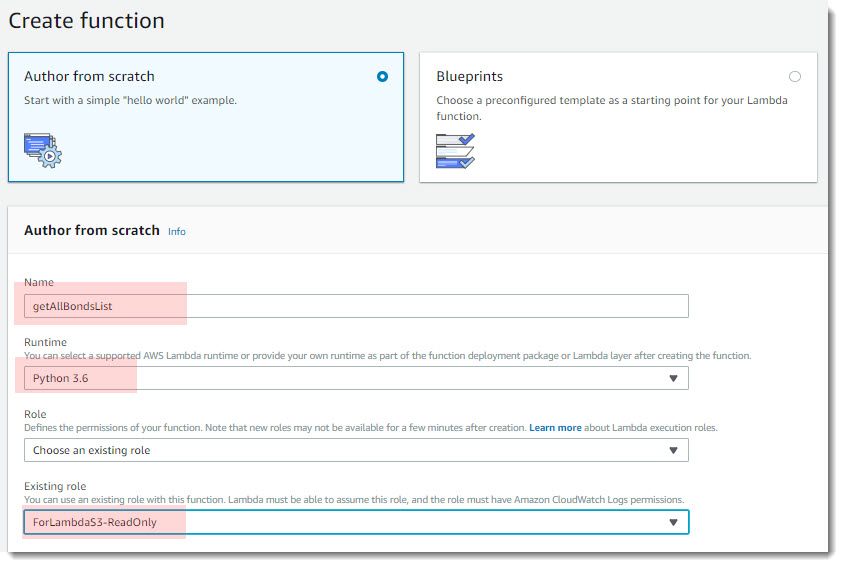
- It remains only to write the function code and test its performance on various test runs. It should be noted that the main component of any Lambda function (if you use Python) is the boto3 library:
import boto3 s3 = boto3.resource('s3') bucket = s3.Bucket('your-s3-bucket') obj = bucket.Object(key = 'bonds.txt') response = obj.get()
The basic idea of our Python function is as follows:- Open the file bonds.txt;
- Read column headers;
- Break records page by page (10 collections in our case);
- Select the desired page;
- Snapshot the name of the columns and records;
- To give the result in the form of collections.
Let's not spend a lot of time on the function and technical implementation code itself; everything is quite simple here and the full code is available on my GitHub .for i in range(0, len(lines_proc)): d = dict((u''.join(key), u''.join(value)) for (key, value) in zip(headers, lines_proc[i].split("\t"))) response_body.append(d) return { 'statusCode': 200, 'page' : num_page, 'body': response_body }
Insert the code (or write your own :)) into the “Function code” block and click on the “Save” button in the upper right corner of the screen.Insert code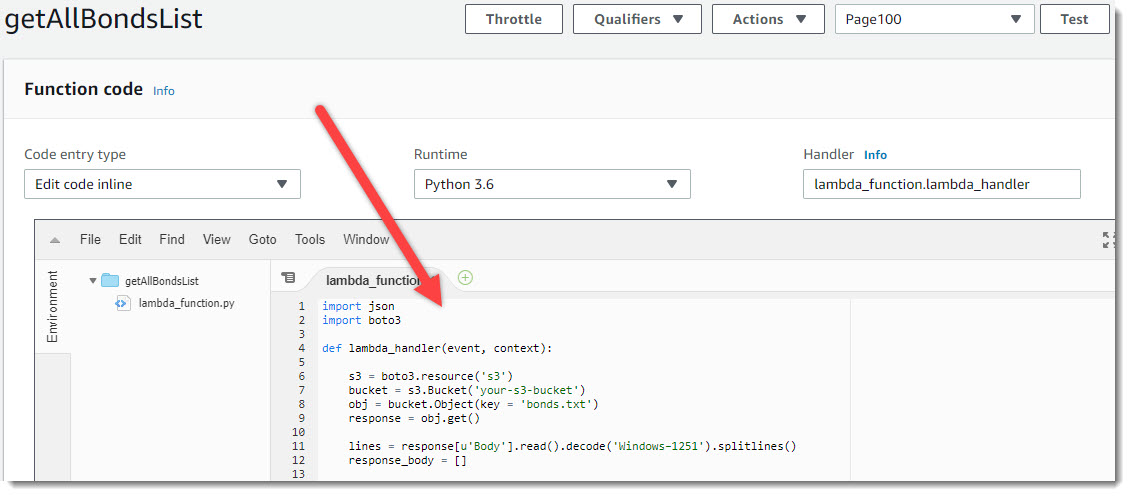
- Creating test events. After inserting the code, the feature is available to run and test. Click on the “Test” button and create several test events: launch of the lambda_handler function with different parameters. Namely:
- Starting a function with the 'page' parameter: '100';
- Starting the function with the 'page' parameter: '1000000';
- Starting the function with the parameter 'page': 'bla-bla-bla';
- Run the function without the 'page' parameter.
Test Event Page100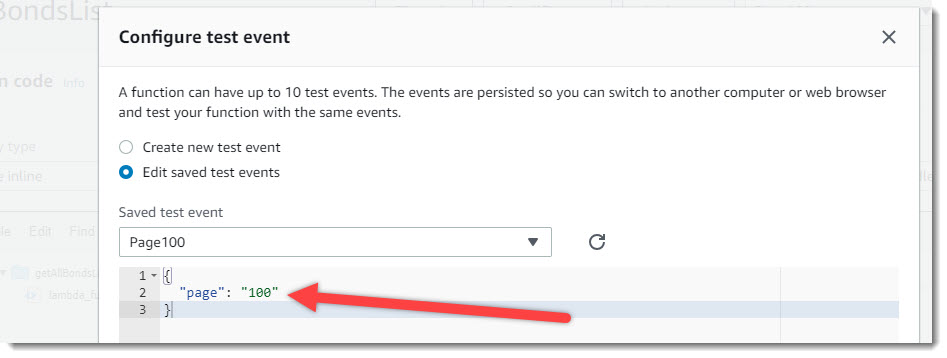
Starting the created function with the transfer of the test event page == 100. As can be seen from the screenshot below, the function has successfully completed, returned status 200 (OK), as well as a set of collections that correspond to the hundredth page of separated data using pagination.Launch test event Page100
For the purity of the experiment, we will launch another test event - “PageBlaBlaBla”. In this case, the function returns the result with the code 415 and a comment that you need to check the correctness of the passed parameters:Test Event PageBlaBlaBla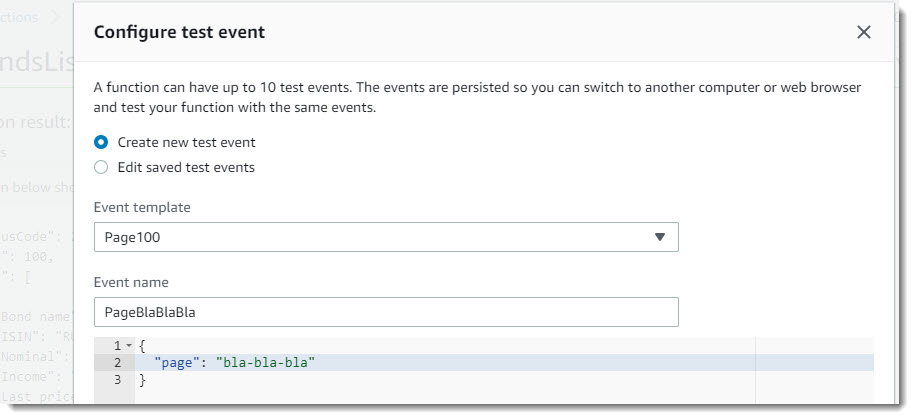 Event triggering PageBlaBlaBla
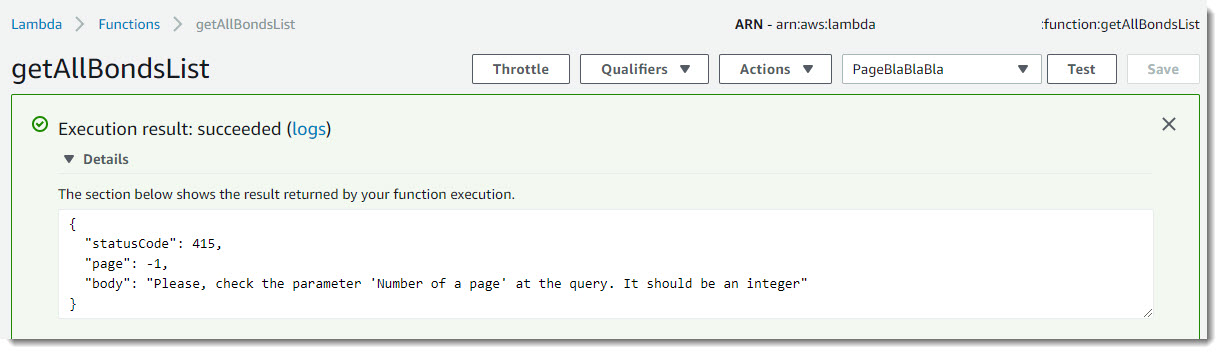
API creation
After all the other cases have been tested and there is an understanding that the Lambda function works as we expect, we proceed to the creation of the API. Create an access point to the Lambda function created above and additionally install protection against unwanted launches using the API Key.
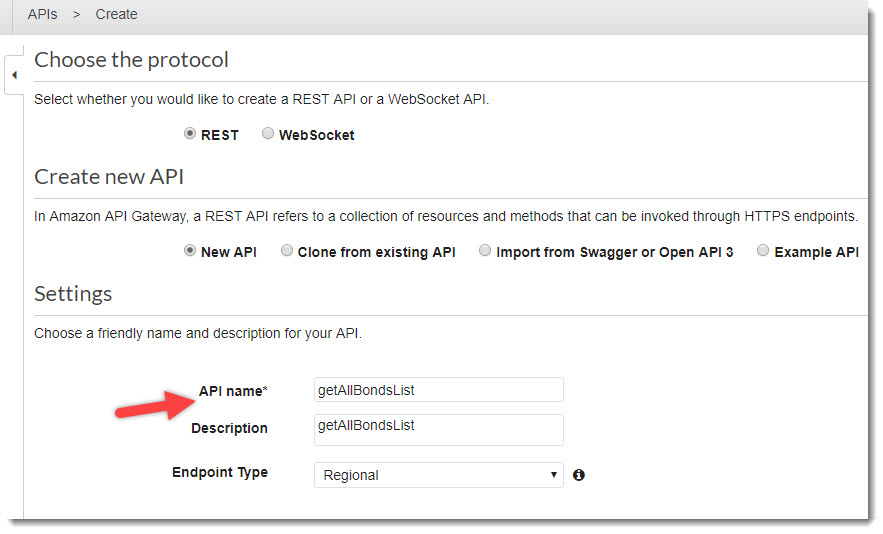
- Go to the service AWS API Gateway. Click on the button “Create API”, set the name of the API - “getAllBondsList”Creating a new API
- Add the GET method to the newly created API. To do this, select Actions -> Create method, in the drop-down list that appears, select the GET method and click on the check markNew GET method

Further, we point out that the GET method will use our Lambda function getAllBondsList. Select it and click on the Save button.Binding Lambda Functions
- We will deploy our API, thereby obtaining the URL for the API call.
Click Actions -> Deploy API, and further, Deployment stage -> New StageIt is possible to deploy the API in different stages and call these stages as you like (for example, DEV / QA / PROD). We will deploy immediately to PROD.
Deploy API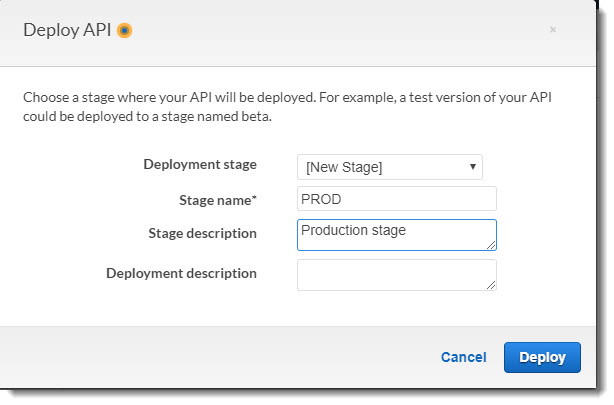
After deployment, there will be a link to launch the newly created API. Let's go to this URL in the address bar of the browser (or execute the curl command in the terminal) - we get an API call and, as a result, launch the Lambda function:API URL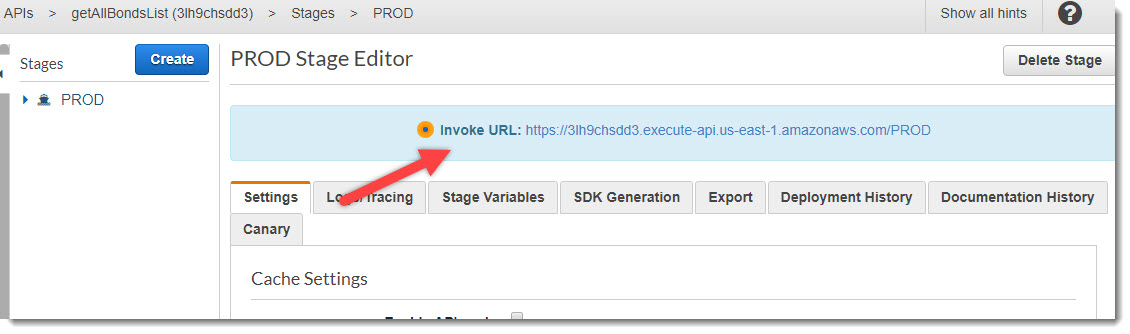
To demonstrate how AWS API Gateway works, I'll use the Postman application. It can be quite comfortable to debug and test the work of the API.First API testingCopy the URL from the PROD stage to Postman and send a GET request to our API: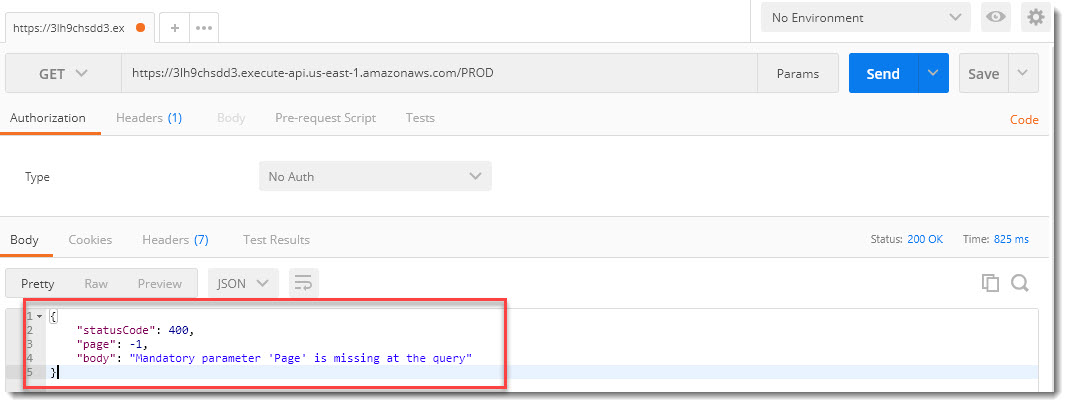
It seems that something went wrong ... the GET request returned a JSON response with code 400 and a hint that the Page parameter was not specified in the API call. Add support for API request parameters. - Support for passed parameters in the request.
Go back to the GET request settings and go to the Method Request step.Method Request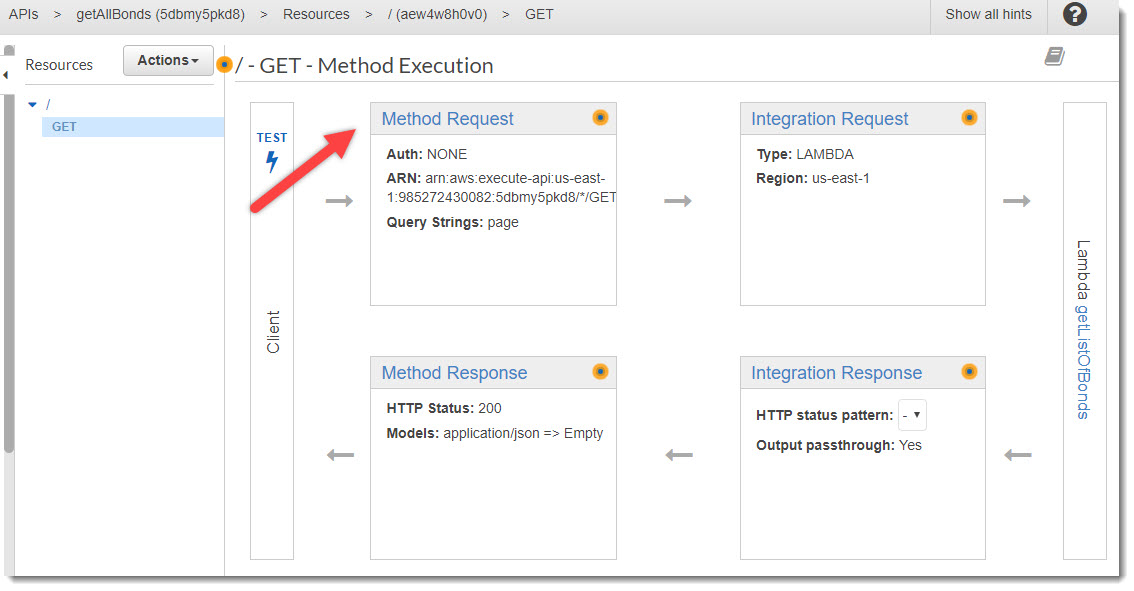
In the detailed Method Request settings, you must expand the URL Query String Parameters block and add a new parameter “page” and make it mandatory (Required):Add parameter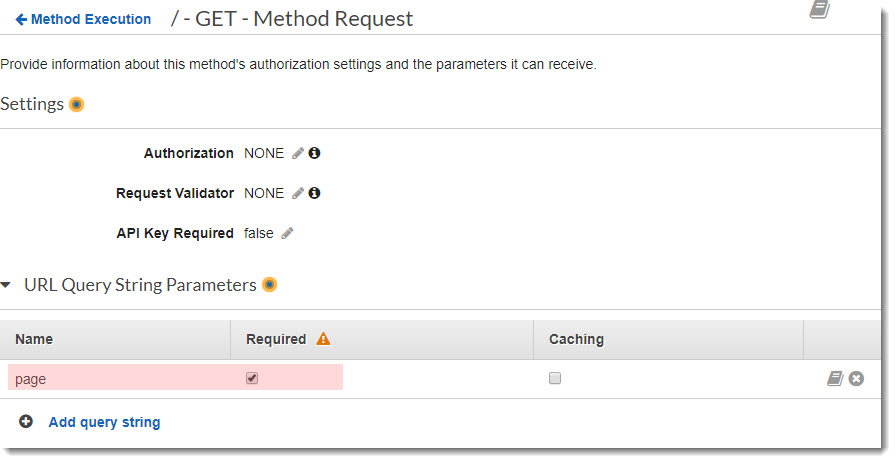
We return to the Method Execution page and go to the Integration Request. Go down to the bottom of the page and open the block "Mapping Templates". Select “When there are no templates templates (recommended)”, in the Content-Type field, indicate application / json and click on the check mark. We scroll the page below and in the text field enter the code as shown in the picture below. After that click on the Save button.Method Request
Having previously done the API API, we check again, but already with the transfer of the “page” parameter:
This is a success! Now the query has worked successfully and returned to us the collections contained on the tenth page! Hooray! - It remains only to protect our API from unwanted external attacks.
To do this, you need to configure the API to work so that when accessing it, it requires a secret key, which is transmitted in the header.
Go to the Keys API and create a new key API bundle - KeyForBondsList.API Keys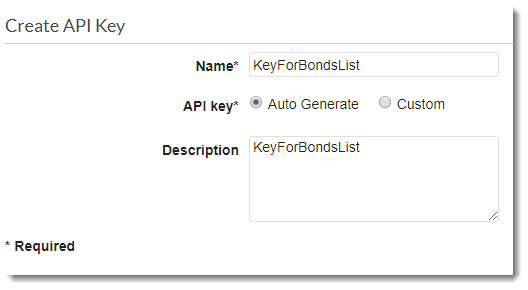
After the API Key is successfully created, you must specify that the getAllBondsList API must require that the API key be passed in the request header. And bind a specific KeyForBondsList key to the getAllBondsList API.
Let's go back to the GET request settings in the Method Request and change the API Key Required parameter from false to true. The API will now require the transfer of an API Key.API Key Required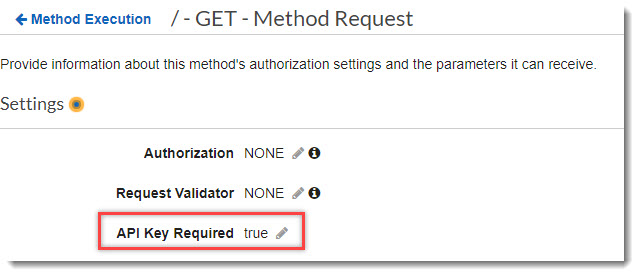
Go to Usage Plan and create a new plan for using the API.
First, we give it a name and description, and secondly, here you can set limits on the launch of the API, for example, no more than one start per second, etc.Create Usage Plan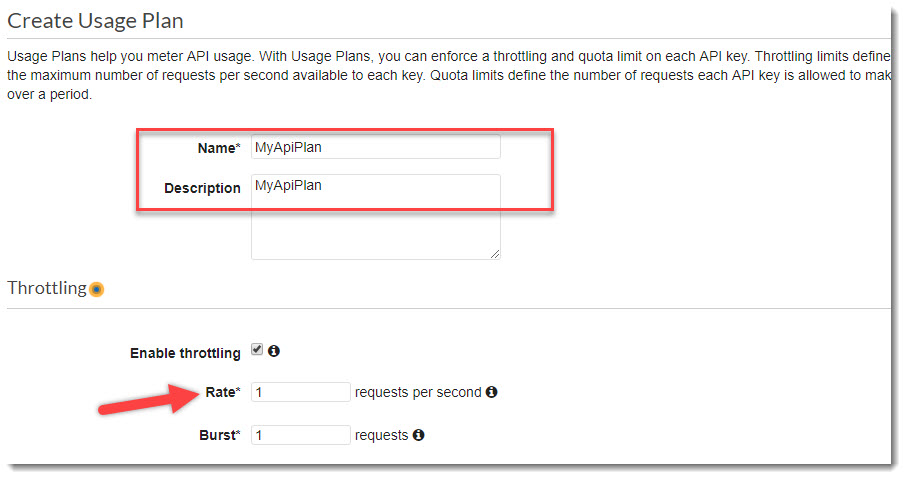
Click on Next and go to the next page where you need to link the stages of the API with the use plan:Binding stage to Usage Plan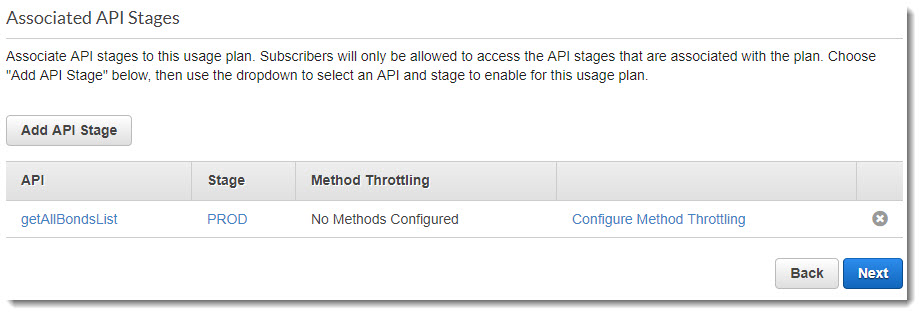
On the next page, we link the Keys API to an API usage plan. Click on the Add API Keys to Usage Plan button and find the names created by the Keys APIs in the previous steps:Binding API Keys to Usage Plan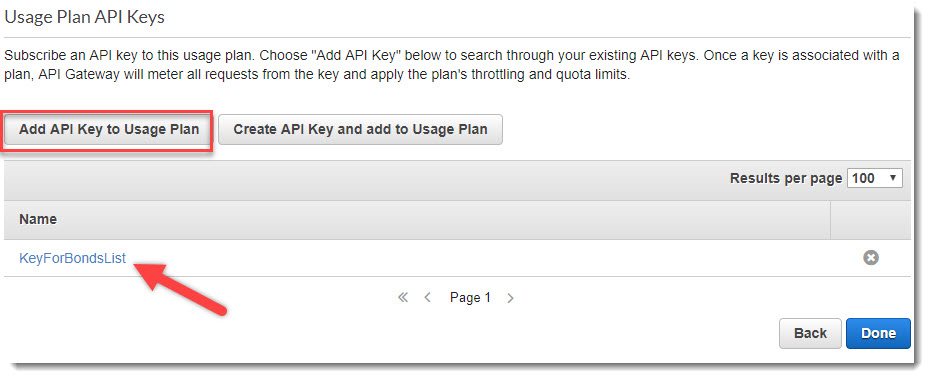
After completing the warmup and running the GET call of our API again, we get the answer: “Forbidden”, because In the request header there is no API Key: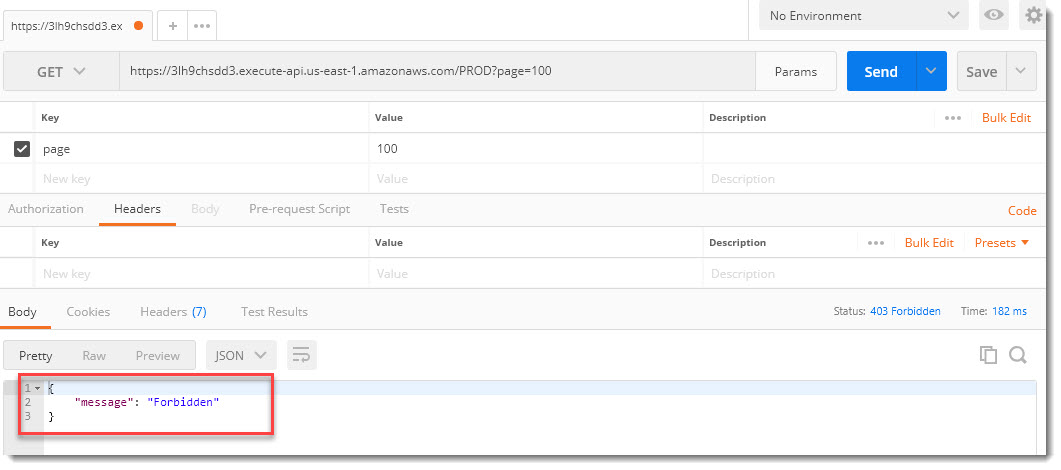
Let's try to add it by copying Keys -> KeyForBondsList -> API key -> Show from the API and paste it into the appropriate section of the request with the key "x-api-key":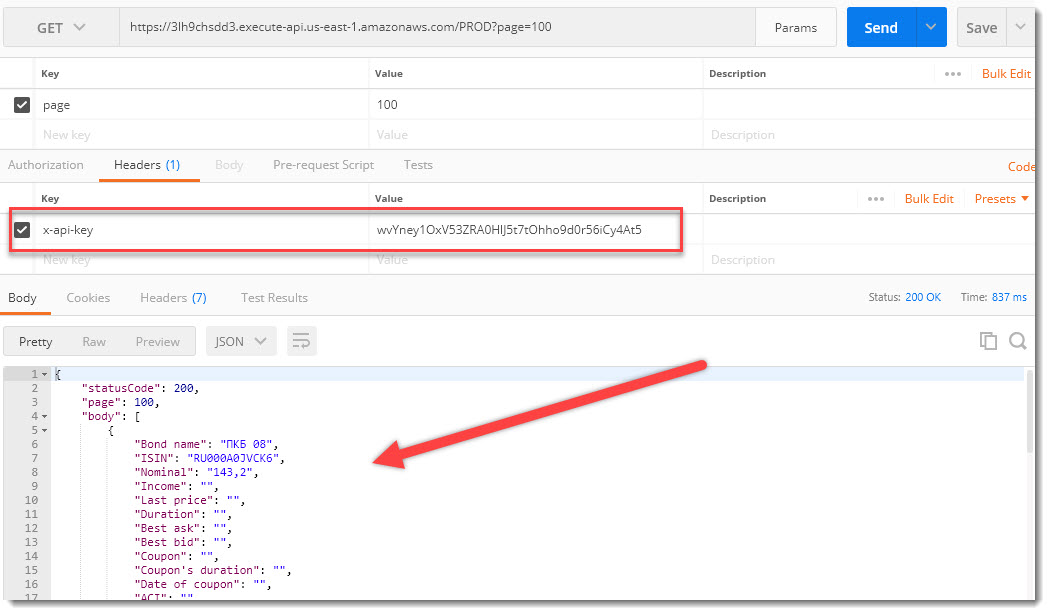
Everything worked out! This time, the request returns data without any problems, the API call is secure and protected from intruders by the API Key secret key.
Conclusions and summary
In this article, we looked at creating a serverless, autoscaled, REST API using Amazon's cloud services. The article was not the smallest in terms of volume, but I tried to explain the whole process of creating an API in as much detail as possible and put together the entire sequence of actions.
I am sure that after one or two repetitions of the actions described in the article, you will be able to raise your cloud API in 5 minutes and even faster.
Due to its relative simplicity, low cost and power, AWS API Gateway service provides developers with ample opportunities for use in work and in commercial projects. To consolidate the theoretical material of this article, try to get a free annual subscription to Amazon Web Services and take the above steps to create a REST API yourself.
For any questions and suggestions, I am ready to talk with pleasure. I look forward to your comments on the article and wish you success!
Source: https://habr.com/ru/post/435180/
All Articles