Introduction to Spring Boot: Creating a Simple Java REST API
Due to the cumbersome configuration of dependencies, Spring configuration for enterprise applications has become a very tedious and error-prone exercise. This is especially true for applications that also use several third-party libraries.
Every time you create another Spring-based enterprise Java application, you need to repeat the same routine steps to set it up:
- Depending on the type of application being created (Spring MVC, Spring JDBC, Spring ORM, etc.), import the necessary Spring modules
- Import a web container library (in the case of web applications)
- Import the necessary third-party libraries (for example, Hibernate, Jackson), and you should look for versions that are compatible with the specified version of Spring
- Configure DAO components, such as: data sources, transaction management, etc.
- Configure web layer components, such as: resource manager, view resolver
- Define a class that loads all necessary configurations.
1. Introducing Spring Boot
Spring authors decided to provide developers with some utilities that automate the setup procedure and speed up the process of creating and deploying Spring applications, collectively called Spring Boot
Spring Boot is a useful project whose goal is to simplify the creation of applications based on Spring. It allows you to create a web application in the simplest way, requiring developers to minimize the effort of setting it up and writing code.
2. Spring Boot Features
Spring Boot has great functionality, but its most significant features are: dependency management, automatic configuration, and embedded servlet containers
2.1. Easy dependency management
To speed up the dependency management process, Spring Boot implicitly packs the necessary third-party dependencies for each type of Spring-based application and provides them to the developer through so-called starter packages (spring-boot-starter-web, spring-boot-starter-data-jpa, and .d.)
Starter packages are a set of convenient dependency descriptors that can be included in your application. This will provide a one-stop solution for all Spring-related technologies, saving the programmer from unnecessary searching for code examples and loading the required dependency descriptors from them (an example of such descriptors and start packages will be shown below)
For example, if you want to start using Spring Data JPA to access the database, simply include the spring-boot-starter-data-jpa dependency in your project and everything will be ready (you don’t have to search for compatible database drivers and Hibernate libraries)
If you want to create a Spring web application, simply add a spring-boot-starter-web dependency that pulls into the project all the libraries needed to develop Spring MVC applications, such as spring-webmvc , jackson-json , validation-api and Tomcat
In other words, Spring Boot collects all common dependencies and defines them in one place, which allows developers to simply use them instead of reinventing the wheel every time they create a new application.
Therefore, when using Spring Boot , the pom.xml file contains much fewer lines than when using it in Spring applications.
Refer to the documentation to familiarize yourself with all Spring boot starter packages.
2.2. Automatic configuration
The second excellent Spring Boot feature is automatic application configuration.
After selecting the appropriate starter package, Spring Boot will attempt to automatically configure the Spring application based on the jar dependencies you added.
For example, if you add Spring-boot-starter-web , Spring Boot will automatically configure such registered bins as DispatcherServlet , ResourceHandlers , MessageSource
If you use spring-boot-starter-jdbc , Spring Boot automatically registers the DataSource , EntityManagerFactory , TransactionManager beans and reads the information for connecting to the database from the application.properties file
If you are not going to use the database, and do not provide any details about the connection in manual mode, the Spring Boot will automatically configure the database in memory, without any additional configuration on your part (if you have H2 or HSQL libraries)
Automatic configuration can be completely redefined at any time using custom settings.
2.3. Native support for application server - servlet container
Each Spring Boot web application includes an embedded web server. Look at the list of servlet containers that are supported out of the box.
Developers no longer have to worry about setting up a servlet container and deploying an application on it. Now the application can run itself as an executable jar file using the built-in server.
If you need to use a separate HTTP server, it’s enough to eliminate the default dependencies. Spring Boot provides separate starter packages for different HTTP servers.
Creating stand-alone web applications with embedded servers is not only convenient for development, but is also a valid solution for enterprise-level applications and is becoming more and more useful in the world of microservices. The ability to quickly pack the entire service (for example, user authentication) in a standalone and fully deployable artifact that also provides an API - makes installing and deploying an application much easier
3. Spring Boot Installation Requirements
To configure and run Spring Boot applications, the following is required:
- Java 8+
- Apache Maven 3.x
4. Creating Spring Boot Applications
Now let's move on to the practice and implement a very simple REST API for accepting payments using the features of Spring Boot
4.1. Creating a web project using Maven
Create a Maven project in your IDE, naming it SpringBootRestService
Be sure to use the Java 8+ version, because Spring Boot does not work with earlier versions
4.2. Pom.xml configuration
The second step is to configure Spring Boot in the pom.xml file
All Spring Boot applications are configured from spring-boot-starter-parent , so before further defining dependencies, add starter-parent as follows:
<parent> <groupId>org.springframework.boot</groupId> <artifactId>spring-boot-starter-parent</artifactId> <version>2.1.1.RELEASE</version> </parent> Since we create a REST API, it is necessary to use spring-boot-starter-web as a dependency, which implicitly defines all other dependencies, such as spring-core , spring-web , spring-webmvc , servlet api , and the jackson-databind library, therefore just add the following to pom.xml:
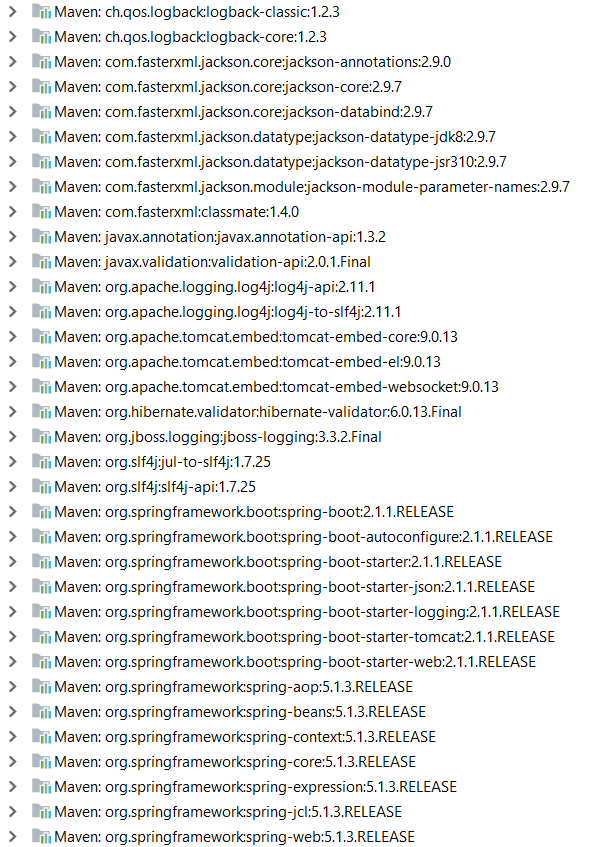
<dependency> <groupId>org.springframework.boot</groupId> <artifactId>spring-boot-starter-web</artifactId> </dependency> Now the following jar libraries are automatically imported into your project:
The next step is to add the Spring Boot plugin:
<build> <plugins> <plugin> <groupId>org.springframework.boot</groupId> <artifactId>spring-boot-maven-plugin</artifactId> </plugin> </plugins> </build> The final step is to make Maven generate the jar executable when building:
<packaging>jar</packaging> Below is the complete pom.xml file:
<?xml version="1.0" encoding="UTF-8"?> <project xmlns="http://maven.apache.org/POM/4.0.0" xmlns:xsi="http://www.w3.org/2001/XMLSchema-instance" xsi:schemaLocation="http://maven.apache.org/POM/4.0.0 http://maven.apache.org/xsd/maven-4.0.0.xsd"> <modelVersion>4.0.0</modelVersion> <groupId>springboot.topjava.ru</groupId> <artifactId>SpringBootRestService</artifactId> <version>1.0</version> <packaging>jar</packaging> <properties> <maven.compiler.source>1.8</maven.compiler.source> <maven.compiler.target>1.8</maven.compiler.target> </properties> <parent> <groupId>org.springframework.boot</groupId> <artifactId>spring-boot-starter-parent</artifactId> <version>2.1.1.RELEASE</version> </parent> <dependencies> <dependency> <groupId>org.springframework.boot</groupId> <artifactId>spring-boot-starter-web</artifactId> </dependency> </dependencies> <build> <plugins> <plugin> <groupId>org.springframework.boot</groupId> <artifactId>spring-boot-maven-plugin</artifactId> </plugin> </plugins> </build> </project> As you can see, using one dependency, we can create a fully functional web application.
4.3. Creating REST resources
Now we are going to create a payment controller along with POJO classes for requests and responses
We write the payment request class:
package springboot.topjava.ru; public class PaymentRequest { private int userId; private String itemId; private double discount; public String getItemId() { return itemId; } public void setItemId(String itemId) { this.itemId = itemId; } public double getDiscount() { return discount; } public void setDiscount(double discount) { this.discount = discount; } public int getUserId() { return userId; } public void setUserId(int userId) { this.userId = userId; } } As well as the class that handles the base response returned by our service:
package springboot.topjava.ru; public class BaseResponse { private final String status; private final Integer code; public BaseResponse(String status, Integer code) { this.status = status; this.code = code; } public String getStatus() { return status; } public Integer getCode() { return code; } } Now create the controller:
package springboot.topjava.ru; import org.springframework.web.bind.annotation.*; @RestController @RequestMapping("/payment") public class PaymentController { private final String sharedKey = "SHARED_KEY"; private static final String SUCCESS_STATUS = "success"; private static final String ERROR_STATUS = "error"; private static final int CODE_SUCCESS = 100; private static final int AUTH_FAILURE = 102; @GetMapping public BaseResponse showStatus() { return new BaseResponse(SUCCESS_STATUS, 1); } @PostMapping("/pay") public BaseResponse pay(@RequestParam(value = "key") String key, @RequestBody PaymentRequest request) { final BaseResponse response; if (sharedKey.equalsIgnoreCase(key)) { int userId = request.getUserId(); String itemId = request.getItemId(); double discount = request.getDiscount(); // Process the request // .... // Return success response to the client. response = new BaseResponse(SUCCESS_STATUS, CODE_SUCCESS); } else { response = new BaseResponse(ERROR_STATUS, AUTH_FAILURE); } return response; } } 4.4. Creating the main application class
This last step is to create a configuration class and launch the application. Spring Boot supports the @SpringBootApplication annotation, which is equivalent to using @Configuration , @EnableAutoConfiguration and @ComponentScan with their default attributes
So you just need to create a class annotated using @SpringBootApplication , and the Spring Boot will enable automatic configuration and scan your resources in the current batch:
package springboot.topjava.ru; import org.springframework.boot.SpringApplication; import org.springframework.boot.autoconfigure.SpringBootApplication; @SpringBootApplication public class Application { public static void main(String[] args) { SpringApplication.run(Application.class, args); } } 5. Deploying the Spring Boot Application
Now let's use the third great feature of Spring Boot - this is the built-in server. All we need to do is create an executable jar file using Maven and run it as a normal stand-alone application:
- Enter the command line mode (cmd command), go to the folder with pom.xml and enter the command mvn clean package
- Maven generates an executable jar file named SpringBootRestService-1.0.jar
- Go to the cd target folder
- Then run the jar file: java -jar SpringBootRestService-1.0.jar
- Go to your browser at http: // localhost: 8080 / payment
Our REST API is running and ready to serve requests on port 8080 (by default)
In this article, we looked at Spring Boot features and created a fully working example using the embedded server.
A source:
https://dzone.com/articles/introducing-spring-boot
Translated updated information:
- Spring-boot-starter-parent changed the version from 1.5.8.RELEASE to 2.1.1.RELEASE and accordingly the list of libraries that Maven pulls up has been updated
- Removed Spring repository ads, dependencies pull up from the central repository
- In the BaseResponse class, the fields were made final, a constructor was added and the setters were removed.
- In the PaymentController controller, you entered the showStatus () method with @GetMapping to test the application in the browser
- Replaced @RequestMapping in methods with @ GetMapping / @ PostMapping
- Also edits were made to deploy the application from the command line.
UPDATE:
As noted by Lure_of_Chaos , now everything can be done automatically through SPRING INITIALIZR . And without leaving your beloved JetBrains IntelliJ IDEA .
')
Source: https://habr.com/ru/post/435144/
All Articles