The art of shamanism or custom firmware for Olinuxino. UBOOT Part 2
All this was going from under Ubuntu 16.04.
The decision to assemble the firmware was born due to the lack of an freely accessible image for this board (Olimex A13-Olinuxino). And the manufacturer offered to buy an SD card with the image and cost about 10 euros at that time, which didn’t suit much, moreover, it was designed for a monitor.
The bootloader configuration will be configured to boot from the SD card. Since there is no NAND memory on the board, and all other boot options are slightly crooked (whoever can collect the uboot for booting from USB media, let him take two steps forward and share). Algorithm CPU utilization allwinner a13 can be found on the manufacturer's website. Or here is a datasheet clip.
')

It is clearly seen from the algorithm that the bootloader is first checked on the SD card, then all the others, and only at the end is the bootloader checked to USB. Therefore, tablets and smartphones can be done with Ubuntu if they slip the SD card with the appropriate way. And apparently, about such an algorithm will be, if not all, then many manufacturers arm processors.
First you need to break the SD card, for this in order not to be mistaken in the process of typing commands, we will reduce the whole process to a script file (I prefer to reduce everything to such files, since I will have to run it more than once).
Let us dwell on the boot loader in more detail, and in its quality choose UBOOT, we extort the version of u-boot-2018.05, the last one at that moment.
It is assumed that there is already all the necessary software for the assembly. And start the build by configuring the bootloader.
To start the configuration, go to the folder with UBOOT and run the command from it:
As a result of execution, we get such a window.
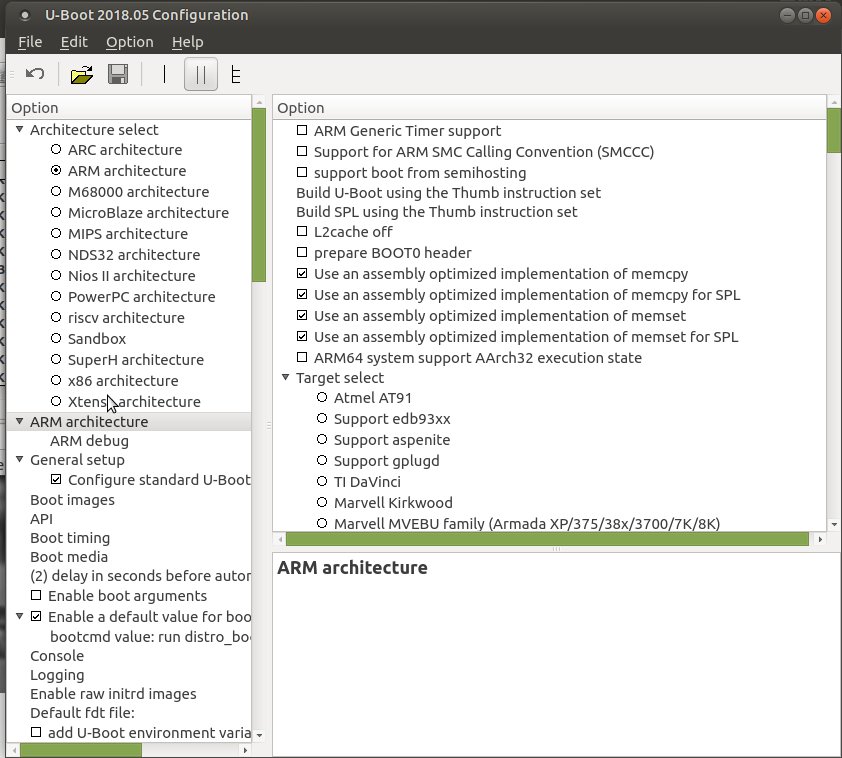
This is the so-called Ix version of the configurator, usually using the console option in it, more information is provided, but this is all the more obvious and it will completely cover our needs.
And further, if you have a lot of time or you don’t feel sorry for yourself, you can configure the bootloader from scratch. However, it is better to upload the ready configuration of this board through the file menu. In the folder with the bootloader source code at /u-boot-2018.05/configs/, select the file A13-OlinuXino_defconfig and this is our configuration, where everything is already installed. Then click save and close the window, because there is nothing to change here.
It remains to run the build command:
In this command, the elements are all the same as in the previous one, only without the xconfig parameter, which means configuration. That's all, the bootloader is assembled.
After the end of the build, in the folder specified in the command, we need to find this file “u-boot-sunxi-with-spl.bin” and this is the correct bootloader.
Next to fill the bootloader on the SD card, use the command:
The loader that was just recorded after the download will point to the next section of the SD card / dev / sdb1, and there it will look for a script file with environment variables which contains instructions for further loading.
This file should be named boot.scr, a file with this name is looking for uboot after its download. The file name can of course be changed as well as the boot method if you get into the UBOOT configuration, but we’ll dwell on this option.
You should also compile the devicetree files for one thing, they are in the source code with the bootloader at /u-boot-2018.05/arch/arm/dts/ we are interested in the file sun5i-a13-olinuxino.dts. It is a configuration of registers and processor peripherals. This is a universal configuration file, so it is quite possible that one uboot boot loader is used for different processors, but different dts files are used. The same dts files are in the source code of the Linux kernel, they are basically the same, just written a little differently and where to get the assembled tree of devices that you already have to choose. In general, to build dts files you need to run this command:
The compiled file will be located at ../olimex-uboot/arch/arm/dts/.
Consider in more detail the boot.scr file.
First, create a boot.cmd file with the contents:
But in order for uboot to understand the instructions, this file must be in the form of a script and for this you need to run the command:
Where boot.scr is the required file.
The first line load mmc 0 0x43000000 sun5i-a13-olinuxino.dtb loads the device tree file at the specified address in RAM. load mmc 0 indicates that you need to load the file from the first section of the SD card, while the numbering for uboot is zero and not one.
The second line load mmc 0 0x42000000 uImage loads the assembled Linux kernel at the specified address.
For our version of the variable setenv video-mode, which is usually further used, we do not need as we do not plan to use the monitor.
Third line:
Well, the last bootm command loads the kernel from the one previously loaded in memory.
In the next article will be the last part that should be placed on the first section of the SD card, this is the formation of the Linux kernel.
The first part of the article
The third part of the article
The decision to assemble the firmware was born due to the lack of an freely accessible image for this board (Olimex A13-Olinuxino). And the manufacturer offered to buy an SD card with the image and cost about 10 euros at that time, which didn’t suit much, moreover, it was designed for a monitor.
The bootloader configuration will be configured to boot from the SD card. Since there is no NAND memory on the board, and all other boot options are slightly crooked (whoever can collect the uboot for booting from USB media, let him take two steps forward and share). Algorithm CPU utilization allwinner a13 can be found on the manufacturer's website. Or here is a datasheet clip.
')
It is clearly seen from the algorithm that the bootloader is first checked on the SD card, then all the others, and only at the end is the bootloader checked to USB. Therefore, tablets and smartphones can be done with Ubuntu if they slip the SD card with the appropriate way. And apparently, about such an algorithm will be, if not all, then many manufacturers arm processors.
First you need to break the SD card, for this in order not to be mistaken in the process of typing commands, we will reduce the whole process to a script file (I prefer to reduce everything to such files, since I will have to run it more than once).
#!/bin/sh DEViCELINK=/dev/sdb fdisk $DEViCELINK <<EOF n # p # 1 # 2048 # 2MiB +64M # , kernel dts n p 2 +2G # ubuntu n p 3 +2G # n p 4 # w EOF mkfs.ext2 /dev/sdb1 << EOF # kernel fat16 ext2 y EOF mkfs.ext4 /dev/sdb2 << EOF y EOF mkfs.ext4 /dev/sdb3 << EOF y EOF mkfs.ext4 /dev/sdb4 << EOF y EOF Build UBOOT
Let us dwell on the boot loader in more detail, and in its quality choose UBOOT, we extort the version of u-boot-2018.05, the last one at that moment.
It is assumed that there is already all the necessary software for the assembly. And start the build by configuring the bootloader.
To start the configuration, go to the folder with UBOOT and run the command from it:
make O=../olimex-uboot # -j4 # ARCH=arm # CROSS_COMPILE=arm-linux-gnueabihf- # xconfig # GUI As a result of execution, we get such a window.
This is the so-called Ix version of the configurator, usually using the console option in it, more information is provided, but this is all the more obvious and it will completely cover our needs.
And further, if you have a lot of time or you don’t feel sorry for yourself, you can configure the bootloader from scratch. However, it is better to upload the ready configuration of this board through the file menu. In the folder with the bootloader source code at /u-boot-2018.05/configs/, select the file A13-OlinuXino_defconfig and this is our configuration, where everything is already installed. Then click save and close the window, because there is nothing to change here.
It remains to run the build command:
make O=../olimex-uboot -j4 ARCH=arm CROSS_COMPILE=arm-linux-gnueabihf- In this command, the elements are all the same as in the previous one, only without the xconfig parameter, which means configuration. That's all, the bootloader is assembled.
After the end of the build, in the folder specified in the command, we need to find this file “u-boot-sunxi-with-spl.bin” and this is the correct bootloader.
Next to fill the bootloader on the SD card, use the command:
dd if=../olimex-uboot/u-boot-sunxi-with-spl.bin # of=/dev/sdb # SD bs=1024 seek=8 # 8KiB , The loader that was just recorded after the download will point to the next section of the SD card / dev / sdb1, and there it will look for a script file with environment variables which contains instructions for further loading.
This file should be named boot.scr, a file with this name is looking for uboot after its download. The file name can of course be changed as well as the boot method if you get into the UBOOT configuration, but we’ll dwell on this option.
You should also compile the devicetree files for one thing, they are in the source code with the bootloader at /u-boot-2018.05/arch/arm/dts/ we are interested in the file sun5i-a13-olinuxino.dts. It is a configuration of registers and processor peripherals. This is a universal configuration file, so it is quite possible that one uboot boot loader is used for different processors, but different dts files are used. The same dts files are in the source code of the Linux kernel, they are basically the same, just written a little differently and where to get the assembled tree of devices that you already have to choose. In general, to build dts files you need to run this command:
make O=../olimex-uboot -j4 ARCH=arm CROSS_COMPILE=arm-linux-gnueabihf- dtbs # dts The compiled file will be located at ../olimex-uboot/arch/arm/dts/.
Consider in more detail the boot.scr file.
First, create a boot.cmd file with the contents:
load mmc 0 0x43000000 sun5i-a13-olinuxino.dtb load mmc 0 0x42000000 uImage setenv bootargs root=/dev/mmcblk0p2 rootfstype=ext4 rw rootwait console=ttyS0,115200 bootm 0x42000000 – 0x43000000 But in order for uboot to understand the instructions, this file must be in the form of a script and for this you need to run the command:
mkimage -C none -A arm -T script -d boot.cmd boot.scr Where boot.scr is the required file.
The first line load mmc 0 0x43000000 sun5i-a13-olinuxino.dtb loads the device tree file at the specified address in RAM. load mmc 0 indicates that you need to load the file from the first section of the SD card, while the numbering for uboot is zero and not one.
The second line load mmc 0 0x42000000 uImage loads the assembled Linux kernel at the specified address.
For our version of the variable setenv video-mode, which is usually further used, we do not need as we do not plan to use the monitor.
Third line:
setenv bootargs # root=/dev/mmcblk0p2 # SD rootfs rootfstype=ext4 # rootfs rw # rootwait console=ttyS0,115200 # uart0 Well, the last bootm command loads the kernel from the one previously loaded in memory.
In the next article will be the last part that should be placed on the first section of the SD card, this is the formation of the Linux kernel.
The first part of the article
The third part of the article
Source: https://habr.com/ru/post/434942/
All Articles