JAVA SOUND API basics
Hi, Habr! I present to your attention the translation of the article "Java Sound, Getting Started, Part 1, Playback" .
This is the first in a series of eight lessons that will fully familiarize you with the Java Sound API.
What is sound in human perception? This is the feeling that we experience when the change in air pressure is transmitted to tiny touch areas inside our ears.
And the main purpose of creating Sound API, respectively, to provide you with the means to write code that will help in transferring pressure waves to the ears to the right subject at the right time.
')
Types of sound in Java:
These types are quite different in their essence and we will concentrate on the first, since in most cases we deal with sound, which either needs to be digitized and recorded from an external source to a file or, vice versa, to reproduce the sound previously recorded from such a file.
The Java Sound API is based on the concept of lines and mixers.
Further:
We will describe the physical and electrical characteristics of the analog audio representation as applied to the audio mixer .
We turn to the scenario of the beginning rock band, which in this case uses six microphones and two stereo speakers. This is what we need to understand how the audio mixer works.
Next we look at a number of Java Sound themes for programming, such as lines, mixers, formats for audio data, and more.
We will understand the connections existing between the SourceDataLine, Clip, Mixer, AudioFormat objects and create a simple program that plays audio.
Below we give an example of this program, which you can use to record and then play the recorded sound.
In the following, we will provide a full explanation of the software code used for this purpose. But not completely in this lesson.
Physical and electrical characteristics of analog sound
The goal of our lesson is to introduce you to the basics of Java programming using the Java Sound API.
The Java Sound API is based on the concept of an audio mixer, which is a device commonly used when playing sound almost anywhere: from rock concerts to listening to CDs at home. But before embarking on a detailed explanation of the audio mixer, it will be useful to get acquainted with the physical and electrical characteristics of the analog sound itself.
Look at pic. one
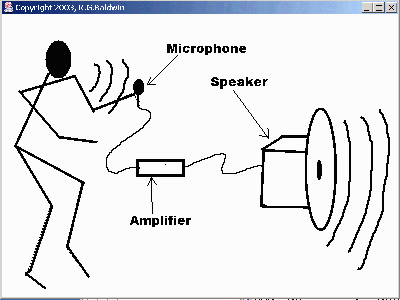
Vasya Pupyrkin pushes speech.
This drawing shows Vasya, who gives a speech using a system known as wide address. Such a system typically includes a microphone, amplifier, and loudspeaker. The purpose of this system is to strengthen Vasya’s voice so that it can be heard even in a large crowd.
Oscillations in the air
Briefly, when Vasya speaks, his vocal cords cause air particles to oscillate in his own larynx. This leads to the appearance of sound waves, which in turn, cause the membrane of the microphone to oscillate and then turn into electrical oscillations of a very small amplitude in accuracy, which simulate the original Vasiny sound vibrations. An amplifier, as its name implies, amplifies these electrical oscillations. Then they get to the loudspeaker, which performs the inverse transformation of amplified electrical oscillations already into very amplified sound waves, but which nevertheless exactly repeat the same waves born in the vocal cords of Vasi Pupyrkin.
Dynamic microphone
Now look at pic. 2, which shows a schematic of a microphone device called dynamic.

Fig. 2 Diagram of a dynamic microphone
Sound vibrations affect the membrane
The pressure of sound vibrations affects the flexible membrane inside the microphone. This causes the membrane to vibrate, while the vibrations of the membrane repeat the vibrations of the sound waves.
Moving coil
The coil is wound from a thin wire attached to the membrane of the microphone. As the membrane oscillates, the coil reciprocates in the magnetic field of the core made of a strong permanent magnet. And how else did Faraday set up, while an electric current arises in the coil.
The electrical signal repeats the shape of the sound waves.
Thus, from a very weak current induced in the coil, an alternating electrical signal is obtained that follows the shape of the sound waves that act on the membrane of the microphone. Further, this signal in the form of alternating voltage is fed to the input of the amplifier with one.
Speaker
In essence, the principle of operation of the loudspeaker repeats the device of a dynamic microphone, only turned on in the opposite direction. (Naturally, in this case, the winding wires are much thicker, and the membrane is much larger to ensure operation with an amplified signal)

Fluctuations in the loudspeaker membrane affect air particles and create powerful sound waves. The form of these waves exactly repeats the form of sound waves of much lower intensity, created by Vasin's vocal cords. But the intensity of the new waves is now enough for sound vibrations from Vasya to reach the ears of people standing even in the back rows of a large crowd.
Rock concert
By this time, you may wonder, what does all this have to do with the Java Sound API? But wait a little longer, we are leading the way to the basics of the audio mixer.
The scheme described above was quite simple. It consisted of Vasya Pupyrkin, a single microphone, amplifier and loudspeaker. Now consider the scheme with Fig. 4, which presents a scene prepared for a rock concert by an aspiring musical group.

Six microphones and two loudspeakers
In Fig. 4 six microphones located on the stage. Two loudspeakers (speakers) are placed on the sides of the stage. When a concert begins, performers sing or play music in each of the six microphones. Accordingly, we will have six electrical signals that must be individually amplified and then fed to both speakers. In addition to this, the performers can use various sound effects, such as reverb, which also need to be translated into electrical signals before they are sent to the loudspeakers.
Two speakers on the sides of the stage are designed to create the effect of stereo sound. That is, the electrical signal coming from the microphone located on the stage on the right should fall into the speaker located also on the right. Similarly, the signal from the microphone on the left must be fed to the loudspeaker located to the left of the scene. But the electrical signals from other microphones located closer to the center of the stage should already be transmitted to both speakers in appropriate proportions. And two microphones right in the center should broadcast their signal to both speakers equally.
Audio mixer
The task above is just performed by an electronic device called an audio mixer.
Audio line (channel)
Although the author is not an expert in audio mixers, in his modest understanding, a typical audio mixer has the ability to receive at the input a certain number of electrical signals independent of each other, each of which represents a source audio signal or a line (channel).
(The concept of the audio channel will become very important when we begin to deal in detail with the Java Sound API.
Independent processing of each audio channel
In any case, the standard audio mixer has the ability to amplify each audio line independently of the other channels. Also, the mixer usually has the ability to overlay sound effects, such as, for example, reverb on any of the audio lines. In the end, the mixer, as its name implies, can mix all individual electrical signals in the output channels as it is set, so as to control the contribution of each audio line to the output channels. (This control is usually called pan or panning - distribution in space).
Returning to stereo sound
Thus, in the diagram with Fig. 4, the audio mixer sound engineer has the ability to combine the signals from six microphones to receive two output signals, each of which is transmitted to its own loudspeaker.
For successful operation, the signal from each microphone must be given in an appropriate proportion, depending on the physical location of the microphone on the stage. (By changing the panning, a qualified sound engineer can change the contribution of each microphone if necessary, for example, if the lead vocalist moves during a concert around the stage).
Time to return to the world of programming
Let's now go back from the physical world to the world of programming. According to Sun: “Java Sound does not imply special hardware configuration; it is designed to allow various audio components to be installed into the system and be accessible to the user through the API. Java Sound supports standard input and output functionality from a sound card (for example, for recording and playing audio files), as well as the ability to mix multiple audio streams. ”
Mixers and Channels
As already mentioned, Java Sound API is built on the concept of mixers and channels. If we move from the physical world to the programming world, then Sun writes the following regarding the mixer:
“A mixer is an audio device with one or more channels. But a mixer that really mixes an audio signal must have several input channels of source sources and at least one output target channel. ”
Input lines can be instances of classes with SourceDataLine objects, and output lines can be TargetDataLine. The mixer can also receive a pre-recorded and looped sound as input, defining its input source channels as instances of class objects implementing the Clip interface.
Line interface channel.
Sun reports the following from the Line interface: “ Line is an element of a digital audio pipeline such as an audio input or output port, mixer, or route of audio data to or from a mixer. Audio data passing through the channel can be mono or multichannel (for example, stereo). ... The channel can have Controls, such as gain, pan and reverb. "
Combining terms together
So, the above quotes from Sun meant the following terms
SourceDataLine
TargetDataLine
Port
Clip
Controls
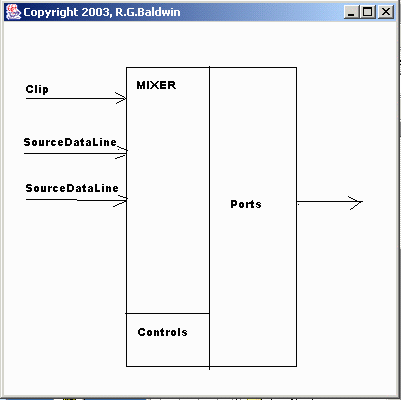
Fig. 5 shows an example of using these terms to build a simple audio output program.
Program script
From the program point of view 5 shows a Mixer object received with one Clip object and two SourceDataLine objects.
What is Clip
Clip is an object at the input of a mixer, the contents of which does not change with time. In other words, you load audio data into a Clip object before you lose it. Clip object audio content may be played one or more times. You can loop Clip and then the content will play again and again.
Input stream
The SourceDataLine object, on the other hand, is a stream object at the input of the mixer. This type of object can receive a stream of audio data and send it to the mixer in real time. The required audio data can be obtained from various sources, such as audio files, a network connection, or a memory buffer.
Different types of channels
Thus, the Clip and SourceDataLine objects can be viewed as input channels for the Mixer object. Each of these input channels can have its own: pan, gain and reverb.
Playing audio content
In such a simple system, the Mixer reads data from input lines, uses control to mix input signals, and provides output stream to one or more output channels, such as a speaker, line-out, headphone jack, and so on.
Listing 11 shows a simple program that captures audio data from a microphone port, stores this data in memory, and then plays it through the speaker port.
We will discuss only capture and playback. Most of the above program accounts for creating a window and a graphical interface for the user in order to be able to control the recording and playback. We will not discuss this part as going beyond the goal. But then we will look at capturing and playing data. We will discuss replay in this lesson, and capture in the following. Along the way, we illustrate the use of an audio channel with the Java Sound API.
The captured data is stored in the ByteArrayOutputStream object.
The data capture code fragment provides for reading audio data from a microphone and storing them as a ByteArrayOutputStream object.
The method called playAudio, which starts in Listing 1, plays audio data that was captured and stored in a ByteArrayOutputStream object.
Listing 1
We start with the standard code
The program fragment in Listing 1 is not really related to Java Sound.
Its purpose is to:
We need this to make the audio data available for later playback.
Go to the Sound API
The code line in Listing 2 is already related to the Java Sound API.
Listing 2
Here we briefly touch on the topic, which will be discussed in detail in the next lesson.
Two independent formats
Most often we are dealing with two independent formats for audio data.
The format of the file (any) that contains audio data (in our program it is not there yet, since the data is stored in memory)
The format of the presented audio data is in itself.
What is the audio format?
Here is what Sun writes about this:
“Each data channel has its own audio format associated with its data stream. The format (an instance of AudioFormat) determines the byte order of the audio stream. The format parameters can be the number of channels, the sampling frequency, the quantization width, the encoding method, etc. The conventional coding methods can be linear PCM pulse modulation and its varieties. ”
Byte sequence
The original audio data is a byte sequence of binary data. There are various options for how to order and interpret this sequence. We are not going to deal with all these options in detail, but we will discuss a little the audio format that we use here in our program.
Small retreat
Here we leave the playAudio method for now and look at the getAudioFormat method from Listing 2.
The complete getAudioFormat method is shown in Listing 3.
Listing 3
In addition to the declaration of initialized variables, the code in Listing 3 contains one executable expression.
AudioFormat object
The getAudioFormat method creates and returns an instance of an object of the AudioFormat class. Here is what Sun writes about this class:
“The AudioFormat class defines the specific ordering of data in an audio stream. Referring to the fields of the AudioFormat object, you can get information on how to correctly interpret the bits in a binary data stream. ”
We use the simplest constructor
The AudioFormat class has two types of constructors (we take the most trivial). For this constructor, the following parameters are required:
As you can see in Listing 3, in our case, we used the following parameters for an instance of an AudioFormat object.
By default, data is encoded linear PCM.
The constructor we used creates an instance of the AudioFormat object using the linear pulse code modulation and parameters specified above (We will return to linear PCM and other encoding methods in the following lessons)
Returning to the playAudio method again
Now that we understand how the format of audio data in Java sound works, let's go back to the playAudio method. As soon as we want to play the available audio data, we need an object of class AudioInputStream. We will get an instance of it in Listing 4.
Listing 4
Parameters for the AudioInputStream constructor
Get frame size
As we see in Listing 4, the value of the third parameter is created using calculations. This is just one of the attributes of the audio format, which we have not mentioned before, and it is called a frame.
What is a frame?
For simple linear PCM used in our program, the frame contains a set of samples for all channels at a given time.
Thus, the frame size is equal to the size of the count in bytes multiplied by the number of channels.
As you may have already guessed, a method called getFrameSize returns the frame size in bytes.
Frame size calculation
Thus, the length of audio data in a frame can be calculated by dividing the total number of bytes in the audio data sequence by the number of bytes in one frame. This calculation is used for the third parameter in Listing 4.
Getting a SourceDataLine Object
The next part of the program that we will discuss is a simple audio output system. As we can see from the diagram in Fig. 5, we will need a SourceDataLine object to solve this problem.
There are several ways to get an instance of the SourceDataLine object, all of which are very intricate. The code in Listing 5 gets and saves a reference to an instance of the SourceDataLine object.
(Note that this code does not just create an instance of the SourceDataLine object. It gets it in a rather roundabout way.)
Listing 5
What is a SourceDataLine object?
About this Sun writes the following:
“SourceDataLine is a data channel in which data can be recorded. It works as an input for a mixer. The application writes the byte sequence to SourceDataLine, which buffers the data and delivers it to its mixer. The mixer can transmit the data processed by it for the next stage, for example, to the output port.
Notice that the naming convention for such a pairing reflects the relationship between the channel and its mixer. ”
GetLine method for class AudioSystem
One way to get an instance of a SourceDataLine object is to call the static getLine method from the AudioSystem class (We will have a lot to report on in the following lessons).
The getLine method requires an input parameter of type Line.Info and returns a Line object that corresponds to the description in the already defined Line.Info object.
Another short retreat
Sun reports the following information about the Line.Info object:
“The channel has its own information object (an instance of Line.Info), which shows which mixer (if any) sends the mixed audio data as output directly to the channel, and which mixer (if any) receives the audio data as input directly from the channel. Line variations can correspond to subclasses of Line.Info, which allows you to specify other types of parameters related to specific types of channels ”
DataLine.Info object
The first expression in Listing 5 creates a new instance of the DataLine.Info object, which is a special form (subclass) of the Line.Info object.
There are several overloaded constructors for the DataLine.Info class. We have chosen to use the simplest. This constructor requires two parameters.
Class object
The first parameter is Class, which represents the class that we defined as SourceDataLine.class
The second parameter determines the desired data format for the channel. We use for it an instance of the AudioFormat object, which has already been defined earlier.
We are already there where necessary?
Unfortunately, we still do not have the SourceDataLine object we need. So far we have an object that only represents information about the SourceDataLine object we need.
Getting a SourceDataLine Object
The second expression in Listing 5 finally creates and stores an instance of SourceDataLine that we need so much. This is done by calling the static getLine method of the AudioSystem class and passing the dataLineInfo as a parameter. (In the next lesson we will look at how to get a Line object, working directly with the Mixer object).
The getLine method returns a reference to an object of type Line, which is the parent of SourceDataLine. Therefore, a downward type cast is necessary here before the return value is stored as a SourceDataLine.
Prepare to use the SourceDataLine object
Once we have an instance of the SourceDataLine object, we need to prepare it for opening and running, as shown in Listing 6.
Listing 6
Opening method
As you can see in Listing 6, we sent the AudioFormat object to the opening method for the SourceDataLine object.
According to Sun, this is the method:
“Opens a line (channel) with a previously defined format, allowing it to receive any system resources it requires and to be in working (operational) state”
Opening state
There are some more that Sun writes about him in this thread.
“Opening and closing a channel affects the allocation of system resources. Successful opening of the channel ensures that all necessary resources are provided to the channel.
Opening the mixer, which has its input and output ports for audio data, includes, among other things, enabling the platform hardware on which the operation takes place and initializing the necessary software components.
Opening a channel, which is a route for audio data to or from a mixer, includes both its initialization and receiving not at all limitless mixer resources. In other words, a mixer has a finite number of channels, so several applications with their own channel requirements (and sometimes even one application) must correctly share mixer resources) ”
Calling the start method for a channel
According to Sun, calling the start method for a channel means the following:
“The channel is allowed to use I / O lines. If an attempt is made to use an already operating line, the method does nothing. But after emptying the data buffer, the line resumes I / O start, starting with the first frame, which it did not have time to process, after the buffer was fully loaded. "
In our case, of course, the channel did not stop. Since we launched it for the first time.
Now we have almost everything we need.
At this point, we have received all the audio resources we need to play the audio data that we have previously recorded and stored in an instance of the ByteArrayOutputStream object. (Recall that this object exists only in the computer’s RAM).
Run the threads
We will create and run the stream to play the audio. The code in Listing 7 creates and starts this thread.
(Do not confuse the start method call on this thread with the start method call in the SourceDataLine object from Listing 6. These are completely different operations)
Listing 7
Simple code
A fragment of the program from Listing 7 is very simple, but it does show an example of multi-thread programming in Java. If you don’t understand it, you’d better get acquainted with this topic in specialized Java training topics.
Once the stream is started, it will work until all previously recorded audio data is played to the end.
New Thread object
The code in Listing 7 creates an instance of the Thread object (stream) belonging to the PlayThread class. This class is defined as an internal class in our program. Its description begins in Listing 8.
Listing 8
Thread run method
With the exception of declaring a variable tempBuffer (which refers to an array of bytes), the full definition of this class is simply the definition of the run method. As you should already know, calling the start method in a Thread object causes the run method of this object to execute.
The run method for this thread starts in Listing 9
Listing 9
The first part of the program fragment in the run method
The run method contains two important parts, the first of which is shown in Listing 9.
In sum, it uses a loop to read the audio data from the AudioInputStream object and pass it to the SourceDataLine object.
The data sent to the SourceDataLine object is automatically transferred to the default audio output. This may be a built-in computer speaker or a line-out. (We will learn how to determine the necessary sound devices in the following lessons). The variable cnt and temp buffer buffer is used to control the flow of data between read and write operations.
Reading data from AudioInputStream
A read loop from the AudioInputStream object, reads the specified maximum number of data bytes from the AudioInputStream and places their byte array.
Return value
Next, this method returns the total number of bytes read, or -1, if the end of the recorded sequence was reached. The number of bytes read is stored in the variable cnt.
Write cycle in SourceDataLine
If the number of bytes read is greater than zero, then a transition to the data writing cycle in SourceDataLine occurs. In this loop, the audio data goes to the mixer. Bytes are read from the byte array in accordance with their indices and written into the channel buffer.
When the input stream dries up
When the reading cycle returns -1, this means that all previously recorded audio data has ended and then the control is transferred to the program fragment in Listing 10.
Listing 10
Lock and wait
The code in Listing 10 calls the drain method for a SourceDataLine object so that the program can block and wait for the internal buffer to empty into the SourceDataLine. When the buffer is empty, this means that the entire next portion is delivered to the sound output of the computer.
Close SourceDataLine
The program then calls the close method to close the channel, thus showing that all system resources used by the channel are now free. Sun reports the following channel closure:
“The closure of the channel indicates that all the resources involved for this channel can be released. To release resources, the application must close the channels, whether they are independently involved or not, as well as when the application ends. Mixers are supposed to share system resources and can be closed and opened repeatedly. Other channels may or may not support reopening after they have been closed. In general, the mechanisms for opening lines vary according to different subtypes. "
And now the end of the story
So here we gave an explanation of how our program uses the Java Sound API in order to ensure the delivery of audio data from the internal memory of the computer to the sound card.
Run the program
Now you can compile and run the program from Listing 11, which crowns the end of our lesson.
Capture and play audio data
The program demonstrates the ability to record data from a microphone and play them through the sound card of your computer. Instructions for using it are very simple.
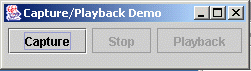
Run the program. A simple GUI GUI, shown in Figure 6, should appear on the screen.
If you do not hear anything, try increasing the sensitivity of your microphone or the volume of the speakers.
The program keeps a record in the computer’s memory, so be careful. If you try to save too much audio data, you may run out of memory.
Conclusion
What's next?
In this lesson, we learned that the Java Sound API is based on the concept of mixers and channels. However, the code we discussed did not explicitly include mixers. The AudioSystem class provided us with static methods that make it possible to write audio processing programs without directly accessing the mixers. In other words, these static methods take the mixers away from us to the background.
. , , , .
11
Sound in JAVA, part one, Start. Sound reproduction
This is the first in a series of eight lessons that will fully familiarize you with the Java Sound API.
What is sound in human perception? This is the feeling that we experience when the change in air pressure is transmitted to tiny touch areas inside our ears.
And the main purpose of creating Sound API, respectively, to provide you with the means to write code that will help in transferring pressure waves to the ears to the right subject at the right time.
')
Types of sound in Java:
- The Java Sound API supports two basic types of audio (sound).
- Sound digitized and recorded directly as a file.
- Record as a MIDI file. Very remote, but similar to a musical notation, where musical instruments are played in the desired sequence.
These types are quite different in their essence and we will concentrate on the first, since in most cases we deal with sound, which either needs to be digitized and recorded from an external source to a file or, vice versa, to reproduce the sound previously recorded from such a file.
Preview
The Java Sound API is based on the concept of lines and mixers.
Further:
We will describe the physical and electrical characteristics of the analog audio representation as applied to the audio mixer .
We turn to the scenario of the beginning rock band, which in this case uses six microphones and two stereo speakers. This is what we need to understand how the audio mixer works.
Next we look at a number of Java Sound themes for programming, such as lines, mixers, formats for audio data, and more.
We will understand the connections existing between the SourceDataLine, Clip, Mixer, AudioFormat objects and create a simple program that plays audio.
Below we give an example of this program, which you can use to record and then play the recorded sound.
In the following, we will provide a full explanation of the software code used for this purpose. But not completely in this lesson.
Sample code and its consideration
Physical and electrical characteristics of analog sound
The goal of our lesson is to introduce you to the basics of Java programming using the Java Sound API.
The Java Sound API is based on the concept of an audio mixer, which is a device commonly used when playing sound almost anywhere: from rock concerts to listening to CDs at home. But before embarking on a detailed explanation of the audio mixer, it will be useful to get acquainted with the physical and electrical characteristics of the analog sound itself.
Look at pic. one
Vasya Pupyrkin pushes speech.
This drawing shows Vasya, who gives a speech using a system known as wide address. Such a system typically includes a microphone, amplifier, and loudspeaker. The purpose of this system is to strengthen Vasya’s voice so that it can be heard even in a large crowd.
Oscillations in the air
Briefly, when Vasya speaks, his vocal cords cause air particles to oscillate in his own larynx. This leads to the appearance of sound waves, which in turn, cause the membrane of the microphone to oscillate and then turn into electrical oscillations of a very small amplitude in accuracy, which simulate the original Vasiny sound vibrations. An amplifier, as its name implies, amplifies these electrical oscillations. Then they get to the loudspeaker, which performs the inverse transformation of amplified electrical oscillations already into very amplified sound waves, but which nevertheless exactly repeat the same waves born in the vocal cords of Vasi Pupyrkin.
Dynamic microphone
Now look at pic. 2, which shows a schematic of a microphone device called dynamic.
Fig. 2 Diagram of a dynamic microphone
Sound vibrations affect the membrane
The pressure of sound vibrations affects the flexible membrane inside the microphone. This causes the membrane to vibrate, while the vibrations of the membrane repeat the vibrations of the sound waves.
Moving coil
The coil is wound from a thin wire attached to the membrane of the microphone. As the membrane oscillates, the coil reciprocates in the magnetic field of the core made of a strong permanent magnet. And how else did Faraday set up, while an electric current arises in the coil.
The electrical signal repeats the shape of the sound waves.
Thus, from a very weak current induced in the coil, an alternating electrical signal is obtained that follows the shape of the sound waves that act on the membrane of the microphone. Further, this signal in the form of alternating voltage is fed to the input of the amplifier with one.
Speaker
In essence, the principle of operation of the loudspeaker repeats the device of a dynamic microphone, only turned on in the opposite direction. (Naturally, in this case, the winding wires are much thicker, and the membrane is much larger to ensure operation with an amplified signal)
Fluctuations in the loudspeaker membrane affect air particles and create powerful sound waves. The form of these waves exactly repeats the form of sound waves of much lower intensity, created by Vasin's vocal cords. But the intensity of the new waves is now enough for sound vibrations from Vasya to reach the ears of people standing even in the back rows of a large crowd.
Rock concert
By this time, you may wonder, what does all this have to do with the Java Sound API? But wait a little longer, we are leading the way to the basics of the audio mixer.
The scheme described above was quite simple. It consisted of Vasya Pupyrkin, a single microphone, amplifier and loudspeaker. Now consider the scheme with Fig. 4, which presents a scene prepared for a rock concert by an aspiring musical group.
Six microphones and two loudspeakers
In Fig. 4 six microphones located on the stage. Two loudspeakers (speakers) are placed on the sides of the stage. When a concert begins, performers sing or play music in each of the six microphones. Accordingly, we will have six electrical signals that must be individually amplified and then fed to both speakers. In addition to this, the performers can use various sound effects, such as reverb, which also need to be translated into electrical signals before they are sent to the loudspeakers.
Two speakers on the sides of the stage are designed to create the effect of stereo sound. That is, the electrical signal coming from the microphone located on the stage on the right should fall into the speaker located also on the right. Similarly, the signal from the microphone on the left must be fed to the loudspeaker located to the left of the scene. But the electrical signals from other microphones located closer to the center of the stage should already be transmitted to both speakers in appropriate proportions. And two microphones right in the center should broadcast their signal to both speakers equally.
Audio mixer
The task above is just performed by an electronic device called an audio mixer.
Audio line (channel)
Although the author is not an expert in audio mixers, in his modest understanding, a typical audio mixer has the ability to receive at the input a certain number of electrical signals independent of each other, each of which represents a source audio signal or a line (channel).
(The concept of the audio channel will become very important when we begin to deal in detail with the Java Sound API.
Independent processing of each audio channel
In any case, the standard audio mixer has the ability to amplify each audio line independently of the other channels. Also, the mixer usually has the ability to overlay sound effects, such as, for example, reverb on any of the audio lines. In the end, the mixer, as its name implies, can mix all individual electrical signals in the output channels as it is set, so as to control the contribution of each audio line to the output channels. (This control is usually called pan or panning - distribution in space).
Returning to stereo sound
Thus, in the diagram with Fig. 4, the audio mixer sound engineer has the ability to combine the signals from six microphones to receive two output signals, each of which is transmitted to its own loudspeaker.
For successful operation, the signal from each microphone must be given in an appropriate proportion, depending on the physical location of the microphone on the stage. (By changing the panning, a qualified sound engineer can change the contribution of each microphone if necessary, for example, if the lead vocalist moves during a concert around the stage).
Time to return to the world of programming
Let's now go back from the physical world to the world of programming. According to Sun: “Java Sound does not imply special hardware configuration; it is designed to allow various audio components to be installed into the system and be accessible to the user through the API. Java Sound supports standard input and output functionality from a sound card (for example, for recording and playing audio files), as well as the ability to mix multiple audio streams. ”
Mixers and Channels
As already mentioned, Java Sound API is built on the concept of mixers and channels. If we move from the physical world to the programming world, then Sun writes the following regarding the mixer:
“A mixer is an audio device with one or more channels. But a mixer that really mixes an audio signal must have several input channels of source sources and at least one output target channel. ”
Input lines can be instances of classes with SourceDataLine objects, and output lines can be TargetDataLine. The mixer can also receive a pre-recorded and looped sound as input, defining its input source channels as instances of class objects implementing the Clip interface.
Line interface channel.
Sun reports the following from the Line interface: “ Line is an element of a digital audio pipeline such as an audio input or output port, mixer, or route of audio data to or from a mixer. Audio data passing through the channel can be mono or multichannel (for example, stereo). ... The channel can have Controls, such as gain, pan and reverb. "
Combining terms together
So, the above quotes from Sun meant the following terms
SourceDataLine
TargetDataLine
Port
Clip
Controls
Fig. 5 shows an example of using these terms to build a simple audio output program.
Program script
From the program point of view 5 shows a Mixer object received with one Clip object and two SourceDataLine objects.
What is Clip
Clip is an object at the input of a mixer, the contents of which does not change with time. In other words, you load audio data into a Clip object before you lose it. Clip object audio content may be played one or more times. You can loop Clip and then the content will play again and again.
Input stream
The SourceDataLine object, on the other hand, is a stream object at the input of the mixer. This type of object can receive a stream of audio data and send it to the mixer in real time. The required audio data can be obtained from various sources, such as audio files, a network connection, or a memory buffer.
Different types of channels
Thus, the Clip and SourceDataLine objects can be viewed as input channels for the Mixer object. Each of these input channels can have its own: pan, gain and reverb.
Playing audio content
In such a simple system, the Mixer reads data from input lines, uses control to mix input signals, and provides output stream to one or more output channels, such as a speaker, line-out, headphone jack, and so on.
Listing 11 shows a simple program that captures audio data from a microphone port, stores this data in memory, and then plays it through the speaker port.
We will discuss only capture and playback. Most of the above program accounts for creating a window and a graphical interface for the user in order to be able to control the recording and playback. We will not discuss this part as going beyond the goal. But then we will look at capturing and playing data. We will discuss replay in this lesson, and capture in the following. Along the way, we illustrate the use of an audio channel with the Java Sound API.
The captured data is stored in the ByteArrayOutputStream object.
The data capture code fragment provides for reading audio data from a microphone and storing them as a ByteArrayOutputStream object.
The method called playAudio, which starts in Listing 1, plays audio data that was captured and stored in a ByteArrayOutputStream object.
private void playAudio() { try{ byte audioData[] = byteArrayOutputStream. toByteArray(); InputStream byteArrayInputStream = new ByteArrayInputStream( audioData); Listing 1
We start with the standard code
The program fragment in Listing 1 is not really related to Java Sound.
Its purpose is to:
- Convert previously saved data into an array of type byte.
- Get the input stream for a byte array of data.
We need this to make the audio data available for later playback.
Go to the Sound API
The code line in Listing 2 is already related to the Java Sound API.
AudioFormat audioFormat = getAudioFormat(); Listing 2
Here we briefly touch on the topic, which will be discussed in detail in the next lesson.
Two independent formats
Most often we are dealing with two independent formats for audio data.
The format of the file (any) that contains audio data (in our program it is not there yet, since the data is stored in memory)
The format of the presented audio data is in itself.
What is the audio format?
Here is what Sun writes about this:
“Each data channel has its own audio format associated with its data stream. The format (an instance of AudioFormat) determines the byte order of the audio stream. The format parameters can be the number of channels, the sampling frequency, the quantization width, the encoding method, etc. The conventional coding methods can be linear PCM pulse modulation and its varieties. ”
Byte sequence
The original audio data is a byte sequence of binary data. There are various options for how to order and interpret this sequence. We are not going to deal with all these options in detail, but we will discuss a little the audio format that we use here in our program.
Small retreat
Here we leave the playAudio method for now and look at the getAudioFormat method from Listing 2.
The complete getAudioFormat method is shown in Listing 3.
private AudioFormat getAudioFormat(){ float sampleRate = 8000.0F; int sampleSizeInBits = 16; int channels = 1; boolean signed = true; boolean bigEndian = false; return new AudioFormat( sampleRate, sampleSizeInBits, channels, signed, bigEndian); }//end getAudioFormat Listing 3
In addition to the declaration of initialized variables, the code in Listing 3 contains one executable expression.
AudioFormat object
The getAudioFormat method creates and returns an instance of an object of the AudioFormat class. Here is what Sun writes about this class:
“The AudioFormat class defines the specific ordering of data in an audio stream. Referring to the fields of the AudioFormat object, you can get information on how to correctly interpret the bits in a binary data stream. ”
We use the simplest constructor
The AudioFormat class has two types of constructors (we take the most trivial). For this constructor, the following parameters are required:
- Sample rate or sample rate per second (Available values: 8000, 11025, 16000, 22050 and 44100 samples per second)
- Data bit width (8 and 16 bits are available per sample)
- The number of channels (one channel for mono and two for stereo)
- Signed or unsigned data that is used in the stream (for example, the value changes from 0 to 255 or from -127 to +127)
- Byte order Big-endian or little-endian. (if you transfer 16-bit values by byte stream, it is important to know which byte comes first - the younger or the oldest, since both variants are encountered).
As you can see in Listing 3, in our case, we used the following parameters for an instance of an AudioFormat object.
- 8000 counts per second
- 16 data size
- data sign
- order little-endian
By default, data is encoded linear PCM.
The constructor we used creates an instance of the AudioFormat object using the linear pulse code modulation and parameters specified above (We will return to linear PCM and other encoding methods in the following lessons)
Returning to the playAudio method again
Now that we understand how the format of audio data in Java sound works, let's go back to the playAudio method. As soon as we want to play the available audio data, we need an object of class AudioInputStream. We will get an instance of it in Listing 4.
audioInputStream = new AudioInputStream( byteArrayInputStream, audioFormat, audioData.length/audioFormat. getFrameSize()); Listing 4
Parameters for the AudioInputStream constructor
- The constructor for the AudioInputStream class requires the following three parameters:
- The stream on which the instance of the AudioInputStream object will be based (as we see for this purpose we are served by an instance of the ByteArrayInputStream object created earlier)
- The audio data format for this stream (for this purpose, we have already created an instance of the AudioFormat object)
- Frame size (frame) for data in this stream (see the description below)
- The first two parameters are clear from the code in Listing 4. However, the third parameter is not so obvious in itself.
Get frame size
As we see in Listing 4, the value of the third parameter is created using calculations. This is just one of the attributes of the audio format, which we have not mentioned before, and it is called a frame.
What is a frame?
For simple linear PCM used in our program, the frame contains a set of samples for all channels at a given time.
Thus, the frame size is equal to the size of the count in bytes multiplied by the number of channels.
As you may have already guessed, a method called getFrameSize returns the frame size in bytes.
Frame size calculation
Thus, the length of audio data in a frame can be calculated by dividing the total number of bytes in the audio data sequence by the number of bytes in one frame. This calculation is used for the third parameter in Listing 4.
Getting a SourceDataLine Object
The next part of the program that we will discuss is a simple audio output system. As we can see from the diagram in Fig. 5, we will need a SourceDataLine object to solve this problem.
There are several ways to get an instance of the SourceDataLine object, all of which are very intricate. The code in Listing 5 gets and saves a reference to an instance of the SourceDataLine object.
(Note that this code does not just create an instance of the SourceDataLine object. It gets it in a rather roundabout way.)
DataLine.Info dataLineInfo = new DataLine.Info( SourceDataLine.class, audioFormat); sourceDataLine = (SourceDataLine) AudioSystem.getLine( dataLineInfo); Listing 5
What is a SourceDataLine object?
About this Sun writes the following:
“SourceDataLine is a data channel in which data can be recorded. It works as an input for a mixer. The application writes the byte sequence to SourceDataLine, which buffers the data and delivers it to its mixer. The mixer can transmit the data processed by it for the next stage, for example, to the output port.
Notice that the naming convention for such a pairing reflects the relationship between the channel and its mixer. ”
GetLine method for class AudioSystem
One way to get an instance of a SourceDataLine object is to call the static getLine method from the AudioSystem class (We will have a lot to report on in the following lessons).
The getLine method requires an input parameter of type Line.Info and returns a Line object that corresponds to the description in the already defined Line.Info object.
Another short retreat
Sun reports the following information about the Line.Info object:
“The channel has its own information object (an instance of Line.Info), which shows which mixer (if any) sends the mixed audio data as output directly to the channel, and which mixer (if any) receives the audio data as input directly from the channel. Line variations can correspond to subclasses of Line.Info, which allows you to specify other types of parameters related to specific types of channels ”
DataLine.Info object
The first expression in Listing 5 creates a new instance of the DataLine.Info object, which is a special form (subclass) of the Line.Info object.
There are several overloaded constructors for the DataLine.Info class. We have chosen to use the simplest. This constructor requires two parameters.
Class object
The first parameter is Class, which represents the class that we defined as SourceDataLine.class
The second parameter determines the desired data format for the channel. We use for it an instance of the AudioFormat object, which has already been defined earlier.
We are already there where necessary?
Unfortunately, we still do not have the SourceDataLine object we need. So far we have an object that only represents information about the SourceDataLine object we need.
Getting a SourceDataLine Object
The second expression in Listing 5 finally creates and stores an instance of SourceDataLine that we need so much. This is done by calling the static getLine method of the AudioSystem class and passing the dataLineInfo as a parameter. (In the next lesson we will look at how to get a Line object, working directly with the Mixer object).
The getLine method returns a reference to an object of type Line, which is the parent of SourceDataLine. Therefore, a downward type cast is necessary here before the return value is stored as a SourceDataLine.
Prepare to use the SourceDataLine object
Once we have an instance of the SourceDataLine object, we need to prepare it for opening and running, as shown in Listing 6.
sourceDataLine.open(audioFormat); sourceDataLine.start(); Listing 6
Opening method
As you can see in Listing 6, we sent the AudioFormat object to the opening method for the SourceDataLine object.
According to Sun, this is the method:
“Opens a line (channel) with a previously defined format, allowing it to receive any system resources it requires and to be in working (operational) state”
Opening state
There are some more that Sun writes about him in this thread.
“Opening and closing a channel affects the allocation of system resources. Successful opening of the channel ensures that all necessary resources are provided to the channel.
Opening the mixer, which has its input and output ports for audio data, includes, among other things, enabling the platform hardware on which the operation takes place and initializing the necessary software components.
Opening a channel, which is a route for audio data to or from a mixer, includes both its initialization and receiving not at all limitless mixer resources. In other words, a mixer has a finite number of channels, so several applications with their own channel requirements (and sometimes even one application) must correctly share mixer resources) ”
Calling the start method for a channel
According to Sun, calling the start method for a channel means the following:
“The channel is allowed to use I / O lines. If an attempt is made to use an already operating line, the method does nothing. But after emptying the data buffer, the line resumes I / O start, starting with the first frame, which it did not have time to process, after the buffer was fully loaded. "
In our case, of course, the channel did not stop. Since we launched it for the first time.
Now we have almost everything we need.
At this point, we have received all the audio resources we need to play the audio data that we have previously recorded and stored in an instance of the ByteArrayOutputStream object. (Recall that this object exists only in the computer’s RAM).
Run the threads
We will create and run the stream to play the audio. The code in Listing 7 creates and starts this thread.
(Do not confuse the start method call on this thread with the start method call in the SourceDataLine object from Listing 6. These are completely different operations)
Thread playThread = new Thread(new PlayThread()); playThread.start(); } catch (Exception e) { System.out.println(e); System.exit(0); }//end catch }//end playAudio Listing 7
Simple code
A fragment of the program from Listing 7 is very simple, but it does show an example of multi-thread programming in Java. If you don’t understand it, you’d better get acquainted with this topic in specialized Java training topics.
Once the stream is started, it will work until all previously recorded audio data is played to the end.
New Thread object
The code in Listing 7 creates an instance of the Thread object (stream) belonging to the PlayThread class. This class is defined as an internal class in our program. Its description begins in Listing 8.
class PlayThread extends Thread{ byte tempBuffer[] = new byte[10000]; Listing 8
Thread run method
With the exception of declaring a variable tempBuffer (which refers to an array of bytes), the full definition of this class is simply the definition of the run method. As you should already know, calling the start method in a Thread object causes the run method of this object to execute.
The run method for this thread starts in Listing 9
public void run(){ try{ int cnt; // // -1 // while((cnt = audioInputStream. read(tempBuffer, 0, tempBuffer.length)) != -1){ if(cnt > 0){ // // // // . sourceDataLine.write( tempBuffer, 0, cnt); }//end if }//end while Listing 9
The first part of the program fragment in the run method
The run method contains two important parts, the first of which is shown in Listing 9.
In sum, it uses a loop to read the audio data from the AudioInputStream object and pass it to the SourceDataLine object.
The data sent to the SourceDataLine object is automatically transferred to the default audio output. This may be a built-in computer speaker or a line-out. (We will learn how to determine the necessary sound devices in the following lessons). The variable cnt and temp buffer buffer is used to control the flow of data between read and write operations.
Reading data from AudioInputStream
A read loop from the AudioInputStream object, reads the specified maximum number of data bytes from the AudioInputStream and places their byte array.
Return value
Next, this method returns the total number of bytes read, or -1, if the end of the recorded sequence was reached. The number of bytes read is stored in the variable cnt.
Write cycle in SourceDataLine
If the number of bytes read is greater than zero, then a transition to the data writing cycle in SourceDataLine occurs. In this loop, the audio data goes to the mixer. Bytes are read from the byte array in accordance with their indices and written into the channel buffer.
When the input stream dries up
When the reading cycle returns -1, this means that all previously recorded audio data has ended and then the control is transferred to the program fragment in Listing 10.
sourceDataLine.drain(); sourceDataLine.close(); }catch (Exception e) { System.out.println(e); System.exit(0); }//end catch }//end run }// PlayThread Listing 10
Lock and wait
The code in Listing 10 calls the drain method for a SourceDataLine object so that the program can block and wait for the internal buffer to empty into the SourceDataLine. When the buffer is empty, this means that the entire next portion is delivered to the sound output of the computer.
Close SourceDataLine
The program then calls the close method to close the channel, thus showing that all system resources used by the channel are now free. Sun reports the following channel closure:
“The closure of the channel indicates that all the resources involved for this channel can be released. To release resources, the application must close the channels, whether they are independently involved or not, as well as when the application ends. Mixers are supposed to share system resources and can be closed and opened repeatedly. Other channels may or may not support reopening after they have been closed. In general, the mechanisms for opening lines vary according to different subtypes. "
And now the end of the story
So here we gave an explanation of how our program uses the Java Sound API in order to ensure the delivery of audio data from the internal memory of the computer to the sound card.
Run the program
Now you can compile and run the program from Listing 11, which crowns the end of our lesson.
Capture and play audio data
The program demonstrates the ability to record data from a microphone and play them through the sound card of your computer. Instructions for using it are very simple.
Run the program. A simple GUI GUI, shown in Figure 6, should appear on the screen.
- Click the Capture button and record any sounds on the microphone.
- Click the Stop button to stop recording.
- Click the Playback button to play the recording through your computer's audio output.
If you do not hear anything, try increasing the sensitivity of your microphone or the volume of the speakers.
The program keeps a record in the computer’s memory, so be careful. If you try to save too much audio data, you may run out of memory.
Conclusion
- We found that the Java Sound API is based on the concept of channels and mixers.
- We received initial information about the physical and electrical characteristics of the analog sound, to then understand the audio mixer device.
- We used the amateur rock concert scenario using six microphones and two stereo speakers to describe the possibility of using an audio mixer.
- We discussed a number of Java Sound programming topics, including mixers, channels, data format, and more.
- We explained to ourselves the general interconnections between the SourceDataLine, Clip, Mixer, AudioFormat objects and the ports in a simple audio output program.
- We got acquainted with the program that allows us to initially record and then play audio data.
- We received a detailed explanation of the code used to play audio data previously recorded in the computer's memory.
What's next?
In this lesson, we learned that the Java Sound API is based on the concept of mixers and channels. However, the code we discussed did not explicitly include mixers. The AudioSystem class provided us with static methods that make it possible to write audio processing programs without directly accessing the mixers. In other words, these static methods take the mixers away from us to the background.
. , , , .
import javax.swing.*; import java.awt.*; import java.awt.event.*; import java.io.*; import javax.sound.sampled.*; public class AudioCapture01 extends JFrame{ boolean stopCapture = false; ByteArrayOutputStream byteArrayOutputStream; AudioFormat audioFormat; TargetDataLine targetDataLine; AudioInputStream audioInputStream; SourceDataLine sourceDataLine; public static void main( String args[]){ new AudioCapture01(); }//end main public AudioCapture01(){ final JButton captureBtn = new JButton("Capture"); final JButton stopBtn = new JButton("Stop"); final JButton playBtn = new JButton("Playback"); captureBtn.setEnabled(true); stopBtn.setEnabled(false); playBtn.setEnabled(false); captureBtn.addActionListener( new ActionListener(){ public void actionPerformed( ActionEvent e){ captureBtn.setEnabled(false); stopBtn.setEnabled(true); playBtn.setEnabled(false); // // // Stop captureAudio(); } } ); getContentPane().add(captureBtn); stopBtn.addActionListener( new ActionListener(){ public void actionPerformed( ActionEvent e){ captureBtn.setEnabled(true); stopBtn.setEnabled(false); playBtn.setEnabled(true); // // stopCapture = true; } } ); getContentPane().add(stopBtn); playBtn.addActionListener( new ActionListener(){ public void actionPerformed( ActionEvent e){ // // playAudio(); } } ); getContentPane().add(playBtn); getContentPane().setLayout( new FlowLayout()); setTitle("Capture/Playback Demo"); setDefaultCloseOperation( EXIT_ON_CLOSE); setSize(250,70); setVisible(true); } // // // ByteArrayOutputStream private void captureAudio(){ try{ // audioFormat = getAudioFormat(); DataLine.Info dataLineInfo = new DataLine.Info( TargetDataLine.class, audioFormat); targetDataLine = (TargetDataLine) AudioSystem.getLine( dataLineInfo); targetDataLine.open(audioFormat); targetDataLine.start(); // // // // Thread captureThread = new Thread( new CaptureThread()); captureThread.start(); } catch (Exception e) { System.out.println(e); System.exit(0); } } // // , // ByteArrayOutputStream private void playAudio() { try{ // // byte audioData[] = byteArrayOutputStream. toByteArray(); InputStream byteArrayInputStream = new ByteArrayInputStream( audioData); AudioFormat audioFormat = getAudioFormat(); audioInputStream = new AudioInputStream( byteArrayInputStream, audioFormat, audioData.length/audioFormat. getFrameSize()); DataLine.Info dataLineInfo = new DataLine.Info( SourceDataLine.class, audioFormat); sourceDataLine = (SourceDataLine) AudioSystem.getLine( dataLineInfo); sourceDataLine.open(audioFormat); sourceDataLine.start(); // // // // Thread playThread = new Thread(new PlayThread()); playThread.start(); } catch (Exception e) { System.out.println(e); System.exit(0); } } // // AudioFormat private AudioFormat getAudioFormat(){ float sampleRate = 8000.0F; //8000,11025,16000,22050,44100 int sampleSizeInBits = 16; //8,16 int channels = 1; //1,2 boolean signed = true; //true,false boolean bigEndian = false; //true,false return new AudioFormat( sampleRate, sampleSizeInBits, channels, signed, bigEndian); } //===================================// // // class CaptureThread extends Thread{ byte tempBuffer[] = new byte[10000]; public void run(){ byteArrayOutputStream = new ByteArrayOutputStream(); stopCapture = false; try{ while(!stopCapture){ int cnt = targetDataLine.read( tempBuffer, 0, tempBuffer.length); if(cnt > 0){ // byteArrayOutputStream.write( tempBuffer, 0, cnt); } } byteArrayOutputStream.close(); }catch (Exception e) { System.out.println(e); System.exit(0); } } } //===================================// // // class PlayThread extends Thread{ byte tempBuffer[] = new byte[10000]; public void run(){ try{ int cnt; // -1 while((cnt = audioInputStream. read(tempBuffer, 0, tempBuffer.length)) != -1){ if(cnt > 0){ // // // // sourceDataLine.write( tempBuffer, 0, cnt); } } sourceDataLine.drain(); sourceDataLine.close(); }catch (Exception e) { System.out.println(e); System.exit(0); } } } //===================================// }//end outer class AudioCapture01.java 11
Source: https://habr.com/ru/post/434424/
All Articles