Veeam solution for backup and recovery of virtual machines on the Nutanix AHV platform. Part 1
If someone has not heard, then we inform: in the past year, the company Veeam Software has implemented support for backup and recovery of virtual machines on the Nutanix Acropolis Hypervisor (AHV) platform. For this purpose, a special infrastructure component Veeam Backup was developed - a secondary proxy server (proxy appliance), which received a beautiful name proper Veeam Availability for Nutanix AHV .
It is a virtual module that allows you to backup and restore VMs on Nutanix AHV clusters, leveraging the capabilities of Veeam Backup & Replication. The solution functions at the hypervisor level: without implementing agents into the guest OS, it creates a backup VM at the image level, as of the current time (including the OS, application data, etc.) and stores it in the Veeam repository.
From these backups, you can then recover in any scenario: restore the entire VM as a whole or individual disks, files, application objects. Both Microsoft Azure recovery, disk export, and instant recovery to VM on the Hyper-V platform are supported.
')
All interested in asking under the cat.
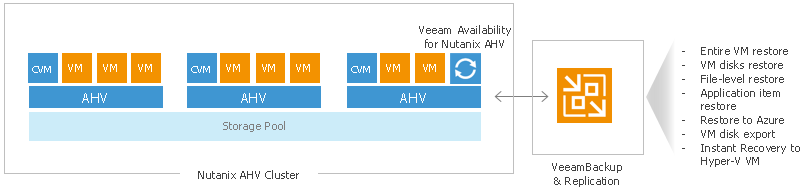
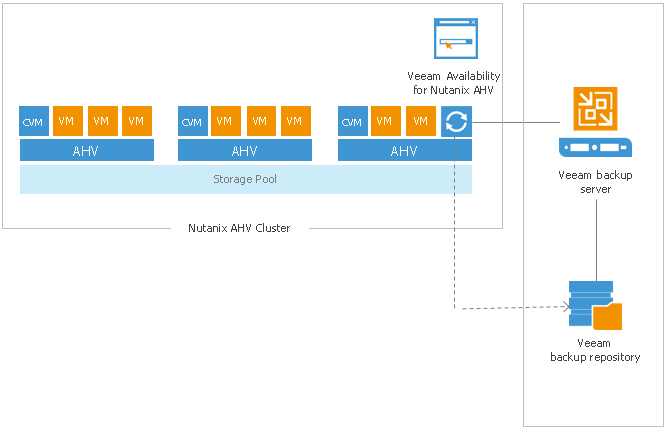
As already mentioned, the main integration component is implemented as a proxy. This is a Linux OS virtual machine that coordinates the interaction between Nutanix AHV and the Veeam backup server. To work with AHV, this proxy uses the Nutanix RESTful API, and performs the following proxy operations:
The proxy is deployed as a virtual machine on a Nutanix AHV cluster, one machine per cluster (so if you plan to back up VMs from two clusters, you will need to deploy two proxies). To deploy, you need to specify the VMDK file, specially prepared by Veeam and downloaded from the site, as a boot disk for VMs in the Nutanix AHV Cluster cluster.
An integrated solution is managed using a web portal in which a variety of operations are available to the user:
But there is also the Veeam Backup & Replication console, from which recovery actions are controlled:
Note: Architecture details are discussed in Veeam Availability for Nutanix AHV Best Practices (in English).
As already mentioned, to deploy a proxy, it is enough to specify the prepared Veeam VMDK disk as a boot disk for VMs in the Nutanix AHV Cluster cluster.
Supported versions of Nutanix AOS:
Processor: x86-64; 4 cores minimum, plus 1 core for each additionally running task in parallel execution (by default, you can start processing 3 machines at the same time).
RAM: 4 GB of RAM plus 1 GB of RAM for each additional task.
Disk space: 1 GB.
Required ports: listed here .
Access Settings:
By default, SSH is disabled for the solution, and the web interface in this version does not provide the ability to enable it. Therefore, we will have to use the AHV console - we go to it from the machine on which our proxy is deployed, and execute one of the following commands:
Licensed objects are virtual machines that will be backed up (we call them “protected VMs”). Wherein:
As it should be, there is a commercial license and a trial license for solving.
There is also a free license for non-commercial use - the NFR license - you can read about it here .
Important! After the expiration of the full (trial or paid) license you can only restore VMs from backups, backup will not be available.
Since the solution includes Veeam Backup & Replication, after downloading the license you have 2 files:
The path to the first file will need to be specified in the web console Veeam Availability for Nutanix AHV (after the setup has completed):
Deployment takes place in several stages:
Consider the third and subsequent stages in more detail. The third stage consists of several steps:
First of all, we need to download the image from the Veeam website and then upload it to Nutanix AHV.
If something is not obvious, you can read the documentation for working with the Nutanix Prism console.
We are still on the Explore tab in the VMs section of the Nutanix Prism console. Now we need to complete these steps:
For this:
Now open a browser URL of the form https: // <your_IP_address>: 8100 - this is the URL of the web console of the integrated solution on the proxy VM:

For login use admin account (login: admin ; password: admin ).
Note: Parallel sessions of two or more users are not supported — someone else's login will terminate your console session.
After you log into the web console on the VM proxy, the Veeam Availability Software for Nutanix AHV installation wizard will start. Follow his steps:
You will be redirected to the login screen again. Enter the new admin password to access the web console. Hurray, we almost finished this stage! It remains a little bit.
First, carefully review the limitations:
Then follow the procedure for adding a cluster:
It is a virtual module that allows you to backup and restore VMs on Nutanix AHV clusters, leveraging the capabilities of Veeam Backup & Replication. The solution functions at the hypervisor level: without implementing agents into the guest OS, it creates a backup VM at the image level, as of the current time (including the OS, application data, etc.) and stores it in the Veeam repository.
From these backups, you can then recover in any scenario: restore the entire VM as a whole or individual disks, files, application objects. Both Microsoft Azure recovery, disk export, and instant recovery to VM on the Hyper-V platform are supported.
')
All interested in asking under the cat.
A few words about architecture
As already mentioned, the main integration component is implemented as a proxy. This is a Linux OS virtual machine that coordinates the interaction between Nutanix AHV and the Veeam backup server. To work with AHV, this proxy uses the Nutanix RESTful API, and performs the following proxy operations:
- Assigns resources needed for backup and restore
- Reads / writes data to AHV datastores.
- Transfers VM data to / from Veeam repository
- Monitors backup jobs
- Performs data compression and deduplication
- Monitors storage policy compliance for backups
- And, of course, is actively working when performing recovery.
The proxy is deployed as a virtual machine on a Nutanix AHV cluster, one machine per cluster (so if you plan to back up VMs from two clusters, you will need to deploy two proxies). To deploy, you need to specify the VMDK file, specially prepared by Veeam and downloaded from the site, as a boot disk for VMs in the Nutanix AHV Cluster cluster.
An integrated solution is managed using a web portal in which a variety of operations are available to the user:
- Configuring Connections to Veeam Backup Infrastructure Components
- Setting up and running backup tasks for VM on Nutanix AHV
- Restore VMs to Nutanix AHV Clusters
- Recover VM disks and connect them to machines hosted on Nutanix AHV clusters
But there is also the Veeam Backup & Replication console, from which recovery actions are controlled:
- Restore guest OS files
- Application object recovery
- Export VM disks to VMDK, VHD and VHDX files
- Recovery in Microsoft Azure
Note: Architecture details are discussed in Veeam Availability for Nutanix AHV Best Practices (in English).
System requirements
As already mentioned, to deploy a proxy, it is enough to specify the prepared Veeam VMDK disk as a boot disk for VMs in the Nutanix AHV Cluster cluster.
Supported versions of Nutanix AOS:
- Paid - Nutanix AOS 5.1.1.1 or higher
- Free Edition Community Edition - 2017/07/20 (AOS v 2017/07/08)
Virtual hardware requirements for this VM
Processor: x86-64; 4 cores minimum, plus 1 core for each additionally running task in parallel execution (by default, you can start processing 3 machines at the same time).
RAM: 4 GB of RAM plus 1 GB of RAM for each additional task.
Disk space: 1 GB.
Required ports: listed here .
Access Settings:
By default, SSH is disabled for the solution, and the web interface in this version does not provide the ability to enable it. Therefore, we will have to use the AHV console - we go to it from the machine on which our proxy is deployed, and execute one of the following commands:
- To enable SSH for one session, run the command
sudo /etc/init.d/ssh start - To permanently enable SSH, issue the command
sudo systemctl enable ssh.socketsudo /etc/init.d/ssh restart
Licensing
Licensed objects are virtual machines that will be backed up (we call them “protected VMs”). Wherein:
- VM templates are considered ordinary machines.
- The machines for which only archiving to tape (tape job) or transfer to a backup site (backup copy job) is performed are not considered
As it should be, there is a commercial license and a trial license for solving.
- The trial is valid for 30 days, you can download it from here .
- Paid is 2 types:
- Subscription (subscription) - for a period of 1 to 5 years.
- Rental (rent) - for a period of 1 to 12 months with the possibility of extension.
There is also a free license for non-commercial use - the NFR license - you can read about it here .
Important! After the expiration of the full (trial or paid) license you can only restore VMs from backups, backup will not be available.
Since the solution includes Veeam Backup & Replication, after downloading the license you have 2 files:
- Veeam Availability for Nutanix AHV license, Veeam Agent for Linux and Veeam Agent for Windows.
- License for Veeam Backup & Replication.
The path to the first file will need to be specified in the web console Veeam Availability for Nutanix AHV (after the setup has completed):
- In the main menu, click on the settings icon (this is the gear, as usual) and select the Appliance Settings item.
- Go to the Summary tab and click License .
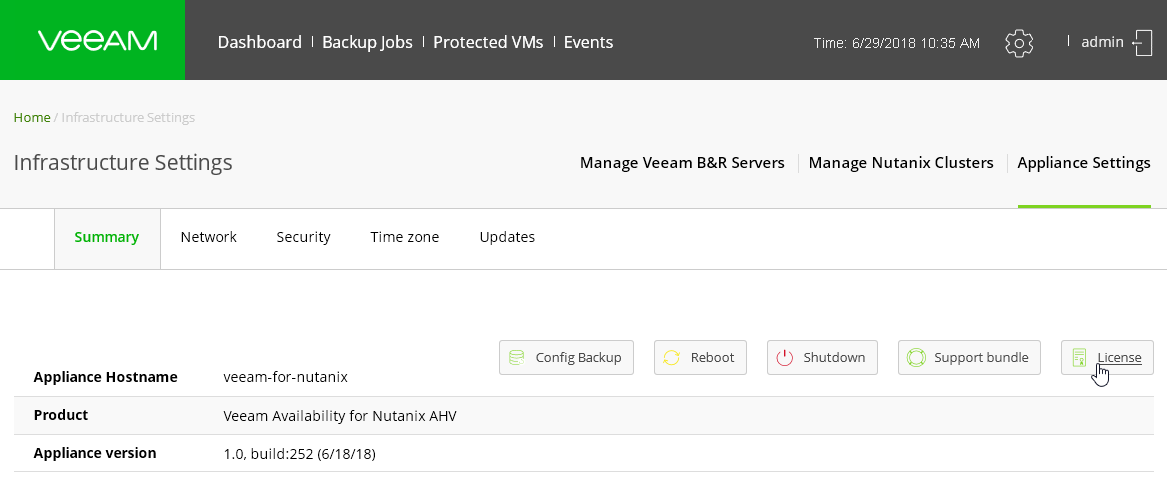
- In the dialog that opens, click Install License and specify the path to the file.
Deploy Solution
Deployment takes place in several stages:
- First you need to install Veeam Backup & Replication (as described here ). I note that you can also use Veeam Backup & Replication that is already working in your infrastructure.
Important! Veeam Availability for Nutanix AHV integrated solution is supported only for Veeam Backup & Replication 9.5 Update 3a and higher. Only 1 Veeam Backup & Replication server can be connected to Veeam Availability for Nutanix AHV infrastructure. - You need to set up a backup repository (as described here ).
Important! You can use a regular repository, a scalable repository or a repository on the ExaGrid storage system. Devices with built-in deduplication HPE StoreOnce and Dell EMC Data Domain as a repository will not be supported. - Then, on the AHV cluster, where the machines to be backed up are running, you need to deploy the VM where the proxy software will work - Veeam Availability for Nutanix AHV itself.
- Next, you need to add the Veeam backup server to the Veeam Availability for Nutanix AHV infrastructure.
- And in the final, you need to configure access rights to the Veeam repository for the accounts, under which the AHV machines will be backed up.
Consider the third and subsequent stages in more detail. The third stage consists of several steps:
- Disk Image Upload for Proxy VM
- Creating VM for proxy
- Login to the web proxy console
- Installing software on VM proxy
Step 1. Download the disk image for the proxy VM
First of all, we need to download the image from the Veeam website and then upload it to Nutanix AHV.
- We download the disk image Veeam Availability for Nutanix AHV from here .
- Go to the web console Nutanix Prism.
- Go to the Explore tab and in the left panel select Images .
- Click Add Image .
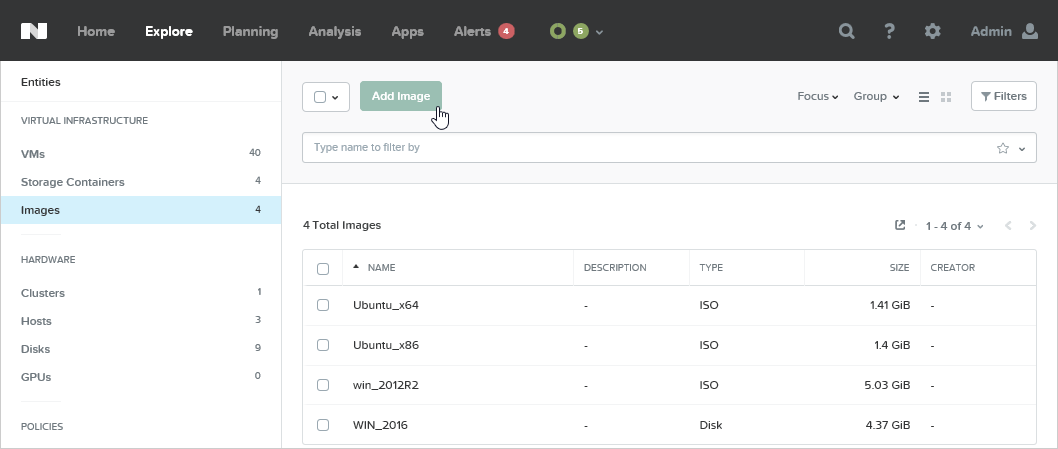
- Then click Add File and specify our downloaded VMDK file.
- Enter the name and short description for our image and click Save .
Step 2. Create a clean Nutanix VM
- On the same Explore tab, in the left pane, select VMs .
- Click the Create VM button.

- In the window that opens, enter the name of the new machine and specify the computational characteristics ( Compute Details ). Remember the system requirements!
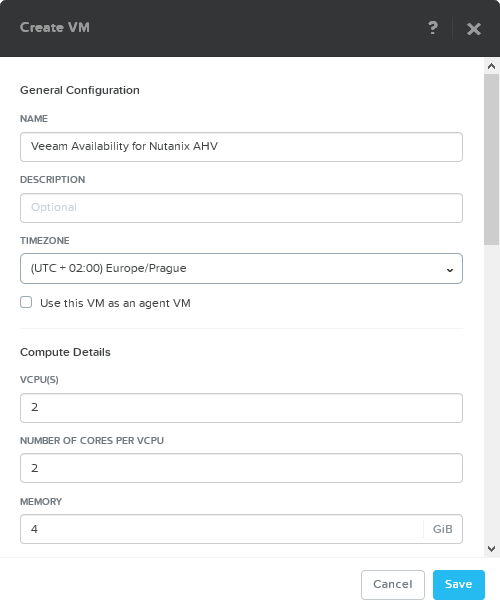
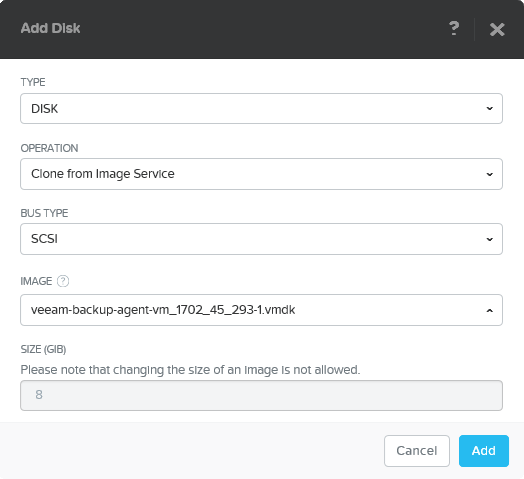
- Now we will indicate what will become the boot disk for this machine. In the Disks section, click Add New Disk .
- In the window that opens, configure the settings for the boot disk:
- From the TYPE list, select DISK .
- From the OPERATION list, select Clone from Image Service (clone from image).
- From the IMAGE list, select our VMDK file that we downloaded in the previous step.
- Click Add .
- Go to the Network Adapters (NIC) section and click Add New NIC to add a new network adapter.
- Select the desired VLAN and click Add .
Note: Check that the specified VLAN has access to the DHCP server, as well as to the Veeam Backup & Replication server and the Nutanix cluster.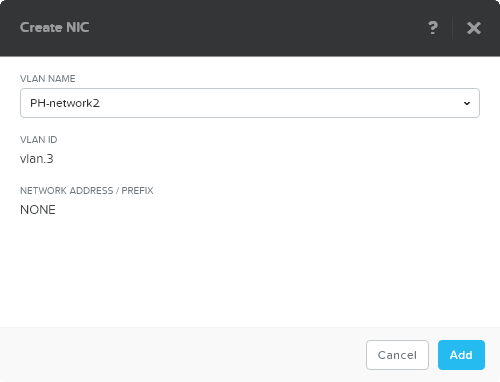
- Click Save . New car is ready.
If something is not obvious, you can read the documentation for working with the Nutanix Prism console.
Step 3. Logging in to the Veeam Web Console Availability for Nutanix AHV
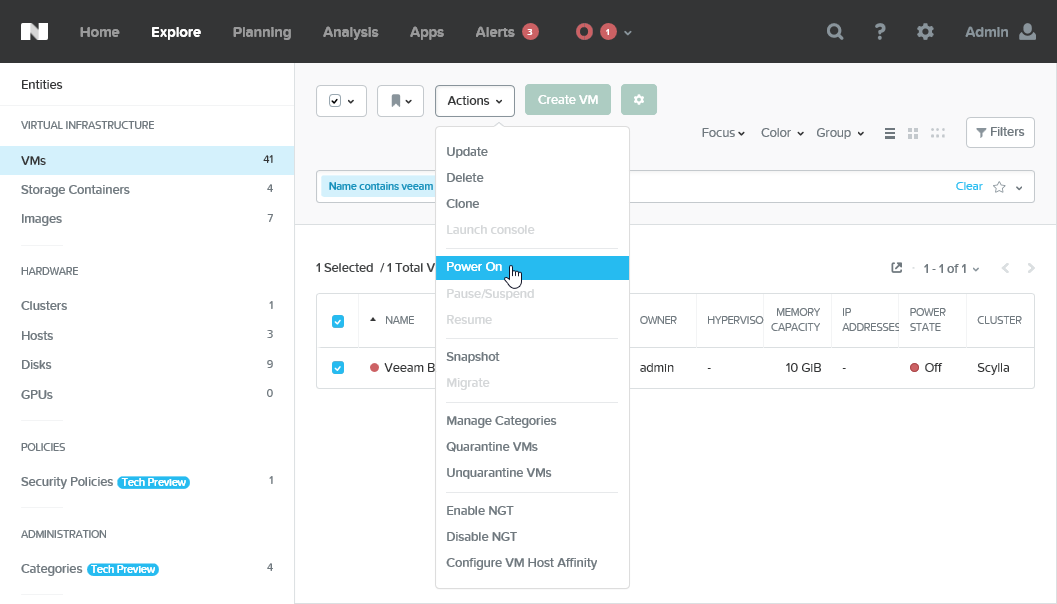
We are still on the Explore tab in the VMs section of the Nutanix Prism console. Now we need to complete these steps:
- From the list of virtual machines, select the newly created machine designed for our proxy.
- Click Actions and select the Power On command to turn on the machine.
- Go to the selected machine and open the TTY console.
- After the OS starts, the screen displays the URL of the web console that we need to access. Open this URL in a browser.
Note: You may have to wait 10 seconds and then press ENTER .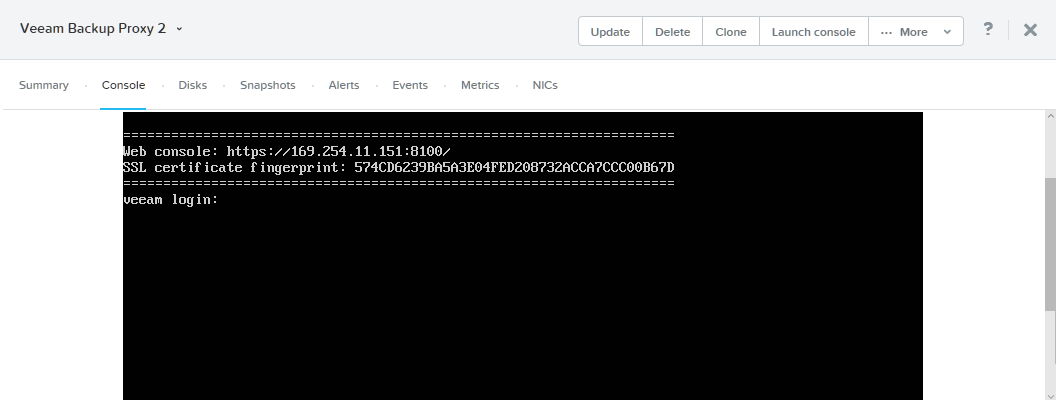
- If you do not have a DHCP server configured, then you will have to set a static IP address for the VM.
For this:
- Log into the console with the initial account (login: veeam ; password: veeam ).
- Run the command
sudo nano /etc/network/interfaces - In the file that opens, find the fragment:
auto eth0
iface eth0 inet dhcp
And replace it with this (specifying the necessary network parameters):auto eth0
iface eth0 inet static
address <your_IP_address>
netmask <your_netmask>
gateway <your_gateway> - Save the file. Restart the Veeam Network Service and Service:
sudo service networking restart
sudo service VeeamBackupAgent restart
Now open a browser URL of the form https: // <your_IP_address>: 8100 - this is the URL of the web console of the integrated solution on the proxy VM:
For login use admin account (login: admin ; password: admin ).
Note: Parallel sessions of two or more users are not supported — someone else's login will terminate your console session.
Step 4. Install the Veeam Software for Nutanix AHV
After you log into the web console on the VM proxy, the Veeam Availability Software for Nutanix AHV installation wizard will start. Follow his steps:
- Click Install .

- Read and agree to use.
- In the Credentials step, change the default admin password to your own. It must contain at least 6 alphanumeric characters and be different from the old one.
- In the Network Settings step, specify the name of the machine on which the proxy is running and its network settings. Another option is to select the option to automatically obtain the IP address Obtain an IP address automatically .

- In the Summary step, check the settings and click Finish .
You will be redirected to the login screen again. Enter the new admin password to access the web console. Hurray, we almost finished this stage! It remains a little bit.
Step 5. Add the Nutanix AHV cluster
First, carefully review the limitations:
- You can specify only 1 Nutanix AHV cluster for one proxy.
- When specifying the cluster settings, you cannot specify the IP addresses of Prism Central.
- [For Nutanix Community Edition 2017.07.20] For authentication, use the built-in admin account.
Then follow the procedure for adding a cluster:
- We go to the web console of our proxy.
- In the main menu, click on the settings icon (traditionally gear) and select Manage Nutanix Clusters .
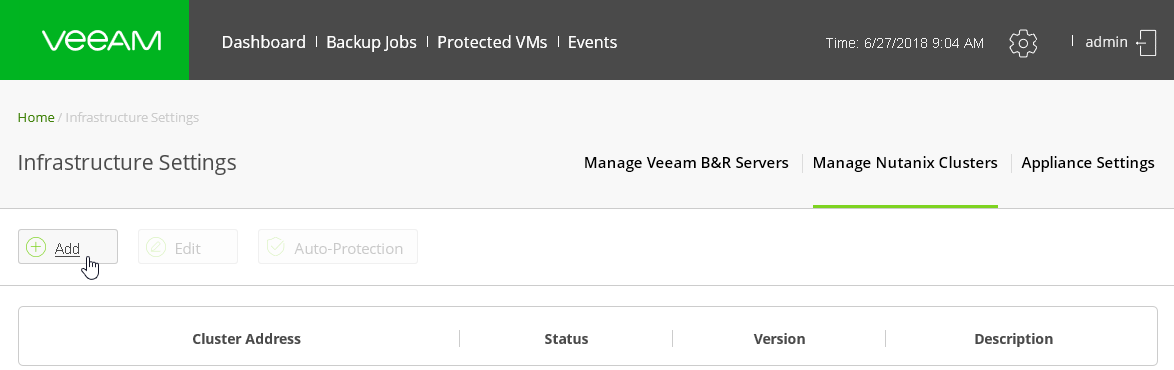
- Click the Add button.
- Specify the settings for the Nutanix AHV cluster:
- In the Cluster name or IP field, specify the IP address or FQDN of the Nutanix AHV server.
- In the Port field, specify the port through which the proxy will communicate with Nutanix AHV (by default 9440 ).
- [optional] In the Description field, enter the description of the Nutanix cluster.
- In the User Name and Password fields, enter the username and password to access the Nutanix AHV cluster.
Important! This account must have the Cluster Admin role. - Click Save .

On this for today, perhaps, everything. Next time, we’ll finish with the configuration and learn how to back up and restore the VM. But it will be in the new, 2019 year.
Happy New Year, dear colleagues and readers! All the best to you and your loved ones!
Source: https://habr.com/ru/post/434402/
All Articles