Regular shadow shadows in the Phaser, or the use of bicycles
Two years ago, I experimented with substances shadows in the Phaser 2D. At the last Ludum Dare, we suddenly decided to make a horror, but what a horror without shadows and light! I crunched my knuckles ...
... And not a damn thing for LD. The game certainly has a little light and shadows, but this is a pitiful semblance of what it really should have been.
After returning home after sending the game to the competition, I decided to “close the gestalt” and finish these unfortunate shadows. What happened - you can feel in the game , play around in the demo , look at the picture, and read the article.

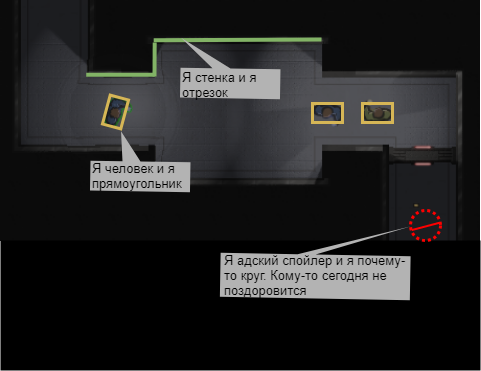
As always in such cases, it makes no sense to try to write a general solution, you need to focus on a specific situation. The game world can be represented in the form of segments - at least those entities that cast shadows. The walls are rectangles, people are rectangles, only turned, hellish spoiler is a circle, but it can be simplified in the cut-off model to a length of diameter, which is always perpendicular to the beam of light.
There are several light sources (20-30), and all of them are circular (spotlights) and are conditionally lower than the illuminated objects (so the shadows can be infinite).
')
I saw in my head the following ways to solve the problem:
In the end, I settled on method 2. However, the article described in the article did not fully suit me. There, the texture was also built in the shader with the help of rakest - the shader in the loop went from the light source in the direction of the beam and looked for an obstacle. In my past experiments, I also did rake in the shader, and it was very expensive, though universal.
“We have some segments in the model,” I thought, “And 10-20 segments fall into the radius of any light source. Can't I quickly calculate the distance map based on this? ”.
So I decided to do it.
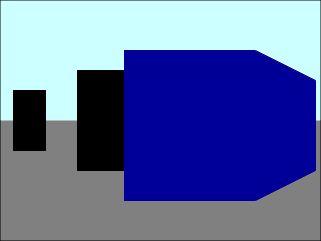
For a start, I just brought up the walls, the conventional “main character” and light sources on the screen. Around the light sources cut out in the mist a circle of pure clear light. To get this:
 ( demo )
I immediately began to do with the shader, so as not to relax. It was necessary to transfer to it for each light its coordinates and range (beyond which the light does not reach), this is done simply through a uniform array. And then in the shader (which is fragmentary, which is performed for each pixel on the screen), it remains to be seen whether the current pixel enters the lit circle or not.
Now we need to understand for each light source which segments will cast a shadow. Rather, which parts of the segments - in the figure below we are not interested in the “red” parts of the segment, since the light still does not reach them.
Note: intersection definition is a kind of preliminary optimization. It is necessary in order to reduce the time of further processing, eliminating large pieces of segments outside the radius of action of the light source. It makes sense when we have a lot of segments, whose length is much larger than the radius of the “glow”. If this is not the case, and we have many short segments, it may be correct not to waste time on determining the intersection and process the segments as a whole, since time savings still fail.

To do this, I used the well-known formula for finding the intersection of a straight line and a circle, which everyone remembers by heart from a school geometry course ... in someone else's imaginary world. I never remembered it, so I had to google it .
Encode, look what happened.
 ( demo )
Like the rules. Now we know what segments can cast a shadow and can perform raikast.
Here we also have options:

Here - segment (wall), - the center of the light source - perpendicular to the segment.
Let be - the angle to the normal for which you need to know the distance from the source to the segment, - point on the segment where the beam falls. Triangle - rectangular, - the leg, and its length is known and constant for this segment, - the desired length. . If you know the step in advance (and we know it), then you can calculate the reverse cosine table in advance and look for distances very quickly.
I will give an example of the code of such a table. Almost all work with corners is replaced with work with indices, i.e. integers from 0 to N, where N = the number of steps in the circle (i.e. the step angle = )
Of course, this method introduces an error for the cases when the initial angle ACD is not a multiple of the step. But for 512 steps, I visually do not see any difference.
So, what we already know how to do:
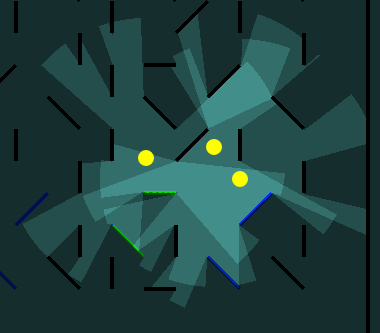
Here is how this table looks like if you draw it with rays.
 ( demo )
And this is how it looks for 10 light sources, if written in texture.

Here, each pixel horizontally corresponds to a corner, and color to a distance in pixels.
All this is written in js like this using imageData
Now we transfer the texture to our shader, which already has the coordinates and radii of the light sources. And we process it like this:
Result:
 ( demo )
Now you can bring some beauty. Let the light fade with distance, and the shadows will be blurred.

To blur, I look at the adjacent corners, + - step, like this:
If you put everything together and measure FPS, it turns out like this:
This result suited me completely. One could still play around with the color of the lighting, but I did not. A little more and adding some normal maps, I posted an updated version of NOPE. She looked like this now:
Then he began to prepare an article. I looked at this gif and thought.
“So it's almost like a pseudo-3d view, like in Wolfenstein,” I exclaimed (yes, I have a good imagination). And in fact - if we assume that all the walls are of the same height, then the distance map is enough for us to build the scene. Why not try?
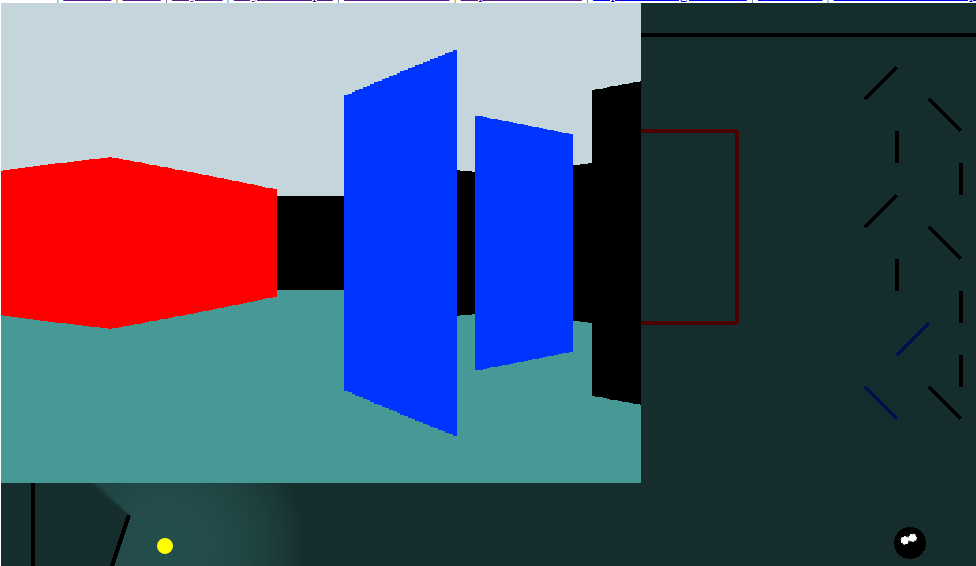
The scene should look something like this.
Hence, our task:
We get as ordered:
 ( demo )
Add lighting - in the same way, we iterate over the light sources and check the world coordinates. And - the final touch - add textures. To do this, in the texture with distances it is also necessary to record the displacement u for the wall texture at this point. This is where the b channel came in handy.
 ( demo )
Perfect.
Just kidding
Not perfect, of course. But damn it, I also read how to make my Wolfenstein 15 years ago through racast, and I wanted to do it all, but here such an opportunity!
At the beginning of the article I mentioned another secret method. Here he is:
In fact, if you need to make a game, then it will be the most correct and fastest way. Why do you need to fence your bikes and solve long-solved problems?
But why?
In 10th grade, I moved to another school and faced math problems. I do not remember the exact example, but this was an equation with degrees, which, by all indications, had to be simplified, but it just could not be done. Desperate, I consulted with my sister, and she said: “add on both sides so x 2 and everything will go bad.” And this was the decision: add something that was not.
When I helped my friend build a house much later, I needed to put a bar in the threshold - to fill a niche. And here I stand and sort out the trimming bars. One seems to fit, but not quite. Others are much smaller. I think I think how to gather the word happiness, and my acquaintance says: “they drank so-called circular grooves where it interferes”. And the big bar is already in place.
These stories are united by such an effect, which I will call the “inventory effect”. When you try to make a decision from existing parts, without seeing in these details material that can be processed and refined. The numbers are tree, money or code.
I have seen this effect many times with my programming colleagues. Without feeling confident in the material, they sometimes succumb when it is necessary to do, say, non-standard control. Or add unit tests to where they were not. Or they try to envisage everything, when designing a class, and then we have a dialogue like:
- It is not necessary now
- What if it becomes necessary?
- Then we will add. Leave the expansion points and that's it. The code is not granite, it is plasticine.
And to learn to see and feel the material with which we work, and we need bicycles.
This is not just a workout for the mind or exercise. This is a way to reach a qualitatively different level of working with code.
Thank you all for reading.
Reference, in case you forgot to click somewhere:
... And not a damn thing for LD. The game certainly has a little light and shadows, but this is a pitiful semblance of what it really should have been.
After returning home after sending the game to the competition, I decided to “close the gestalt” and finish these unfortunate shadows. What happened - you can feel in the game , play around in the demo , look at the picture, and read the article.
As always in such cases, it makes no sense to try to write a general solution, you need to focus on a specific situation. The game world can be represented in the form of segments - at least those entities that cast shadows. The walls are rectangles, people are rectangles, only turned, hellish spoiler is a circle, but it can be simplified in the cut-off model to a length of diameter, which is always perpendicular to the beam of light.
There are several light sources (20-30), and all of them are circular (spotlights) and are conditionally lower than the illuminated objects (so the shadows can be infinite).
')
I saw in my head the following ways to solve the problem:
- For each light source we build a texture the size of a screen (well, or 2-4 times smaller). On this texture, we simply draw the trapezium BCC'D ', where A is the light source, BC is the line segment, B'C' is the projection of the line onto the edge of the texture. After these textures are sent to the shader, where they are mixed into a single picture.
Something like this was done by the author of the platformer Celeste, which is well written in his article on medium: medium.com/@NoelFB/remaking-celestes-lighting-3478d6f10bf
Problems: 20-30 screen-sized textures that need to be redrawn almost every frame and loaded into the GPU. I remember that it was a very, very not a quick process.
- The method described in the post on the habr is habr.com/post/272233 . For each light source we build a “depth map”, i.e. a texture where x = the angle of the “ray” from the light source, y = the number of the light source, and color == the distance from the source to the nearest obstacle. If we take, say, a step of 0.7 degrees (360/512), and 32 light sources, then we get one texture 512x32, which is not updated for so long.(texture example for a step of 45 degrees)

- The secret method that I will describe at the very end
In the end, I settled on method 2. However, the article described in the article did not fully suit me. There, the texture was also built in the shader with the help of rakest - the shader in the loop went from the light source in the direction of the beam and looked for an obstacle. In my past experiments, I also did rake in the shader, and it was very expensive, though universal.
“We have some segments in the model,” I thought, “And 10-20 segments fall into the radius of any light source. Can't I quickly calculate the distance map based on this? ”.
So I decided to do it.
For a start, I just brought up the walls, the conventional “main character” and light sources on the screen. Around the light sources cut out in the mist a circle of pure clear light. To get this:
I immediately began to do with the shader, so as not to relax. It was necessary to transfer to it for each light its coordinates and range (beyond which the light does not reach), this is done simply through a uniform array. And then in the shader (which is fragmentary, which is performed for each pixel on the screen), it remains to be seen whether the current pixel enters the lit circle or not.
class SimpleLightShader extends Phaser.Filter { constructor(game) { super(game); let lightsArray = new Array(MAX_LIGHTS*4); lightsArray.fill(0, 0, lightsArray.length); this.uniforms.lightsCount = {type: '1i', value: 0}; this.uniforms.lights = {type: '4fv', value: lightsArray}; this.fragmentSrc = ` precision highp float; uniform int lightsCount; uniform vec4 lights[${MAX_LIGHTS}]; void main() { float lightness = 0.; for (int i = 0; i < ${MAX_LIGHTS}; i++) { if (i >= lightsCount) break; vec4 light = lights[i]; lightness += step(length(light.xy - gl_FragCoord.xy), light.z); } lightness = clamp(0., 1., lightness); gl_FragColor = mix(vec4(0,0,0,0.5), vec4(0,0,0,0), lightness); } `; } updateLights(lightSources) { this.uniforms.lightsCount.value = lightSources.length; let i = 0; let array = this.uniforms.lights.value; for (let light of lightSources) { array[i++] = light.x; array[i++] = game.world.height - light.y; array[i++] = light.radius; i++; } } } Now we need to understand for each light source which segments will cast a shadow. Rather, which parts of the segments - in the figure below we are not interested in the “red” parts of the segment, since the light still does not reach them.
Note: intersection definition is a kind of preliminary optimization. It is necessary in order to reduce the time of further processing, eliminating large pieces of segments outside the radius of action of the light source. It makes sense when we have a lot of segments, whose length is much larger than the radius of the “glow”. If this is not the case, and we have many short segments, it may be correct not to waste time on determining the intersection and process the segments as a whole, since time savings still fail.
To do this, I used the well-known formula for finding the intersection of a straight line and a circle, which everyone remembers by heart from a school geometry course ... in someone else's imaginary world. I never remembered it, so I had to google it .
Encode, look what happened.
Like the rules. Now we know what segments can cast a shadow and can perform raikast.
Here we also have options:
- Just go in a loop in a circle, throw rays and look for the intersection. The distance to the nearest intersection is the value we need.
- You can go only on those angles that fall into the segments. After all, we already know the points, it is easy to calculate the angles.
- Further, if we go along the segment, then we do not need to throw rays and count the intersections - we can move along the segment with the necessary step. Here's how it works:
Here - segment (wall), - the center of the light source - perpendicular to the segment.
Let be - the angle to the normal for which you need to know the distance from the source to the segment, - point on the segment where the beam falls. Triangle - rectangular, - the leg, and its length is known and constant for this segment, - the desired length. . If you know the step in advance (and we know it), then you can calculate the reverse cosine table in advance and look for distances very quickly.
I will give an example of the code of such a table. Almost all work with corners is replaced with work with indices, i.e. integers from 0 to N, where N = the number of steps in the circle (i.e. the step angle = )
class HypTable { constructor(steps = 512, stepAngle = 2*Math.PI/steps) { this.perAngleStep = [1]; for (let i = 1; i < steps/4; i++) { // pi/2 let ang = i*stepAngle; this.perAngleStep[i] = 1/Math.cos(ang); } this.stepAngle = stepAngle; } /** * @param distancesMap - , * @param angle1 - * @param angle2 - * @param normalFromLight - , */ fillDistancesForArc(distancesMap, angle1, angle2, normalFromLight) { const D = Math.hypot(normalFromLight.x, normalFromLight.y); const normalAngle = Phaser.Math.normalizeAngle(Math.atan2(normalFromLight.y, normalFromLight.x)); const normalAngleIndex = (normalAngle / this.stepAngle)|0; const index1 = (angle1 / this.stepAngle)|0; const index2 = (angle2 / this.stepAngle)|0; for (let angleIndex = index1; angleIndex <= index2; angleIndex++) { let distanceForAngle = D * this.perAngleStep[normalize(angleIndex - normalAngleIndex)]; distancesMap.set(angleIndex, distanceForAngle); } } } Of course, this method introduces an error for the cases when the initial angle ACD is not a multiple of the step. But for 512 steps, I visually do not see any difference.
So, what we already know how to do:
- To find segments in the radius of the light source that can cast a shadow
- For step t, make a table of dist (angle), passing through each segment and calculating the distance.
Here is how this table looks like if you draw it with rays.
And this is how it looks for 10 light sources, if written in texture.
Here, each pixel horizontally corresponds to a corner, and color to a distance in pixels.
All this is written in js like this using imageData
fillBitmap(data, index) { let total = index + this.steps*4; let d1, d2; let i = 0; //data[index] = Red //data[index+1] = Green //data[index+2] = Blue //data[index+3] = Alpha for (; index < total; index+=4, i++) { // 512, R 2. d1 = (this.distances[i]/2)|0; data[index] = d1; d1 = this.distances[i] - d1*2; d2 = (d1*128)|0; // G - 2. data[index+1] = d2; // B A 255, . data[index+2] = 255; data[index+3] = 255; } } Now we transfer the texture to our shader, which already has the coordinates and radii of the light sources. And we process it like this:
// uniform sampler2D iChannel0; #define STRENGTH 0.3 #define MAX_DARK 0.7 #define M_PI 3.141592653589793 #define M_PI2 6.283185307179586 // float decodeDist(vec4 color) { return color.r*255.*2. + color.g*2.; } float getShadow(int i, float angle, float distance) { // x == float u = angle/M_PI2; // y == float v = float(i)/${MAX_LIGHTS}.; float shadowAfterDistance = decodeDist(texture2D(iChannel0, vec2(u, v))); // 1 , 0 . return step(shadowAfterDistance, distance); } void main() { float lightness = 0.; for (int i = 0; i < ${MAX_LIGHTS}; i++) { if (i >= lightsCount) break; vec4 light = lights[i]; // vec2 light2point = gl_FragCoord.xy - light.xy; float radius = light.z; float distance = length(light2point); float inLight = step(distance, radius); // , // . // , // , // // , if (inLight == 0.) continue; float angle = mod(-atan(light2point.y, light2point.x), M_PI2); // 1 0 float thisLightness = (1. - getShadow(i, angle, distance)); //, “” , , // lightness += thisLightness*STRENGTH; } lightness = clamp(0., 1., lightness); gl_FragColor = mix(vec4(0,0,0,MAX_DARK), vec4(0,0,0,0), lightness); } Result:
Now you can bring some beauty. Let the light fade with distance, and the shadows will be blurred.
To blur, I look at the adjacent corners, + - step, like this:
thisLightness = (1. - getShadow(i, angle, distance)) * 0.4 + (1. - getShadow(i, angle-SMOOTH_STEP, distance)) * 0.2 + (1. - getShadow(i, angle+SMOOTH_STEP, distance)) * 0.2 + (1. - getShadow(i, angle-SMOOTH_STEP*2., distance)) * 0.1 + (1. - getShadow(i, angle+SMOOTH_STEP*2., distance)) * 0.1; If you put everything together and measure FPS, it turns out like this:
- On embedded video cards, everything is bad (<30-40), even for simple examples.
- On the rest - all is well, as long as the light sources are not very strong. That is, the number of light sources per pixel is important, not the total number.
This result suited me completely. One could still play around with the color of the lighting, but I did not. A little more and adding some normal maps, I posted an updated version of NOPE. She looked like this now:
Then he began to prepare an article. I looked at this gif and thought.
“So it's almost like a pseudo-3d view, like in Wolfenstein,” I exclaimed (yes, I have a good imagination). And in fact - if we assume that all the walls are of the same height, then the distance map is enough for us to build the scene. Why not try?
The scene should look something like this.
Hence, our task:
- At the point on the screen get the world coordinates for the case when there are no walls.
We will count as follows:- To begin with, we normalize the coordinates of a point on the screen so that in the center of the screen there is a point (0,0), and at the corners (-1, -1) and (1,1) respectively
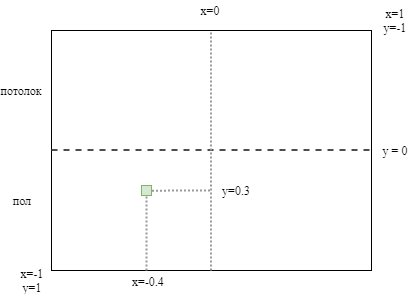
- The x coordinate becomes the angle from the direction of gaze, you just need to multiply it by A / 2, where A is the angle
- The y coordinate determines the distance from the observer to the point, in general, d ~ 1 / y. For a point on the lower edge of the screen, the distance = 1, for a point on the center of the screen, the distance = infinity.

- Thus, if you do not take into account the walls, then for each visible point of the world there will be 2 points on the screen - one above the middle (on the “ceiling”) the other below (on the “floor”)
- To begin with, we normalize the coordinates of a point on the screen so that in the center of the screen there is a point (0,0), and at the corners (-1, -1) and (1,1) respectively
- Now we can look at the table of distances. If there is a wall closer than our point, then it is necessary to draw a wall. If not, then the floor or ceiling
We get as ordered:
Add lighting - in the same way, we iterate over the light sources and check the world coordinates. And - the final touch - add textures. To do this, in the texture with distances it is also necessary to record the displacement u for the wall texture at this point. This is where the b channel came in handy.
Perfect.
Just kidding
Not perfect, of course. But damn it, I also read how to make my Wolfenstein 15 years ago through racast, and I wanted to do it all, but here such an opportunity!
Instead of conclusion
At the beginning of the article I mentioned another secret method. Here he is:
Just take the engine that already knows how.
In fact, if you need to make a game, then it will be the most correct and fastest way. Why do you need to fence your bikes and solve long-solved problems?
But why?
In 10th grade, I moved to another school and faced math problems. I do not remember the exact example, but this was an equation with degrees, which, by all indications, had to be simplified, but it just could not be done. Desperate, I consulted with my sister, and she said: “add on both sides so x 2 and everything will go bad.” And this was the decision: add something that was not.
When I helped my friend build a house much later, I needed to put a bar in the threshold - to fill a niche. And here I stand and sort out the trimming bars. One seems to fit, but not quite. Others are much smaller. I think I think how to gather the word happiness, and my acquaintance says: “they drank so-called circular grooves where it interferes”. And the big bar is already in place.
These stories are united by such an effect, which I will call the “inventory effect”. When you try to make a decision from existing parts, without seeing in these details material that can be processed and refined. The numbers are tree, money or code.
I have seen this effect many times with my programming colleagues. Without feeling confident in the material, they sometimes succumb when it is necessary to do, say, non-standard control. Or add unit tests to where they were not. Or they try to envisage everything, when designing a class, and then we have a dialogue like:
- It is not necessary now
- What if it becomes necessary?
- Then we will add. Leave the expansion points and that's it. The code is not granite, it is plasticine.
And to learn to see and feel the material with which we work, and we need bicycles.
This is not just a workout for the mind or exercise. This is a way to reach a qualitatively different level of working with code.
Thank you all for reading.
Reference, in case you forgot to click somewhere:
Source: https://habr.com/ru/post/434370/
All Articles