Creating a face recognition model using deep learning in Python
Translator Elena Bornovolokova specifically for Netology adapted the article by Fayzan Shaykh on how to create a face recognition model and in what areas it can be applied.
In recent years, computer vision has gained popularity and stood out in a separate direction. Developers create new applications that are used throughout the world.
In this direction, I am attracted to the concept of open source. Even technology giants are ready to share new discoveries and innovations with everyone, so that technology does not remain the privilege of the rich.
One of these technologies is face recognition. With proper and ethical use, this technology can be applied in many areas of life.
')
In this article, I will show you how to create an effective face recognition algorithm using open source tools. Before turning to this information, I want you to prepare and be inspired by watching this video:
I will cite several potential applications of facial recognition technology.
Face recognition in social networks . Facebook has replaced manual tagging of images with automatically generated tag offers for each image uploaded to the platform. Facebook uses a simple face recognition algorithm to analyze pixels in an image and compare it with relevant users.
Face recognition in security . A simple example of using face recognition technology to protect personal data is unlocking a smartphone "face by". This technology can be implemented in the access system: a person looks into the camera, and she determines whether to allow him to enter or not.
Face recognition to count the number of people . Face recognition technology can be used when calculating the number of people attending an event (for example, a conference or a concert). Instead of manually counting the participants, we install a camera that can capture images of the faces of the participants and give out the total number of visitors. This will help automate the process and save time.

Consider how we can use facial recognition technology, referring to the open source tools available to us.
I used the following tools that I recommend to you:
Before we start building our facial recognition model, let's look at these points in more detail.
Check if the camera is configured correctly. With Ubuntu, this is easy: see if the device is recognized by the operating system. To do this, follow these steps:
Step 2.1: Install Python
The code in this article is written using Python (version 3.5). To install Python, I recommend using Anaconda , a popular Python distribution for data processing and analysis.
Step 2.2: Install OpenCV
OpenCV is an open source library designed to create computer vision applications. Installing OpenCV is done using
Step 2.3: Install the face_recognition API
We will use the
After setting up the system, proceed to the implementation. To begin with, we will create a program, and then we will explain what we have done.
Create a
Then run this Python file by typing:
If everything works correctly, a new window will open with running face recognition mode in real time.
Let's summarize and explain what our code did:
At this all the fun does not end there. We will do another cool thing: create a full-fledged application example based on the code above. Let's make some small changes to the code, and everything will be ready.
Suppose you want to create an automated system using a video camera to track where the speaker is at a given time. Depending on its position, the system rotates the camera so that the speaker always remains in the center of the frame.
The first step is to create a system that identifies the person or people in the video and focuses on the location of the speaker.
We will analyze how to do this. As an example, I chose a video on YouTube with speakers from the DataHack Summit 2017 conference.
First we import the necessary libraries:
Then we read the video and set the length:
After that we create an output file with the required resolution and frame rate similar to the one in the input file.
Download the image of the speaker as a sample to recognize it in the video:
When finished, start the cycle, which will be:
Let's look at the code that will do this:
The code will give you this result:
Courses "Netology" on the topic:
Introduction
In recent years, computer vision has gained popularity and stood out in a separate direction. Developers create new applications that are used throughout the world.
In this direction, I am attracted to the concept of open source. Even technology giants are ready to share new discoveries and innovations with everyone, so that technology does not remain the privilege of the rich.
One of these technologies is face recognition. With proper and ethical use, this technology can be applied in many areas of life.
')
In this article, I will show you how to create an effective face recognition algorithm using open source tools. Before turning to this information, I want you to prepare and be inspired by watching this video:
Face recognition: potential applications
I will cite several potential applications of facial recognition technology.
Face recognition in social networks . Facebook has replaced manual tagging of images with automatically generated tag offers for each image uploaded to the platform. Facebook uses a simple face recognition algorithm to analyze pixels in an image and compare it with relevant users.
Face recognition in security . A simple example of using face recognition technology to protect personal data is unlocking a smartphone "face by". This technology can be implemented in the access system: a person looks into the camera, and she determines whether to allow him to enter or not.
Face recognition to count the number of people . Face recognition technology can be used when calculating the number of people attending an event (for example, a conference or a concert). Instead of manually counting the participants, we install a camera that can capture images of the faces of the participants and give out the total number of visitors. This will help automate the process and save time.
System Setup: Hardware and Software Requirements
Consider how we can use facial recognition technology, referring to the open source tools available to us.
I used the following tools that I recommend to you:
- Webcam (Logitech C920) for building a face recognition model in real time on a Lenovo E470 ThinkPad laptop (Core i5 7th Gen). You can also use your laptop’s built-in camera or camcorder with any suitable system for real-time video analysis instead of the ones I used.
- It is preferable to use a graphics processor for faster video processing.
- We used the Ubuntu 18.04 operating system with all the necessary software.
Before we start building our facial recognition model, let's look at these points in more detail.
Step 1: Hardware Setup
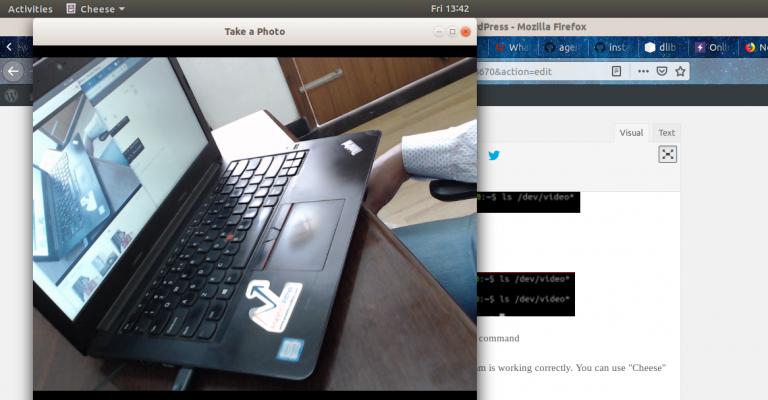
Check if the camera is configured correctly. With Ubuntu, this is easy: see if the device is recognized by the operating system. To do this, follow these steps:
- Before connecting a webcam to a laptop, check all connected video devices by typing
ls /dev/video*on the command line. As a result, a list of all video devices connected to the system will be displayed.
- Connect the webcam and set the command again. If the webcam is connected correctly, the new device will be reflected in the result of the command.

- You can also use the webcam software to check its correct operation. In Ubuntu, you can use the program "Cheese".
Step 2: Software Setup
Step 2.1: Install Python
The code in this article is written using Python (version 3.5). To install Python, I recommend using Anaconda , a popular Python distribution for data processing and analysis.
Step 2.2: Install OpenCV
OpenCV is an open source library designed to create computer vision applications. Installing OpenCV is done using
pip : pip3 install opencv-python Step 2.3: Install the face_recognition API
We will use the
face_recognition API , which is considered the easiest API to recognize faces in Python around the world. To install, use: pip install dlib pip install face_recognition Implementation
After setting up the system, proceed to the implementation. To begin with, we will create a program, and then we will explain what we have done.
Walkthrough
Create a
face_detector.py file and then copy the code below: # import libraries import cv2 import face_recognition # Get a reference to webcam video_capture = cv2.VideoCapture("/dev/video1") # Initialize variables face_locations = [] while True: # Grab a single frame of video ret, frame = video_capture.read() # Convert the image from BGR color (which OpenCV uses) to RGB color (which face_recognition uses) rgb_frame = frame[:, :, ::-1] # Find all the faces in the current frame of video face_locations = face_recognition.face_locations(rgb_frame) # Display the results for top, right, bottom, left in face_locations: # Draw a box around the face cv2.rectangle(frame, (left, top), (right, bottom), (0, 0, 255), 2) # Display the resulting image cv2.imshow('Video', frame) # Hit 'q' on the keyboard to quit! if cv2.waitKey(1) & 0xFF == ord('q'): break # Release handle to the webcam video_capture.release() cv2.destroyAllWindows() Then run this Python file by typing:
python face_detector.py If everything works correctly, a new window will open with running face recognition mode in real time.
Let's summarize and explain what our code did:
- First, we specified the hardware on which the video analysis will be performed.
- Next, we made a video capture in real time frame by frame.
- Then they processed each frame and extracted the location of all the faces in the image.
- As a result, these frames were reproduced in the form of a video, along with an indication of where the faces are located.
An example of the use of face recognition technology
At this all the fun does not end there. We will do another cool thing: create a full-fledged application example based on the code above. Let's make some small changes to the code, and everything will be ready.
Suppose you want to create an automated system using a video camera to track where the speaker is at a given time. Depending on its position, the system rotates the camera so that the speaker always remains in the center of the frame.
The first step is to create a system that identifies the person or people in the video and focuses on the location of the speaker.
We will analyze how to do this. As an example, I chose a video on YouTube with speakers from the DataHack Summit 2017 conference.
First we import the necessary libraries:
import cv2 import face_recognition Then we read the video and set the length:
input_movie = cv2.VideoCapture("sample_video.mp4") length = int(input_movie.get(cv2.CAP_PROP_FRAME_COUNT)) After that we create an output file with the required resolution and frame rate similar to the one in the input file.
Download the image of the speaker as a sample to recognize it in the video:
image = face_recognition.load_image_file("sample_image.jpeg") face_encoding = face_recognition.face_encodings(image)[0] known_faces = [ face_encoding, ] When finished, start the cycle, which will be:
- Extract frame from video.
- Find all faces and identify them.
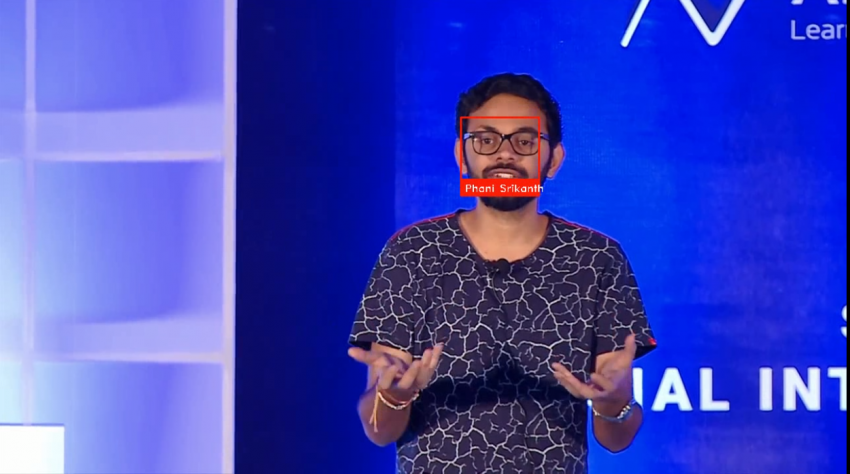
- Create a new video that will combine the original frame with the location of the speaker’s face with the signature.
Let's look at the code that will do this:
# Initialize variables face_locations = [] face_encodings = [] face_names = [] frame_number = 0 while True: # Grab a single frame of video ret, frame = input_movie.read() frame_number += 1 # Quit when the input video file ends if not ret: break # Convert the image from BGR color (which OpenCV uses) to RGB color (which face_recognition uses) rgb_frame = frame[:, :, ::-1] # Find all the faces and face encodings in the current frame of video face_locations = face_recognition.face_locations(rgb_frame, model="cnn") face_encodings = face_recognition.face_encodings(rgb_frame, face_locations) face_names = [] for face_encoding in face_encodings: # See if the face is a match for the known face(s) match = face_recognition.compare_faces(known_faces, face_encoding, tolerance=0.50) name = None if match[0]: name = "Phani Srikant" face_names.append(name) # Label the results for (top, right, bottom, left), name in zip(face_locations, face_names): if not name: continue # Draw a box around the face cv2.rectangle(frame, (left, top), (right, bottom), (0, 0, 255), 2) # Draw a label with a name below the face cv2.rectangle(frame, (left, bottom - 25), (right, bottom), (0, 0, 255), cv2.FILLED) font = cv2.FONT_HERSHEY_DUPLEX cv2.putText(frame, name, (left + 6, bottom - 6), font, 0.5, (255, 255, 255), 1) # Write the resulting image to the output video file print("Writing frame {} / {}".format(frame_number, length)) output_movie.write(frame) # All done! input_movie.release() cv2.destroyAllWindows() The code will give you this result:
From the Editor
Courses "Netology" on the topic:
- online profession " Python-developer "
- online profession " Data Scientist "
Source: https://habr.com/ru/post/434354/
All Articles