Logging into Aeronet: running a standalone quadrocopter in a virtual environment
To fly on a quadcopter now, if desired, perhaps, perhaps, everyone. But in order to solve the problem of autonomous control, so that you do not need to move the remote control stick and constantly monitor the drone - in this formulation, the solution may require a lot of resources: buy, assemble, solder, adjust, take off, drop, and after a fall - return to the beginning of the cycle.
Teaching the Aeronet judges / teachers on our project, we faced the need for a simplified “entry into the topic” of programming unmanned vehicles for teachers of robotics / computer science, who already have a set of basic knowledge.
There is an easy way to learn the basics of drone flight programming - a virtual simulation environment, a step-by-step example of the use of which we will discuss in our article.
To upgrade the basic programming skills of the drone, you do not need to buy anything - just use the jMAVSim drone simulator of the PX4 project. The PX4 is a powerful set of open source software designed for use on various unmanned vehicles, both flying and driving on the ground. The source code of the project lies on Github .
Initially, Linux Ubuntu LTS is recommended as a development environment by the PX4 authors. There is also Mac support. This year, a simulation and development environment for Windows appeared in Cygwin, which can simplify life for Russian educational institutions that use Windows in computer science classes.
Next we look at the process of installing, building and running the simulator under Linux and under Windows.
Installing and running jMAVSim on Linux Ubuntu
PX4 developers recommend Linux Ubuntu 16.04 LTS as a standard system. Linux allows you to build the PX4 package for all supported systems (NuttX-based hardware platforms, Qualcomm Snapdragon Flight, Linux, simulation environments, ROS).
First of all, add the user to the dialout group:
sudo usermod -a -G dialout $USER Let's log in to the changes to take effect.
The development toolchain development for Pixhawk / NuttX, including jmavsim, is done automatically using the ubuntu_sim_nuttx.sh script. You need to download the script to the user's directory and run it with the command
source ubuntu_sim_nuttx.sh All questions asked by the script to answer positively.
At the end of the script restart the computer.
It remains for us to download the source code of the controller that controls the flight and assemble it.
Clone the software repository of the flight controller PX4 with github:
git clone https://github.com/PX4/Firmware.git In the Firmware folder, now we have the complete source code, which is executed in the flight controller (and in the simulator). In the future, it can be useful both for the purpose of studying and making changes to it. Go to the copied folder of the firmware repository:
cd src/Firmware We compile and run the simulator:
make px4_sitl jmavsim The first compilation process takes some time. After successful completion, the PX4 console appears:

You can send a drone into flight by entering the command in the console:
pxh> commander takeoff 
Drone landing - commander land command, simulation stop - CTRL + C or shutdown .
Installing and running jMAVSim on Windows
The Cygwin PX4 tool kit appeared in 2018. This is the most productive way to compile / develop a PX4 for Windows. To install - download and run the installation file from Github or Amazon .
By default, the toolchain is installed in the C: \ PX4 folder.
At the last step of the installer, you can tick the "clone the PX4 repository, build and run simulation with jMAVSim" checkbox (clone the PX4 repository, compile and run the jMAVSim simulator).
The development environment in Cygwin is launched using the run-console.bat file in the installation directory (by default, C: \ PX4).
If you forgot to tick the jMAVSim launch checkbox during the installation process - in Cygwin you can clone the repository and start the simulator using the commands:
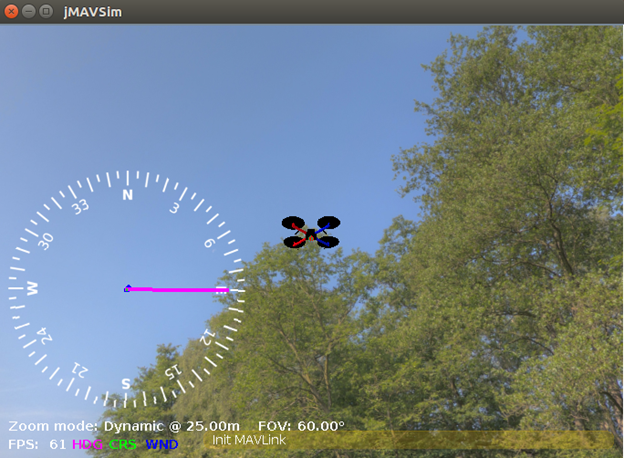
git clone --recursive -j8 https://github.com/PX4/Firmware.git cd Firmware make px4_sitl jmavsim After compiling, the PX4 console and the simulator window will appear on the screen:

The sky and trees are not displayed on my Windows yet, instead of them - a black background, as reported by the developers of the simulator .
The console commands for managing the drone are the same: take-off — commander takeoff , landing — commander land , stop simulation — CTRL + C, or the shutdown .
Flights using the QGroundControl ground station program
The QGroundControl program allows you to fully configure the drones on the PX4 or ArduPilot platforms, as well as plan and carry out autonomous flights outdoors using GPS.
The program code is fully open, and it works on Windows, OS X, Linux, iOS and Android platforms. The installation file for the desired platform can be downloaded in the Download section of the program website .
For Windows, download and run this file .
After installation and launch, if jMAVSim is already running on our computer, the program will connect to it automatically.
You can launch a drone in flight using the Fly-Takeoff button, and land it. You can also perform a virtual flight over GPS points:

Autonomous flight programming with mavros
Virtual drone jMAVSim can be controlled using the mavlink protocol, which is described in several articles (for example, 1 , 2 ). To implement mavlink communication, we will use the mavros package of the ROS system (robot operating system) .
PX4 developers recommend using ROS Kinetic.
The mavros package provides MAVLink communication between the computer on which the ROS is running (for example, a Linux virtual machine, or Raspberry PI) and a flight controller (real or in a simulator environment).
The mavros package is installed along with other packages during the full installation of Kinetic ROS .
The mavros package is launched with connection to the simulator using the roslaunch command, indicating the ip address and port of the computer on which the simulator is running:
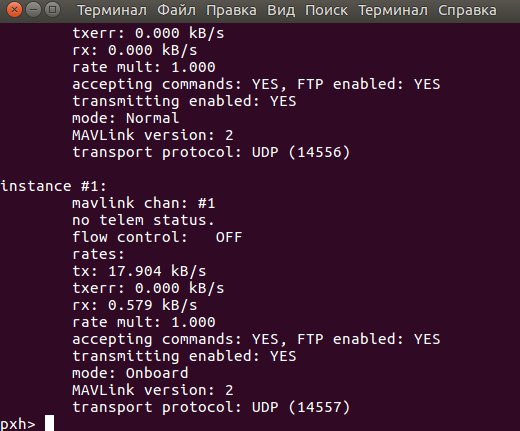
roslaunch mavros px4.launch fcu_url:="udp://@192.168.0.22:14557" If the simulator is not running on the same host where jMAVSim is running, before connecting mavros, you must enable mavlink messages to be sent over the network using the param set MAV_BROADCAST 1 in the jMAVSim console. When the command is executed, the ip-address of the host used for the mavlink protocol is displayed. The port can be found using the mavlink status command in the simulator console:
The success of the connection to the flight controller should be checked with the command:
rostopic echo /mavros/state If the connection is successful - so-called messages will appear in the console. mavlink heartbeat, about once per second:
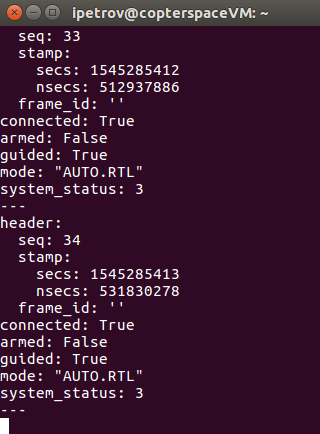
If the messages do not appear / are not updated / the field Connected = False - the connection with the flight controller is not established, and you should find out why.
At the time of this writing, under Windows, after the param set MAV_BROADCAST 1 command in the jMAVSim console, messages were started in a loop:
WARN [mavlink] getting required buffer size failed. In order for the simulator to work properly under Windows, you should add the line 1029 of the src / modules / mavlink / mavlink_main.cpp file:
#if defined(__APPLE__) && defined(__MACH__) || defined(__CYGWIN__) And recompile / restart the simulator with the command make px4_sitl jmavsim .
This problem has been reported to the developers , possibly, it will be fixed in subsequent releases.
After a successful connection, you can launch the drone in an autonomous flight using the following commands of the ROS system console:
- We publish 5 times per second target point for the flight of the drone in OFFBOARD mode. To ensure that the drone does not “fall out” of the OFFBOARD autonomous flight mode, it is necessary to publish the target point all the time, several times a second:
rostopic pub -r 5 /mavros/setpoint_position/local geometry_msgs/PoseStamped "header: seq: 0 stamp: secs: 0 nsecs: 0 frame_id: '' pose: position: x: 0.0 y: 0.0 z: 5.0 orientation: x: 0.0 y: 0.0 z: 0.0 w: 0.0"
- We transfer the drone to OFFBOARD mode (in a new separate terminal session):
')rosservice call /mavros/set_mode "base_mode: 0 custom_mode: 'OFFBOARD'" - We send the command to transfer the drone to flight mode (i.e. “charge”):
rosservice call /mavros/cmd/arming "value: true"
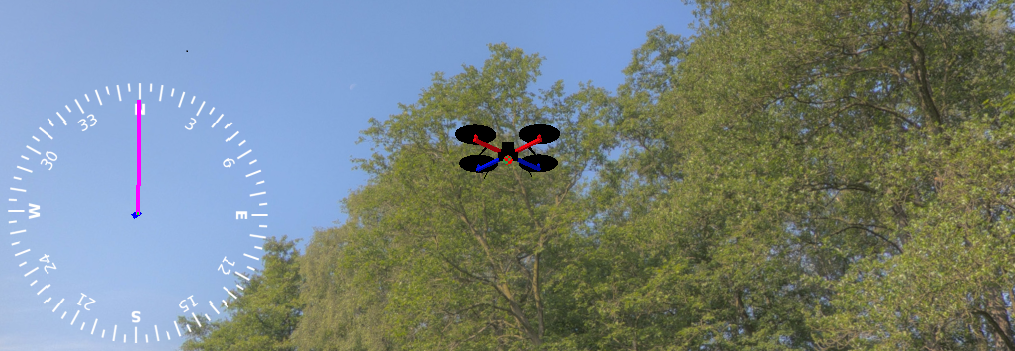
After the last command, the virtual drone should fly up and freeze at a height of 5 meters:
Also, the launch of the drone can be done using a simple code on Python:
import rospy from geometry_msgs.msg import PoseStamped from mavros_msgs.srv import CommandBool, SetMode rospy.init_node("offbrd",anonymous=True) rate=rospy.Rate(5) setpoint_pub=rospy.Publisher("/mavros/setpoint_position/local",PoseStamped,queue_size=10) arming_s=rospy.ServiceProxy("/mavros/cmd/arming",CommandBool) set_mode=rospy.ServiceProxy("/mavros/set_mode",SetMode) setpt=PoseStamped() setpt.pose.position.z=5 for i in range (0,10): setpoint_pub.publish(setpt) rate.sleep() set_mode(0,"OFFBOARD") arming_s(True) while (rospy.is_shutdown()==False): setpoint_pub.publish(setpt) rate.sleep() The code above uses the same ROS services as the command line example.
The code needs to be copied to a text file, for example, fly_jmavsim.py, and run it from the command line with the command python fly_jmavsim.py .
In the process of debugging this example, I encountered a feature of the jMAVSim simulator - it requires a productive processor for normal operation. On a Linux virtual machine, he managed to calculate only 10 FPS, and fell immediately after takeoff. On a laptop while I was writing an article - he also periodically lost control / fell. It helped the laptop power from the network - because when powered by a battery, power saving mode is activated, which underestimates processor performance, which directly affects the operation of the simulator.
Based on the above examples, those who wish can develop autonomous flight programs themselves (by square, circle, arbitrary trajectory, etc.). Performing such exercises can be useful to prepare for programming autonomous missions on a real quadcopter.
We wish you all successful flights!
References:
Source: https://habr.com/ru/post/434220/
All Articles