Three-dimensional presentation of products on Three.js for the smallest
All sorts of presentations of products in 3D - not such a rarity in our time, but these tasks cause a lot of questions from novice developers. Today we will look at some of the basics that will help get into this topic and not stumble upon such a simple task as displaying a three-dimensional model in a browser. We will use Three.js as the most popular tool in this area as an aid.
Getting Started
First of all, we will make an HTML template for ourselves. In order not to complicate the example, we will not use anything superfluous, no collectors, preprocessors, etc.
We need a container for canvas and a set of scripts - actually three.js, a loader for models in obj format, and a script for controlling the camera with the mouse.
<div class='canvas-container'></div> <script src='https://unpkg.com/three@0.99.0/build/three.min.js'></script> <script src='https://unpkg.com/three@0.99.0/examples/js/loaders/OBJLoader.js'></script> <script src='https://unpkg.com/three@0.99.0/examples/js/controls/OrbitControls.js'></script> <script src='./main.js'></script> If your project uses NPM and assemblers, then you can import all of this from the three package. Actually, if someone doesn't know, Unpkg takes all of the NPM packages.
If you need to quickly connect something from some package to your page, but you did not find the link to the CDN - remember Unpkg, most likely you need it.
The main script will start with a heap of global variables. So we simplify the example.
let SCENE; let CAMERA; let RENDERER; let LOADING_MANAGER; let IMAGE_LOADER; let OBJ_LOADER; let CONTROLS; let MOUSE; let RAYCASTER; let TEXTURE; let OBJECT; In Three.js, everything starts from the stage, so we initialize it and create a couple of light sources:
function initScene() { SCENE = new THREE.Scene(); initLights(); } function initLights() { const ambient = new THREE.AmbientLight(0xffffff, 0.7); SCENE.add(ambient); const directionalLight = new THREE.DirectionalLight(0xffffff); directionalLight.position.set(0, 1, 1); SCENE.add(directionalLight); } Light sources are different. Most often in such tasks ambient is used - filling light, and directional - light in a certain direction. There are also point sources of light, but we do not need them yet. We make the color of the glow white so that there are no distortions.
It can be useful to play with the color of the filling glow, especially with shades of gray, so you can make a softer image.
The second important thing is the camera. This is the essence that determines the point at which we are located, and the direction in which we are looking.
function initCamera() { CAMERA = new THREE.PerspectiveCamera(45, window.innerWidth / window.innerHeight, 1, 2000); CAMERA.position.z = 100; } Camera parameters are usually selected by eye and depend on the models used.
The third object we need is a renderer. He is responsible for drawing the image. Its initialization speaks for itself:
function initRenderer() { RENDERER = new THREE.WebGLRenderer({ alpha: true }); RENDERER.setPixelRatio(window.devicePixelRatio); RENDERER.setSize(window.innerWidth, window.innerHeight); } Loaders are needed in order to download data of different formats. Here you can find a long list of options, but we need only two - one for the pictures (it comes in the box) and one for the models (we connected it at the beginning).
function initLoaders() { LOADING_MANAGER = new THREE.LoadingManager(); IMAGE_LOADER = new THREE.ImageLoader(LOADING_MANAGER); OBJ_LOADER = new THREE.OBJLoader(LOADING_MANAGER); } Let's start loading the model. As expected, it happens asynchronously. After loading the model, we can play with its parameters:
function loadModel() { OBJ_LOADER.load('./model.obj', (object) => { object.scale.x = 0.3; object.scale.y = 0.3; object.scale.z = 0.3; object.rotation.x = -Math.PI / 2; object.position.y = -30; OBJECT = object; SCENE.add(OBJECT); }); } It remains to run the barrel organ:
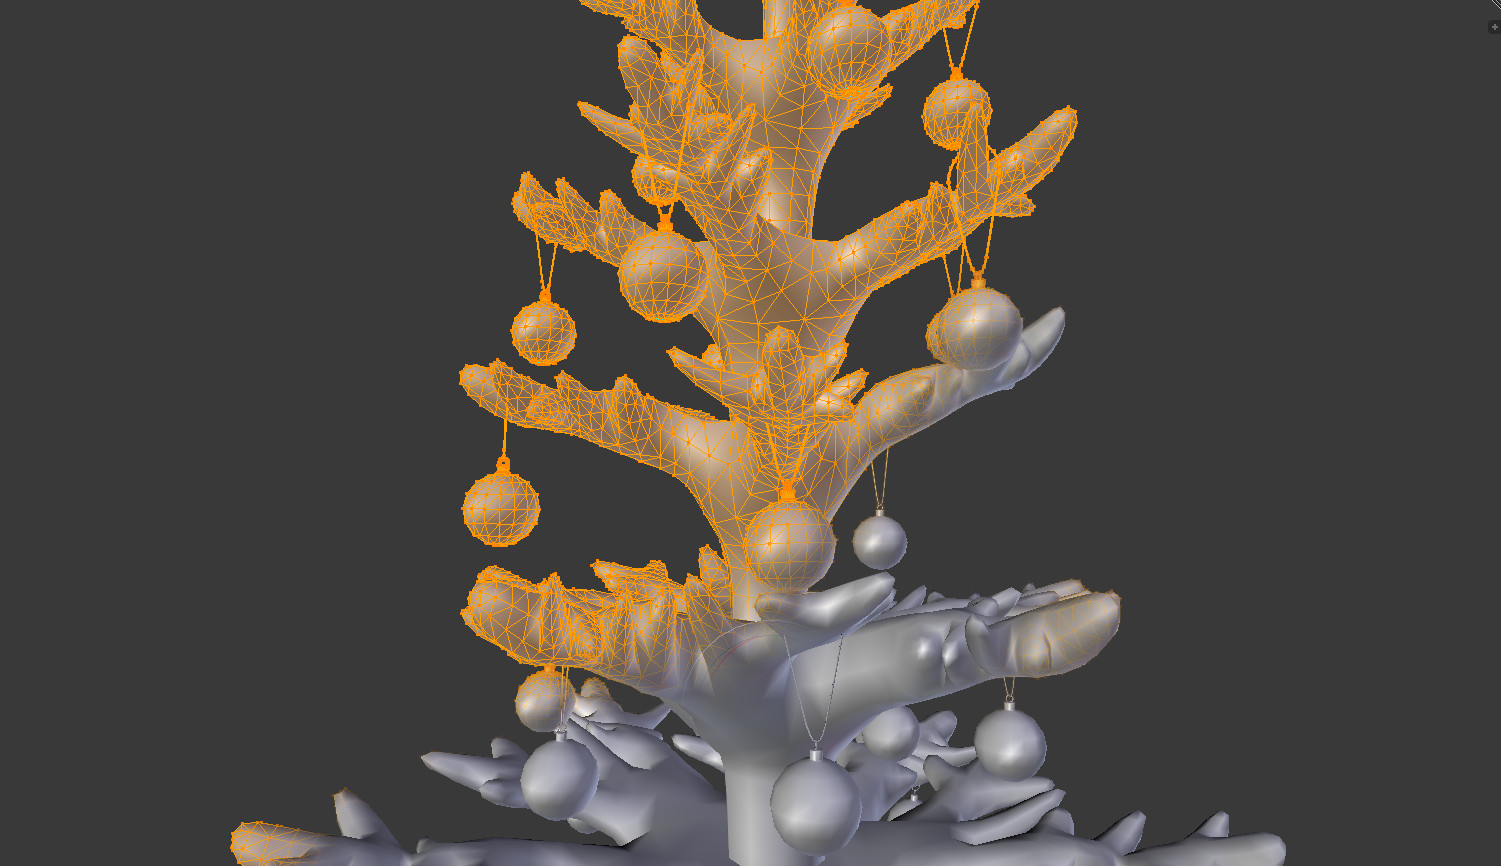
function animate() { requestAnimationFrame(animate); render(); } function render() { CAMERA.lookAt(SCENE.position); RENDERER.render(SCENE, CAMERA); } As a result, we will have just a white Christmas tree with shadows (I took the model from here ).

One, two, three, herringbone burn! But without textures, of course, it will not burn. Yes, and about the shaders of fire and other elements, we will talk some other time ... But at least we can see that the model of the Christmas tree is “on TV”.
Before moving on to textures, it is helpful to add a standard browser window resizing event handler:
function initEventListeners() { window.addEventListener('resize', onWindowResize); onWindowResize(); } function onWindowResize() { CAMERA.aspect = window.innerWidth / window.innerHeight; CAMERA.updateProjectionMatrix(); RENDERER.setSize(window.innerWidth, window.innerHeight); } Add texture
Our model and picture-texture work on the principle of stickers-translators on children's technology models. As we already know, objects in the WebGL context consist of a heap of triangles. By themselves, they have no color. For each triangle there is the same triangular “sticker” with a texture that you need to stick on it. But if we have 1000 triangles, then we need to load 1000 texture pictures? Of course no. A sprite is made, the same as for icons in CSS (you probably came across them in the work), and the model itself is added with information about which triangles and where on it are. And then Three.js already independently deals with everything and we see the finished result. In fact, everything is a little more complicated, but the idea should be clear.
Christmas tree branches are not a very illustrative example. They are all the same. Much better structure of such a texture will be seen in the example of Bulbasaurus:

But enough of the words, let's proceed to action. Initialize the texture and load the image with it:
function initTexture() { TEXTURE = new THREE.Texture(); } function loadTexture() { IMAGE_LOADER.load('./texture.jpg', (image) => { TEXTURE.image = image; TEXTURE.needsUpdate = true; }); } Now we need to expand the model loading function. If we had the same texture as the bulbasaurus, everything would be simple. But the Christmas tree texture covers only branches. We need to somehow separate them and apply it only to them. How to do it? You can approach this issue in different ways. It's time to use console.log and look at the model itself.
If you do not know how to select a specific part of the model, use console.log. This is usually the fastest way to find out how the parts differ.
Usually we have two options for how to divide the model into parts. The first (good) is when the 3D-artist has signed the component parts of the model and we have access to the name fields from them and we can determine from them what is what. In our example, this is not, but there are names of materials. We use them. For parts of the model from the material “Christmas_Tree” we will use the texture:
function loadModel() { OBJ_LOADER.load('./model.obj', (object) => { object.traverse(function(child) { if (child instanceof THREE.Mesh) { switch (child.material.name) { case 'Christmas_Tree': child.material.map = TEXTURE; break; // . . . } } }); // . . . Thus we get something like this:

For parts of the materials “red” and “pink” (these are balls - Christmas toys), we simply set a random color. In such cases, HSL is convenient to use:
switch (child.material.name) { case 'Christmas_Tree': child.material.map = TEXTURE; break; case 'red': child.material.color.setHSL(Math.random(), 1, 0.5); break; case 'pink': child.material.color.setHSL(Math.random(), 1, 0.5); break; } Note to artists: give meaningful names to everything in models. The names of the materials in our example just break the brain. We have red here can be green. I did not change them to show the absurdity of what is happening. The abstract name “material for balls” would be more universal.
Equirectangular projection
The difficult word equirectangular projection in Russian is an equidistant projection. Translated to the household - pulled the ball on the rectangle. You can quote me. At school, we all saw a map of the world - it is rectangular, but we understand that if we transform it a little bit, then we’ll have a globe. That is exactly it. To better understand how these distortions are arranged take a look at the picture:

When creating thumbnails of different products, the background is often made using such projections. We take a distorted picture with the environment and display it on a large sphere. The camera is inside it. It looks like this:
function initWorld() { const sphere = new THREE.SphereGeometry(500, 64, 64); sphere.scale(-1, 1, 1); const texture = new THREE.Texture(); const material = new THREE.MeshBasicMaterial({ map: texture }); IMAGE_LOADER.load('./world.jpg', (image) => { texture.image = image; texture.needsUpdate = true; }); SCENE.add(new THREE.Mesh(sphere, material)); } For example, I deliberately unfinished edges, so if you use the example from the githaba, then there you will find a distinct seam on which the picture closes. If anyone is interested, then its original is taken from here .
Total for the moment we have something like this:

Christmas tree with colored balls looks pretty nice.
Orbit controls
In order to appreciate the beauty of the three-dimensional space, add a mouse control. And then everything seems to be in 3D, you need to twist it all. OrbitControls are usually used in such tasks.
function initControls() { CONTROLS = new THREE.OrbitControls(CAMERA); CONTROLS.minPolarAngle = Math.PI * 1 / 4; CONTROLS.maxPolarAngle = Math.PI * 3 / 4; CONTROLS.update(); } It is possible to set restrictions on the angles to which you can rotate the camera, restrictions on zoom and other options. It is useful to look into the documentation, there are a lot of interesting things.
You can't tell a lot about this kind of control. Connected, turned on and it works. Just do not forget to regularly update the status:
function animate() { requestAnimationFrame(animate); CONTROLS.update(); render(); } Here you can get a little distracted, twist the Christmas tree in different directions ...
Raycaster
Raycaster allows you to do the following: he draws a straight line in space and finds all the objects with which it intersects. This allows you to do many different interesting things, but in the context of product presentations there will be two main cases - it will react to mouse hovering at something and react to a mouse click on something. To do this, you will need to draw lines perpendicular to the screen through a point with the coordinates of the mouse and look for intersections. And this will do. Expand the render function, look for intersections with the balls and repaint them:
function render() { RAYCASTER.setFromCamera(MOUSE, CAMERA); paintHoveredBalls(); // . . . } function paintHoveredBalls() { if (OBJECT) { const intersects = RAYCASTER.intersectObjects(OBJECT.children); for (let i = 0; i < intersects.length; i++) { switch (intersects[i].object.material.name) { case 'red': intersects[i].object.material.color.set(0x000000); break; case 'pink': intersects[i].object.material.color.set(0xffffff); break; } } } } With simple mouse movements back and forth, we make sure that everything works.

But there is one subtlety - Three.js does not know how to smoothly change colors. And in general, this library is not about smooth changes in values. Here is the time to connect any tool that is designed for this purpose, for example, Anime.js.
<script src='https://unpkg.com/animejs@2.2.0/anime.min.js'></script> Use this library to animate values:
switch (intersects[i].object.material.name) { case 'red': // intersects[i].object.material.color.set(0x000000); anime({ targets: intersects[i].object.material.color, r: 0, g: 0, b: 0, easing: 'easeInOutQuad' }); break; // . . . } Now the colors change smoothly, but only after the mouse moves away from the ball. Something needs to be fixed. To do this, we use symbols - they allow us to safely add meta-information to objects, and we just need to add information about whether the ball is animated or not.
Symbols in ES6 + is a very powerful tool that, among other things, allows you to add information to objects from third-party libraries without fear that it will lead to a conflict of names or break logic.
We make a global constant (in theory, it would be worth making a global object for all such symbols, but we have a simple example, we will not complicate it):
const _IS_ANIMATED = Symbol('is animated'); And we add a check to the function of repainting the balls:
if (!intersects[i].object[_IS_ANIMATED]) { anime({ targets: intersects[i].object.material.color, r: 0, g: 0, b: 0, easing: 'easeInOutQuad' }); intersects[i].object[_IS_ANIMATED] = true; } Now they are smoothly repainted immediately when you hover the mouse. Thus, using symbols, you can quickly add similar checks in animations without saving the states of all the balls in a separate place.
Tooltips
The last thing we’ll do today is tooltips. This task is often found. For a start, we just need to impose them.
<div class='popup-3d'> !</div> .popup-3d { color: #fff; font-family: 'Pacifico', cursive; font-size: 10rem; pointer-events: none; } Do not forget to disable pointer-events if they are not necessary.
It remains to add CSS3DRenderer. This is not really a renderer at all; it’s rather a thing that simply adds CSS transformations to the elements and it seems that they are in a common scene. For pop-up labels - this is just what you need. Make the global variable CSSRENDERER, initialize it and do not forget to call the function render itself. Everything looks like a normal renderer:
function initCSSRenderer() { CSSRENDERER = new THREE.CSS3DRenderer(); CSSRENDERER.setSize(window.innerWidth, window.innerHeight); CSSRENDERER.domElement.style.position = 'absolute'; CSSRENDERER.domElement.style.top = 0; } function render() { CAMERA.lookAt(SCENE.position); RENDERER.render(SCENE, CAMERA); CSSRENDERER.render(SCENE, CAMERA); } At the moment, nothing happened. Actually, we did not do anything. We initialize the pop-up element, we can immediately play with its size and position in space:
function initPopups() { const popupSource = document.querySelector('.popup-3d'); const popup = new THREE.CSS3DObject(popupSource); popup.position.x = 0; popup.position.y = -10; popup.position.z = 30; popup.scale.x = 0.05; popup.scale.y = 0.05; popup.scale.z = 0.05; console.log(popup); SCENE.add(popup); } Now we see the inscription “in 3D”. In fact, it is not entirely in 3D, it lies on top of the canvas, but for hints it is not so important, the effect is important.
It remains the final touch - to smoothly show the inscription in a certain range of angles. Use the global symbol again:
const _IS_VISIBLE = Symbol('is visible'); And we update the state of the pop-up element depending on the angle of rotation of the camera:
function updatePopups() { const popupSource = document.querySelector('.popup-3d'); const angle = CONTROLS.getAzimuthalAngle(); if (Math.abs(angle) > .9 && popupSource[_IS_VISIBLE]) { anime({ targets: popupSource, opacity: 0, easing: 'easeInOutQuad' }); popupSource[_IS_VISIBLE] = false; } else if (Math.abs(angle) < .9 && !popupSource[_IS_VISIBLE]) { anime({ targets: popupSource, opacity: 1, easing: 'easeInOutQuad' }); popupSource[_IS_VISIBLE] = true; } } Everything is quite simple. Now the inscription smoothly appears and disappears. You can add an auto-rotate and enjoy the result.
CONTROLS.autoRotate = true; CONTROLS.autoRotateSpeed = -1.0; 
Conclusion
Today we looked at how to display three-dimensional models to your page, how to twist them with a mouse, how to make tooltips, how to react to pointing the mouse at certain parts of the model and how to use symbols in the context of various animations. I hope this information will be useful. Well, everyone with the coming, now you know what you can learn on holidays.
PS: The full source code of the example with a Christmas tree is available on the githab .
')
Source: https://habr.com/ru/post/433876/
All Articles