Animation in MooTools. The basics and not only.
In this topic, I'm going to put all my knowledge about animation in MooTools together and look at topics more in-depth than just examples of using plugins. The theoretical information is valid not only for MooTools, but also for other frameworks. It will be interesting for beginners to familiarize themselves with the capabilities of the framework, and for those who continue - to understand how it all works :). The article contains many examples, there are quite original ones, here are some of them: 1 , 2 , 3 . Enjoy your reading.
MooTools uses the Fx class to create animated effects. All classes that implement any animation are inherited from Fx. In this class, helper methods for animation are defined:
It should be emphasized that the Fx class itself is abstract, that is, it does not animate anything, it operates only with general data to implement the principles of animation. Direct animation involved heirs Fx. Basically, to animate elements on HTML pages, classes are used that animate various CSS properties of elements. We will talk about these classes, and also consider the case of creating your own class, which implements the animation of non-CSS properties.
')
I hope that from the previous paragraph it became clear that the transition equation is the law for calculating the increment delta. Fortunately, in MooTools there is a whole set of such laws that will allow to make the animation smooth, sharp, fading, jumping, etc., but this will not be enough for us - we will also write our own equation. But more about that later. Now let's see what the standard equations are:

And here is the same jumping animation.


Quarter circle.

Elastic.

Exponential function.


Fifth degree


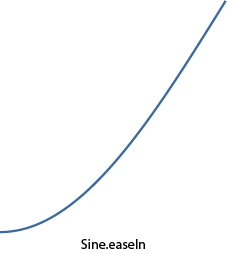
A piece of sinusoid.


An example showing the use of various equations of transitions in the animation look here .
And what if among the whole variety of embedded equations there is no need? No problem, you can always write your own, what we now do. Ideally, the equation should be such that, for an argument equal to zero, it returns 0, and for a unit it is 1. In this case, there will be no jumps of the parameter to be animated at the beginning and at the end of the animation.
As an example, I wanted to write an equation imitating oscillations on an electrocardiogram. Of course, it would be possible to remove points from someone's cardiogram and interpolate them into a polynomial, for example (for this, I even wrote a prog in the third year of study :), but this would not be so accurate and resource-intensive (on large orders) for final use. Therefore, the function turned out to be complicated. The entire conventional domain of definition (from 0 to 1) is divided into intervals, each of which has its own small function. The result was the following:

As you can see, on the first interval a “quadro-function” is defined for a smooth rise from zero, then a set of straight lines with different inclinations and lengths, and at the end a quarter of a circle for a smooth lift to unity. Here is what it looks like in the form of curves:


Add this function to the Fx.Transitions object as follows:
Now you can use it by passing the transition option as an option (note: the example uses the Fx.Morph plugin, which will be discussed below, but for now it can simply be considered a successor of Fx, which understands all options in the designer that Fx understands):
There is only one element in the HTML code:
A living example lies here . An interesting effect: during the testing of the script, I listened to Drum'n'Bass and it seemed that the heartbeat of this heart was very in time with the music (try it yourself).
Ok, we may not have achieved an ideal human cardiogram, but we have written our function. As it turned out, it is not so difficult :).
However, there is a special syntax for creating chains. They are implemented in the class of Chain. It contains as many as three methods:
The caterpillar itself is a regular div, in which the CSS properties of the left, top, width and height change, creating the effect of movement (oh, yes, its color also changes for realism). The caterpillar's pitch will consist of two stages: the first is the movement of its head to the right place, and the second is the pulling of the tail to the head. The example uses Fx.Morph, which allows you to animate several CSS properties simultaneously, which will be discussed in more detail below.
A living example is here . And here is an example of nothing to do with chains, just a flight of fantasy, but cool.
The method that responded to the mouse click instead of instantly changing the angle now calls the start method and sends the current value of the angle of rotation of the indicator and the value of the angle it should be rotated to after the end of the animation:
That's all, we have an animated transition, which can be seen here .
An example based on various transition equations is based on this class:
In the HTML code of the example, two drop-down lists, an animated ball and a button for every fireman.
means that two CSS properties will be animated: margin-left (from 0 to 10) and background-color (from '#EEE' to '# 555'). The ranges of values can not be specified, but only indicate the final value, then the current value specified in the element style will be taken as the initial value. As an example, use Fx.Morph to create an animated menu:
And also you can see the menu.
The official example .
The official example .
In the example below, the transparency of the array of elements changes when the cursor hovers over them, and the closer the element is to what is currently under the cursor, the less its transparency, and the farther - the more:
Living example .
An interesting menu option from MooTools .
I hope that the readers were interested in digging deeper into the implementation of animation in MooTools. Most of what is described here should be applicable to other frameworks.
Thanks for attention.
Animation in MooTools.
Basic principles. Class Fx.
So today we will do the animation. First you need to understand how the principles of animation are implemented in MooTools. An animation in MooTools is a change in a property of an element over time (transition), for example, changing the CSS property left is horizontal movement, and background-color is a smooth change in fill color.MooTools uses the Fx class to create animated effects. All classes that implement any animation are inherited from Fx. In this class, helper methods for animation are defined:
- start - this method starts the transition.
- set - changes the value of the parameter being animated. Called at each transition step. It is an abstract method, if it can be called that, i.e. each implementation of an animated plugin must override set in its own way.
- cancel - cancels the current animation.
- pause - pauses the current animation.
- resume - resumes paused animation.
- fps - the number of frames per second for animation. It characterizes, if I may say so, the “smoothness” of the animation - the bigger it is, the “smoother”.
- unit - a unit of measurement, for example, "em", "px", "%". Used to transform CSS properties.
- link is an option that characterizes the behavior of the animation when start was called during the transition. It can take the following values ( an example with different link values ):
- 'ignore' - all start calls during the animation are ignored. Used by default.
- 'cancel' - the current animation will be stopped and a new one will be started with the parameters that came to start.
- 'chain' - all start calls during the animation will be added to the chain and their animation will begin immediately after the current one ends.
- duration - the duration of the animation.
- transition is a transition equation. The transition equations will be discussed in more detail below.
- The time elapsed from the start of the transition to the current moment is divided by the duration, thus we get a number from 0 to 1 characterizing the progress of the animation. Let's call it progress.
- This number is passed to the transition function (which will be discussed below). The result of calculating the transition function is called delta.
- The value of the parameter being animated is calculated as follows: param = (to - from) × delta + from, where from is the initial value of the parameter, and to is the final value of the parameter. Obviously, when delta is equal to 0, we get the initial value of the parameter, and when 1 - the final value.
It should be emphasized that the Fx class itself is abstract, that is, it does not animate anything, it operates only with general data to implement the principles of animation. Direct animation involved heirs Fx. Basically, to animate elements on HTML pages, classes are used that animate various CSS properties of elements. We will talk about these classes, and also consider the case of creating your own class, which implements the animation of non-CSS properties.
')
Transition Equations. Writing your own equation.
Agree, the animation of moving an element on a page would not look very nice if it started abruptly and stopped abruptly at the end of the path. This happens if the increment delta (which was mentioned above) remains constant throughout the entire time. This is called a linear transition, its equation is delta = progress. If we successively take several progress values from 0 to 1 and substitute them into the equation, we obtain the usual straight line, which starts abruptly at 0 and ends abruptly at 1.I hope that from the previous paragraph it became clear that the transition equation is the law for calculating the increment delta. Fortunately, in MooTools there is a whole set of such laws that will allow to make the animation smooth, sharp, fading, jumping, etc., but this will not be enough for us - we will also write our own equation. But more about that later. Now let's see what the standard equations are:
- Linear - direct (delta = progress).
- Quad is a quadratic function (delta = progress 2 ).
- Cubic is a cubic function (delta = progress 3 ).
- Quart - delta = progress 4 .
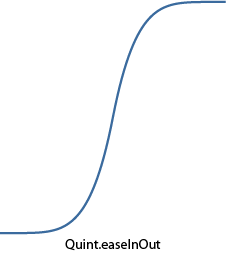
- Quint - delta = progress 5 .
- Pow is the general power function delta = progress x (by default, the power is 6).
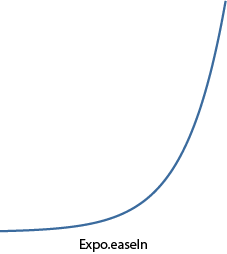
- Expo is an exponential function (delta = 2 (progress - 1) × 8 ).
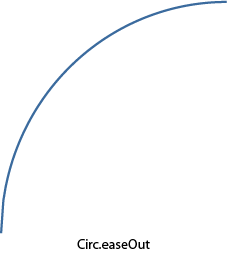
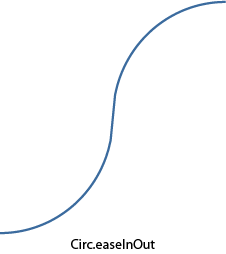
- Circ - quarter of a circle (delta = 1 - sin (acos (progress))).
- Sine - a piece of sinusoid (delta = 1 - sin ((1 - progress) × π / 2)).
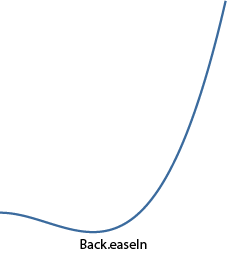
- Back - first delays the delta in the minus, and then smoothly brings to 1.
- Bounce - bouncing transition.
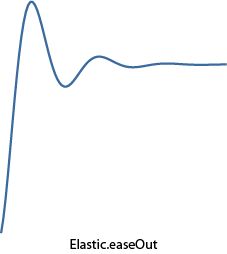
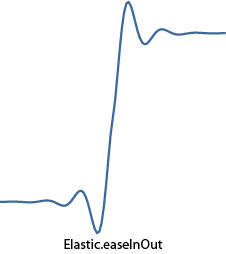
- Elastic - elastic transition (the only association - elastic :).
- easeIn - is used by default and does not change anything.
- easeOut - calculates the delta value using the formula 1 - transition (1 - progress), thus expanding the transition curve.
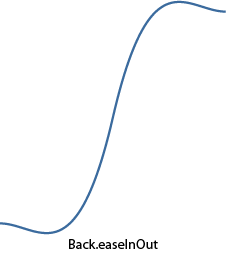
- easeInOut - to the middle of the transition calculates delta by the formula transtition (2 × progress), and then - by (2 - transition (2 × progress)) / 2, combining two curves in one transition: straight and unfolded.
And here is the same jumping animation.
Quarter circle.
Elastic.
Exponential function.
Fifth degree
A piece of sinusoid.
An example showing the use of various equations of transitions in the animation look here .
And what if among the whole variety of embedded equations there is no need? No problem, you can always write your own, what we now do. Ideally, the equation should be such that, for an argument equal to zero, it returns 0, and for a unit it is 1. In this case, there will be no jumps of the parameter to be animated at the beginning and at the end of the animation.
As an example, I wanted to write an equation imitating oscillations on an electrocardiogram. Of course, it would be possible to remove points from someone's cardiogram and interpolate them into a polynomial, for example (for this, I even wrote a prog in the third year of study :), but this would not be so accurate and resource-intensive (on large orders) for final use. Therefore, the function turned out to be complicated. The entire conventional domain of definition (from 0 to 1) is divided into intervals, each of which has its own small function. The result was the following:
As you can see, on the first interval a “quadro-function” is defined for a smooth rise from zero, then a set of straight lines with different inclinations and lengths, and at the end a quarter of a circle for a smooth lift to unity. Here is what it looks like in the form of curves:
Add this function to the Fx.Transitions object as follows:
Fx.Transitions.extend({
Heartbeat: function (x){
if (x < 0.3)
return Math.pow(x, 4) * 49.4;

if (x < 0.4)
return 9 * x - 2.3;

if (x < 0.5)
return -13 * x + 6.5;

if (x < 0.6)
return 4 * x - 2;

if (x < 0.7)
return 0.4;

if (x < 0.75)
return 4 * x - 2.4;

if (x < 0.8)
return -4 * x + 3.6;

if (x >= 0.8)
return 1 - Math.sin(Math.acos(x));
}
});
Now you can use it by passing the transition option as an option (note: the example uses the Fx.Morph plugin, which will be discussed below, but for now it can simply be considered a successor of Fx, which understands all options in the designer that Fx understands):
var fx = new Fx.Morph($( 'Heart' ), { transition: Fx.Transitions.Heartbeat, duration: 900, link: 'chain' });

// 10 .
for ( var i = 0; i < 10; i++){
// .
fx.start({
'width' : 265,
'height' : 238,
'margin-left' : -20,
'margin-top' : -20
});

// .
fx.start({
'width' : 225,
'height' : 198,
'margin-left' : 0,
'margin-top' : 0
});
}
There is only one element in the HTML code:
<img id="Heart" src="./images/heart.png" />
A living example lies here . An interesting effect: during the testing of the script, I listened to Drum'n'Bass and it seemed that the heartbeat of this heart was very in time with the music (try it yourself).
Ok, we may not have achieved an ideal human cardiogram, but we have written our function. As it turned out, it is not so difficult :).
Chains. Coupling animation transformations.
It is often necessary to specify several consecutive transformations so that each of the following occurs after the end of the previous one. If you simply call them sequentially, then by default every next call will be ignored (see the link option of the Fx class). If you specify a link equal to 'chain', then all subsequent calls will be added to the chain and will be executed sequentially.However, there is a special syntax for creating chains. They are implemented in the class of Chain. It contains as many as three methods:
- chain - appends the function to the end of the chain.
- callChain - calls the next function in the chain and removes it from the chain.
- clearChain - clears the chain.
The caterpillar itself is a regular div, in which the CSS properties of the left, top, width and height change, creating the effect of movement (oh, yes, its color also changes for realism). The caterpillar's pitch will consist of two stages: the first is the movement of its head to the right place, and the second is the pulling of the tail to the head. The example uses Fx.Morph, which allows you to animate several CSS properties simultaneously, which will be discussed in more detail below.
var CaterpillarController = new Class({
// Chain .
Implements: Chain,

// .
largeSize: 200,
smallSize: 10,

// .
initialize: function (caterpillar){
this .caterpillar = $(caterpillar);

// Fx.Morph start.
this .fx = new Fx.Morph( this .caterpillar, { duration: 900, transition: Fx.Transitions.Expo.easeOut, link: 'chain' });

// .
this .fx.addEvent( 'chainComplete' , this .callChain.bind( this ));

return this ;
},

// .
// (dimension: — true, — false)
// (direction: — true, — false).
move: function (dimension, direction){
var dimensions = this .caterpillar.getCoordinates();
var options1, options2;

// .
if (dimension){
// .
if (direction){
options1 = { 'width' : dimensions.width + this .largeSize };
options2 = { 'left' : dimensions.left + this .largeSize, 'width' : this .smallSize };
} else {
options1 = { 'left' : dimensions.left - this .largeSize, 'width' : this .largeSize + this .smallSize };
options2 = { 'width' : this .smallSize };
}
} else {
// .
if (direction){
options1 = { 'height' : dimensions.height + this .largeSize };
options2 = { 'top' : dimensions.top + this .largeSize, 'height' : this .smallSize };
} else {
options1 = { 'top' : dimensions.top - this .largeSize, 'height' : this .largeSize + this .smallSize };
options2 = { 'height' : this .smallSize };
}
}

// ( ).
$extend(options1, { 'background-color' : '#7CCB26' });
$extend(options2, { 'background-color' : '#4C9004' });

//
// ( , link 'chain').
this .fx.start(options1);
this .fx.start(options2);

return this ;
}
});

window.addEvent( 'domready' , function (){
// move .
new CaterpillarController( 'Caterpillar' ).move( true , true ).
chain( function () { this .move( false , true ); }).
chain( function () { this .move( true , false ); }).
chain( function () { this .move( false , true ); }).
chain( function () { this .move( true , true ); }).
chain( function () { this .move( false , false ); }).
chain( function () { this .move( true , false ); }).
chain( function () { this .move( false , false ); });
});
A living example is here . And here is an example of nothing to do with chains, just a flight of fantasy, but cool.
Animate your own variables.
So far, we have used animations of various CSS properties. But, as I pointed out at the beginning of the article, the Fx class can be used to animate anything. Therefore, it would be nice to try to write your successor Fx. We take as the basis the improved version of the rheostat script I wrote about in this topic . What can be animated in it? For example, the angle of rotation of the indicator. Recall that if you make a single click on the rheostat, the indicator immediately appears in the place of pressing. And what if you animate this transition? It would be fun, and you need to write just a few lines :). So, what you need to create a full-fledged successor to Fx:- add to the class description Extends: Fx for inheritance.
- pass options to the base constructor.
- override the set method to apply the value of the parameter to be animated to the parameter “physics”, in this case, turn the indicator by the angle value.
- call start to start the animation.
set: function (now){
// now — .
this .oldMouseAngle = this .mouseAngle = this .angle = now;
this .updateIndicatorPosition();
}
The method that responded to the mouse click instead of instantly changing the angle now calls the start method and sends the current value of the angle of rotation of the indicator and the value of the angle it should be rotated to after the end of the animation:
captureMouse: function (e){
this .captured = true ;

var mouseAngle = this .getMouseAngle(e);
if ((mouseAngle >= this .options.minAngle) && (mouseAngle <= this .options.maxAngle))
// .
this .start( this .angle, mouseAngle);
}
That's all, we have an animated transition, which can be seen here .
Standard animated plugins.
Fx.Tween.
This class is the simplest class that animates any CSS property of an element. To work, he needs a link to the element being animated, the name of the CSS property being animated, and a range of values. Creation example:var myFx = new Fx.Tween(element, [, options]);
An example based on various transition equations is based on this class:
// CSS- top 'Ball'.
var fx = new Fx.Tween( 'Ball' , { property: 'top' , duration: 900, link: 'cancel' });
var transitionSelect = $( 'Transition' );
var modifierSelect = $( 'Modifier' );
var test = $( 'Test' );

// .
modifierSelect.addEvent( 'change' , startAnimation);
transitionSelect.addEvent( 'change' , startAnimation);
test.addEvent( 'click' , startAnimation);

function startAnimation(){
// 'sine:in'.
fx.options.transition = transitionSelect.value + modifierSelect.value;

// .
fx.start(60, 400);
}
In the HTML code of the example, two drop-down lists, an animated ball and a button for every fireman.
Fx.Morph.
It is used more often than Fx.Tween because it can simultaneously animate several CSS properties of an element. The constructor is almost the same as that of Fx.Tween, except for the absence of the property option, instead of it, an object describing which CSS properties to animate and in what ranges is passed to the start method. For example:morph.start({
'margin-left' : [0, 10],
'background-color' : [ '#EEE' , '#555' ]
});
means that two CSS properties will be animated: margin-left (from 0 to 10) and background-color (from '#EEE' to '# 555'). The ranges of values can not be specified, but only indicate the final value, then the current value specified in the element style will be taken as the initial value. As an example, use Fx.Morph to create an animated menu:
var menuHeadItems = $$( '#Menu .MenuHeadItem' );

menuHeadItems.each( function (item, i){
var morph = new Fx.Morph(item, { duration: 900, transition: Fx.Transitions.Elastic.easeOut, link: 'cancel' });

// 100i ms.
// : opacity margin-left. ""
// 1.
morph.start.delay(i * 100, morph, {
'opacity' : [0, 1],
'margin-left' : 0
});

item.addEvents({
// .
'mouseenter' : function (){
morph.start({
'margin-left' : 8,
'background-color' : '#DDD'
});
},
// .
'mouseleave' : function (){
morph.start({
'margin-left' : 0,
'background-color' : '#EEE'
});
}
});
});
And also you can see the menu.
The official example .
Fx.Slide.
Quite a useful class when you need something from somewhere left or drove. The constructor is very similar to all previous ones, so I will not dwell on it especially. I can only say that he understands a few more options, the most important of which is the mode, which determines the direction of the “exit”: vertical or horizontal. On the basis of this class two more examples with animated menus are made: the first and the second .The official example .
Fx.Elements.
Allows you to conveniently animate any number of CSS properties for any number of elements at the same time. An array of the elements over which the transformations will be performed is transferred to its constructor. And the beauty is in the start method - an array of objects is transferred there for conversion. It turns out that each element from the array passed to the constructor corresponds to an element object from the array passed to start. Thus, mass animation of elements is carried out.In the example below, the transparency of the array of elements changes when the cursor hovers over them, and the closer the element is to what is currently under the cursor, the less its transparency, and the farther - the more:
var elements = $$( '#ElementsContainer .Element' );
var elementsFx = new Fx.Elements(elements, { duration: 500, link: 'cancel' });

elements.each( function (element, i){
// .
element.addEvent( 'mouseenter' , function (){
var arg = {};

//
// .
elements.each( function (element, j){
arg[j] = { opacity: 1 - Math.min(Math.abs(i - j), 5) / 8 };
});

// .
elementsFx.start(arg);
});
});
Living example .
An interesting menu option from MooTools .
I hope that the readers were interested in digging deeper into the implementation of animation in MooTools. Most of what is described here should be applicable to other frameworks.
Thanks for attention.
Source: https://habr.com/ru/post/43379/
All Articles